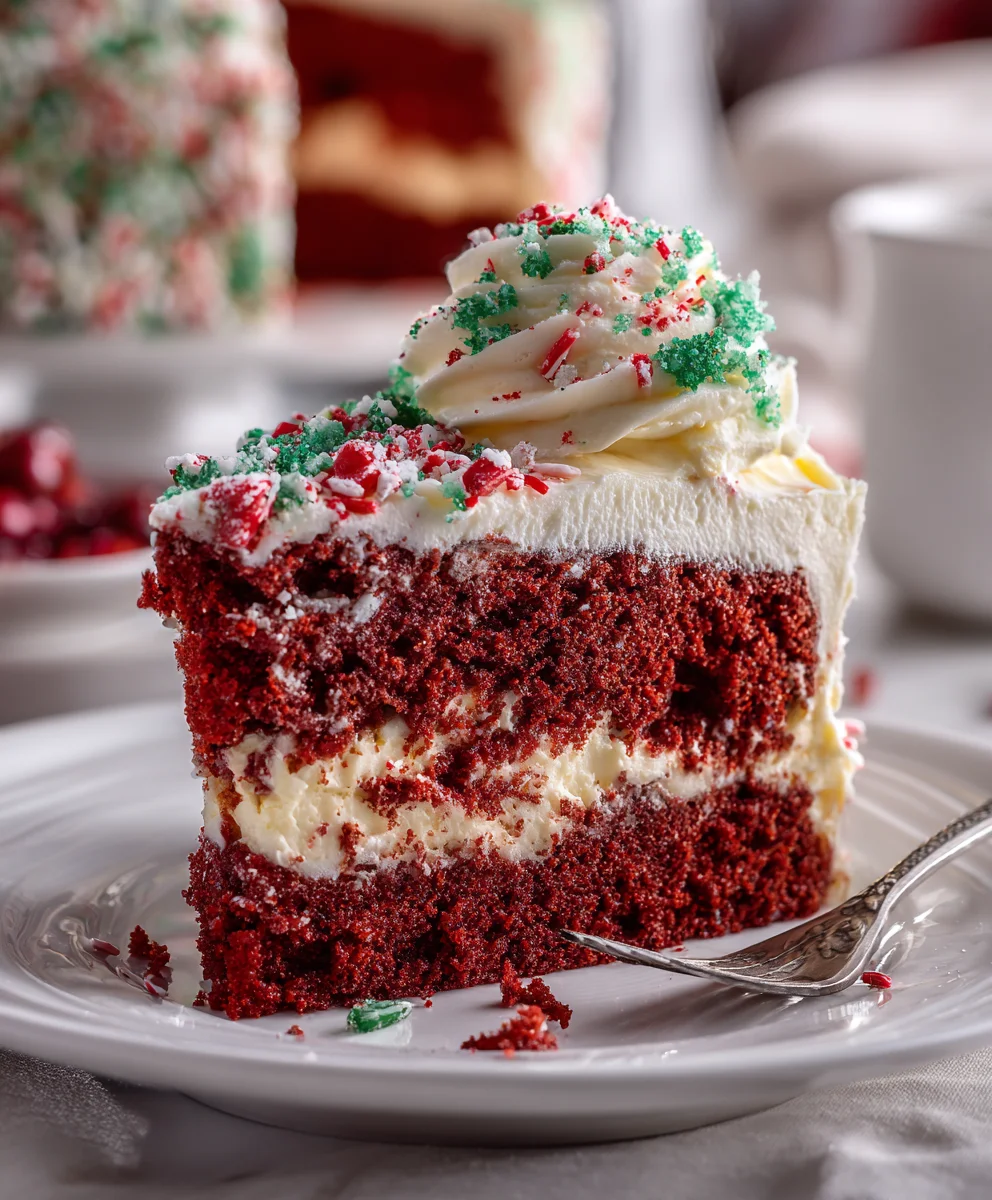
Introduction to Christmas Red Velvet Poke Cake
As the holiday season approaches, I find myself daydreaming about festive treats that remind me of warmth, love, and all things merry. This Christmas Red Velvet Poke Cake fits that bill beautifully. It’s the kind of recipe that not only looks dazzling on the dessert table but also fills your kitchen with that irresistible aroma of sweet vanilla and chocolate. If you’re a busy mom or a professional prepping for holiday gatherings, this cake is a quick solution. It’s deliciously decadent and sure to impress your loved ones without needing marathon baking sessions!
Why You’ll Love This Christmas Red Velvet Poke Cake
This Christmas Red Velvet Poke Cake is a delightful treat that combines convenience with flavor. It’s incredibly easy to make, giving you more time to enjoy the holiday festivities with family and friends. The rich velvety texture, paired with creamy pudding, creates a dessert that tastes far more complex than its simple ingredient list. Plus, the festive colors and sprinkles make it a showstopper at any holiday gathering!
Ingredients for Christmas Red Velvet Poke Cake
To whip up this festive Christmas Red Velvet Poke Cake, you’ll need a handful of delightful ingredients that come together to create sheer indulgence. Here’s what you’ll require:
- Red velvet cake mix: This provides the cake’s base, delivering that classic crimson hue and rich flavor.
- Eggs: Essential for binding the ingredients and adding moisture, ensuring a tender cake.
- Oil: Adds fat for richness and contributes to the cake’s moist texture.
- Water: Activates the dry ingredients in the cake mix, helping everything come together smoothly.
- Instant vanilla pudding mix: The secret to that ultra-creamy filling. It infuses flavor and a luscious texture throughout the cake.
- Milk: This is whisked with the pudding mix to create a silky-smooth filling that seeps into the cake.
- Whipped topping: Used for frosting, it adds a light, airy finish that balances the richness of the cake.
- Green gel food coloring: Perfect for giving your whipped topping a festive twist that matches the holiday spirit.
- Red and white Christmas sprinkles: These add the finishing touch, offering a pop of color and a fun crunch to each slice.
You can find exact measurements for each of these ingredients down below for easy printing. Trust me, once you’ve gathered these elements, the magic of the Christmas Red Velvet Poke Cake begins!
How to Make Christmas Red Velvet Poke Cake
Making a Christmas Red Velvet Poke Cake is easier than you might think. With a few simple steps, you’ll be on your way to a stunning dessert that steals the show. Let’s roll up our sleeves and dive into this festive baking adventure!
Prepare the Cake
Preheat and Prepare
First things first, preheat your oven to 350°F. Now, follow the instructions on the cake mix box, adding the required eggs, oil, and water. As you blend them, feel that holiday spirit bubbling up! Pour the batter into a greased pan, and in no time, you’ll have a beautiful red velvet cake baking in your oven.
Poke the Cake
Create Holes
Once your cake is done and has cooled for about 10 minutes, it’s time for the fun part. Grab the handle of a wooden spoon or a similar utensil. Gently poke holes all over the cake, about an inch apart. You want those holes deep enough to hold all that luscious pudding. This step is crucial for making sure the cake truly absorbs all that creamy goodness!
Make the Pudding
Whisk the Mixture
In a large bowl, whisk together the two boxes of instant vanilla pudding mix and the milk until it’s smooth and silky. Just picture that rich, creamy texture you’re about to pour onto the cake. Take a moment to enjoy the anticipation because it’s only going to get better from here!
Pour Pudding Over Cake
Ensure Full Absorption
Now, pour the pudding over your warm cake, making sure to fill those holes generously. Use the back of a spoon to gently push the pudding into the holes. It’s a bit like a little massage for your cake! Spread it evenly across the top for that extra touch of sweetness, allowing every bite to be a delightful surprise.
Chill the Cake
Setting Time
Once you’ve poured the pudding, cover your masterpiece with plastic wrap and pop it into the fridge. Let it chill for about two hours. This step is essential—it allows the pudding to set in the cake, enhancing the flavors and texture. Plus, it keeps the cake cool, which is perfect for a festive gathering!
Prepare the Topping
Whipped Topping and Color
After your cake has chilled, it’s time to add some color! In a medium bowl, stir together the whipped topping and a few drops of green gel food coloring. Mix until you achieve your desired festive shade. Watching it transform into a beautiful hue is like painting a little holiday magic into your dessert!
Final Assembly
Top, Chill, and Prepare to Serve
Spread that vibrant whipped topping over the chilled cake, ensuring even coverage. After that, refrigerate it for at least another two hours. This helps the flavors meld beautifully and keeps everything nice and cool. When you’re ready to serve, sprinkle on the red and white Christmas sprinkles for that festive flair!
Tips for Success
- Always let the cake cool completely before poking holes and adding pudding.
- For extra richness, use whole milk instead of low-fat when mixing the pudding.
- Feel free to adjust the amount of green food coloring according to your festive vision!
- If you’re short on time, you can prep this cake a day in advance for even better flavors.
- Store leftovers in the fridge to keep it fresh and delicious!
Equipment Needed for Christmas Red Velvet Poke Cake
- 9×13-inch baking pan: You can also use a round cake pan if that’s what you have.
- Mixing bowls: Any medium to large bowls will do for mixing the cake and pudding.
- Whisk: A whisk is great, but a fork can work in a pinch!
- Wooden spoon: For poking holes, any sturdy utensil with a rounded end will suffice.
- Plastic wrap: A clean towel can replace it for covering the cake while chilling.
Variations for Christmas Red Velvet Poke Cake
- Chocolate Pudding Filling: Swap out the vanilla pudding for chocolate pudding for a richer, double chocolate experience.
- Gluten-Free Option: Use a gluten-free red velvet cake mix and make sure your pudding mix is gluten-free to accommodate dietary needs.
- Cream Cheese Frosting: Replace the whipped topping with cream cheese frosting for a tangy twist that complements the red velvet beautifully.
- Lower Sugar Version: Opt for sugar-free pudding mix and reduced-fat whipped topping to lighten up the dessert without sacrificing flavor.
- Nutty Delight: Add chopped nuts like pecans or walnuts between the pudding and topping layers for a delightful crunch and flavor contrast.
Serving Suggestions for Christmas Red Velvet Poke Cake
- Pair with Coffee: Serve alongside a warm cup of coffee or hot cocoa for a delightful contrast to the cake’s sweetness.
- Festive Plates: Present the cake on a vibrant holiday-themed platter to elevate its festive appearance.
- Fresh Berries: Add a side of fresh raspberries or strawberries for a fruity balance and a splash of color.
- Whipped Cream: Consider topping individual slices with additional whipped cream for an extra indulgence.
- Ice Cream: A scoop of vanilla or mint ice cream makes a delicious companion to this rich cake!
FAQs about Christmas Red Velvet Poke Cake
Can I make the Christmas Red Velvet Poke Cake a day in advance?
Absolutely! In fact, making it a day ahead can elevate the flavors. Just ensure you store it properly in the fridge. This way, the pudding filling has more time to soak into the cake, making it even more delicious.
What can I substitute for whipped topping?
If you prefer a richer flavor, cream cheese frosting works wonderfully as a substitute. You can also make homemade whipped cream with heavy cream and sugar for a more natural option.
Can I use a different cake flavor instead of red velvet?
Of course! This poke cake technique works beautifully with other flavors too. Consider using chocolate or vanilla cake for a different twist on the traditional recipe!
Is this Christmas Red Velvet Poke Cake suitable for vegetarians?
Yes! This delightful dessert is vegetarian-friendly, making it perfect for festive gatherings. Just double-check that your pudding mix and whipped topping are suitable for your dietary preferences.
How can I make my poke cake look more festive?
To amp up the festivities, use holiday-themed sprinkles, edible glitter, or fresh berries for garnish. You can also arrange the slices on a colorful platter for a striking presentation!
Final Thoughts on Christmas Red Velvet Poke Cake
As I reflect on the joy this Christmas Red Velvet Poke Cake brings to my holiday table, I can’t help but smile. It’s more than just dessert; it’s a celebration of flavors, colors, and memories shared with loved ones. Each slice tells a story, from the way the pudding seeps into the warm cake to the festive toppings that spark joy. Whether you’re hosting a gathering or simply enjoying a quiet moment with family, this cake adds a touch of magic to the season. I hope it warms your heart and home as much as it has mine!
Print
Christmas Red Velvet Poke Cake
- Total Time: 4 hours
- Yield: 12 servings 1x
- Diet: Vegetarian
Description
A festive and decadent red velvet poke cake, perfect for Christmas celebrations.
Ingredients
- 1 box red velvet cake mix
- Ingredients needed to make the cake: eggs, oil, and water
- 2 (3.4 ounce) boxes instant vanilla pudding mix
- 4 cups milk
- 8 ounce tub whipped topping
- Green gel food coloring
- Red and white Christmas sprinkles
Instructions
- Preheat the oven to 350°F. Prepare the cake mix and bake per the directions on the back of the box.
- When the cake comes out of the oven, take a wooden utensil handle or something similar and poke holes all over the cake, about 1 inch apart.
- In a large bowl, whisk together the pudding mix and milk until smooth.
- Pour pudding over the cake, ensuring to fill the holes as much as possible. Spread it out and gently push it into the holes using the back of a spoon.
- Cover with plastic wrap and place in the refrigerator for 2 hours to set.
- In a medium bowl, stir together the whipped topping and food coloring until reaching your desired shade.
- Spread the whipped topping on top of the cake and refrigerate for an additional 2 hours or longer to set.
- When ready to serve, add the sprinkles.
- Slice and serve.
Notes
- Make sure to let the cake cool completely before adding the pudding.
- Adjust the amount of food coloring based on your preference for color intensity.
- This cake can be prepared a day in advance for better flavor.
- Prep Time: 30 minutes
- Cook Time: 30 minutes
- Category: Dessert
- Method: Baking
- Cuisine: American
Nutrition
- Serving Size: 1 slice
- Calories: 350
- Sugar: 30g
- Sodium: 200mg
- Fat: 15g
- Saturated Fat: 8g
- Unsaturated Fat: 5g
- Trans Fat: 0g
- Carbohydrates: 50g
- Fiber: 1g
- Protein: 4g
- Cholesterol: 40mg