Introduction to Chocolate Peanut Butter Snowballs
I often find myself searching for sweet treats that are both simple and satisfying. Chocolate Peanut Butter Snowballs are the answer to my prayers! These little bites of joy come together with minimal effort, making them a delightful choice for any day. Imagine a creamy peanut butter center, perfectly coated in chocolate, and topped with a drizzle of caramel. Whether you’re looking to pamper your family or impress your guests, these snowballs will surely hit the mark. They’re the sweet hug you need after a long day!
Why You’ll Love This Chocolate Peanut Butter Snowballs
These Chocolate Peanut Butter Snowballs are a dream come true for anyone short on time. In just under an hour, you can whip up a treat that’s perfect for any occasion. They offer a delightful blend of creamy, crunchy, and sweet—it’s like a party in your mouth! Plus, they’re no-bake, meaning less mess and easier cleanup. Who wouldn’t love that? Trust me, these little delights will have everyone begging for more!
Ingredients for Chocolate Peanut Butter Snowballs
Let’s dive into the delicious world of Chocolate Peanut Butter Snowballs! Here’s what you’ll need:
- Creamy Peanut Butter: This is the heart of our snowballs. It brings that rich, nutty flavor that we all love.
- Unsalted Butter: Just a bit of melted butter adds creaminess and keeps the texture smooth.
- Powdered Sugar: The sweet magic! It helps form the dough and balances the savory peanut butter.
- Vanilla Extract: A splash of vanilla enhances the flavor profile, making it warm and inviting.
- Pinch of Fine Salt: Optional but recommended! A small pinch of salt can elevate the taste by balancing sweetness.
- Crushed Graham Crackers: Add these for some extra crunch and texture—totally optional, though.
- Crushed Vanilla Wafers: These contribute a sweet bite, adding complexity to our snowballs.
- Powdered Milk: Another optional ingredient that boosts creaminess; it’s perfect for a richer filling.
- Semi-sweet or Milk Chocolate Melting Wafers or Chips: The all-important chocolate coating. Choose your favorite type to match your taste!
- Vegetable or Coconut Oil: If you’d like a smoother chocolate coating, a little oil can help. It’s totally your call!
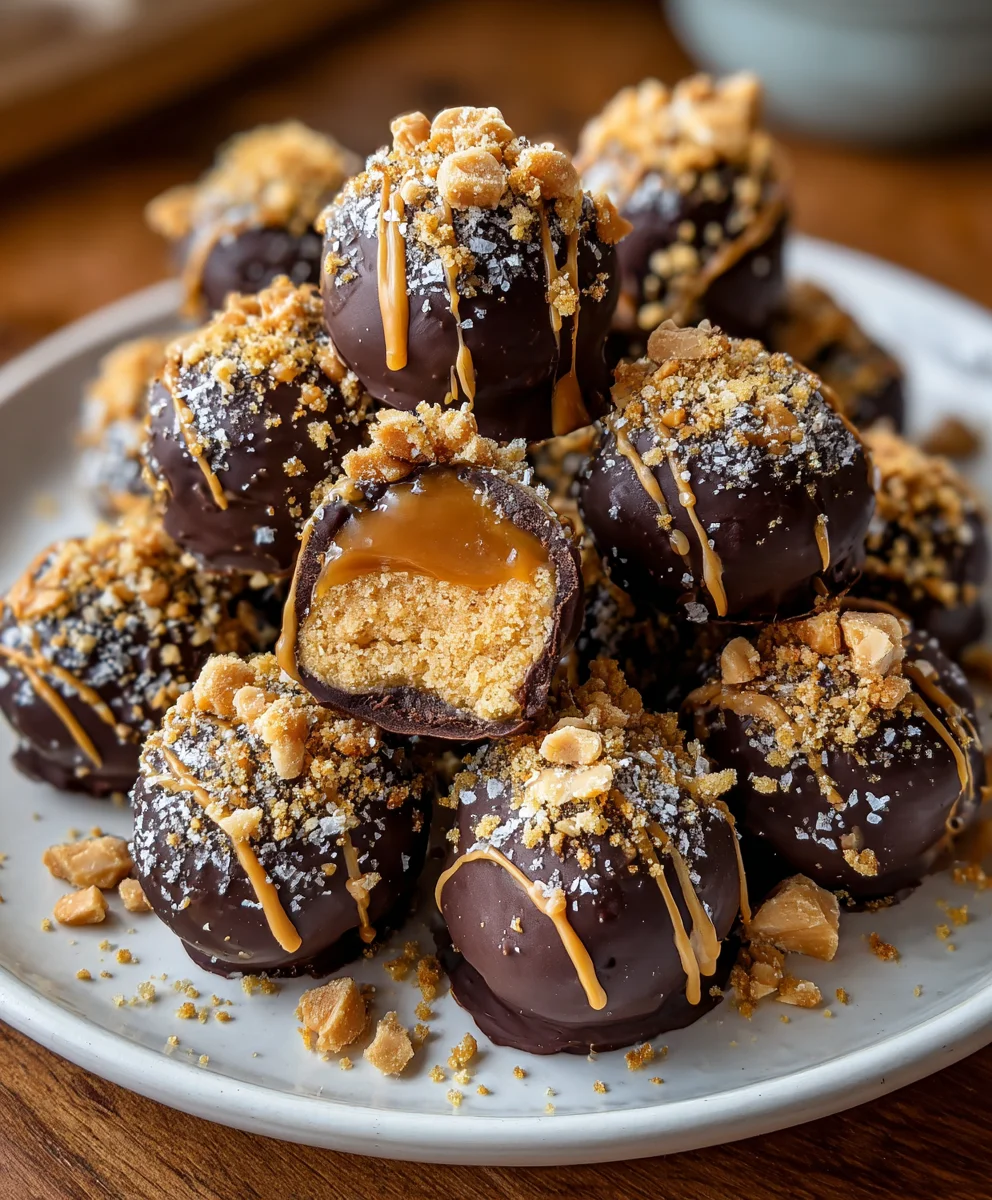
- Soft Caramel Candies or Caramel Sauce: This luscious addition swirls on top for extra sweetness and a beautiful touch.
- Heavy Cream or Milk: Used to melt the caramel, making it silky and drizzle-ready.
- Sea Salt Flakes: For a fancy finish, sprinkle these on top to enhance flavor.
- Crushed Peanuts, Sprinkles, or White Chocolate Drizzle: These are perfect for adding that little pop of color or crunch.
Specific measurements for each ingredient are located at the bottom of the article, ready for you to print out. Happy prepping!
How to Make Chocolate Peanut Butter Snowballs
Now that we have the ingredients ready, let’s get to the fun part: making these irresistible Chocolate Peanut Butter Snowballs! Follow these simple steps to create your own little bites of heaven.
Step 1: Blend the Base
Start by placing the creamy peanut butter in a medium mixing bowl. Add the melted butter, vanilla extract, and if you like, a pinch of fine salt. Use a spoon or electric mixer to blend everything together until the mixture is smooth and creamy. Trust me, the aroma of peanut butter is enough to make anyone swoon!
Step 2: Incorporate the Sweetness
Next, gradually sift in the powdered sugar. It’s best to do this in stages, mixing well after each addition. You’re aiming for a thick, pliable dough here. Adjust the amount of powdered sugar until it feels just right—not too sticky or dry. This process is like sculpting, so have fun with it!
Step 3: Add Optional Ingredients
If you’re feeling adventurous, this is the time to mix in those optional ingredients! Add in some finely crushed graham crackers or vanilla wafers for added texture. A dash of powdered milk can also amp up the creaminess. These additions turn your snowballs into a unique delight!
Step 4: Shape the Snowballs
Line a baking sheet with parchment paper to make cleanup a breeze. Now, using a teaspoon or small scoop, portion out the dough. Roll each portion between your palms until you have nice, smooth balls—about one inch in diameter. Place them on the tray, and pat yourself on the back; you’re one step closer!
Step 5: Chill the Balls
To achieve that perfect firmness, place the tray in the refrigerator for at least 25 minutes. If you’re in a hurry, the freezer works too—just 10 to 15 minutes will do the trick! This step is crucial for a smooth chocolate coating later.
Step 6: Melt the Chocolate
For the chocolate coating, grab a microwave-safe bowl and add your chocolate chips or melting wafers. Heat them in short bursts of 20 to 30 seconds, stirring after each interval. When it’s fully smooth, you can mix in a teaspoon of vegetable or coconut oil if you prefer a thinner consistency!
Step 7: Coat the Snowballs
Now for the fun part! Remove the chilled balls from the refrigerator. Using a fork or a dipping tool, carefully submerge each ball in the melted chocolate. Let the excess chocolate drip back into the bowl before returning the coated balls to the parchment-lined tray.
Step 8: Prepare the Caramel Drizzle
In a separate microwave-safe bowl, melt the caramel candies with a splash of heavy cream or milk. Heat in intervals of 10 to 15 seconds, stirring until it’s silky and smooth. Once ready, use a spoon or a piping bag to drizzle this heavenly caramel over your chocolate-coated snowballs.
Step 9: Add Toppings
This is where you get to unleash your creativity! While the caramel is still warm and gooey, sprinkle on sea salt flakes, crushed peanuts, or colorful sprinkles. You could even drizzle some white chocolate for a fancy finish. The options are endless!
Step 10: Refrigerate Until Firm
Finally, pop the tray back in the refrigerator for about 15 to 20 minutes. This will ensure that the chocolate and caramel coatings harden perfectly. Once they’re nice and firm, transfer your Chocolate Peanut Butter Snowballs to an airtight container. It’s time to enjoy your sweet creations!
Tips for Success
- Use room temperature peanut butter for easier blending.
- Adjust powdered sugar gradually to achieve your preferred dough consistency.
- Chill the chocolate for dipping; it will make the process easier.
- Experiment with toppings to personalize your Chocolate Peanut Butter Snowballs.
- Store in an airtight container to keep them fresh and delicious!
Equipment Needed
- Mixing Bowl: A medium bowl works well for blending ingredients. A large bowl can also be handy if you prefer more room.
- Spoon or Electric Mixer: Use whatever helps you mix smoothly—what you have on hand is perfect!
- Baking Sheet: A standard sheet tray with parchment paper is ideal. A plate can work too if you’re in a pinch!
- Microwave-Safe Bowls: Needed for melting chocolate and caramel—glass or ceramic works best.
- Dipping Tool or Fork: Either will do when coating your snowballs with chocolate.
Variations of Chocolate Peanut Butter Snowballs
- Nut Butter Swap: Try almond, cashew, or sunflower butter instead of peanut butter for a different nutty flavor.
- Dark Chocolate Coating: Use dark chocolate instead of milk chocolate for a richer taste.
- Vegan Option: Substitute creamy peanut butter with a plant-based option and use vegan chocolate to keep it dairy-free.
- Gluten-Free Version: Replace regular graham crackers or vanilla wafers with gluten-free alternatives. It’s easy to accommodate gluten-free diets!
- Flavor Infusions: Add a splash of almond extract or orange zest to the peanut butter mixture for a unique twist.
- Coconut Flakes: Sprinkle unsweetened shredded coconut on top for a tropical flair.
- Protein Boost: Mix in a scoop of protein powder for an added nutritional punch—great for a post-workout treat!
Serving Suggestions
- Pair your Chocolate Peanut Butter Snowballs with a glass of cold milk for a nostalgic treat.
- Serve them alongside fresh fruit, like strawberries or bananas, for a refreshing contrast.
- For a festive presentation, arrange them on a decorative platter with colorful sprinkles.
- Include a side of creamy whipped cream for dipping—perfect for gatherings or parties!
FAQs about Chocolate Peanut Butter Snowballs
As you embark on your journey to create these delightful Chocolate Peanut Butter Snowballs, you may have a few questions. Don’t worry; I’ve got you covered! Here are some common queries I’ve encountered, along with their answers.
Can I use crunchy peanut butter instead of creamy?
Absolutely! Crunchy peanut butter will add a fantastic texture to your snowballs. Just keep in mind that it may slightly alter the creaminess of the filling.
How do I store leftover snowballs?
To keep your Chocolate Peanut Butter Snowballs fresh, store them in an airtight container in the refrigerator. They’ll stay delicious for up to a week!
Can I freeze the snowballs for later use?
Yes! You can freeze them for up to three months. Just ensure they are stored in an airtight container. Thaw them in the fridge before enjoying.
What can I use instead of melting wafers for coating?
If you don’t have melting wafers, feel free to use chocolate chips. Just remember to add a bit of oil for that smooth coating!
Can I substitute the caramel with something else?
Of course! If caramel isn’t your thing, try using melted chocolate or a fruit puree for a fresh twist. The options are endless!
Final Thoughts
Creating these Chocolate Peanut Butter Snowballs is not just about making a treat; it’s about crafting joyful moments for yourself and your loved ones. The first bite brings a cozy sense of nostalgia, reminding us of simpler times filled with sweetness. With their creamy center and delightful chocolate coat, they embody everything we cherish about family gatherings and celebrations. Plus, the ease of preparation makes them the perfect solution for busy days. So, roll up your sleeves and get ready for a delightful kitchen adventure—it eagerly awaits, and trust me, the smiles will be worth it!
Print
Chocolate Peanut Butter Snowballs
- Total Time: 55 minutes
- Yield: 24 snowballs 1x
- Diet: Vegetarian
Description
Chocolate Peanut Butter Snowballs are a delightful treat featuring a creamy peanut butter filling, coated in chocolate, and finished with a drizzle of caramel and optional toppings.
Ingredients
- 1 cup creamy peanut butter
- 2 tablespoons unsalted butter, melted
- 1 1/2 to 2 cups powdered sugar, sifted
- 1/4 teaspoon vanilla extract
- Pinch fine salt (optional)
- 1/2 cup finely crushed graham crackers (optional)
- 1/2 cup crushed vanilla wafers (optional)
- 1/4 cup powdered milk (optional)
- 12 ounces semi-sweet or milk chocolate melting wafers or chips
- 1 teaspoon vegetable or coconut oil (optional)
- 1/4 cup soft caramel candies or caramel sauce
- 1 teaspoon heavy cream or milk
- Sea salt flakes (for decoration)
- Crushed peanuts (for decoration)
- Sprinkles (for decoration)
- White chocolate drizzle (for decoration)
Instructions
- In a medium mixing bowl, blend peanut butter, melted butter, vanilla extract, and a pinch of salt until smooth.
- Gradually incorporate sifted powdered sugar until a thick, pliable dough forms, adjusting powder as needed for a firm, non-sticky texture.
- If desired, mix in crushed graham crackers, vanilla wafers, or powdered milk for added structure and flavor.
- Line a baking sheet with parchment paper. Portion dough using a teaspoon or small scoop, then roll between palms to form smooth balls, approximately 1 inch in diameter. Arrange on prepared tray.
- Place tray in the refrigerator for a minimum of 25 minutes, or freeze for 10 to 15 minutes, to ensure centers are firm before coating.
- In a microwave-safe bowl, melt chocolate in 20 to 30 second intervals, stirring after each, until fully smooth. Blend in oil if a thinner consistency is preferred.
- Remove centers from refrigeration. Using a fork or dipping tool, submerge each ball in melted chocolate, allowing excess to drip off. Place coated balls back on parchment-lined tray.
- Melt caramels with heavy cream or milk in a microwave-safe bowl, heating in 10 to 15 second intervals and stirring until fluid and smooth.
- Pipe or spoon melted caramel in thin lines over chocolate-coated balls. If using, immediately add sea salt flakes, crushed peanuts, sprinkles, or white chocolate drizzle before coatings set.
- Return tray to the refrigerator for 15 to 20 minutes until chocolate and caramel are fully firm. Transfer finished snowballs to an airtight container for storage.
Notes
- Adjust the amount of powdered sugar based on desired texture.
- Chill the chocolate before dipping for easier coating.
- Store snowballs in an airtight container to keep them fresh.
- Prep Time: 45 minutes
- Cook Time: 10 minutes
- Category: Dessert
- Method: No-Bake
- Cuisine: American
Nutrition
- Serving Size: 1 snowball
- Calories: 150
- Sugar: 12g
- Sodium: 80mg
- Fat: 8g
- Saturated Fat: 3g
- Unsaturated Fat: 5g
- Trans Fat: 0g
- Carbohydrates: 18g
- Fiber: 1g
- Protein: 3g
- Cholesterol: 5mg