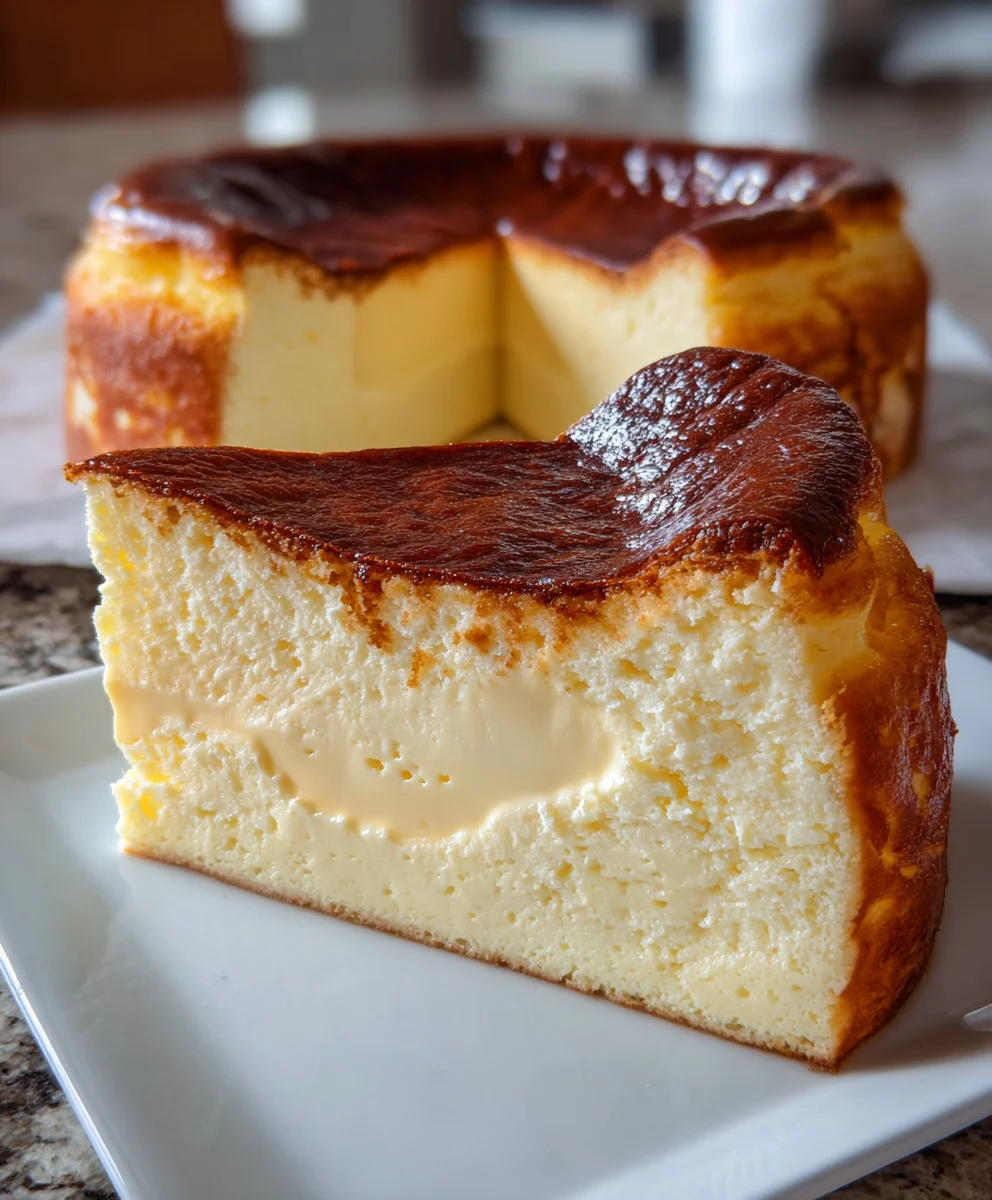
Introduction to Creamy Burnt Basque Cheesecake Bliss
Welcome to my kitchen, where today’s star is none other than the Creamy Burnt Basque Cheesecake Bliss. As a busy mom, I know how precious time is, and this delightful dessert promises both simplicity and indulgence. The beauty of this cheesecake lies in its rich, velvety layers and that perfectly burnt caramelized top. Imagine serving it to your loved ones, faces lighting up with joy at the first bite! It’s the kind of dessert that makes guests feel special, yet it’s straightforward enough for any hectic weeknight.
Why You’ll Love This Creamy Burnt Basque Cheesecake Bliss
This Creamy Burnt Basque Cheesecake Bliss is a true gem for anyone, especially the busy moms and professionals juggling life’s demands. It’s not just about indulgence—this dessert is quick to make and uses just a handful of ingredients. The result? A show-stopping cheesecake that balances creamy richness with a smoky, caramelized top. It’s deliciously versatile, sure to please everyone at the table, even the pickiest of eaters!
Ingredients in Creamy Burnt Basque Cheesecake Bliss
Before diving into the delicious world of Creamy Burnt Basque Cheesecake Bliss, let’s gather our ingredients. Here’s what you’ll need:
- Full-Fat Cream Cheese: This is the soul of our cheesecake, giving it that rich, creamy texture. Make sure it’s at room temperature for easy mixing.
- Granulated Sugar: This adds sweetness and helps create that lovely caramelized top. You can adjust the amount depending on your sweetness preference.
- Large Eggs: Eggs act as a binding agent, providing structure while making the cheesecake light and fluffy. Use fresh eggs for the best results.
- All-Purpose Flour: Just a touch to help set the cheesecake as it bakes. You could easily swap this with a gluten-free flour blend if needed!
- Salt: A pinch is crucial to enhance the flavors of the other ingredients and balance the sweetness.
- Vanilla Extract: This adds a warm, inviting flavor that complements the rich creaminess of the cheesecake.
You can find the exact amounts of these ingredients at the bottom of the article for printing. Each ingredient plays a vital role in creating the blissful experience that awaits you!
How to Make Creamy Burnt Basque Cheesecake Bliss
Step 1: Prepare Your Baking Pan
First things first, let’s get that oven preheating to 400°F (200°C). This step is essential for our cheesecake to achieve the perfect consistency. While the oven warms up, grab a 9×5 inch loaf pan. Lightly butter the bottom and sides to prevent sticking. Then, line the pan with parchment paper, allowing it to hang over the edges. This little trick will help you lift the cheesecake out effortlessly later. Once that’s done, your pan will be all set for the creamy goodness we’re about to create. Don’t skip this step; it ensures the cheesecake comes out looking as good as it tastes!
Step 2: Mix the Cream Cheese
Now it’s time to dive into mixing! In a large mixing bowl, add your room-temperature full-fat cream cheese. Using a hand mixer or a stand mixer, beat the cream cheese until it’s smooth and creamy. You want to eliminate all lumps, so take your time with this step. Next, gradually add your granulated sugar to the cream cheese. Mix well until combined; this process helps to aerate the mixture. Ideally, you should see a silky mixture that makes you want to dive right in. Trust me, a good creamy base is key to the success of this Creamy Burnt Basque Cheesecake Bliss!
Step 3: Incorporate Eggs
With your cream cheese mixture ready, it’s time to add the eggs. Crack each egg one at a time into a small bowl, then incorporate it into the cream cheese mixture. This method ensures that no eggshells find their way into your dessert. Mix well after each addition to help create a light and fluffy texture. It’s like adding a touch of magic with every egg! Don’t rush; take a moment to make sure they’re fully combined before adding the next. This step is crucial for the cheesecake’s structure and can take your dessert to new heights of creamy bliss.
Step 4: Add Flour and Vanilla
Next up, we’ll introduce our dry ingredients. Gently fold in the all-purpose flour and a pinch of salt into the creamy mixture. You can do this with a spatula to maintain the airy texture we’ve built so far. This step is all about balance; don’t overmix! Once blended, stir in the vanilla extract for that warm, inviting flavor we all love. The aroma will transport you to dessert paradise! Take a moment to enjoy the transformation of your ingredients into this rich mixture. It’s a sensory delight that promises a heavenly cheesecake!
Step 5: Pour and Bake
It’s time for the exciting part—pouring your cheesecake mixture into the prepared loaf pan! Use a spatula to scrape every last bit from the bowl. Once your pan is full, smooth out the top with the spatula. Now, place it in your preheated oven. Bake for about 45 minutes until the top is a beautiful golden brown. You’ll notice a slight jiggle in the center when it’s done. This is perfectly normal and shows the creamy interior! Resist the temptation to open the oven just yet; let the magic happen without interruptions for the best results!
Step 6: Cooling and Serving
After baking, remove your cheesecake from the oven and let it cool at room temperature for about 30 minutes. This is essential, as it allows the cheesecake to set before chilling. Once cooled, refrigerate for at least 4 hours, but overnight is even better if you can wait. This chilling time deepens the flavors and enhances creaminess. When ready to serve, gently lift the cheesecake out using the parchment paper. Slice it into generous pieces and plate it up! Now, you can enjoy your slice of Creamy Burnt Basque Cheesecake Bliss in all its glory—chilled or at room temperature for optimal flavor!
Tips for Success
- Ensure your cream cheese is at room temperature; it mixes smoother this way.
- Don’t rush the baking—oven times can vary, so keep an eye on that beautiful caramelized top!
- For a gluten-free version, substitute the all-purpose flour with a gluten-free blend.
- Chill your cheesecake longer for enhanced flavors; overnight is ideal if you can wait!
- Use fresh eggs for the best texture and flavor!
Equipment Needed
- 9×5 inch loaf pan: You can also use an 8-inch round cake pan if that’s all you have.
- Mixing bowl: A large one is best, but any bowl will do.
- Hand mixer or stand mixer: A whisk works too, just a bit more elbow grease required!
- Spatula: Essential for scraping out every creamy bit.
- Parchment paper: Make cleanup easier and for easy cheesecake removal!
Variations of Creamy Burnt Basque Cheesecake Bliss
- Citrus Zing: Add lemon or orange zest for a fresh, zesty twist that brightens the flavors!
- Chocolate Delight: Fold in melted dark chocolate or cocoa powder to create a rich chocolate version of this classic cheesecake.
- Berry Bliss: Swirl in pureed strawberries, raspberries, or blueberries for a fruity burst of flavor.
- Nutty Sweetness: Incorporate crushed nuts like pecans or walnuts into the batter for added texture and flavor.
- Gluten-Free Option: Substitute the all-purpose flour with a gluten-free blend for a gluten-free cheesecake option, perfect for those with dietary restrictions.
- Plant-Based Version: Use dairy-free cream cheese and vegan eggs to make a delicious vegan version that everyone can enjoy!
Serving Suggestions for Creamy Burnt Basque Cheesecake Bliss
- Pair with a dollop of whipped cream for added decadence.
- Serve alongside fresh fruit like berries or sliced peaches to balance the richness.
- A cup of espresso or strong coffee complements the cheesecake beautifully.
- Drizzle with a homemade berry coulis for a colorful presentation.
- Garnish with mint leaves for a fresh touch!
FAQs about Creamy Burnt Basque Cheesecake Bliss
Can I use low-fat cream cheese for this recipe?
While you can use low-fat cream cheese, it won’t provide the same creamy texture and richness that’s essential for the Creamy Burnt Basque Cheesecake Bliss. Full-fat cream cheese truly enhances the flavor and mouthfeel.
How can I store leftovers of the cheesecake?
Store any leftovers in an airtight container in the fridge. The cheesecake will stay fresh for up to four days. Just remember to let it sit at room temperature for a few minutes before serving to bring back that creamy goodness!
What should I do if I don’t have a loaf pan?
If you don’t have a loaf pan, an 8-inch round cake pan works just fine! Just keep an eye on the baking time, as it may differ slightly.
Can I freeze the Creamy Burnt Basque Cheesecake?
Yes, you can freeze this cheesecake. Wrap it tightly in plastic wrap, then in foil, and freeze for up to three months. To enjoy, thaw it in the fridge overnight before serving!
What can I serve with this cheesecake?
The Creamy Burnt Basque Cheesecake Bliss pairs beautifully with fresh berries, whipped cream, or a drizzle of fruit coulis. A rich coffee or herbal tea makes a lovely beverage accompaniment, enhancing the dessert’s richness.
Final Thoughts
As you embark on your journey to create this Creamy Burnt Basque Cheesecake Bliss, know that you’re not just making a dessert; you’re crafting sweet memories. The joy of serving this rich, creamy delight to family and friends is truly unmatched. Picture their smiles as they savor each bite, flavors dancing on their tongues! Whether it’s a special occasion or just a simple treat for a busy week, this cheesecake brings a sense of indulgence that everyone deserves. So roll up your sleeves and enjoy every moment of this delicious outing in your kitchen!
Print
Creamy Burnt Basque Cheesecake Bliss
- Total Time: 4 hours 60 minutes
- Yield: 8 servings 1x
- Diet: Vegetarian
Description
A deliciously rich and creamy burnt Basque cheesecake with a caramelized top, perfect for dessert lovers.
Ingredients
- 16 ounces Full-Fat Cream Cheese
- 1 cup Granulated Sugar
- 3 large Eggs
- 1/4 cup All-Purpose Flour
- 1 pinch Salt
- 1 teaspoon Vanilla Extract
Instructions
- Preheat your oven to 400°F (200°C). Lightly butter a 9×5 inch loaf pan and line it with parchment paper.
- In a mixing bowl, beat cream cheese until smooth, add sugar, then incorporate eggs one at a time.
- Fold in flour and salt, mix until combined, then stir in vanilla extract.
- Pour the mixture into the loaf pan and bake for approximately 45 minutes or until the top is golden.
- Let cool at room temperature for 30 minutes and then refrigerate for at least 4 hours.
- Lift out of the pan using parchment, slice, and serve chilled or at room temperature.
Notes
- Can substitute all-purpose flour with a gluten-free blend for gluten-free version.
- Make sure the cream cheese is at room temperature for easier mixing.
- For best flavor, serve the cheesecake that has been refrigerated for at least 4 hours.
- Prep Time: 15 minutes
- Cook Time: 45 minutes
- Category: Dessert
- Method: Baking
- Cuisine: Spanish
Nutrition
- Serving Size: 1 slice
- Calories: 350
- Sugar: 25g
- Sodium: 250mg
- Fat: 25g
- Saturated Fat: 15g
- Unsaturated Fat: 8g
- Trans Fat: 0g
- Carbohydrates: 30g
- Fiber: 1g
- Protein: 6g
- Cholesterol: 150mg