Introduction to Molten Lava Cake Chocolate
Have you ever craved a dessert that feels like a warm hug on a chilly evening? That’s exactly what molten lava cake chocolate delivers! This decadent treat transforms an ordinary day into a moment of indulgence, making it perfect for busy moms like us who need a little boost. Whether you’re hosting a dinner party or simply treating yourself after a long day, this recipe is as simple as it is satisfying. In just under 30 minutes, you can serve up a chocolate masterpiece that will impress your loved ones and fill your home with delicious aromas.
Why You’ll Love This Molten Lava Cake Chocolate
This molten lava cake chocolate is not just a dessert; it’s an experience! In less time than it takes to scroll through your social feed, you can create pure chocolate bliss. The gooey center oozes warmth, pairing beautifully with a scoop of vanilla ice cream. Plus, its straightforward steps make it perfect for anyone, even on the busiest of nights. Trust me, every bite will have you singing its praises!
Ingredients for Molten Lava Cake Chocolate
Gathering the right ingredients is the first step toward crafting this chocolate delight. Here’s what you’ll need to create your molten lava cake chocolate masterpiece:
- Unsalted Butter: This is the star ingredient that brings richness to the cake. Ensure you have some extra butter on hand for greasing the ramekins, which helps the cakes release smoothly.
- Baking Chocolate: Choose high-quality baking chocolate for the best flavor. This will create that deep, indulgent chocolate taste everyone loves.
- Eggs and Egg Yolks: These are essential for creating a rich, tender crumb. The yolks help in achieving the gooey center, while the egg whites add volume.
- Granulated Sugar: Sweeten things up! Sugar not only adds sweetness but also contributes to the structure of the cake.
- Vanilla Extract: A splash of vanilla elevates the flavor, making it more aromatic and delightful.
- Salt: Just a pinch enhances the sweetness of the cake, balancing all those rich flavors beautifully.
- All-Purpose Flour: This gives body to our cake without making it too dense. Use it sparingly during mixing to maintain that lava-like center.
- Cocoa Powder: This optional ingredient intensifies the chocolate flavor. Dust some extra cocoa in your ramekins for a delicious surprise.
- Powdered Sugar: For a sweet finish! Dust it on top for a lovely presentation.
- Vanilla Ice Cream: A scoop of this is a lovely way to complement the warm chocolate cake, adding creaminess.
- Chocolate Sauce: Drizzle a little on top for that extra touch of decadence.
For exact measurements, check the end of this article where you can easily print the recipe for your next baking adventure!
How to Make Molten Lava Cake Chocolate
Creating your own molten lava cake chocolate is like unlocking a treasure chest of flavor. Follow these straightforward steps to delight yourself and your loved ones. Each step builds on the last, so pay attention and enjoy the process!
Step 1: Preheat the Oven and Prepare Ramekins
Start by preheating your oven to 450°F (230°C). This step is crucial for achieving that perfect, molten center.
While it heats up, generously grease six 120 ml ramekins with softened butter. Don’t skip this part; it ensures our chocolate cakes release easily. Dust the greased ramekins with cocoa powder to prevent sticking and add a delightful extra layer of chocolate flavor.
Step 2: Melt the Chocolate and Butter
In a microwave-safe bowl, combine your chopped baking chocolate and unsalted butter. Place it in the microwave and melt in 30-second intervals, stirring thoroughly after each interval.
Keep an eye on it! You want it smooth and glossy, with both chocolate and butter fully combined. Patience is key to avoid scorching the chocolate!
Step 3: Whisk Eggs and Sugar
Grab a large mixing bowl and whisk together the eggs, egg yolks, and granulated sugar.
Whisk until the mixture turns pale and fluffy, about 2-3 minutes. This is an important step because it introduces air, giving your cake a beautiful texture!
Step 4: Combine Wet Ingredients
Now, pour the melted chocolate and butter mixture into the bowl of whisked eggs and sugar. Add in the vanilla extract and salt.
Mix gently until everything is homogenous. You want those gooey chocolate flavors to mingle with the egg mixture perfectly!
Step 5: Add Dry Ingredients
It’s time to sift in your all-purpose flour and cocoa powder. Gently fold them into the wet mixture using a spatula. Be careful not to overmix!
Avoid the urge to whisk vigorously; we want to keep that lovely light texture and ensure our cake stays molten in the center.
Step 6: Fill Ramekins
Spoon your luscious batter evenly among the prepared ramekins, filling each about three-quarters full. This ensures they have room to rise without spilling over.
Remember, portion control helps everyone get an equal share of that delicious molten chocolate goodness!
Step 7: Bake
Place the filled ramekins on a baking sheet and pop them into the oven.
Bake for 10-12 minutes. Watch closely; the edges should be set while the centers remain soft. It’s that perfect moment where magic happens!
Step 8: Cool and Unmold
Once baked, let the cakes cool in their ramekins for about one minute. This brief pause helps them set slightly, so they don’t fall apart when unmolding.
To release them, carefully place a small plate over each ramekin. Invert the ramekin to release the cake, gently lifting it off afterward. Patience here rewards you with a perfect shape!
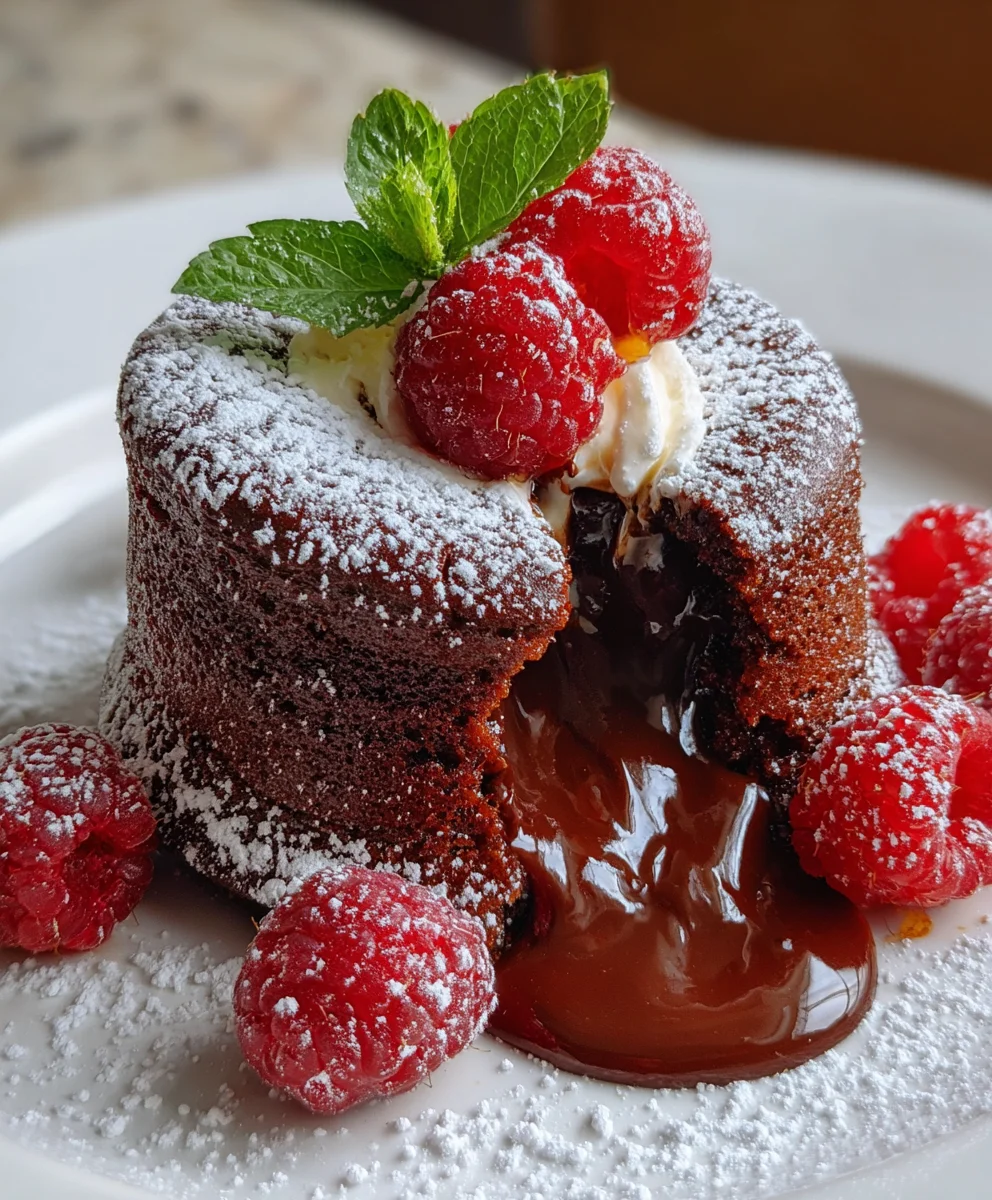
Step 9: Garnish and Serve
Now for the fun part! Top each molten lava cake with a scoop of creamy vanilla ice cream. Drizzle some rich chocolate sauce over the top for added decadence.
To finish, give a light dusting of powdered sugar for that picture-perfect presentation. Your guests won’t believe you made these at home!
Tips for Success
- Always grease and dust your ramekins thoroughly to ensure easy removal.
- Use high-quality chocolate for a richer flavor; after all, it’s the star of the show!
- Check your cakes at the lower end of the baking time for that perfect molten center.
- Don’t rush the cooling process—it’s vital for clean unmolding!
- Experiment with toppings; fresh berries or whipped cream add a delightful touch.
Equipment Needed
- Ramekins: Six 120 ml ramekins are ideal. If you don’t have ramekins, custard cups or oven-safe bowls work just as well.
- Mixing Bowls: A large bowl for whisking eggs and a medium one for melting chocolate are essential.
- Spatula: Use a flexible spatula for folding ingredients without overmixing.
- Whisk: A good whisk is crucial for incorporating air into your egg mixture.
- Baking Sheet: A sturdy baking sheet allows for easy transport of the ramekins in and out of the oven.
Variations
- Nutty Twist: Add chopped nuts like hazelnuts or walnuts to the batter for a crunchy surprise with each gooey bite.
- Fruit-Infused: Incorporate fresh raspberries or cherries into the batter for a burst of fruity flavor that complements the chocolate.
- Gluten-Free Option: Substitute all-purpose flour with a gluten-free flour blend to cater to gluten-sensitive friends.
- Dark Chocolate Lovers: Swap in bittersweet or dark chocolate for an intensified chocolate experience.
- Coffee Kick: Mix in a teaspoon of espresso powder to enhance the chocolate flavor, creating a mocha-like treat.
Serving Suggestions for Molten Lava Cake Chocolate
- Serve with a scoop of creamy vanilla ice cream to balance the rich chocolate.
- Pair it with a dollop of fresh whipped cream for extra indulgence.
- Top with fresh berries like raspberries or strawberries for a pop of color and tartness.
- Drizzle with homemade chocolate sauce or caramel for a decadent finish.
- Offer a side of espresso or rich coffee to enhance the chocolate experience.
FAQs about Molten Lava Cake Chocolate
Can I make molten lava cake chocolate in advance?
While it’s best served fresh, you can prepare the batter in advance. Just cover the ramekins and refrigerate them. Bake right before serving to enjoy that gooey center!
What if my molten lava cake chocolate is too runny?
If your cakes turn out too runny, it’s likely they were underbaked. Keep an eye on them while baking; the edges should be set, but the center should still jiggle slightly for that perfect molten effect.
Can I use different types of chocolate?
Absolutely! While traditional baking chocolate is ideal, feel free to experiment with dark chocolate or even milk chocolate. Just remember, the type of chocolate will influence the overall sweetness and richness of your dessert.
What can I do if I don’t have ramekins?
If ramekins aren’t available, custard cups or oven-safe mugs can work just as well. Just adjust the cooking time, as larger cups may need a minute or two longer in the oven!
How should I store leftover lava cakes?
If you have any leftovers (which is rare!), let the cakes cool completely. Store them in an airtight container in the fridge for up to two days. Reheat gently in the microwave before serving to restore that gooey goodness.
Final Thoughts
Indulging in molten lava cake chocolate is like savoring a moment of pure joy in a busy world. Each bite teases your taste buds, with its warm, gooey center leaving a lingering craving for more. I can’t help but smile every time I see the delighted expressions of my family as they dig into these rich, chocolaty delights. This recipe not only brings people together but also transforms an ordinary evening into an extraordinary experience. So, grab your ramekins and enjoy the magic of homemade molten lava cake chocolate—it’s a treat that truly warms the heart!
Print
Molten Lava Cake Chocolate
- Total Time: 27 minutes
- Yield: 6 servings 1x
- Diet: Vegetarian
Description
Indulge in the rich, velvety goodness of molten lava cake chocolate, with a gooey center that flows with chocolate delight.
Ingredients
- 227 grams unsalted butter, plus extra softened butter for greasing
- 227 grams baking chocolate, chopped
- 4 large eggs
- 4 large egg yolks
- 300 grams granulated sugar
- 1 teaspoon vanilla extract
- 0.25 teaspoon salt
- 65 grams all-purpose flour
- 16 grams cocoa powder, plus extra for dusting
- Powdered sugar, as needed
- Vanilla ice cream, as needed
- Chocolate sauce, as needed
Instructions
- Preheat oven to 230°C. Generously grease six 120 ml ramekins with softened butter and lightly dust with cocoa powder. Set aside.
- Combine butter and chopped baking chocolate in a microwave-safe bowl. Melt in 30-second intervals, stirring thoroughly after each, until smooth and glossy.
- In a large mixing bowl, whisk together eggs, egg yolks, and granulated sugar until pale and fluffy, approximately 2-3 minutes.
- Pour the melted chocolate mixture into the whisked eggs and sugar. Add vanilla extract and salt, mixing gently until homogenous.
- Sift in flour and cocoa powder. Fold gently into the wet mixture just to combine, being careful not to overmix.
- Spoon batter evenly among prepared ramekins, filling each about three-quarters full. Arrange ramekins on a baking sheet.
- Bake in the preheated oven for 10-12 minutes, until the edges are set but the centers remain soft.
- Allow to cool in ramekins for 1 minute. Place a small plate over each ramekin and invert to release. Let cakes rest briefly before lifting off ramekins.
- Top each cake with a scoop of vanilla ice cream, a drizzle of chocolate sauce, and a dusting of powdered sugar if desired. Serve immediately.
Notes
- Serve warm for the best molten effect.
- Experiment with various toppings such as fresh berries or whipped cream.
- Prep Time: 15 minutes
- Cook Time: 12 minutes
- Category: Dessert
- Method: Baking
- Cuisine: French
Nutrition
- Serving Size: 1 cake
- Calories: 450
- Sugar: 40g
- Sodium: 150mg
- Fat: 25g
- Saturated Fat: 15g
- Unsaturated Fat: 8g
- Trans Fat: 0g
- Carbohydrates: 50g
- Fiber: 2g
- Protein: 6g
- Cholesterol: 180mg