Introduction to Butterfinger Pie
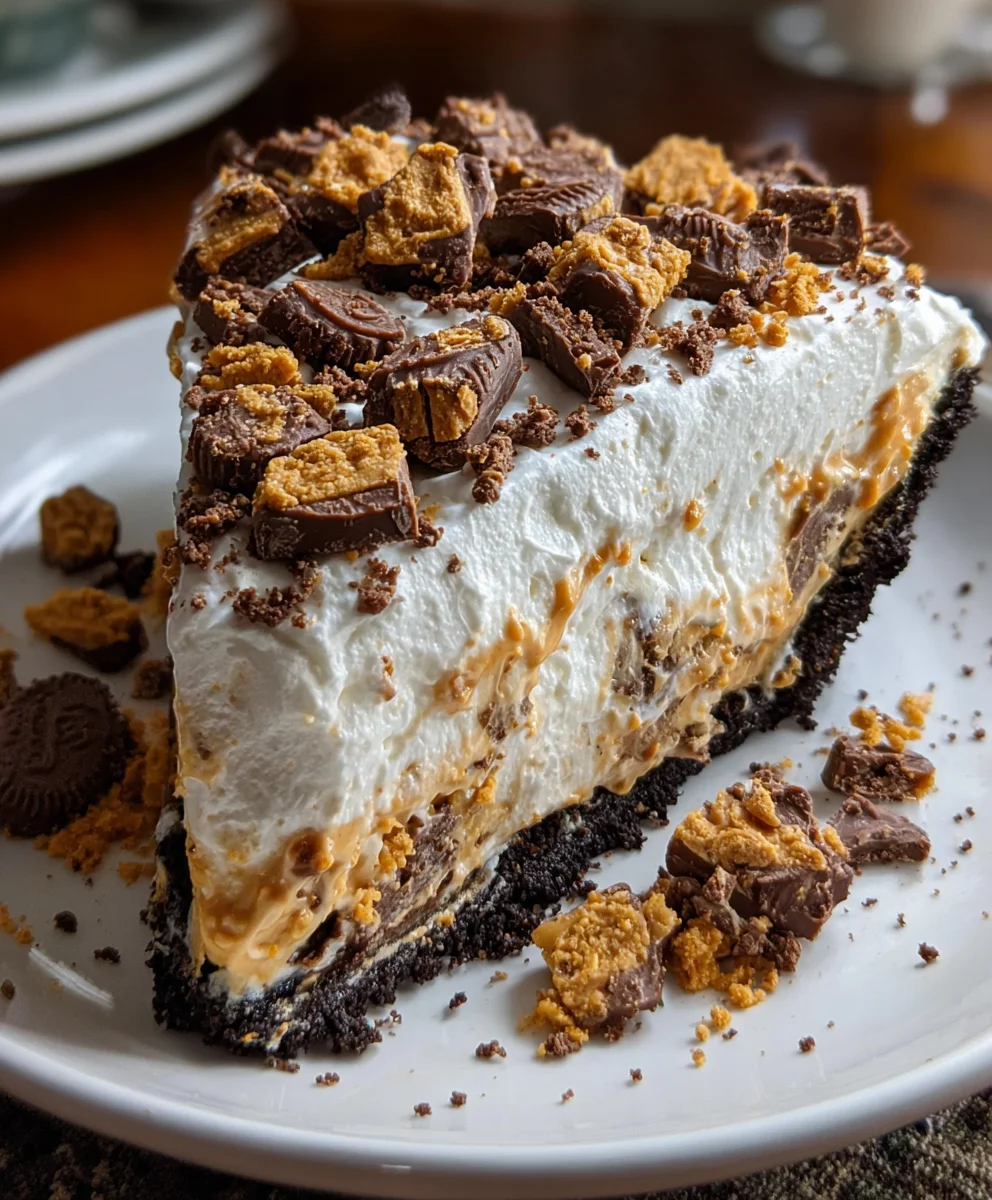
Have you ever craved something sweet, creamy, and oh-so-delicious? If that’s a yes, then let me introduce you to my new favorite indulgence: Butterfinger Pie. This heavenly dessert combines an Oreo crust with a smooth, creamy filling packed with Butterfinger candy — the ultimate treat for a busy day or a special gathering. It’s incredibly easy to make and promises smiles all around. Whether you want to impress guests or simply enjoy a slice after a long week, this Butterfinger Pie is sure to become your go-to dessert!
Why You’ll Love This Butterfinger Pie
Let’s face it: life can get hectic, and we all need a little magic to brighten our days. This Butterfinger Pie is a lifesaver! It’s quick to whip up, taking just a half-hour for prep and bake time. With its combination of crunchy Oreos and creamy peanut butter filling, it’s a flavor adventure in every bite. Plus, it’s sure to make your loved ones smile, making dessert time a cherished moment!
Ingredients Butterfinger Pie
Making a delightful Butterfinger Pie doesn’t require a treasure trove of ingredients. Here’s what you’ll need:
- Oreo Cookies: The crunchy base of our pie, these cookies bring a rich chocolate flavor that pairs beautifully with the filling.
- Unsalted Butter: This helps bind the cookie crumbs together, ensuring a deliciously rich and sturdy crust.
- Cream Cheese: For that smooth and creamy texture, cream cheese adds a delightful richness that complements the pie perfectly.
- Creamy Peanut Butter: This ingredient takes the flavor to the next level, harmonizing beautifully with the sweetness of the Butterfingers.
- Powdered Sugar: A sprinkle of sweetness to balance everything; it blends effortlessly into the filling.
- Butterfinger Candy Bars: The star of the show! Chopped and folded into the filling, they provide that iconic crunch and taste.
- Cool Whip: This lightens up the filling, giving it an airy texture that just melts in your mouth.
- Heavy Whipping Cream: Used for making the whipped topping, it adds a luxurious finish to your pie.
- Vanilla Extract: A dash of vanilla enhances the overall flavor, making everything taste more decadent.
- Additional Powdered Sugar: This second helping sweetens the whipped cream topping to perfection.
For the exact measurements, check the bottom of the article or print it out for your kitchen adventures!
How to Make Butterfinger Pie
Step 1: Preheat the Oven
First things first, turn your oven to 350 degrees Fahrenheit. Preheating is crucial because it helps the crust bake evenly, delivering that perfect crunch. No one likes a soggy pie crust! While the oven heats up, you can work on making the crust, saving precious time in this busy world.
Step 2: Prepare the Oreo Crust
Now, let’s whip up that fabulous Oreo crust. Start by placing your Oreo cookies into a food processor. Pulse them until they resemble fine crumbs—think sand on the beach! Transfer the crumbs to a mixing bowl and pour in the melted unsalted butter. Stir until it’s all combined, making sure your crumbs are well coated. Press this mixture firmly into a pie plate; I find using the flat bottom of a measuring cup helps create a solid and even layer. Remember, a sturdy crust sets the stage for our dreamy filling!
Step 3: Bake the Crust
Once your crust is pressed in nicely, pop it in the preheated oven for about 8 to 10 minutes. Keep an eye on it, as you want it firm but not burnt! Once done, take the crust out and let it cool completely before adding the delightful filling. Patience is key here, as a warm crust can mess up our creamy concoction.
Step 4: Make the Creamy Filling
While the crust cools, let’s dive into that luscious filling! In a large mixing bowl, beat together softened cream cheese, creamy peanut butter, and powdered sugar until everything is silky smooth. This is where the real magic happens! Next, gently fold in the chopped Butterfinger pieces and Cool Whip. I recommend mixing on low speed to prevent overmixing, which could deflate that light, fluffy texture. The combination of flavors will make your taste buds dance with excitement—get ready for a real treat!
Step 5: Chill the Pie
Once your filling is ready, pour it into the cooled Oreo crust. Use a spatula to spread it evenly and then let the pie chill in the refrigerator for at least two hours. This allows the filling to set up beautifully, creating that perfect slice when it’s time to serve. Plus, the flavors meld together perfectly during this chilling time!
Step 6: Top with Whipped Cream
Finally, it’s time to add a luscious topping! In a fresh bowl, combine heavy whipping cream, vanilla extract, and powdered sugar. Whisk until you get stiff peaks—this is where your whipped cream gets that luxurious texture. Gently dollop this whipped cream over the pie and swirl it around for a beautiful finish. Don’t forget to sprinkle some extra chopped Butterfinger on top for a WOW factor—who could resist that?
Tips for Success
- Make sure your cream cheese is at room temperature for easy blending.
- Mix the filling ingredients on low speed to keep it airy and prevent overmixing.
- Chill the pie overnight for even better flavor and a firmer texture.
- Adjust the amount of Butterfinger to suit your personal taste.
- Use a hot knife to slice cleanly through the pie when serving.
Equipment Needed
- Food Processor: A great tool for crushing Oreos. A resealable plastic bag with a rolling pin works too!
- Mixing Bowls: Having a few on hand is helpful for combining ingredients. Any large bowl will do!
- Measuring Cups: Precision matters! A simple set will ensure everything is just right.
- Whisk or Electric Mixer: For whipping cream and blending filling. A handheld whisk can work as well.
- Pie Plate: A classic choice for baking! A springform pan is another excellent option.
Variations
- Gluten-Free Option: Use gluten-free Oreos to make this Butterfinger Pie suitable for those with gluten sensitivities.
- Dairy-Free Variation: Opt for dairy-free cream cheese and whipped topping, and substitute the heavy whipping cream with coconut cream for a tropical twist!
- Chocolate Lovers’ Delight: Add a layer of melted chocolate or chocolate ganache on top of the pie before the whipped cream for an extra chocolatey experience.
- Nut-Free Version: Replace peanut butter with sunflower seed butter to accommodate nut allergies while keeping the nutty flavor.
- Extra Crunch: Incorporate crushed pretzels into the Oreo crust for a sweet and salty twist that adds surprising texture.
Serving Suggestions
- Pair your Butterfinger Pie with a scoop of vanilla ice cream for a delightful contrast in temperature.
- Serve with a drizzle of chocolate sauce to elevate the indulgence level.
- Garnish with whipped cream swirls and extra chopped Butterfinger for a stunning presentation.
- Enjoy alongside a cup of coffee or hot cocoa for a comforting dessert experience.
- Consider adding fresh berries on the side for a refreshing touch!
FAQs about Butterfinger Pie
Can I make Butterfinger Pie a day in advance?
Absolutely! In fact, making it a day ahead allows the flavors to meld beautifully and the filling to set perfectly. Just cover it well and store it in the refrigerator until you’re ready to serve.
What can I substitute for Cool Whip?
If you prefer, you can use homemade whipped cream in place of Cool Whip. Simply whip heavy cream with a bit of sugar and vanilla until stiff peaks form for that light, airy texture.
How do I store leftover Butterfinger Pie?
Keep any leftovers in an airtight container in the refrigerator. It will stay fresh for about 3 to 4 days, though I doubt there will be much left!
Can I freeze Butterfinger Pie?
Yes, you can freeze it! Just make sure it’s well wrapped or placed in an airtight container. Thaw it in the fridge overnight before serving for the best texture.
What variations can I try with this recipe?
There are many fun variations! You can switch the crust to a graham cracker or gluten-free option, or even experiment with additional toppings like caramel sauce or chocolate shavings for extra flair!
Final Thoughts
Every slice of Butterfinger Pie is like a hug for your taste buds! It brings together comforting flavors and satisfying textures that can brighten even the busiest days. This pie isn’t just a dessert; it’s a moment of joy shared with family and friends. Picture everyone gathered around the table, laughter filling the air, and eyes lighting up with delight over each delectable bite. This recipe proves that even simple indulgences can create cherished memories. So, whether it’s a weeknight treat or a special occasion, let Butterfinger Pie be your go-to for bringing a little sweetness into life!
Print
Butterfinger Pie
- Total Time: 2 hours 30 minutes
- Yield: 8 servings 1x
- Diet: Vegetarian
Description
Indulge in this creamy and crunchy Butterfinger Pie, featuring a delicious Oreo crust and a heavenly filling packed with Butterfinger candy.
Ingredients
- 30 Oreo Cookies
- 7 Tablespoons unsalted butter, melted
- 8 ounces cream cheese, softened to room temperature
- ½ cup creamy peanut butter
- 1/3 cup powdered sugar
- 12 ounces Butterfinger candy bars, chopped (reserve some for garnish)
- 8 ounces Cool Whip, thawed
- 1 cup Heavy Whipping Cream
- 1 teaspoon vanilla extract
- 2 Tablespoons powdered sugar
Instructions
- Preheat the oven to 350 degrees.
- Add the Oreos to a food processor and pulse until you have fine crumbs.
- Add the crumbs to a large bowl and then pour in the melted butter. Stir until fully combined.
- Pour the crumbs into a pie plate and press the crumbs into the bottom and up the sides creating a thick, even layer. I use a measuring cup to help with the pressing.
- Bake the crust for 8-10 minutes and then remove it from the oven. Allow it to cool completely before adding your pie filling.
- In a large bowl, beat together the cream cheese, peanut butter, and powdered sugar using a mixer until smooth.
- Add the chopped Butterfingers and Cool Whip to the cream cheese filling. Mix together on low speed until just combined.
- Pour the filling into the cooled pie crust and use a spatula to spread it out evenly. Chill the pie for at least two hours.
- In a large mixing bowl, add the cream, vanilla, and powdered sugar. Whisk until stiff peaks form.
- Spoon the whipped cream onto the top of the pie filling and gently swirl it around. Chop and sprinkle the extra Butterfinger on top. Chill until ready to serve!
Notes
- Be careful not to over whisk the cream to avoid turning it into butter.
- This pie can be made a day in advance and stored in the refrigerator.
- Feel free to adjust the amount of Butterfinger based on your preference.
- Prep Time: 20 minutes
- Cook Time: 10 minutes
- Category: Dessert
- Method: Baking and Chilling
- Cuisine: American
Nutrition
- Serving Size: 1 slice
- Calories: 350
- Sugar: 25g
- Sodium: 150mg
- Fat: 20g
- Saturated Fat: 10g
- Unsaturated Fat: 5g
- Trans Fat: 0g
- Carbohydrates: 36g
- Fiber: 2g
- Protein: 5g
- Cholesterol: 30mg