Introduction to Korean Rice Balls
As a busy mom, I know the struggle of finding quick, delicious meals that please everyone at the table. Enter Korean Rice Balls, a delightful fusion of flavors and convenience. These little bundles are perfect when you need a snack on the go or a light meal that’s easy to whip up. With their flexible fillings, they can cater to even the pickiest eaters. Plus, they come together in no time, making them an ideal choice for those hectic weekdays. Join me on this culinary adventure where we’ll blend tradition with simplicity to create something special!
Why You’ll Love This Korean Rice Balls
Korean Rice Balls are your go-to snack for busy days! They’re not only incredibly easy to make but also packed with flavor that everyone will adore. Imagine a quick meal option that allows you to customize each rice ball to suit your family’s taste buds. Whether you’re juggling work, kids, or both, this recipe transforms your kitchen into a haven of deliciousness without the stress. They’re a tasty treat that brings joy in every bite!

Ingredients for Korean Rice Balls
Ready to dive into making Korean Rice Balls? Below is a list of the ingredients you’ll need. Each one plays a crucial role in crafting these delightful bites!
- Short or medium-grain rice: This is essential for that sticky texture we love in rice balls. Sushi rice works wonderfully!
- Seaweed seasoning: This adds a savory punch. You can find it in the Asian aisle or make your own for a fresher taste.
- Toasted sesame oil: Just a touch adds depth and a nutty aroma that elevates the rice.
- Carrot (optional): Finely diced carrots add color and a hint of sweetness, making these rice balls look and taste lovely.
- Tuna (for filling): Canned tuna is a quick and tasty way to include protein. Pair it with mayo for a creamy texture.
- Japanese mayonnaise: This brings a smooth richness to your filling. It’s different from regular mayo, so keep it on hand!
- Salt & pepper: Simple seasonings, but they make all the difference in enhancing your flavors.
- Ground beef bulgogi (for filling): This marinated meat creates a savory and umami flavor that’s hard to resist!
For exact measurements and further instructions, check out the bottom of this article where everything is available for printing. Happy cooking!
How to Make Korean Rice Balls
Now that we have our ingredients, it’s time to roll up our sleeves and dive into making these delightful Korean Rice Balls. Follow these simple steps, and you’ll have an impressive snack or light meal in no time!
Step 1: Make the Filling
First things first, we whip up the filling. For the tuna mayo filling, take a small bowl and mix the drained canned tuna with Japanese mayonnaise. Season it with salt and pepper to your liking.
If you’re going for the bulgogi filling, simply prepare your ground beef bulgogi according to your favorite recipe or use leftover bulgogi if you have any. The more flavor, the better!
Step 2: Season the Rice
Next, we need to give our rice that signature flavor. If you choose to add diced carrots, sauté them in a little oil until soft, about three minutes. This step adds a bit of sweetness and color to your rice balls.
Combine the warm rice with the sautéed carrots (if using) and drizzle in the toasted sesame oil. Gently mix everything together until the rice is awash with flavor. Warm rice is vital; it helps everything stick together seamlessly.
Step 3: Add Filling and Shape Rice Balls
Now comes the fun part! Take about two tablespoons of your seasoned rice and flatten it in your palm. Then, add about one tablespoon of your chosen filling right in the center. Top it off with a bit more rice.
With soft, warm rice in hand, gently shape it into a ball. The trick is to apply just enough pressure, so you encase the filling without squishing it out. A light touch does the job!
If you find the rice sticking to your hands, you can use a little vegetable oil on your palms or wear food-safe gloves. Trust me, it makes the process much cleaner!
Step 4: Seaweed Seasoning
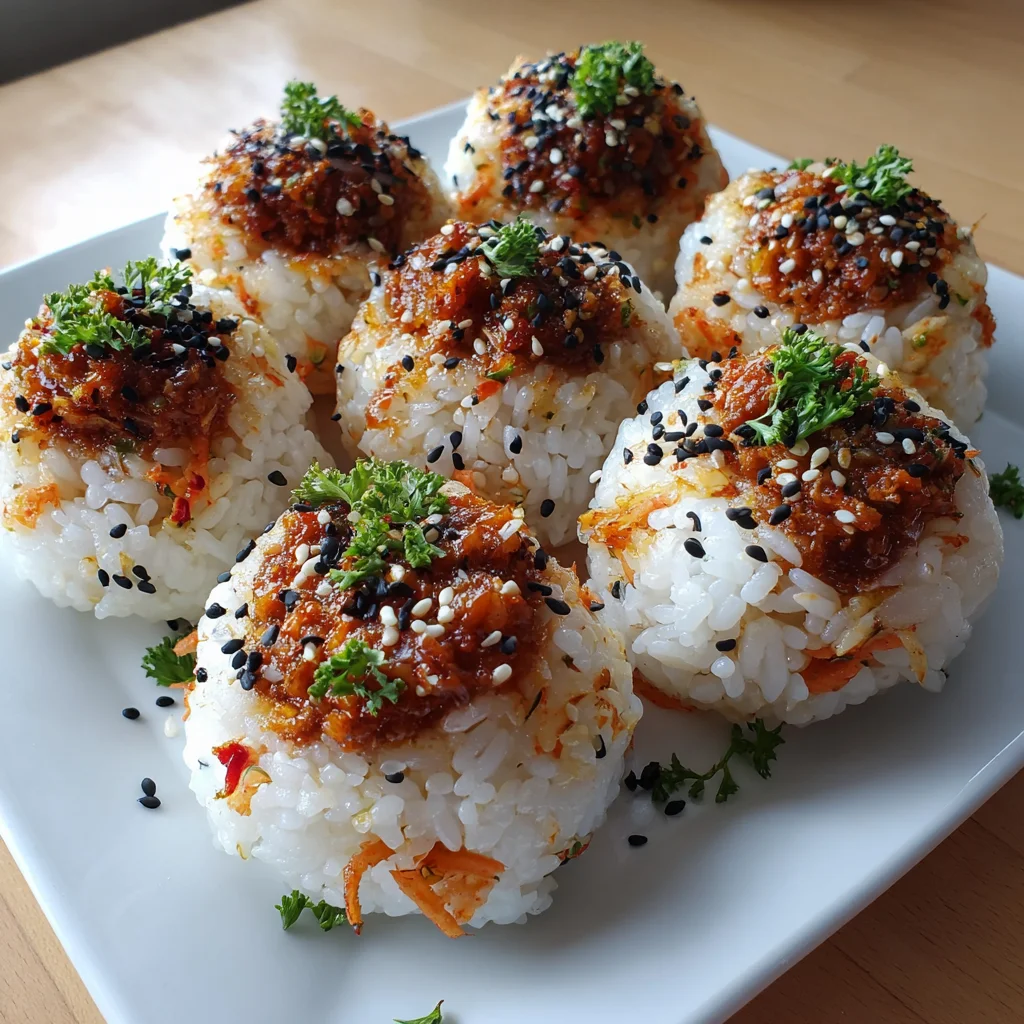
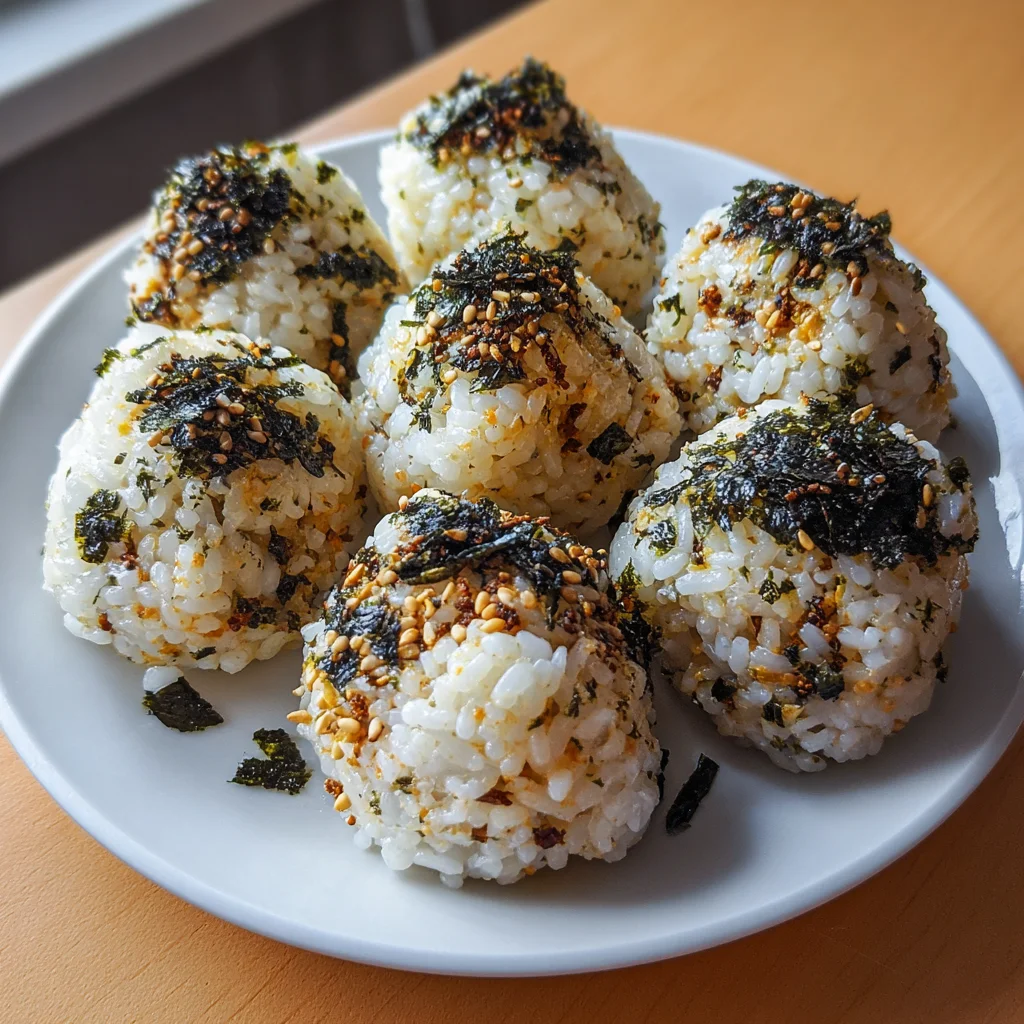
Finally, let’s wrap it all up with a touch of seaweed! Roll your rice balls in the seaweed seasoning until they’re fully coated. This final touch not only adds flavor but also makes your rice balls look irresistible.
Now, your Korean Rice Balls are ready to be served! Whether you enjoy them straight away or pack them for later, excitement is guaranteed in every bite!
Tips for Success
- Use warm rice for better stickiness. Cold rice struggles to hold its shape.
- Apply a bit of oil to your hands or gloves when shaping rice balls. It prevents sticking!
- Don’t rush the mixing! Ensure the seaweed seasoning and sesame oil are well incorporated.
- Experiment with fillings! Enjoy variations based on your family’s preferences.
- Store leftovers in an airtight container for up to two days!
Equipment Needed
- Mixing bowl: A medium-sized bowl works best for combining fillings.
- Cooking pot: Use a saucepan for steaming rice if not pre-cooked.
- Spatula: A sturdy spatula is great for mixing the rice and fillings.
- Food-safe gloves: Optional but helpful for easy handling.
Variations
- Vegetarian Option: Swap in sautéed mushrooms or marinated tofu for a savory, plant-based filling.
- Spicy Tuna: Add a touch of sriracha or gochujang to your tuna mayo for an extra kick!
- Herb-Infused Rice: Mix in chopped green onions or cilantro for a fresh twist on the rice flavor.
- Cheese Lover: Incorporate a small cube of cheese into the filling for a gooey surprise.
- Fruit Addition: Try adding diced cucumber or avocado for a refreshing crunch.
Serving Suggestions for Korean Rice Balls
- Side Dishes: Pair your rice balls with a simple cucumber salad for a refreshing crunch.
- Drinks: Enjoy them with green tea or a light lemonade to balance the flavors.
- Presentation: Serve on a colorful plate and garnish with sesame seeds for a beautiful touch.
FAQs about Korean Rice Balls
What type of rice is best for Korean Rice Balls?
You’ll want to stick with short or medium-grain rice, as they are sticky and easily mold into balls. Sushi rice is an excellent choice!
Can I make Korean Rice Balls in advance?
Absolutely! You can prepare them up to two days ahead. Just store them in an airtight container in the fridge. Reheat them briefly in the microwave.
What can I use instead of tuna for the filling?
If tuna isn’t your thing, feel free to use bulgogi, marinated tofu, or even grilled vegetables. The possibilities are endless!
Are Korean Rice Balls gluten-free?
Yes! As long as you use gluten-free soy sauce or ensure the seasoning is gluten-free, these tasty snacks fit your dietary needs perfectly.
How do I know when my rice is cooked perfectly?
The rice should be soft and slightly sticky but not mushy. If it’s too dry, add a splash of water while cooking!
Final Thoughts
Creating Korean Rice Balls has been a joyful journey, blending flavors and nurturing my family’s taste buds in a fun, hands-on way. These delightful snacks offer not just a meal but a moment of connection with my loved ones. Remember, every rice ball is like a little hug for the tummy! The laughter shared while rolling them together is what makes this recipe truly special. Whether packed for lunch or served as an after-school snack, they’re bound to spark joy. So roll up your sleeves and enjoy the magic of making Korean Rice Balls with your family!
Print
Korean Rice Balls
- Total Time: 30 minutes
- Yield: 4 servings 1x
- Diet: Gluten Free
Description
Korean Rice Balls are a delicious and easy-to-make snack or meal option, featuring sticky rice filled with flavorful fillings like tuna mayo or bulgogi.
Ingredients
- 3 cups cooked rice (short or medium-grain, warmed)
- ⅓ cup seaweed seasoning
- 1½ teaspoons toasted sesame oil
- ½ small carrot (finely diced, optional)
- For Tuna Mayo Filling:
- 5 oz canned tuna (drained)
- 1½ Tablespoons Japanese mayonnaise
- salt & pepper to taste
- For Bulgogi Filling:
- 1 cup ground beef bulgogi
Instructions
- Make the filling: For the tuna mayo filling, add the canned tuna and Japanese mayonnaise to a small bowl and mix well. Season with salt and pepper to taste.
- Season the rice: Sauté the finely diced carrots with a bit of oil until soft, about 3 minutes. Add the carrots and toasted sesame oil to the warm rice and mix together.
- Add filling and shape rice balls: Take 2 tablespoons of rice and gently flatten it against your hand. Add about 1 tablespoon of filling to the center and top it with a bit of rice. Gently but firmly shape the rice into a ball while encasing the filling. Tip: Apply a bit of vegetable oil to food-safe gloves for easy handling.
- Seaweed seasoning: Roll each rice ball in seaweed seasoning. Serve and enjoy!
Notes
- Short or medium-grain rice is recommended as rice balls require sticky rice, such as sushi rice, to hold their shape. Long-grain rice such as Jasmine rice isn’t sticky enough.
- Keep a ratio of 2.5 tablespoons of rice per 1 tablespoon of filling.
- Use warm rice for best results, as cold rice doesn’t stick together well. Reheat leftover cold or frozen rice until it’s soft and sticky.
- You can make them ahead up to 2 days in advance and store in the fridge in an airtight container. To reheat, microwave for 20 seconds at a time while covered with a damp paper towel.
- Prep Time: 20 minutes
- Cook Time: 10 minutes
- Category: Snack
- Method: No-Bake
- Cuisine: Korean
Nutrition
- Serving Size: 1 rice ball
- Calories: 311
- Sugar: 1g
- Sodium: 155mg
- Fat: 7g
- Saturated Fat: 1g
- Unsaturated Fat: 6g
- Trans Fat: 1g
- Carbohydrates: 45g
- Fiber: 1g
- Protein: 13g
- Cholesterol: 20mg