Introduction to Mini Biscoff Cheesecakes
Welcome to the sweet world of Mini Biscoff Cheesecakes! As a busy mom, I know how precious time can be. This delightful recipe is perfect for those days when you crave something indulgent yet quick to whip up. Imagine creamy cheesecakes nestled in a crunchy Biscoff crust, ready to impress your loved ones or treat yourself without the fuss. With these mini treats, you’ll enjoy dessert without feeling overwhelmed. So, let’s get started on this little culinary adventure that will bring smiles to faces and warmth to hearts!
Why You’ll Love This Mini Biscoff Cheesecake
These Mini Biscoff Cheesecakes aren’t just delicious; they’re also incredibly easy to make! In just a little over three hours, you can create a stunning dessert that tastes like a dream. The creamy filling pairs perfectly with the crunchy Biscoff crust, offering a delightful contrast in each bite. Plus, they’re portion-controlled, which means you can indulge without guilt. What’s not to love about that?
Ingredients for Mini Biscoff Cheesecakes
Gathering the right ingredients is the first step to creating your Mini Biscoff Cheesecakes. Here’s what you’ll need:
- Biscoff cookie crumbs: The star of the show! They lend a rich, spiced flavor and create a delightful, crunchy crust.
- Melted butter: This helps bind the cookie crumbs together and provides a rich taste.
- Cream cheese: Look for full-fat cream cheese for that luscious, creamy texture that makes cheesecakes irresistible.
- Heavy cream: Whipping this into your filling adds an airy lightness and richness to the final product.
- Powdered sugar: This sweetens the cheesecake, balancing the flavors with just the right amount of sweetness.
- Vanilla extract: A dash of this adds warmth and depth to the cheesecake filling.
- Biscoff spread: A scoop of this magic spread takes the cheesecakes to new levels of deliciousness, infusing them with that wonderful caramelized flavor.
- Crumpled Biscoff cookies: They make for a perfect topping, giving each cheesecake an attractive finish and a little extra crunch.
Consider this your canvas! Feel free to experiment. For an extra indulgent touch, try adding a tablespoon of Biscoff spread to the filling. If you can’t find Biscoff cookies, any similar speculoos cookies will do the trick. Need a quick substitute for cream cheese? Try using a thicker Greek yogurt for a slightly different taste.
For the exact measurements, you can find them at the bottom of this article, perfect for easy printing!

How to Make Mini Biscoff Cheesecakes
Preheat the Oven and Prepare the Muffin Tin
First things first, preheat your oven to 350°F (175°C). This step is crucial! Preheating allows the crust to bake evenly and ensures it’s ready for your delicious filling. While your oven warms up, grab a 12-cup muffin tin and line each cup with paper liners. This makes for easy removal later and keeps your cheesecakes looking neat. Trust me, it saves a lot of hassle down the line!
Make the Cookie Crust
Now, let’s get to that mouthwatering cookie crust! In a medium bowl, mix the Biscoff cookie crumbs with melted butter. You want it to resemble damp sand. This richness will create that perfect texture. Once combined, take about a tablespoon of this mixture and press it firmly into each muffin liner. It’s essential to create a solid base. A little elbow grease goes a long way!
Bake the Crust
With the crusts pressed down, pop the muffin tin into the oven and bake for just 5 minutes. This quick bake helps set the crust and gives it a slight crunch. After baking, remove the tin from the oven and let the crusts cool completely. Allowing them to cool is crucial. A hot crust will turn your creamy filling into a melty mess!
Make the Cheesecake Filling
While the crusts are cooling, let’s whip up that creamy filling! In a large mixing bowl, use an electric mixer to beat the cream cheese until it’s smooth and creamy. Then, add in the heavy cream, powdered sugar, and vanilla extract. Beat these together until the mixture thickens up beautifully. Don’t rush — avoid lumps by mixing slowly and thoroughly. Finally, add your delightful Biscoff spread and blend it in until smooth. It’s going to be heavenly!
Fill the Muffin Cups
Now comes the fun part: filling those lovely crusts! You can either spoon or use a piping bag to carefully fill each muffin cup with the cheesecake mixture. Make sure to fill them almost to the top, as they will set and look absolutely scrumptious. Even distribution is key to ensure every bite is just as delightful!
Chill the Cheesecakes
Next, it’s time for some patience. Cover your muffin tin with plastic wrap and place it in the fridge. Chill the cheesecakes for at least 3 hours. This step is vital for achieving that perfect set. Trust me, it’ll be worth the wait!
Final Touches
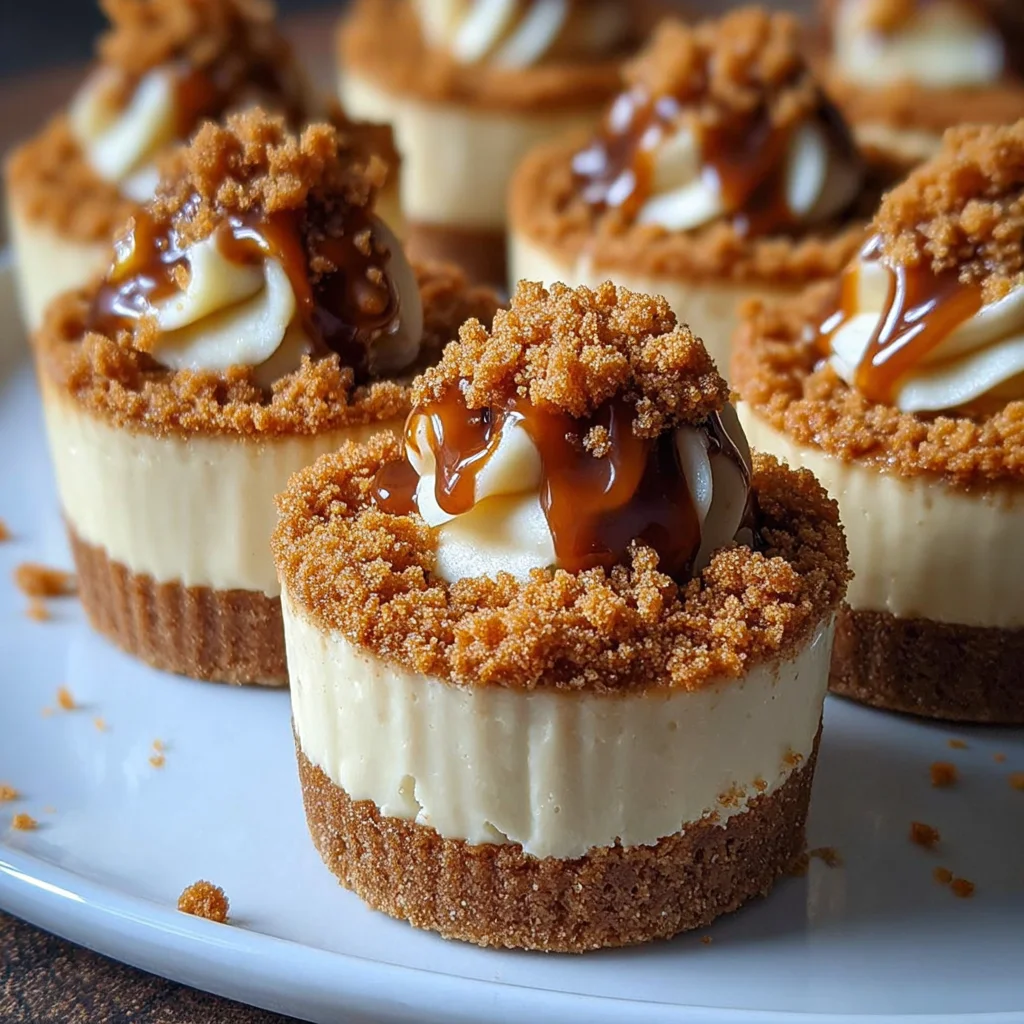
Once the cheesecakes are perfectly chilled, it’s time for the grand finale! Carefully remove them from the muffin tin and top each one with crumbled Biscoff cookies for an extra crunch. For an indulgent touch, consider adding a dollop of whipped cream or a drizzle of caramel sauce. Serve immediately or store them in an airtight container. Your Mini Biscoff Cheesecakes are now ready to shine!
Tips for Success
- Press the cookie crust firmly for a stable base that won’t crumble.
- Beat the cream cheese thoroughly to prevent lumps in your filling.
- Chill for the full 3 hours to ensure a perfect set.
- Use a piping bag for neat and stylish filling.
- Try adding different toppings, such as chocolate shavings or fresh fruit, for variety.
Equipment Needed
- Muffin tin: A standard 12-cup pan works perfectly, but you can also use mini cheesecake pans.
- Mixing bowls: A medium bowl for the crust and a large bowl for the filling.
- Electric mixer: A hand mixer or stand mixer will make whipping easy.
- Piping bag (optional): For stylishly filling the cups, but a spoon works just fine!
Variations of Mini Biscoff Cheesecakes
- Chocolate Biscoff Cheesecakes: Add cocoa powder to the filling for a chocolatey twist that pairs beautifully with Biscoff.
- Nutty Delight: Fold in chopped nuts, such as pecans or walnuts, into the cheesecake filling for added crunch and flavor.
- Caramel Swirl: Drizzle caramel sauce on top of the cheesecake filling before chilling for an extra layer of sweetness.
- Fruit Topping: Top your cheesecakes with fresh berries or sliced bananas for a fruity explosion.
- Gluten-Free Option: Use gluten-free cookies instead of Biscoff for those needing a gluten-free treat.
Serving Suggestions for Mini Biscoff Cheesecakes
- Pair with a cup of freshly brewed coffee or chai tea for a cozy treat.
- Serve alongside a scoop of vanilla ice cream for an indulgent dessert experience.
- Garnish with a sprig of mint for a pop of color.
- Arrange on a decorative plate for an eye-catching presentation at gatherings.
FAQs about Mini Biscoff Cheesecakes
As you embark on making these Mini Biscoff Cheesecakes, you might have a few questions. Let’s tackle some common ones!
Can I make these cheesecakes ahead of time?
Absolutely! These delightful Mini Biscoff Cheesecakes can be made a day in advance. Just keep them in the fridge until you’re ready to serve. They taste even better after chilling!
What if I don’t have Biscoff cookies?
No worries at all! If you can’t find Biscoff cookies, any similar spiced cookies will work. Speculoos or even ginger snaps can create a delightful crust.
Can I freeze Mini Biscoff Cheesecakes?
Yes, you can freeze them! Just ensure they’re wrapped tightly. When you’re ready to enjoy them, let them thaw in the fridge overnight. You’ll still get that creamy goodness!
How do I store leftovers?
Store any leftover cheesecakes in an airtight container in the refrigerator. They should last for about 3-4 days, but I doubt they’ll last that long!
What other toppings can I use?
The possibilities are endless! Consider topping your Mini Biscoff Cheesecakes with fresh fruit, whipped cream, or even a chocolate drizzle for an extra treat. Get creative!
Final Thoughts
Creating Mini Biscoff Cheesecakes is truly a joyful experience. The process, from combining the crumbly crust to swirling in that silky filling, is both rewarding and satisfying. These little bites of heaven bring smiles not just to your table, but also to your heart. Picture sharing them with loved ones, their eyes lighting up with delight. Whether it’s for a special occasion or just because you deserve a treat, these cheesecakes are a fantastic way to sweeten your day. Embrace the joy of baking and let these delightful desserts bring warmth to your home and happiness to your family.
Print
Mini Biscoff Cheesecakes
- Total Time: 3 hours 20 minutes
- Yield: 12 mini cheesecakes 1x
- Diet: Vegetarian
Description
Delicious mini cheesecakes made with Biscoff cookies and creamy filling, perfect for a sweet treat.
Ingredients
- 1 1/2 cups Biscoff cookie crumbs
- 1/4 cup melted butter
- 2 cups cream cheese
- 1 cup heavy cream
- 1/2 cup powdered sugar
- 1 teaspoon vanilla extract
- 1/2 cup Biscoff spread
- 1/4 cup Biscoff cookies, crumbled
Instructions
- Preheat your oven to 350°F (175°C) and prepare a 12-cup muffin tin by lining each cup with paper liners.
- In a medium bowl, combine the Biscoff cookie crumbs and melted butter, stirring until the crumbs are evenly coated and the mixture begins to hold together.
- Spoon about one tablespoon of the cookie crumb mixture into each muffin cup and press it down firmly with the back of a spoon to create a solid crust.
- Place the muffin tin in the oven and bake for 5 minutes to set the crust. After baking, remove the tin from the oven and allow the crusts to cool completely.
- While the crusts cool, beat the cream cheese in a large mixing bowl with an electric mixer until smooth and creamy.
- Add the heavy cream, powdered sugar, and vanilla extract to the cream cheese and beat on medium speed until the mixture thickens and becomes smooth.
- Add the Biscoff spread to the mixture and beat again until fully incorporated and the filling is thick and smooth.
- Spoon or pipe the Biscoff cheesecake mixture onto each cooled cookie crust, filling each cup almost to the top.
- Smooth the tops of the cheesecakes with a spatula, making sure they are even.
- Place the mini cheesecakes in the fridge to chill for at least 3 hours, or until fully set.
- Once chilled, remove the cheesecakes from the fridge and top each one with crumbled Biscoff cookies.
- Serve immediately or store the cheesecakes in an airtight container in the refrigerator until ready to enjoy.
Notes
- Make sure to press the cookie crust firmly to avoid a crumbly base.
- For a richer flavor, you can add an extra tablespoon of Biscoff spread to the filling.
- If you don’t have a muffin tin, use a mini cheesecake pan or a standard cupcake tin.
- Allow the cheesecakes to chill for the full 3 hours to ensure they set properly.
- Top the cheesecakes with whipped cream or caramel sauce for an extra indulgent touch.
- Prep Time: 15 minutes
- Cook Time: 5 minutes
- Category: Dessert
- Method: Baking
- Cuisine: American
Nutrition
- Serving Size: 1 cheesecake
- Calories: 280
- Sugar: 18g
- Sodium: 200mg
- Fat: 21g
- Saturated Fat: 12g
- Unsaturated Fat: 6g
- Trans Fat: 0g
- Carbohydrates: 22g
- Fiber: 1g
- Protein: 3g
- Cholesterol: 60mg