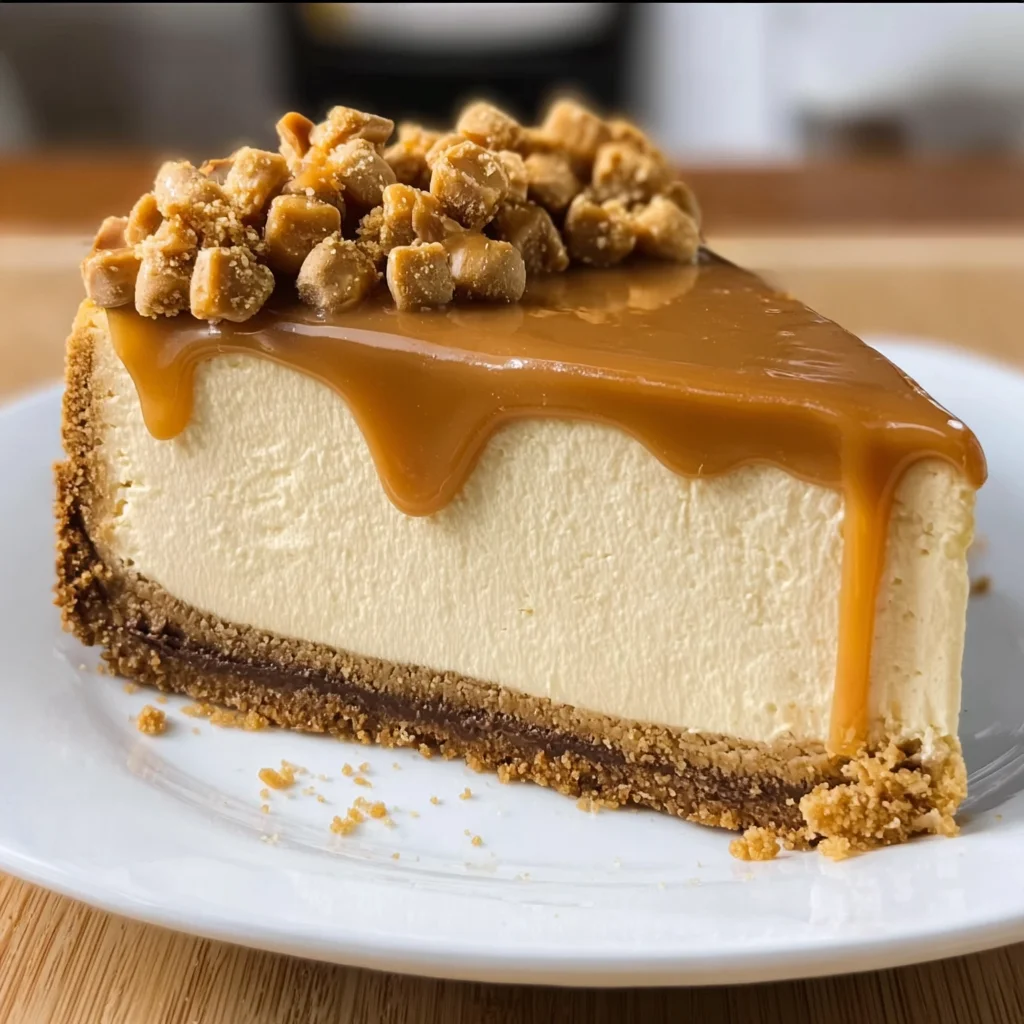
Introduction to Loaded Butterscotch Cheesecake
Have you ever craved a dessert that feels like a warm hug? This Loaded Butterscotch Cheesecake is just that! It’s creamy, decadent, and utterly delightful. Perfect for busy moms like us, this recipe is not just easy but also a lot of fun to make. Whether you’re celebrating a special occasion or looking to impress your family, this cheesecake will surely steal the show. Imagine the joy on your loved ones’ faces when they take their first bite—heavenly! So, let’s dive into this creamy dream and elevate our dessert game together!
Why You’ll Love This Loaded Butterscotch Cheesecake
This Loaded Butterscotch Cheesecake is a game changer for busy schedules! It combines rich butterscotch flavors with a silky cream cheese filling, making it an indulgent treat. Plus, it’s surprisingly easy to put together with just a bit of prep time. You’ll love knowing you can impress guests without spending hours in the kitchen. Every slice is pure bliss, and who wouldn’t love that?
Ingredients for Loaded Butterscotch Cheesecake
Gathering the right ingredients is key to making this Loaded Butterscotch Cheesecake as delightful as it sounds! Here’s a list of what you’ll need to create this masterpiece:
- Graham cracker crumbs: The base of our crust. It adds a sweet, crunchy texture.
- Light brown sugar: This provides caramel notes, enhancing the butterscotch flavor beautifully.
- Unsalted butter: It binds the crust together and adds richness. Feel free to substitute with coconut oil for a dairy-free option.
- Cream cheese: The heart of our cheesecake! It gives us that creamy texture we all adore, so let it soften at room temperature for best results.
- Sour cream: Adds tanginess and creaminess, balancing the sweetness of the butterscotch.
- Heavy whipping cream: This helps create a velvety filling that melts in your mouth.
- Butterscotch chips: A must for that deep butterscotch flavor! If you’re feeling adventurous, dark butterscotch chips offer a richer taste.
- Dry butterscotch pudding mix: This thickens the filling while adding more butterscotch goodness. You can try caramel pudding mix for a twist!
- Eggs: They give structure to our cheesecake, preventing it from collapsing.
Make sure to check the bottom of the article for exact measurements! Happy baking!

How to Make Loaded Butterscotch Cheesecake
Now, let’s transform those wonderful ingredients into a dessert that will make your heart sing! Here’s a step-by-step guide to creating your Loaded Butterscotch Cheesecake. Follow along, and remember, it’s all about having fun in the kitchen!
Step 1: Prepare Your Oven and Springform Pan
First things first, preheat your oven to 325°F (163°C). Grab your trusty 9-inch springform pan and line the bottom with parchment paper. This little trick will make it easier to remove the cheesecake later. Don’t forget to grease the sides with a bit of butter or cooking spray!
Step 2: Make the Crust
In a medium bowl, combine the graham cracker crumbs, brown sugar, and melted butter. Mix it well until it starts to resemble wet sand. You want it crumbly, just like a beach on a sunny day! Press this mixture firmly into the bottom and about halfway up the sides of your springform pan. Really get in there—that crust is the foundation!
Step 3: Bake the Crust
Bake that beautiful crust for 10 minutes. While it does its thing, enjoy the sweet smell wafting through your kitchen. Once it’s done, set it aside to cool for a moment, and drop the oven temperature to 300°F (148°C).
Step 4: Prepare the Filling
In a large bowl, beat the cream cheese until it’s smooth and creamy. It should feel like fluffy clouds forming. Scrape down the sides of the bowl to get everything incorporated; we don’t want any lonely cream cheese hanging around!
Step 5: Combine Ingredients
Now, add in your packed brown sugar and flour. Mix it until well combined. Next, pour in the vanilla extract and the sour cream. Mix again until it’s all silky smooth! Don’t forget to incorporate that luscious heavy whipping cream—this is where the magic happens!
Step 6: Add Eggs
Time to melt those butterscotch chips! Melt them in the microwave in 20-second bursts, stirring in between. Once they’re smooth and glossy, add them to your batter and mix. Then, sprinkle in the dry butterscotch pudding mix and combine it all. Finally, add the eggs one at a time, mixing slowly after each addition. Remember to scrape down the sides as needed!
Step 7: Bake the Cheesecake
Now comes the fun part—baking! Wrap the outside of your springform pan with aluminum foil to avoid any water getting in. Place your pan inside a larger roasting pan. Pour your cheesecake batter into the prepared crust and smooth the top. Pour warm water into the roasting pan until it comes halfway up the sides of the springform pan.
Bake for 1 hour and 35 minutes. Your cheesecake should have set edges, but a slightly jiggly center is okay—that’s the sign of perfection!
Step 8: Cool and Chill
Once baked, turn off the oven. Leave the cheesecake inside with the door closed for 30 minutes. After that, crack the oven door and let it sit for another 30 minutes. This gentle cooling process helps prevent cracking. Remove the cheesecake and the water bath, and let it cool at room temperature for an hour. Then, refrigerate it for at least 5-6 hours or overnight to truly set!
Step 9: Create the Butterscotch Ganache
When it’s time to add the finishing touches, grab a heat-proof bowl. Place the additional butterscotch chips and heavy whipping cream in it. Microwave this mixture in 15-20 second intervals, stirring until it’s smooth and glossy. You want a ganache that’s as rich as your favorite childhood candy!
Step 10: Add Ganache and Decorate
Pour that luscious ganache over your chilled cheesecake, spreading it evenly across the top. For an extra touch, sprinkle additional butterscotch chips on as a decoration. They’re the sprinkles on this glorious sundae of a dessert!
Refrigerate your masterpiece for at least 30 minutes before serving to let the ganache set. And there you have it—your Loaded Butterscotch Cheesecake is ready to dazzle friends and family!
Tips for Success
- Make sure all ingredients, especially cream cheese, are at room temperature for smooth mixing.
- Don’t rush the cooling process; it helps to prevent cracks and ensures a creamy texture.
- Measure your ingredients carefully—baking is often more precise than cooking.
- Use a water bath to keep the cheesecake moist while baking.
- Try topping with whipped cream for even more indulgence!
Equipment Needed for Loaded Butterscotch Cheesecake
- 9-inch springform pan: Essential for easy removal. A regular pie dish works in a pinch.
- Mixing bowls: Use different sizes for comfort. Any bowl will do!
- Hand or stand mixer: For a smooth batter. A whisk can be a workout!
- Measuring cups and spoons: Precision is key in baking!
- Parchment paper: Helps with easy removal. Aluminum foil can substitute for lining!
Variations on Loaded Butterscotch Cheesecake
- Chocolate Ripple: Add a layer of chocolate ganache beneath the butterscotch ganache for a dual-flavor explosion!
- Salted Caramel: Drizzle salted caramel sauce on top instead of or in addition to the butterscotch ganache for a sweet and salty treat.
- Nutty Crunch: Fold in chopped nuts like pecans or walnuts into the cheesecake filling for an added crunch. Just be sure to warn your friends if they have nut allergies!
- Dairy-Free Option: Swap cream cheese with dairy-free cream cheese and use coconut cream instead of heavy whipping cream for a delicious dairy-free version.
- Fruity Twist: Add pureed fruit like banana or ripe peaches into the filling for a fresh take. Peach and butterscotch together? Absolutely delightful!
- Spice it Up: Add a pinch of cinnamon or nutmeg to the cheesecake batter for a warm, cozy flavor that pairs wonderfully with the butterscotch.
Serving Suggestions for Loaded Butterscotch Cheesecake
- Pair with Coffee: A rich cup of coffee enhances the sweet flavors beautifully.
- Serve with Whipped Cream: Add a dollop of fresh whipped cream for extra creaminess.
- Accompany with Fresh Fruit: Berries or sliced bananas add a refreshing contrast and color.
- Present with Chocolate Sauce: A drizzle of chocolate sauce can elevate the dessert experience.
- Use Fun Garnishes: Top with mint leaves or chocolate shavings for a delightful touch!
FAQs about Loaded Butterscotch Cheesecake
Can I use a different crust for my Loaded Butterscotch Cheesecake?
Absolutely! While graham cracker crust is classic, you can experiment with Oreo crumbs, digestive biscuits, or even a gluten-free crust. All will taste delicious!
How can I prevent my cheesecake from cracking?
To avoid cracks, make sure to bake the cheesecake in a water bath and cool it gradually in the oven. This gentle approach works wonders!
Can I freeze Loaded Butterscotch Cheesecake?
Yes, you can! Just wrap individual slices in plastic wrap and then in foil. They can stay in the freezer for up to 3 months. Perfect for future cravings!
How long does the cheesecake need to chill?
This cheesecake benefits from at least 5-6 hours of chilling, but overnight is best. This allows the flavors to meld beautifully, creating that signature creaminess!
Can I make this cheesecake ahead of time?
Definitely! This Loaded Butterscotch Cheesecake is ideal for making ahead. Just prepare it a day or two in advance, and you’ll save yourself time on the big day. Plus, it tastes even better after a night in the fridge!
Final Thoughts
Creating this Loaded Butterscotch Cheesecake is not just about baking; it’s about crafting memories. As you whip, mix, and pour, each step brings joy and excitement that fills your kitchen. Imagine serving this beautiful dessert at a family gathering or a cozy evening after dinner. It’s more than just a treat; it’s a celebration of togetherness and flavor. I hope you find as much happiness in making and sharing this cheesecake as I do. So, gather your loved ones, slice up these delectable pieces, and indulge in each creamy, butterscotch-laden bite. You deserve it!
Print
Loaded Butterscotch Cheesecake
- Total Time: 8 hours (including chilling time)
- Yield: 8–10 servings 1x
- Diet: Vegetarian
Description
A decadent Loaded Butterscotch Cheesecake featuring a graham cracker crust, creamy butterscotch-flavored filling, and a rich butterscotch ganache topping.
Ingredients
- Crust
- 1 3/4 cups (235g) graham cracker crumbs
- 1/4 cup (56g) packed light brown sugar
- 7 tbsp (98g) unsalted butter, melted
- Filling
- 24 oz (678g) cream cheese, room temperature
- 3/4 cup (168g) packed light brown sugar
- 3 tbsp (24g) all-purpose flour
- 1 tsp vanilla extract
- 1/2 cup (112g) sour cream
- 1/2 cup (120ml) heavy whipping cream
- 1 cup (169g) butterscotch chips
- 3.4 oz package dry butterscotch pudding mix
- 4 large eggs, room temperature
- Topping
- 1 cup (169g) butterscotch chips
- 4 1/2 tbsp (68ml) heavy whipping cream
- Additional butterscotch chips, for decorating
Instructions
- Preheat oven to 325°F (163°C). Line the bottom of a 9-inch (23cm) springform pan with parchment paper and lightly grease the sides.
- In a medium bowl, combine graham cracker crumbs, brown sugar, and melted butter. Mix well until the mixture resembles wet sand.
- Press the crust mixture firmly into the bottom and halfway up the sides of the springform pan.
- Bake for 10 minutes, then remove and set aside to cool. Reduce oven temperature to 300°F (148°C).
- In a large bowl, beat the cream cheese until smooth and creamy. Scrape down the sides of the bowl.
- Add brown sugar and flour. Mix until well combined and smooth.
- Add vanilla extract and mix.
- Add sour cream and heavy whipping cream. Mix until fully incorporated.
- Melt the butterscotch chips in the microwave in 20-second intervals, stirring until smooth.
- Add the melted butterscotch chips to the batter and mix until evenly combined.
- Add the dry butterscotch pudding mix and mix until well combined.
- Add eggs one at a time, mixing slowly after each addition. Scrape down the sides of the bowl as needed.
- Wrap the outside of the springform pan with aluminum foil to prevent water from leaking into the pan. Place the pan inside a larger roasting pan.
- Pour the cheesecake batter into the prepared crust. Smooth the top.
- Pour warm water into the roasting pan to come about halfway up the side of the springform pan to create a water bath.
- Bake for 1 hour and 35 minutes, or until the edges are set and the center is slightly jiggly.
- Turn off the oven and leave the cheesecake inside with the door closed for 30 minutes.
- Crack the oven door and leave the cheesecake inside for another 30 minutes.
- Remove cheesecake from the oven and water bath, and let it cool at room temperature for 1 hour.
- Refrigerate the cheesecake for at least 5-6 hours, or preferably overnight, until fully set.
- Add butterscotch chips and heavy whipping cream to a heat-proof bowl.
- Microwave in 15-20 second intervals, stirring until smooth and glossy.
- Pour the ganache over the top of the chilled cheesecake and spread evenly.
- Sprinkle additional butterscotch chips over the ganache for decoration.
- Refrigerate for at least 30 minutes before serving to set the topping.
Notes
- Ensure all ingredients are at room temperature for better mixing.
- For a richer flavor, use dark butterscotch chips.
- Let the cheesecake cool completely before refrigerating for best results.
- Prep Time: 30 minutes
- Cook Time: 1 hour and 35 minutes
- Category: Dessert
- Method: Baking
- Cuisine: American
Nutrition
- Serving Size: 1 slice
- Calories: 450
- Sugar: 35g
- Sodium: 250mg
- Fat: 28g
- Saturated Fat: 17g
- Unsaturated Fat: 8g
- Trans Fat: 0g
- Carbohydrates: 45g
- Fiber: 1g
- Protein: 6g
- Cholesterol: 110mg