
Introduction to Homemade Fried Ice Cream
Are you ready to indulge in a thrilling dessert experience? Let me introduce you to my version of Homemade Fried Ice Cream! This delightful treat combines the rich creaminess of vanilla ice cream with a crunchy, golden corn flake coating. It’s perfect for busy days when you need a quick solution or a sweet treat to impress your loved ones. I can still remember the joy on my family’s faces when I brought this to the table. Simple, satisfying, and downright delicious, this recipe is your ticket to dessert heaven!
Why You’ll Love This Homemade Fried Ice Cream
Let’s be honest—making dessert should be fun, not stressful. That’s why you’ll adore this Homemade Fried Ice Cream recipe. It’s quick, easy, and requires minimal effort yet delivers maximum flavor. The flavors blend beautifully, with the creamy ice cream and crunchy corn flakes dancing on your taste buds. Plus, it’s a fun dessert to make together with family, creating heartwarming moments in the kitchen!
Ingredients for Homemade Fried Ice Cream
Gathering the right ingredients is key to a fabulous Homemade Fried Ice Cream. Here’s what you need:
- Vanilla Ice Cream: The star of this dish! Choose a rich, creamy variety that melts beautifully.
- Corn Flakes Cereal: These give the dish its signature crunch—feel free to use a generic brand to save on costs!
- Unsalted Butter: Adds a luscious flavor to the corn flake coating. If you prefer margarine or a dairy-free alternative, those work too!
- Granulated Sugar: Just a touch to enhance the sweetness. You can swap this for coconut sugar for a more natural option.
- Ground Cinnamon: A hint of spice that elevates the flavor profile. You can experiment with nutmeg for a different twist.
- Salt: A tiny pinch brings out the flavors—don’t skip this step!
- Vanilla Extract: For an extra layer of flavor. If you’re feeling adventurous, almond extract can also be delicious!
- Toppings: Get creative with chocolate sauce, caramel drizzle, whipped cream, and maraschino cherries for a festive finish.
For exact quantities, check the bottom of the article for a convenient printable version. Now, let’s get cooking!

How to Make Homemade Fried Ice Cream
Making Homemade Fried Ice Cream is a delightful journey that’s easier than you might think. I promise! Just follow these straightforward steps, and you’ll have a sweet masterpiece in no time!
Step 1: Prepare Ice Cream Balls
Start by taking your vanilla ice cream out of the freezer. You’ll want it to be just soft enough to scoop. Grab a large scoop and create six mounds, each about 2 ½ inches wide. Place these scoops on large pieces of plastic wrap.
Wrap each mound tightly, shaping them into balls with flat bottoms. This trick prevents them from rolling away later. If your ice cream starts to melt, don’t worry! Just pop the wrapped mounds back in the freezer while you work.
Step 2: Freeze the Mounds
Once you’ve wrapped all the ice cream mounds, place them on a baking sheet. Slide that into the freezer for at least an hour. This step is crucial because you want the ice cream to be as solid as a rock before working with it!
Step 3: Crush the Corn Flakes
While you’re waiting, it’s time to prepare the crunchy coating. Use a food processor or grab a ziploc bag and a rolling pin to crush the corn flakes into small pieces. You aim for a coarse texture—think breadcrumbs, not dust. Set this aside for later.
Step 4: Cook the Corn Flake Mixture
Next, grab a medium skillet and set it over medium heat. Melt the unsalted butter in the skillet. Once it’s bubbling, add the crushed corn flakes, granulated sugar, ground cinnamon, salt, and vanilla extract. Stir continuously and let it cook for about two minutes. You’ll know it’s done when the mixture deepens in color and begins to smell toasty.
Step 5: Roll the Ice Cream Balls
After your corn flake mixture has cooled, it’s time for the fun part! Carefully unwrap the ice cream balls and roll them in the crispy corn flake mixture. Press the coating into the ice cream so it sticks well. You can do this step with warm or cooled corn flakes—both work great!
Step 6: Serve with Toppings
Finally, serve your Homemade Fried Ice Cream immediately for the best experience. Top it off with drizzles of chocolate and caramel sauce, a dollop of whipped cream, and a cherry on top. Presentation is key, so make it as fabulous as you feel!
Tips for Success
- Make sure your ice cream is very firm before rolling it in corn flakes for best coating.
- Prep ice cream balls ahead of time and keep them frozen until you’re ready to serve.
- For extra crunch, toast your cornflakes a little longer in the skillet.
- Don’t hesitate to experiment with toppings—everyone loves to customize their dessert!
- Have fun! Making dessert should be a joyful experience.
Equipment Needed
- Large Scoop: For shaping ice cream balls. A measuring cup works too.
- Plastic Wrap: Keeps the ice cream tight and contained. Parchment paper can be a substitute!
- Baking Sheet: To freeze the ice cream mounds. Any flat dish will do.
- Skillet: Use a non-stick pan for easy cooking of corn flake mixture.
- Food Processor or Rolling Pin: To crush the corn flakes. A sturdy bowl and cup can work in a pinch!
Variations
- Chocolate Ice Cream: Switch out vanilla for chocolate ice cream for a rich, decadent twist.
- Nutty Crunch: Incorporate chopped nuts into the corn flake mixture for added texture and flavor.
- Gluten-Free: Substitute corn flakes with gluten-free cereal to accommodate dietary needs.
- Fruity Delight: Layer in slices of fresh fruit like strawberries or bananas between the ice cream and coating.
- Non-Dairy Option: Use coconut or almond milk ice cream for a delicious dairy-free treat.
Serving Suggestions
- Drinks: Pair your dessert with a chilled glass of vanilla iced coffee or a refreshing fruit punch.
- Sides: Serve with a light fruit salad for a fresh contrast to the rich ice cream.
- Presentation: Use vibrant plates and garnish with mint leaves for a pop of color!
FAQs about Homemade Fried Ice Cream
Can I make homemade fried ice cream ahead of time?
Absolutely! You can prepare the ice cream balls in advance and keep them in the freezer. This makes it convenient for those busy evenings when you crave a sweet surprise.
What are some delicious toppings for fried ice cream?
Oh, the possibilities are endless! Try drizzling chocolate sauce, caramel sauce, or even a sprinkle of nuts. Whipped cream and maraschino cherries add that perfect finishing touch!
Is this recipe suitable for kids to help with?
Yes, this can be a fun family activity! Kids can help scoop and roll the ice cream, and they’ll love customizing their own dessert with toppings.
Can I use other types of cereal?
Of course! Feel free to experiment with different cereals. Rice Krispies or Frosted Flakes could also provide a unique crunch to your homemade fried ice cream.
How do I properly store leftover fried ice cream?
If you have any leftovers, simply place the fried ice cream back in the freezer. Just be sure to wrap them tightly so they don’t get freezer burn.
Final Thoughts
Making Homemade Fried Ice Cream is more than just a dessert; it’s about creating moments that warm the heart. I still recall the laughter and excitement it brings to our family gatherings. Every bite delivers a delightful crunch followed by that creamy ice cream melting in your mouth—pure bliss! This recipe is a reminder that even the simplest creations can spark joy and bring loved ones together. So gather your family, embrace the mess, and enjoy a treat that’s as fun to make as it is to eat. You’ll be creating sweet memories in no time!
Print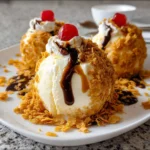
Homemade Fried Ice Cream: Indulge in This Easy Recipe!
- Total Time: 1 hour 40 minutes (including freezing time)
- Yield: 6 servings 1x
- Diet: Vegetarian
Description
Delicious homemade fried ice cream featuring crunchy corn flakes and creamy vanilla ice cream.
Ingredients
- Half gallon vanilla ice cream
- 5 cups corn flakes cereal
- ½ cup (113g) unsalted butter
- 2 Tbsp granulated sugar
- 2 tsp ground cinnamon
- ⅛ tsp salt
- ¼ tsp vanilla extract
- Chocolate sauce (for topping)
- Caramel sauce (for topping)
- Whipped cream (for topping)
- Maraschino cherries (for topping)
Instructions
- Prepare 6 large pieces of plastic wrap.
- Scoop out the ice cream onto each sheet, creating 6 mounds that are 2 ½ inches in size (roughly 1 ⅓ cups per mound). Wrap each mound with plastic wrap, shaping them into balls with flat bottoms by gently pressing. If the ice cream softens too quickly, place the wrapped mounds in the freezer as you go.
- Place the wrapped ice cream on a baking sheet and freeze until solid, around 1 hour.
- Use a food processor or a ziploc bag and rolling pin to crush the corn flake cereal into small pieces. Set aside.
- In a medium skillet set over medium heat, melt the butter. Once melted, stir in the corn flakes, granulated sugar, cinnamon, salt, and vanilla extract. Stir continuously and cook the mixture for 2 minutes until it deepens in color and smells toasty.
- Remove the corn flake mixture from the heat and transfer it to a shallow bowl. You can either roll the balls in the warm mixture or allow it to cool completely.
- Once cooled, roll the ice cream balls into the cornflake mixture, pressing the mixture into the ice cream with your hands.
- Serve immediately with your favorite toppings or keep in the freezer until you’re ready to serve.
Notes
- Ensure the ice cream is firm before rolling it in the cornflake mixture.
- You can prepare the ice cream balls ahead of time and keep them in the freezer until you are ready to fry or serve.
- Experiment with different toppings to customize your fried ice cream.
- Prep Time: 30 minutes
- Cook Time: 10 minutes
- Category: Dessert
- Method: Frying
- Cuisine: American
Nutrition
- Serving Size: 1 serving
- Calories: 320
- Sugar: 20g
- Sodium: 270mg
- Fat: 18g
- Saturated Fat: 10g
- Unsaturated Fat: 4g
- Trans Fat: 0g
- Carbohydrates: 36g
- Fiber: 1g
- Protein: 4g
- Cholesterol: 40mg