
Introduction to No Bake Turtle Mini Cheesecake
Hey there, dessert lovers! If you’re like me, life gets pretty hectic. Between work, family, and those never-ending to-do lists, finding time to whip up a fancy dessert can feel impossible. That’s where my No Bake Turtle Mini Cheesecake comes in as your new best friend! This delightful treat combines creamy cheesecake, a crunchy crust, and luscious toppings—all without turning on the oven. It’s a perfect quick solution for busy days or an impressively sweet ending for your loved ones. Trust me, this is one recipe you’ll want in your back pocket!
Why You’ll Love This No Bake Turtle Mini Cheesecake
Let me tell you, this No Bake Turtle Mini Cheesecake is an absolute game-changer for dessert lovers! It’s incredibly easy to put together, making it perfect for those busy weeknights. Plus, there’s no oven involved, which means less mess! The taste? Pure bliss! The combination of creamy filling, rich caramel, and crunchy pecans will have everyone raving. You’ll love how quickly you can impress friends and family—all with a dessert that feels indulgent but is super simple!
Ingredients for No Bake Turtle Mini Cheesecake
Ready to gather your ingredients? This No Bake Turtle Mini Cheesecake is made with a handful of simple items you probably have in your kitchen. Let’s break down what you’ll need:
- Graham Cracker Crumbs: These provide a sweet and crunchy base. You can easily make your own by crushing regular graham crackers if you prefer.
- Unsalted Butter: Melted butter helps bind the crust together. Unsalted is best to control the saltiness of the dessert.
- Sugar: Just a touch of sugar in the crust balances the flavors perfectly. You can swap it out with coconut sugar for a healthier spin.
- Cream Cheese: Softened cream cheese is the star of the cheesecake filling. Make sure it’s at room temperature to avoid lumps!
- Powdered Sugar: This adds sweetness and helps achieve a smooth texture in the filling. You can use regular sugar if blended well enough.
- Vanilla Extract: A splash of vanilla enhances the cheesecake flavor. Pure vanilla extract is always my go-to for the best taste.
- Whipped Topping: This lightens up the filling. If you prefer, homemade whipped cream works wonders and adds a personal touch.
- Caramel Sauce: Drizzle this over the top for that iconic turtle flavor. You can use store-bought or make your own for more flair.
- Chocolate Sauce: Similar to caramel, this adds a rich sweetness. Dark chocolate sauce can be a delightful alternative.
- Chopped Pecans: These provide the perfect crunch and nutty flavor. Feel free to substitute with walnuts or even skip them if you’re not a fan.
For exact measurements, you’ll find everything you need at the bottom of the article, ready for printing. It’s time to get started on this delicious adventure!

How to Make No Bake Turtle Mini Cheesecake
Now that you’ve gathered all your ingredients, it’s time to dive into the fun part—making your No Bake Turtle Mini Cheesecake! Follow these easy steps, and you’ll have mini cheesecakes ready to chill in no time. Let’s get cooking!
Prepare the Crust
Start by mixing one cup of graham cracker crumbs with the melted butter and two tablespoons of sugar. I like to do this in a large bowl, which makes it easy to combine everything. The crumbs should soak up the butter, turning into a sandy mixture.
Now, grab your mini cheesecake cups or a muffin tin. Use your fingers or the back of a spoon to press this crust mixture firmly into the bottom of each cup. Make sure it’s packed tightly, providing a sturdy base for your delicious filling. This step is crucial because a well-prepared crust will hold everything together beautifully!
Make the Cheesecake Filling
In a separate bowl, beat 8 ounces of softened cream cheese until it’s nice and smooth. I usually use a hand mixer for this, but a whisk will work if you’re feeling strong!
Next, slowly add in half a cup of powdered sugar and one teaspoon of vanilla extract. Keep mixing until those ingredients are fully incorporated.
The best part? Fold in one cup of whipped topping carefully. You want to keep the mixture light and fluffy—overmixing can make it dense, and we want our cheesecake to feel as airy as a cloud!
Assemble the Cheesecakes
Let’s bring our mini cheesecakes to life! Spoon the luscious cheesecake filling into each cup over the chilled crust. Fill them close to the top for an enticing look. It’s worth it to take your time here and ensure every cup is evenly filled.
After you’ve filled all your cups, it’s time for the most important step: refrigerate for at least two hours. I know, waiting can be tough, but this chilling time helps the filling set properly, so don’t skip it!
Add Toppings
Once your cheesecakes have set, it’s time for the grand finale! Drizzle half a cup of caramel sauce and half a cup of chocolate sauce over the top of each cheesecake. Allow those sweet, gooey flavors to cascade down the sides—they’re as delightful to look at as they are to eat.
Finally, sprinkle chopped pecans on top for that perfect crunch. You can also get creative here and add a little extra drizzle of sauce if you’re feeling fancy! Now you’re ready to serve these mini works of art to your family or guests—but I won’t blame you if you want to keep them all to yourself!
Tips for Success
- Make sure your cream cheese is softened fully for a lump-free filling.
- Press the crust firmly to create a sturdy base; a spoon or your fingers work well.
- Don’t rush the chilling process—this is key for proper setting.
- Feel free to experiment with toppings; try adding some sea salt for a salted caramel twist!
- Use an offset spatula to smooth the cheesecake filling for a polished look.
Equipment Needed for No Bake Turtle Mini Cheesecake
- Mixing Bowls: You’ll need at least two. A large one for the crust and filling, and a smaller one for mixing toppings.
- Hand Mixer or Whisk: A hand mixer makes things easy, but a whisk gives you a workout!
- Mini Cheesecake Cups or Muffin Tin: Perfect for individual servings; you can use silicone molds for easy removal.
- Spoon or Offset Spatula: Great for filling the cups and smoothing out the cheesecake.
Variations of No Bake Turtle Mini Cheesecake
- Chocolate Cookie Crust: Swap graham cracker crumbs for chocolate cookie crumbs for a rich, chocolaty base.
- Vegan Option: Use dairy-free cream cheese and whipped topping along with a plant-based buttery substitute for the crust.
- Flavored Cream Cheese: Try using flavored cream cheese, like caramel or vanilla, for an extra layer of taste.
- Fruit Toppings: Top with fresh fruits like strawberries or bananas along with the caramel and chocolate for a fruity twist.
- No Added Sugar: Use sugar-free cream cheese and toppings if you’re looking to cut down on sugar without sacrificing flavor.
Serving Suggestions for No Bake Turtle Mini Cheesecake
- Fresh Berries: Serve with a side of strawberries or raspberries for a refreshing touch.
- Ice Cream: A scoop of vanilla ice cream on the side makes for a delightful contrast.
- Elegant Plating: Drizzle extra caramel and chocolate on the plate for a beautiful presentation.
- Drink Pairing: A nice cup of coffee or a dessert wine complements the flavors perfectly.
FAQs about No Bake Turtle Mini Cheesecake
Got questions? No problem! Here are some common ones about my No Bake Turtle Mini Cheesecake that might just help you with your baking adventure.
Can I make these mini cheesecakes ahead of time?
Absolutely! One of the best things about this no bake dessert is that you can prepare it a day in advance. Just keep them covered in the refrigerator until you’re ready to serve!
Can I substitute the cream cheese?
Yes, you can! If you want a lighter option, consider using mascarpone cheese or a dairy-free cream cheese for a delicious cheesecake recipe that accommodates dietary preferences.
What’s the best way to store leftovers?
To keep your mini cheesecakes fresh, store them in an airtight container in the fridge. They should stay good for up to four days—if they last that long!
Can I freeze the mini cheesecakes?
Definitely! These mini delights can be frozen for up to a month. Just make sure to wrap them well to avoid freezer burn. Thaw them in the fridge before serving for the best texture.
What can I use instead of pecans?
If you’re not a fan of pecans, you can easily swap them for crushed walnuts, almonds, or even skip the nuts altogether. The cheesecake will still be amazing!
Final Thoughts on No Bake Turtle Mini Cheesecake
There’s something truly magical about making a No Bake Turtle Mini Cheesecake. It’s more than just a dessert; it’s a way to bring smiles to faces and sweet endings to busy days. Each mini cheesecake feels like a little hug for your taste buds, combining creamy, crunchy, and rich flavors in every bite.
Whether you’re celebrating a special occasion or just treating yourself, this recipe delivers joy with minimal effort. So, grab your ingredients, get creative, and relish the bliss of no-bake goodness that will surely become a family favorite!
Print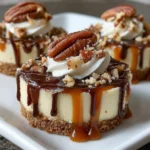
No Bake Turtle Mini Cheesecake Recipe You Must Try!
- Total Time: 2 hours 20 minutes
- Yield: 12 mini cheesecakes 1x
- Diet: Vegetarian
Description
This No Bake Turtle Mini Cheesecake is a deliciously easy dessert that features a sweet and crunchy graham cracker crust, a creamy cheesecake filling, and rich caramel and chocolate toppings.
Ingredients
- 1 cup graham cracker crumbs
- 1/4 cup unsalted butter (melted)
- 2 tbsp sugar
- 8 oz cream cheese (softened)
- 1/2 cup powdered sugar
- 1 tsp vanilla extract
- 1 cup whipped topping
- 1/2 cup caramel sauce
- 1/2 cup chocolate sauce
- Chopped pecans (for garnish)
Instructions
- Prepare the Crust: Mix graham cracker crumbs, melted butter, and sugar; press into mini cheesecake cups or a muffin tin.
- Make the Cheesecake Filling: Beat softened cream cheese, then add powdered sugar and vanilla. Fold in whipped topping.
- Assemble the Cheesecakes: Fill cups with cheesecake mixture and refrigerate for at least 2 hours.
- Add Toppings: Drizzle with caramel and chocolate sauce, and sprinkle with chopped pecans before serving.
Notes
- Ensure cream cheese is softened to avoid lumps.
- Avoid overmixing the filling to keep it light.
- Don’t skip the chilling step for proper setting.
- Prep Time: 20 minutes
- Cook Time: 0 minutes
- Category: Dessert
- Method: No Bake
- Cuisine: American
Nutrition
- Serving Size: 1 mini cheesecake
- Calories: 250
- Sugar: 22g
- Sodium: 150mg
- Fat: 15g
- Saturated Fat: 9g
- Unsaturated Fat: 3g
- Trans Fat: 0g
- Carbohydrates: 28g
- Fiber: 1g
- Protein: 3g
- Cholesterol: 30mg