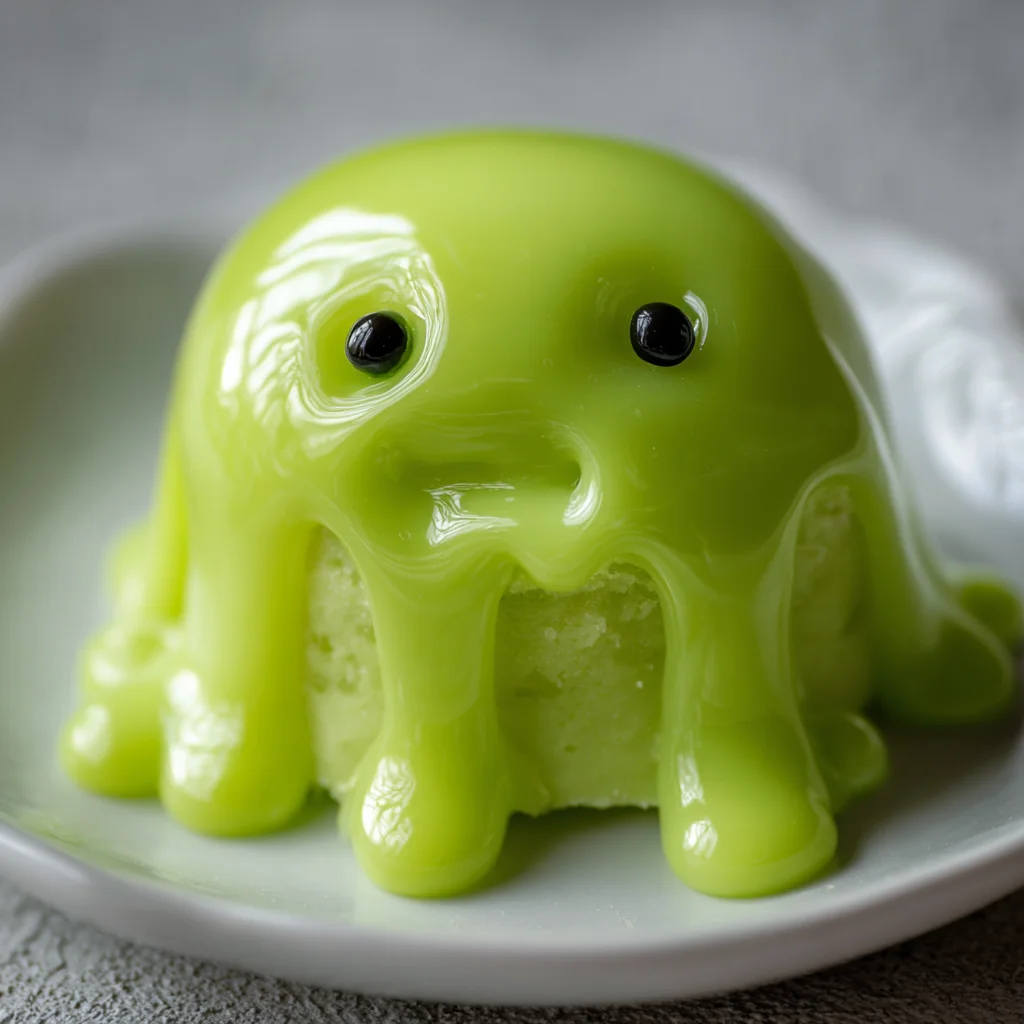
Introduction to Slime-Filled Halloween Cookies
As Halloween approaches, I find myself swept up in the excitement of crafting spooky treats for my family and friends. That’s where these Slime-Filled Halloween Cookies come into play—a delightful blend of fun and flavor! Not only are they visually stunning with their vibrant green filling, but they also taste divine, thanks to the creamy cheesecake inside rich chocolate cookie dough. They’re perfect for busy days when you want to whip up something impressive without spending hours in the kitchen. Trust me, only the sound of delighted laughter will fill your home once you take out these little monsters!
Why You’ll Love This Slime-Filled Halloween Cookies
These Slime-Filled Halloween Cookies are not only easy to make but they also deliver a flavor explosion that the whole family will adore. With just a bit of prep and a fun assembly process, you’ll have a spooky treat that’s perfect for parties or a simple Halloween night at home. Plus, who can resist that ooey-gooey cheesecake filling? It’s a treat that’s sure to impress while being surprisingly quick and stress-free to prepare!
Ingredients for Slime-Filled Halloween Cookies
Gathering your ingredients is the first exciting step on our spooky culinary adventure! For these Slime-Filled Halloween Cookies, you’ll need a delightful mix of sweet and creamy elements to make magic happen in your kitchen!
- Cheesecake Filling:
- Cream Cheese: Softened for a smooth, rich filling.
- Confectioners Sugar: Sweetens the filling to perfection, adding a melt-in-your-mouth quality.
- All-Purpose Flour: Helps stabilize the cheesecake filling, keeping it from spreading during baking.
- Vanilla Extract: Enhances the flavor, making the filling irresistibly good.
- Neon Green Food Coloring: Adds a spooky touch for that slime effect.
- Cookie Dough:
- Salted Butter: Gives richness and helps create a tender cookie.
- Light Brown Sugar: Adds moisture and depth with its caramel notes.
- Granulated Sugar: Balances the sweetness in the dough.
- Large Egg: Acts as a binder, keeping our cookie dough cohesive.
- Milk: Helps soften the dough and creates a nice texture.
- Baking Soda: Provides the lift, ensuring a chewy cookie.
- Vanilla Extract: Just like in the filling, it enhances flavor.
- Dark Chocolate Cocoa Powder or Black Gel Food Coloring: Creates that rich black hue resembling Halloween night.
- All-Purpose Flour: The foundation of our cookie dough, giving it structure.
- Halloween Sprinkles: Optional, but who can resist a festive touch?
For exact measurements, check the bottom of the article where you also find a printable version of this delightful recipe!

How to Make Slime-Filled Halloween Cookies
Prepare the Cheesecake Filling
Start by mixing the cheesecake filling. In a medium bowl, combine softened cream cheese, confectioners sugar, flour, vanilla extract, and a few drops of neon green food coloring. Use an electric mixer to blend it all together until smooth and creamy, like a sweet cloud of delight. I always add more food coloring until it reaches that vibrant slime hue that screams Halloween! Remember, the greener, the better! Every bit of effort in this stage is pivotal. You’ll want a mixture that’s creamy yet thick enough to hold its shape when frozen, so give it a good whip and enjoy the anticipation of what’s to come!
Freeze the Cheesecake Filling
This step is crucial! Once your cheesecake filling is bright and luscious, scoop out 1 ½ teaspoons of that green goodness onto a lined baking sheet. Place them in the freezer for at least 2 hours. Freezing is essential, ensuring that the filling stays intact during baking. No one wants those delicious gooey centers leaking out! Plus, having them perfectly frozen makes for a delightful surprise with each bite. Trust me, the kids will get a kick out of the surprise inside!
Make the Cookie Dough
Now it’s time for the cookie dough! In a large mixing bowl, beat together your room-temperature butter, light brown sugar, and granulated sugar. Mix until it’s creamy and fluffy—this is where the magic begins! Next, add in the egg, milk, and vanilla extract, blending until everything is well combined. For that Halloween flair, slowly mix in dark chocolate cocoa powder or black gel food coloring, adjusting until you reach a deep black hue. Then, in a separate bowl, whisk together your baking soda and flour. It’s vital to avoid overmixing once you bring the dry ingredients into the wet; a gentle fold is all you need to create a lovely, soft dough!
Chill the Cookie Dough
After mixing, cover the cookie dough and chill it for at least 2 hours. Chilling is a baker’s secret weapon! This step firms up the dough, helping maintain those perfectly defined cookie shapes during baking. Trust me, skipping this could lead to melted puddles instead of cookies! So, while you’re anticipating these festive treats, be patient and let those doughy clouds cool down.
Assemble the Cookies
Once both your filling and cookie dough are ready, it’s time to assemble the cookies. Start by preheating your oven to 350°F. Roll 1 tablespoon of the cookie dough into a ball, then flatten it slightly. This is the base for your cookie. Next, place a frozen cheesecake ball right in the center. Now, take another tablespoon of the dough, flatten it again, and place it on top of the cheesecake filling. Pinch around the edges to seal them tightly, ensuring no creamy goodness escapes. For a festive vibe, add sprinkles on top, pressing them in lightly. Don’t be shy—sprinkles make everything better!
Bake the Cookies
Finally, when they’re assembled and ready, pop them into your preheated oven. Bake for 12-15 minutes, keeping an eye on them until they’re just firm. Once the edges are set, remove them and let them cool on the baking sheet for about 10 minutes. This cooling helps the gooey filling find its cozy place inside the cookie. When transferring to a cooling rack, you’ll want to savor those warm, soft delights as they finish off their final resting stage. Enjoy the incredible aroma filling your home—you know something delicious is in the works!
Tips for Success
- Ensure your cream cheese is softened for a smooth filling.
- Don’t skip the chilling step for both the filling and dough; it helps maintain shape.
- Use quality vanilla extract for an extra flavor boost.
- Experiment with different food colorings for unique spooky shades.
- Try adding nuts or chocolate chips for an extra twist!
Equipment Needed
- Mixing Bowls: Any size will do; just make sure they’re big enough to handle your ingredients.
- Electric Mixer: A hand mixer is perfect, but a stand mixer works well too.
- Parchment Paper: If you’re out, a silicone baking mat is an excellent alternative.
- Scooper: A tablespoon or cookie scoop helps portion filling and dough.
- Baking Sheets: Regular baking sheets or insulated ones will bring out the best in your cookies.
Variations of Slime-Filled Halloween Cookies
- Gluten-Free Version: Substitute all-purpose flour with a gluten-free blend to cater to gluten-sensitive family members.
- Nutty Twist: Add a handful of chopped nuts, like walnuts or pecans, to the cookie dough for a delightful crunch and flavor contrast.
- Chocolate Lovers: Mix in chocolate chips or chunks into the cookie dough for a richer chocolate experience!
- Alternate Fillings: Experiment with other cream cheese flavors, like pumpkin spice or raspberry, for a seasonal spin.
- Vegan Option: Use vegan cream cheese, substitute the butter with coconut oil, and swap the egg with a chia egg for a plant-based version!
Serving Suggestions for Slime-Filled Halloween Cookies
- Pair with a spooky-themed milkshake or hot chocolate for a delightful treat!
- Use Halloween-themed plates and napkins to create an exciting presentation.
- Display cookies on a cake stand adorned with fake spider webs and plastic spiders for added flair.
- Serve alongside a platter of fresh fruit to balance out the sweetness.
FAQs about Slime-Filled Halloween Cookies
Can I make these Slime-Filled Halloween Cookies ahead of time?
Absolutely! You can prepare the cheesecake filling and cookie dough in advance. Just remember to chill the dough and freeze the filling until you’re ready to assemble and bake. This makes it convenient for busy schedules!
What if I can’t find neon green food coloring?
No worries! You can use any green food coloring you have on hand. Just remember to mix until you reach your desired slime-like hue. Alternatively, you can experiment with other colors for a unique twist.
How should I store the cookies after baking?
Once they’re fully cooled, store your Slime-Filled Halloween Cookies in an airtight container at room temperature. They’ll stay fresh for several days—if they last that long!
Can I freeze these cookies after baking?
Yes! To freeze, let the cookies cool completely, then place them in a single layer in a freezer-safe bag. They keep well for up to a month. Just thaw at room temperature when you’re ready to enjoy them again!
How do I know when the cookies are done baking?
The cookies should look slightly set but soft in the center. When they are lightly firm at the edges but still a bit gooey inside, you know they’re ready. They’ll continue to firm up as they cool.
Final Thoughts on Slime-Filled Halloween Cookies
Whipping up these Slime-Filled Halloween Cookies is more than just baking; it’s a joyful experience that fits perfectly into any fall celebration! The laughter shared over the vibrant, creamy filling peeking from the rich chocolate cookie brings a sense of togetherness. I love watching my family’s eyes light up when they take their first bite and discover the delightful surprise inside. Each cookie is a blend of creativity and fun, making them a perfect addition to your Halloween traditions. So go ahead, dive into this spooky culinary adventure and create sweet memories with loved ones!
Print
Slime-Filled Halloween Cookies: A Spooky Delight to Try!
- Total Time: 2 hours 55 minutes
- Yield: 24 cookies 1x
- Diet: Vegetarian
Description
Slime-Filled Halloween Cookies are a festive treat that combines creamy cheesecake filling with rich chocolate cookie dough, perfect for celebrating Halloween.
Ingredients
- Cheesecake Filling:
- 4 ounces cream cheese, softened
- 2 cups confectioners sugar
- 1 ½ Tablespoons all-purpose flour
- 1 teaspoon vanilla extract
- neon green food coloring
- Cookie Dough:
- ½ cup salted butter, room temperature
- ½ cup light brown sugar, packed
- ½ cup granulated sugar
- 1 large egg, room temperature
- 1 Tablespoon milk
- 1 teaspoon baking soda
- 2 teaspoons vanilla extract
- ¼ cup dark chocolate cocoa powder or black
- black gel food coloring
- 1 ⅔ cups all-purpose flour
- Halloween sprinkles
Instructions
- In a medium mixing bowl, use an electric mixer to combine the cheesecake filling ingredients, adding enough food coloring to reach your desired shade of green.
- Line a baking sheet with parchment paper. Scoop out 1 ½ teaspoons of the filling and place it on the lined baking sheet. Repeat until all the filling has been scooped. Freeze for at least 2 hours.
- In a large bowl, use an electric mixer to beat together the butter, brown sugar, and granulated sugar until creamy and well-combined.
- Mix in the egg, milk, vanilla, and black food coloring. Start with about ½ a teaspoon of the food coloring and add more until the dough reaches a deep black color.
- In a medium bowl, whisk to combine the baking soda, cocoa powder, and flour. Stir the dry ingredients into the wet ingredients until just combined. Do not overmix.
- Cover and chill the dough for at least 2 hours.
- Line 2 cookie sheets with parchment paper.
- Roll 1 Tablespoon of dough into a ball, flatten slightly, and place on a prepared baking sheet. Repeat until you have used half of the black dough, placing each dough ball 2 inches apart.
- Place a cream cheese ball in the center of each.
- Roll and slightly flatten another 1 Tablespoon of cookie dough and place it on top of each cookie. Gently press the two layers of cookie dough together to seal the edges.
- Add sprinkles, gently pressing them into the top of the cookies.
- Chill for 30 minutes before baking.
- When ready to bake, preheat the oven to 350°F.
- Bake for 12-15 minutes. Allow the cookies to cool on the baking sheet for about 10 minutes before transferring to a cooling rack to cool fully.
Notes
- Allow the cream cheese filling to freeze completely to ensure it doesn’t leak out during baking.
- Ensure the cookie dough is chilled before baking to maintain shape.
- Experiment with other food colorings to create different spooky shades.
- Prep Time: 40 minutes
- Cook Time: 15 minutes
- Category: Dessert
- Method: Baking
- Cuisine: American
Nutrition
- Serving Size: 1 cookie
- Calories: 150
- Sugar: 10g
- Sodium: 110mg
- Fat: 7g
- Saturated Fat: 4g
- Unsaturated Fat: 2g
- Trans Fat: 0g
- Carbohydrates: 20g
- Fiber: 1g
- Protein: 2g
- Cholesterol: 20mg