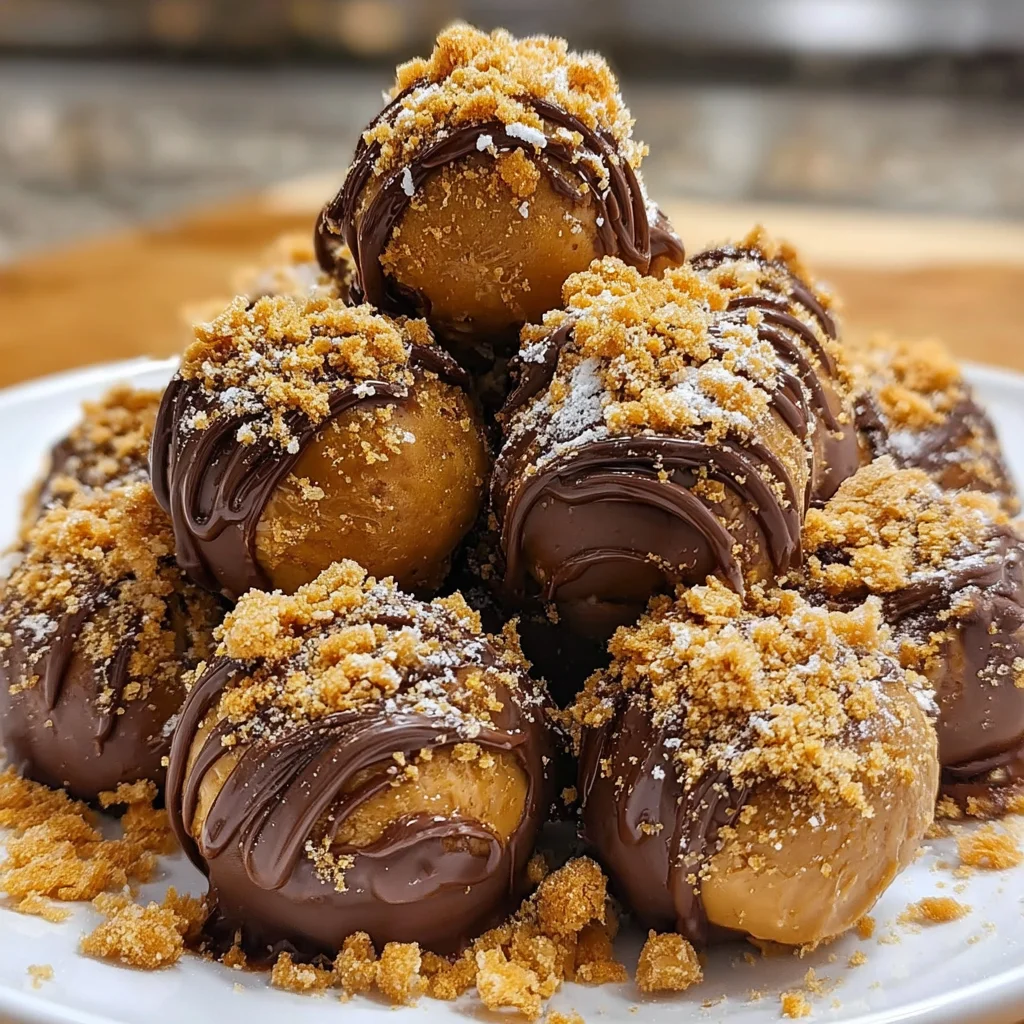
Introduction to Butterfinger Balls
Let’s be honest: life can get hectic, especially for busy moms and professionals. That’s where these irresistible Butterfinger Balls come into play. They’re a delightful no-bake treat that can brighten even the most chaotic days. Imagine a sweet bite packed with creamy peanut butter and rich chocolate, all while taking just 15 minutes of your time!
These treats are not just quick but also a hit with family and friends. Whether you’re hosting a gathering, attending a potluck, or simply satisfying your sweet cravings, these Butterfinger Balls are the perfect solution. Let’s get rolling on this delicious adventure!
Why You’ll Love This Butterfinger Balls
What’s not to love about these delightful Butterfinger Balls? They’re super easy to make, requiring no baking skills whatsoever. Just mix, roll, and chill—simple, right? Plus, they burst with flavor, satisfying both your sweet tooth and those of your loved ones. In just 15 minutes, you can whip up a treat that feels like a gourmet dessert but is quick enough to fit into your busiest days.

Ingredients for Butterfinger Balls
Creating these mouthwatering Butterfinger Balls is a breeze! Here’s what you’ll need:
- Creamy Peanut Butter: The star of this treat, peanut butter brings a creamy richness that melds beautifully with sweet flavors.
- Salted Butter: A bit of softened butter adds extra creaminess and helps bind everything together.
- Pure Vanilla Extract: This enhances the overall flavor, giving your treats that delightful warm undertone.
- Powdered Sugar: For sweetness, this ingredient helps create that melt-in-your-mouth texture while balancing the richness of peanut butter.
- Graham Cracker Crumbs: They provide structure and a lovely crunch that complements the other flavors perfectly.
- Crushed Butterfinger Candy: The key ingredient adds a sweet, crunchy surprise and that signature Butterfinger taste. Feel free to add a couple of extra pieces for garnish!
- Chocolate Flavored Almond Bark: This creates a luscious coating that wraps the Butterfinger Balls in smooth chocolatey goodness. You can substitute with your favorite chocolate if desired.
For the full ingredient measurements, be sure to check the bottom of the article where you can find them for printing!
How to Make Butterfinger Balls
Making Butterfinger Balls is a delightful process that anyone can master. Follow these simple steps, and you’ll be enjoying your sweet creations in no time!
Step 1: Mix Peanut Butter and Butter
Start by grabbing a medium-sized mixing bowl. Combine your creamy peanut butter, softened butter, and a splash of pure vanilla extract. Using a handheld mixer, beat these ingredients for about a minute until you achieve a smooth and creamy blend. It’s like a sweet embrace for your taste buds!
Step 2: Add Dry Ingredients
Now, lower the mixer speed—don’t want to create a powdery explosion! Gradually add the powdered sugar, graham cracker crumbs, and the star of the show, crushed Butterfinger candy. Mix everything together until fully combined. It should look like a heavenly mixture that promises deliciousness!
Step 3: Prepare Baking Sheet
While the mixture is resting, take a baking sheet and line it with parchment paper. This step ensures your Butterfinger Balls won’t stick and simplifies cleanup. Plus, who doesn’t love saving time in the kitchen?
Step 4: Form the Balls
Now comes the fun part! Using a 1-tablespoon cookie scoop, scoop out the mixture and roll it into little balls. Place them gently on the lined baking sheet. Once all the mixture is rolled out, pop the baking sheet in the refrigerator for at least 30 minutes. This helps the balls firm up, making the next steps easier!
Step 5: Melt Almond Bark
While you’re waiting, melt 8 ounces of chocolate flavored almond bark. Place it in a microwave-safe bowl and heat it in 45-second intervals, stirring occasionally. Keep heating in 30-second bursts until it’s smooth and creamy. This chocolatey goodness is going to wrap your Butterfinger Balls in pure delight!
Step 6: Coat the Balls
Once your chilled balls are ready, it’s time for a dip! Roll each one in the melted almond bark until it’s fully coated. Then, place them back on the lined baking sheet. You might find it hard to resist sneaking a taste at this stage—it’s okay, I won’t tell!
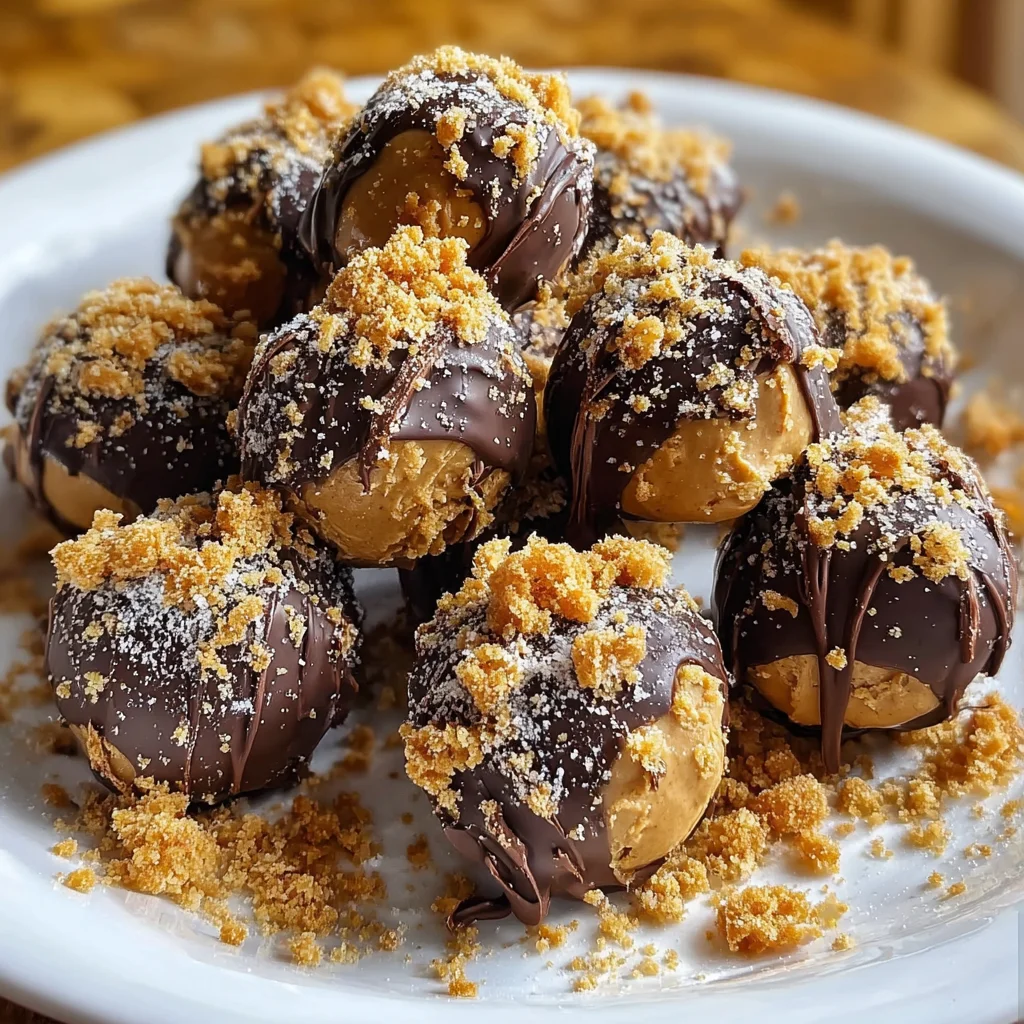
Step 7: Drizzle and Garnish
For the final touch, melt the remaining 2 ounces of almond bark. Drizzle it artfully over the coated balls for that professional look. Don’t forget to sprinkle a bit of extra crushed Butterfinger candy on top. It adds flair and even more flavor! Chill them in the fridge until you’re ready to indulge.
Tips for Success
- Always use creamy peanut butter for the best texture—smoothness is key!
- Make sure your butter is softened to ensure easy mixing. No one needs a workout in the kitchen!
- Chill the balls adequately to help them hold their shape before coating.
- Feel free to get creative! Add a pinch of salt to the chocolate for a sweet-salty flavor explosion.
- Store your Butterfinger Balls in an airtight container to keep them fresh and delicious!
Equipment Needed
- Mixing Bowl: A medium-sized bowl is perfect; use a large one if making a double batch.
- Handheld Mixer: This makes mixing effortless; a wooden spoon works in a pinch!
- Cookie Scoop: Helps in portioning; a tablespoon can serve as a substitute.
- Parchment Paper: Line your baking sheet for easy cleanup; foil can work too!
- Microwave-Safe Bowl: Needed for melting almond bark; any microwave-safe dish will do.
Variations on Butterfinger Balls
- Nut-Free Version: Substitute creamy peanut butter with sunflower seed butter to make these treats nut-free, perfect for schools or gatherings.
- Vegan Option: Use coconut oil instead of butter and dairy-free chocolate to create a delicious vegan treat!
- Crunchy Twist: Add chopped nuts or pretzels to the mixture for an extra crunch and texture.
- Flavor Infusion: Experiment with flavored extracts like almond or coconut for a unique kick with every bite.
- Chip Variation: Mix in mini chocolate chips or toffee bits along with the crushed Butterfinger for added sweetness and surprise!
Serving Suggestions for Butterfinger Balls
- Coffee or Tea: Pair these treats with your favorite brew for a cozy afternoon snack.
- Ice Cream: Serve alongside a scoop of vanilla or chocolate ice cream for a dessert extravaganza!
- Presentation: Arrange them on a fancy platter with a sprinkle of crushed Butterfinger for a pop of color.
- Gift Option: Package in a decorative tin to share with friends and family—sweet gifts always bring smiles!
FAQs about Butterfinger Balls
I’ve gathered some common questions to help you on your journey to blissful Butterfinger Balls creation. Here’s what you might be wondering:
Can I make Butterfinger Balls ahead of time?
Absolutely! You can prepare them up to a week in advance. Just store them in an airtight container in the fridge to keep them fresh and delicious.
What can I use instead of almond bark?
If you prefer, you can use melting chocolate, such as milk chocolate or dark chocolate. Just make sure it’s good quality for the best flavor!
Are Butterfinger Balls gluten-free?
They’re not inherently gluten-free due to the graham cracker crumbs. However, you can easily find gluten-free crumbs or crush gluten-free cookies as a substitute for a tasty treat.
How do I store leftover Butterfinger Balls?
Keep them in an airtight container in the fridge. They’ll stay good for about a week, although I doubt they’ll last that long!
Can I customize the flavors in Butterfinger Balls?
Of course! You can experiment with different add-ins like chopped nuts, coconut, or even flavored extracts to switch it up and keep things exciting!
Final Thoughts
Indulging in these Butterfinger Balls is like being wrapped in a warm, sweet hug. The blend of creamy peanut butter and rich chocolate takes you back to carefree moments, reminding us of the simple joys of life. These no-bake treats are perfect for busy days, family gatherings, or just to satisfy those sweet cravings. Sharing them with loved ones creates sweet memories. Plus, they’re incredibly easy to make! So, don your apron and get ready to impress your family with a delightful dessert that feels both homemade and special. Enjoy every bite and smile!
Print
Butterfinger Balls
- Total Time: 45 minutes (including chilling time)
- Yield: Approximately 24 Butterfinger Balls 1x
- Diet: Vegetarian
Description
Butterfinger Balls are delicious no-bake treats made with creamy peanut butter, rich chocolate, and crushed Butterfinger candy, perfect for satisfying your sweet tooth!
Ingredients
- 1 cup creamy peanut butter
- ¼ cup salted butter, softened
- 1 teaspoon pure vanilla extract
- 1 cup powdered sugar
- ¾ cup graham cracker crumbs
- ½ cup crushed Butterfinger candy (approximately 6 fun-size bars), plus 1-2 extra for garnish
- 10 ounces chocolate flavored almond bark (divide into 8 ounces and 2 ounces)
Instructions
- In a medium-sized mixing bowl, combine the creamy peanut butter, softened butter, and vanilla extract. Use a handheld mixer on medium-high speed to beat together until smooth, about 1 minute.
- Lower the mixer speed to medium-low, then add the powdered sugar, graham cracker crumbs, and crushed Butterfinger candy. Mix for 1½-2 minutes or until the mixture is well combined.
- Line a baking sheet with parchment paper.
- Use a 1-tablespoon cookie scoop to scoop the Butterfinger mixture and roll them into balls. Place on the lined baking sheet and chill in the refrigerator for at least 30 minutes.
- In a microwave-safe bowl, add 8 ounces of almond bark. Heat in the microwave at full power for 45 seconds, stir, and continue heating in 30-second intervals until melted and smooth.
- Remove the balls from the refrigerator and roll each one in the melted almond bark until fully coated, then place back on the lined baking sheet.
- In a separate bowl, melt the remaining 2 ounces of almond bark using the same method as before. Drizzle over the tops of the Butterfinger balls and sprinkle with extra crushed Butterfinger candy. Refrigerate until ready to serve.
Notes
- Make sure to use smooth peanut butter for the best texture.
- You can substitute with other types of chocolate if preferred.
- Store in an airtight container in the refrigerator for up to a week.
- Prep Time: 15 minutes
- Cook Time: 0 minutes
- Category: Dessert
- Method: No-Bake
- Cuisine: American
Nutrition
- Serving Size: 1 ball
- Calories: 150
- Sugar: 10g
- Sodium: 100mg
- Fat: 8g
- Saturated Fat: 4g
- Unsaturated Fat: 3g
- Trans Fat: 0g
- Carbohydrates: 16g
- Fiber: 1g
- Protein: 3g
- Cholesterol: 15mg