Introduction to Cannoli Cheesecake Bars
Welcome back, fellow food lovers! If you’re anything like me, your sweet tooth can be as demanding as a toddler in a candy store. Thankfully, my Cannoli Cheesecake Bars are here to save the day! These little beauties are not just a delicious treat; they’re a slice of happiness wrapped in creamy, dreamy layers. With a quick prep time and a heavenly taste, this recipe becomes your new go-to for busy days or family gatherings. Plus, who can resist the flavors of cannoli and cheesecake mingling together? Let’s dive into this delightful adventure!
Why You’ll Love This Cannoli Cheesecake Bars
You’re going to fall head over heels for these Cannoli Cheesecake Bars! They come together quickly, making them perfect for a last-minute dessert or when friends drop by unannounced. The combination of creamy cheesecake and crunchy graham cracker crust is simply divine. Plus, you can customize them with chocolate chips or pistachios, creating a personal touch that will impress everyone at the table. Sweet, indulgent, and oh-so-simple to make!
Ingredients for Cannoli Cheesecake Bars
Gathering the right ingredients is key to crafting the perfect Cannoli Cheesecake Bars. Here’s what you’ll need:
- Graham crackers: Finely crushed to form a delightful crust that adds crunch and flavor.
- Unsalted butter: This brings richness to the crust and helps hold it together, giving it that melt-in-your-mouth quality.
- Granulated sugar: A hint of sweetness enhances the flavor of the crust and balances the tanginess of the cheese.
- Vanilla essence: The soul of many desserts, it infuses warmth and depth into the cheesecake.
- Ricotta: The star ingredient! Its creamy texture gives these bars their signature smoothness and lightness.
- Cream cheese: Adds richness and a velvety touch, perfectly complementing the ricotta.
- Powdered sugar: For a sweeter filling without granules, blending seamlessly into the creamy mix.
- Grated lemon zest: A sprinkle of citrus brightness, lifting the flavor to new heights.
- Small chocolate chips: These little gems add a delightful burst of sweetness and a familiar cannoli touch.
- Chopped pistachios (optional): For a fun crunch and a pop of color, but feel free to skip if nuts aren’t your thing!
- Whipped cream: Whipped to make the bars extra creamy and dreamy when served.
- Chocolate chips and pistachios for decoration: These elevate the visual appeal and make your bars look fancy!
For exact quantities of each ingredient, check the bottom of the article where you can also find a printable version for your convenience. Happy cooking!
How to Make Cannoli Cheesecake Bars
Step 1: Prepare the Baking Dish
First things first, preheat your oven to 325°F (160°C). This step is crucial for even baking! While the oven is warming up, grab a 9×9-inch baking dish. Grease it lightly with some butter, then line it with parchment paper. Leave a little overhang. This makes lifting out your bars a breeze later on. Trust me; your future self will thank you.
Step 2: Make the Crust
In a large bowl, mix together the finely crushed graham crackers, melted butter, granulated sugar, and a splash of vanilla essence. It’s like making a sandy beach—each ingredient adding texture and flavor! Once combined, press this mixture firmly into the bottom of your prepared dish. Use the back of a measuring cup to really pack it down. A solid crust equals sturdy, delicious bars!
Step 3: Prepare the Filling
For the filling, blend ricotta, softened cream cheese, powdered sugar, vanilla essence, and that zingy lemon zest in a separate bowl. Mix until it’s completely smooth. It should feel like a luxurious cloud! Gently fold in the small chocolate chips and optional pistachios. This adds pops of sweetness and a bit of crunch that we all love in cannoli.
Step 4: Assemble the Bars
Spread the creamy filling evenly over your crust. Use a spatula to make it as smooth as possible. The filling needs to touch every corner of the crust. This ensures that every bite is indulgently satisfying. Now that it’s spread evenly, it’s time for the oven!
Step 5: Bake and Cool
Carefully place the dish into your preheated oven and bake for 30-35 minutes. You’ll know it’s done when the edges look firm, but the center is still slightly wobbly. Once baked, let the bars cool at room temperature. After that, pop them in the fridge for at least 4 hours, or better yet, overnight! Chilling is key for that perfect cheesecake texture.
Step 6: Serve and Enjoy
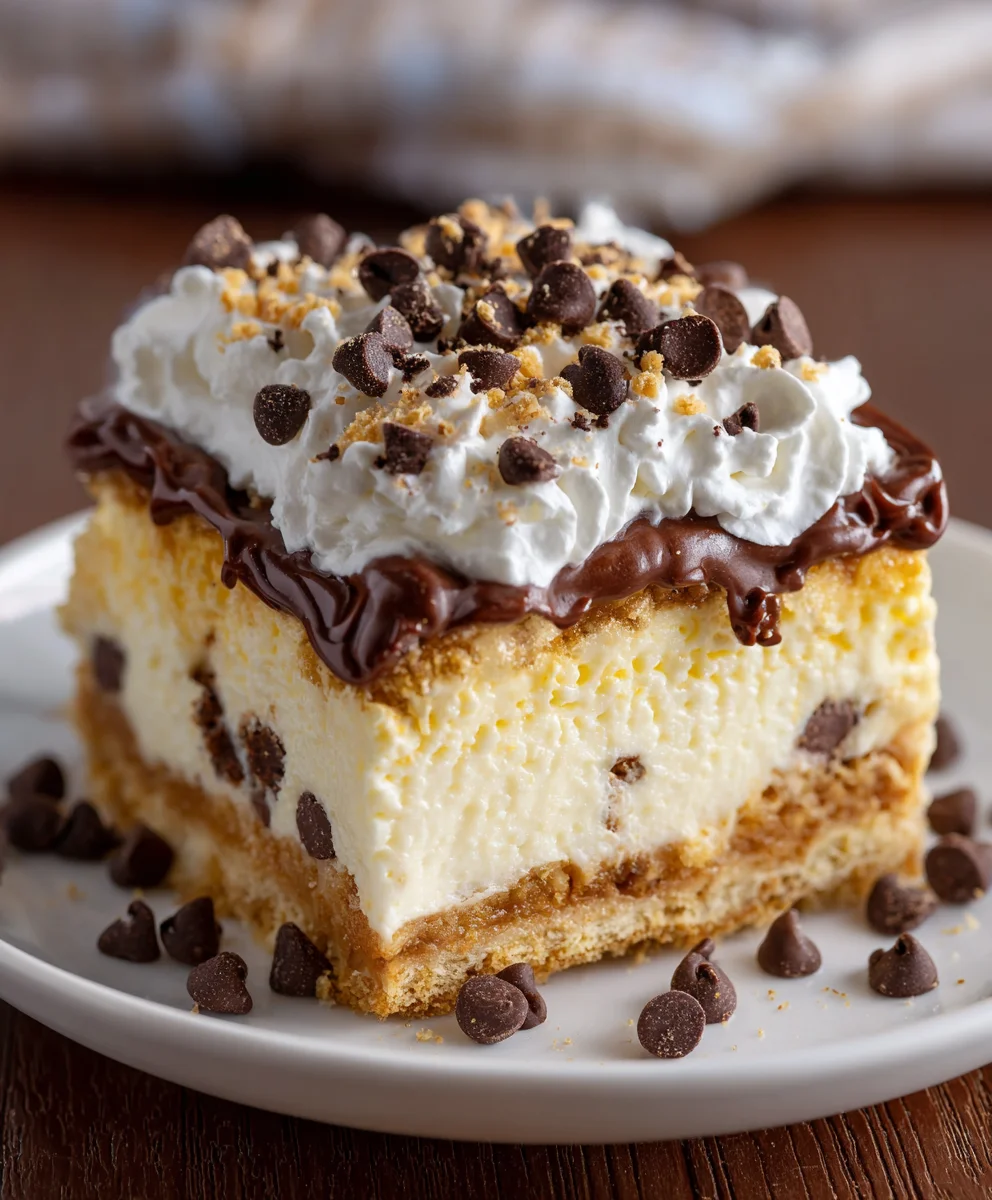
When you’re ready to serve, pull the cheesecake out using the parchment paper. Slice it into squares like a pro! Top each bar with a dollop of whipped cream, sprinkle with extra chocolate chips, and maybe add some pistachios for the wow factor. Each bite will be a combination of creamy, crunchy, and downright delicious. Enjoy your Cannoli Cheesecake Bars with a cup of coffee or a glass of dessert wine for an extra treat!
Tips for Success
- Always use room temperature ingredients for a smoother filling.
- Don’t skip the chilling time; it’s essential for that perfect texture.
- Experiment with flavored extracts, like almond or orange, for a unique twist.
- For a firmer bar, add an extra layer of graham cracker crust.
- Keep toppings simple; fresh fruit also pairs beautifully with these bars.
Equipment Needed
- 9×9-inch baking dish: A classic choice. You can also use an 8×8-inch dish if needed.
- Mixing bowls: Get one large and a medium-sized bowl for mixing ingredients smoothly.
- Spatula: A must-have for spreading your filling evenly. A wooden spoon works too.
- Measuring cups and spoons: Essential for accurate ingredient portions. A kitchen scale is a great alternative!
- Parchment paper: This helps with easy removal. If you don’t have any, greasing the dish well can work.
Variations of Cannoli Cheesecake Bars
- Chocolate Lovers: Incorporate cocoa powder into the crust for a chocolatey twist. You can also use chocolate-flavored cream cheese for the filling.
- Fruit-Infused: Add fresh raspberries or strawberries to the filling for a fruity burst that perfectly complements the creaminess.
- Nut-Free Option: Simply omit the pistachios and replace them with extra chocolate chips or sprinkles if you have nut allergies.
- Gluten-Free: Use gluten-free graham crackers to make the crust. This way, everyone can enjoy these delightful bars!
- Spiced Cannoli: Add a pinch of cinnamon or nutmeg to the filling for a warm spiced flavor reminiscent of the fall season.
Serving Suggestions for Cannoli Cheesecake Bars
- Pair with a rich espresso or cappuccino for a delightful Italian touch.
- Serve alongside fresh berries or fruit compote for a burst of flavor.
- For a festive touch, garnish with mint leaves or edible flowers.
- Present on a beautiful platter to wow your guests!
FAQs about Cannoli Cheesecake Bars
As you embark on your journey to create these mouthwatering Cannoli Cheesecake Bars, questions often pop up. Let’s address some of the most common ones!
Can I make Cannoli Cheesecake Bars ahead of time?
Absolutely! In fact, making these bars a day in advance is highly recommended. This allows the flavors to meld beautifully, ensuring maximum deliciousness!
What can I substitute for ricotta cheese?
If ricotta isn’t available, a combination of cottage cheese and cream cheese works well. Just blend them until smooth to achieve a similar creamy effect.
Can I freeze leftover Cannoli Cheesecake Bars?
<pDefinitely! These bars freeze wonderfully. Just wrap them tightly in plastic wrap and then in aluminum foil before placing them in the freezer.
How do I store Cannoli Cheesecake Bars?
Store your cheesecake bars in an airtight container in the refrigerator. They should stay fresh for about a week—if they last that long!
What’s the best way to garnish Cannoli Cheesecake Bars?
You can keep it simple with a dollop of whipped cream and a sprinkle of chocolate chips. For extra flair, add crushed pistachios or fresh berries for color and flavor!
Final Thoughts
Creating these Cannoli Cheesecake Bars is more than just baking; it’s about sharing joy and indulgence. With every bite, you’re enveloped in a creamy, dreamy world that brings back warm memories of family gatherings and holidays. As you watch your loved ones savor each square, you’ll feel the satisfaction that comes with serving something truly special. Whether it’s a busy weeknight or a festive celebration, this recipe offers a simple yet delightful solution to satisfy your sweet cravings. So, go ahead, whip up a batch, and let these bars work their magic on your heart and taste buds!
Print
Cannoli Cheesecake Bars
- Total Time: 4 hours 55 minutes
- Yield: 16 bars 1x
- Diet: Vegetarian
Description
Indulgent Cannoli Cheesecake Bars combining the flavors of cannoli with a creamy cheesecake base, perfect for sweet cravings.
Ingredients
- 1 ½ cups finely crushed graham crackers
- ½ cup melted unsalted butter
- ¼ cup granulated sugar
- 1 teaspoon vanilla essence
- 16 oz ricotta
- 8 oz softened cream cheese
- ¾ cup powdered sugar
- 1 teaspoon vanilla essence
- 1 teaspoon grated lemon zest
- ½ cup small chocolate chips
- ¼ cup finely chopped pistachios (optional)
- 1 cup whipped cream
- Chocolate chips and pistachios for decoration
Instructions
- Preheat your oven to 325°F (160°C). Prepare a 9×9-inch baking dish by greasing it and lining with parchment paper, leaving extra for easy removal.
- Combine graham cracker crumbs, melted butter, granulated sugar, and vanilla until mixed thoroughly. Firmly press this mixture into the base of the prepared dish for the crust.
- In another bowl, mix ricotta, cream cheese, powdered sugar, vanilla, and lemon zest until smooth. Fold in chocolate chips and pistachios gently.
- Spread the filling over the crust evenly. Bake for 30-35 minutes, or until the edges are firm and the center remains slightly wobbly.
- Allow the cheesecake to cool to room temperature, then refrigerate for at least 4 hours or overnight for solidification.
- Once set, use the parchment to lift the cheesecake out, slice into squares, and top with whipped cream. Add extra chocolate chips and pistachios as optional garnish.
Notes
- For best results, prepare a day in advance and let it chill overnight.
- Feel free to adjust the amount of sugar based on your taste preference.
- Chocolate chips and pistachios are optional but highly recommended for added flavor and texture.
- Prep Time: 20 minutes
- Cook Time: 35 minutes
- Category: Dessert
- Method: Baking
- Cuisine: Italian-American
Nutrition
- Serving Size: 1 bar
- Calories: 290
- Sugar: 15g
- Sodium: 160mg
- Fat: 18g
- Saturated Fat: 10g
- Unsaturated Fat: 6g
- Trans Fat: 0g
- Carbohydrates: 30g
- Fiber: 1g
- Protein: 4g
- Cholesterol: 50mg