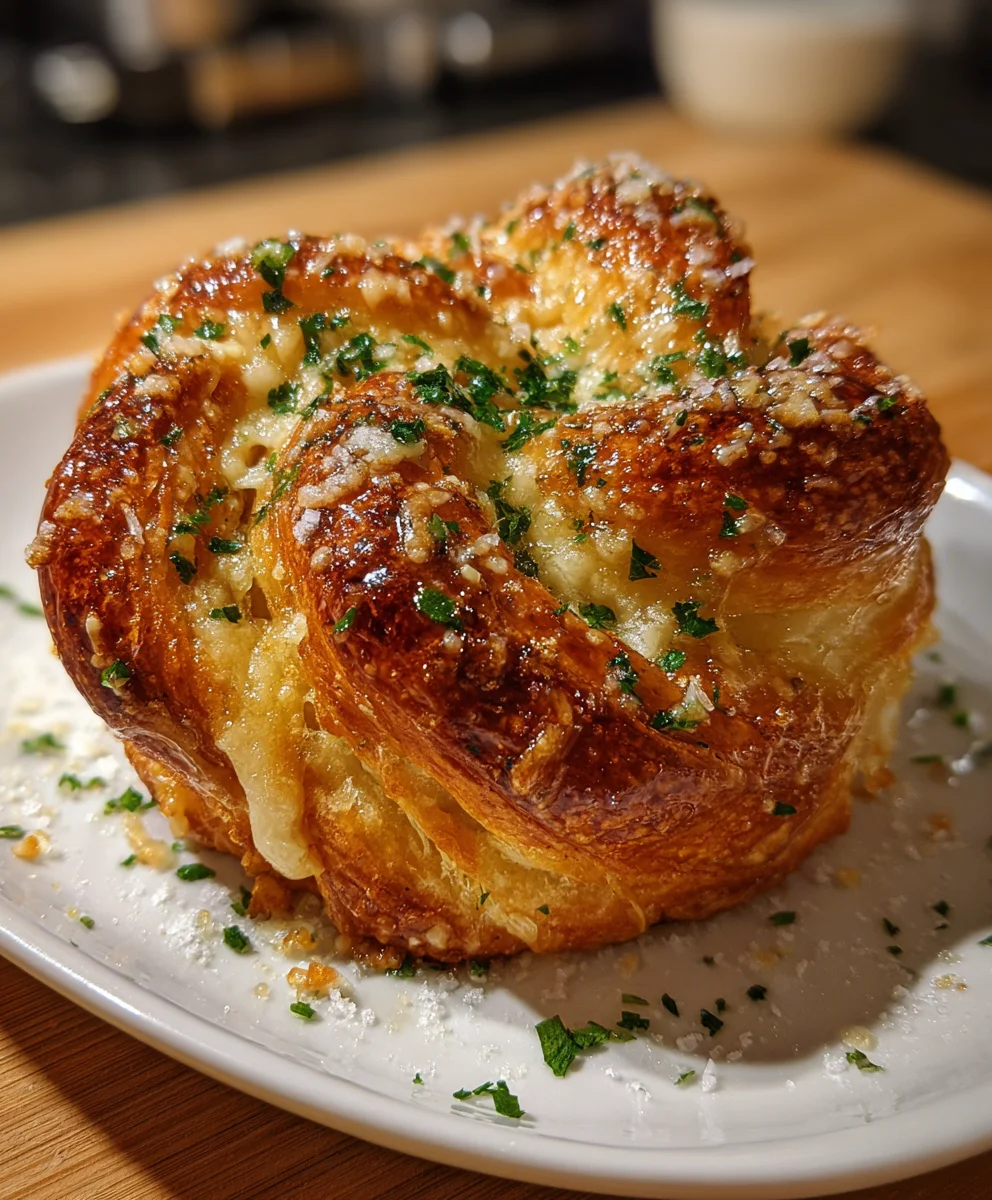
Introduction to Cheesy Garlic Cruffin
Welcome to the wonderful world of Cheesy Garlic Cruffins, where savory dreams come true! As a busy mom, I know that life can get hectic, and sometimes you just need a quick solution for a tasty snack or brunch option. These delightful little treats are not only easy to whip up but are also bursting with flavor, making them perfect for impressing friends or family. With crispy, buttery layers accentuated by cheesy, garlicky goodness, you’ll find yourself reaching for seconds (or thirds!). Trust me, these cruffins are destined to become a cherished favorite in your recipe book!
Why You’ll Love This Cheesy Garlic Cruffin
Imagine a warm, flaky treat that practically hugs your taste buds with every bite. The Cheesy Garlic Cruffin combines simplicity and flavor in a way that feels like a warm embrace after a long day. They’re perfect for busy mornings or as an afternoon pick-me-up. Plus, with minimal prep time, you can enjoy these fluffy delights fresh out of the oven, bringing comfort and satisfaction to your table!
Ingredients for Cheesy Garlic Cruffin
Gathering the right ingredients is the first step toward your Cheesy Garlic Cruffin adventure! Here’s what you’ll need:
- All-purpose flour: This is the backbone for your cruffins, giving them that delightful, airy structure.
- Granulated sugar: Just a touch for balance, enhancing the overall flavor of your savory treat.
- Salt: A must! It elevates flavors and brings everything together, like a supportive friend.
- Instant yeast: This will give your dough the lift it needs, helping your cruffins rise to new heights.
- Warm milk: Acts as a fantastic hydrator, ensuring your dough is smooth and fluffy.
- Unsalted butter (melted): Adds richness and flavor, ensuring each bite melts in your mouth.
- Warm water: A little warmth activates the yeast, getting everything bubbly and lively.
- Egg: It’s the secret glue that bonds all your ingredients together, adding moisture and richness.
- Grated Parmesan cheese: This sharp, nutty cheese creates layers of flavor that blend beautifully into the cruffin.
- Shredded mozzarella cheese: Known for its gooey texture, mozzarella gives that cheesy pull we all adore!
- Garlic (minced): This aromatic gem infuses your cruffins with a fragrant kick that’s utterly irresistible.
- Softened unsalted butter: Used in the filling, it helps spread the garlic goodness evenly on the dough.
- Fresh parsley (chopped): A burst of color and freshness, giving your cruffins a delightful finishing touch!
For exact measurements, check out the recipe details at the end of this article. You’ll have everything you need at your fingertips, making it super easy to get started on this delicious journey!
How to Make Cheesy Garlic Cruffin
Prepare the Dough
Let’s start this savory adventure! In a large mixing bowl, combine the all-purpose flour, granulated sugar, salt, and instant yeast. Make a well in the center, like a cozy nest for the wet ingredients. Pour in the warm milk, melted butter, and warm water. Then, crack that egg in there!
Using a wooden spoon or your hands, mix until everything is blended and forms a shaggy dough. It might look a bit messy, but that’s okay! Transfer it to a floured surface and knead for about 8 to 10 minutes. You want to feel that dough become smooth and elastic. This is the foundation for deliciousness that will lead to pillowy cruffins!
Knead and Rise
Kneading is your dough’s favorite workout! This step helps develop gluten, which gives the cruffins their signature texture. As you knead, you might notice it becoming softer and more pliable. Think of it as a mini massage session for your dough.
Next, we let it rise. Transfer the dough back to the bowl, cover it with a clean kitchen towel or plastic wrap, and place it in a warm spot. Allow it to rise for about 1 hour, or until it doubles in size. You’ll know it’s ready when you can poke it gently, and it springs back slowly. Time to move on to the next step!
Make the Garlic Filling
Now, while your dough is rising, it’s time to whip up the heavenly garlic filling. In a small bowl, mix together the softened unsalted butter, minced garlic, and chopped fresh parsley. This aromatic mixture is what dreams are made of! Make sure to blend it well so every bite is full of flavor.
Shape the Cruffins
After the dough has risen, it’s time for some fun! Lightly flour your surface again and roll the dough into a large rectangle, about 1/4 inch thick. Picture it—a perfect canvas waiting for that garlicky masterpiece! Spread the garlic butter mixture evenly across the dough, ensuring every corner is slathered in flavor.
Next, it’s time for the cheese! Sprinkle grated Parmesan and shredded mozzarella generously over the surface. Now, carefully roll the dough tightly into a log, starting from one long edge. Think of making a big, cheesy burrito! Once rolled, slice the log into 8 to 10 equal portions.
Place each round slice into your greased muffin tin, stacking them vertically for that delightful layered effect. This is where the magic happens! Cover the muffin tin with a kitchen towel and let the cruffins rest for about 20 minutes. They’ll puff up, creating the flaky goodness we all crave!
Bake the Cruffins
Preheat your oven to 375°F (190°C). While it’s warming up, lightly grease your muffin tin if you haven’t already. Once those golden beauties have had a chance to relax, pop the muffin tin in the oven and bake for 20 to 25 minutes. Keep an eye on them; we want a beautiful golden brown!
When they’re done, your kitchen will be filled with an irresistible aroma. Remove the cruffins from the oven and allow them to cool for just a few minutes before taking them out of the muffin tin. They’ll be screaming to be devoured, so prepare for some serious enjoyment!
Tips for Success
- Use warm, but not hot, liquids to ensure the yeast activates properly.
- Knead the dough until smooth; it should bounce back when poked.
- Don’t skip the resting times—they’re essential for fluffy cruffins!
- Experiment with different cheeses for a personalized flavor twist.
- Serve warm for the best cheesy experience!
Equipment Needed
- Mixing bowl: A large bowl for mixing the dough; alternatively, use a stand mixer with a dough hook.
- Rolling pin: Essential for flattening the dough; a wine bottle can do the trick in a pinch!
- Muffin tin: A standard muffin pan is ideal; silicone pans work great too for easy removal.
- Spatula: Helpful for spreading the garlic filling; any flat utensil will do.
- Kitchen towel: For covering the dough while it rises; a plastic wrap works just as well.
Variations
- Herb-infused: Mix in dried herbs like oregano or thyme for a fragrant twist!
- Spicy kick: Add a pinch of red pepper flakes to the garlic filling for an extra zing.
- Cheesy overload: Experiment with different cheeses, like cheddar or gouda, for unique flavors.
- Vegetable boost: Toss in finely chopped spinach or sun-dried tomatoes for added color and nutrition.
- Gluten-free: Swap all-purpose flour for a gluten-free blend to accommodate dietary needs.
Serving Suggestions for Cheesy Garlic Cruffin
- Pair with a crisp green salad for a balanced meal.
- Serve alongside a bowl of tomato soup for a comforting combination.
- Complement with a glass of white wine, like Chardonnay, for a sophisticated touch.
- Garnish with extra parsley for a pop of color and freshness!
FAQs about Cheesy Garlic Cruffin
Got questions about your soon-to-be favorite snack? Let’s dive into some common inquiries about these delectable Cheesy Garlic Cruffins!
Can I make the dough ahead of time? Absolutely! You can prepare the dough and let it rise. Then cover it and refrigerate until you’re ready to bake.
How do I store leftover cruffins? Keep your Cheesy Garlic Cruffins in an airtight container at room temperature for up to two days. Warm them briefly in the oven before serving!
Can I freeze these cruffins? Yes! After baking, allow them to cool completely. Store in a freezer-safe bag, and they’ll be good for up to three months.
What if I don’t have instant yeast? You can substitute it with active dry yeast, just remember to activate it in warm water first.
Can kids help make these cruffins? Definitely! Kids will love spreading the filling, making it a fun family activity!
Final Thoughts
Making Cheesy Garlic Cruffins is like wrapping your kitchen in a warm hug. Every step fills your home with delightful aromas, transporting you to a cozy Italian bistro. As you take that first bite, the crispy layers give way to a cheesy explosion, creating a moment of pure joy. These cruffins are not just a recipe; they’re an experience that brings family and friends together. Whether for brunch, a snack, or an easy dinner, you’ll find they evoke smiles and satisfied sighs. So roll up your sleeves and enjoy the magic of baking these scrumptious treats!
Print
Cheesy Garlic Cruffin
- Total Time: 1 hour 45 minutes
- Yield: 8–10 cruffins 1x
- Diet: Vegetarian
Description
A delicious and savory twist on a classic muffin, these Cheesy Garlic Cruffins combine layers of buttery dough with garlic and cheese for a delectable treat.
Ingredients
- 2 cups all-purpose flour
- 1 tablespoon granulated sugar
- 1 teaspoon salt
- 2 teaspoons instant yeast
- 1/2 cup warm milk
- 1/4 cup unsalted butter, melted
- 1/2 cup warm water
- 1 large egg
- 1/2 cup grated Parmesan cheese
- 1 cup shredded mozzarella cheese
- 3 cloves garlic, minced
- 1/4 cup unsalted butter, softened
- 1 tablespoon fresh parsley, chopped
Instructions
- In a large mixing bowl, combine the all-purpose flour, granulated sugar, salt, and instant yeast.
- Make a well in the center of the dry ingredients and pour in the warm milk, melted butter, and warm water.
- Crack the egg into the bowl and begin to mix the ingredients together with a wooden spoon or your hands.
- Knead the dough for about 8 to 10 minutes until it becomes smooth and elastic.
- Cover the bowl with a clean kitchen towel or plastic wrap and allow the dough to rise for about 1 hour, or until it doubles in size.
- While the dough is rising, prepare the filling by mixing the minced garlic, softened butter, and chopped fresh parsley in a small bowl.
- Preheat your oven to 375°F (190°C) and lightly grease a muffin tin with butter or cooking spray.
- Once the dough has risen, turn it out onto a floured surface and roll it into a large rectangle about 1/4 inch thick.
- Spread the garlic butter mixture evenly over the surface of the dough.
- Sprinkle the grated Parmesan cheese evenly over the garlic butter, followed by the shredded mozzarella cheese.
- Carefully roll the dough into a log, starting from one of the long edges.
- Slice the log into 8 to 10 equal portions, depending on the size of your muffin tin.
- Place each slice into a muffin cup, stacking them vertically to create a layered effect.
- Cover the muffin tin with a kitchen towel and let the dough rest for another 20 minutes to rise slightly.
- Once the dough has risen, place the muffin tin in the preheated oven and bake for 20 to 25 minutes, or until the cruffins are golden brown on top.
- Remove the cruffins from the oven and let them cool slightly before removing them from the muffin tin.
- Serve the cheesy garlic cruffins warm, garnished with additional chopped parsley if desired.
Notes
- Ensure the milk and water are warm, but not hot, to help activate the yeast.
- These cruffins are best served fresh, but can be stored in an airtight container for a couple of days.
- Prep Time: 20 minutes
- Cook Time: 25 minutes
- Category: Baking
- Method: Baking
- Cuisine: Italian
Nutrition
- Serving Size: 1 cruffin
- Calories: 180
- Sugar: 1g
- Sodium: 300mg
- Fat: 10g
- Saturated Fat: 6g
- Unsaturated Fat: 3g
- Trans Fat: 0g
- Carbohydrates: 18g
- Fiber: 0g
- Protein: 5g
- Cholesterol: 40mg