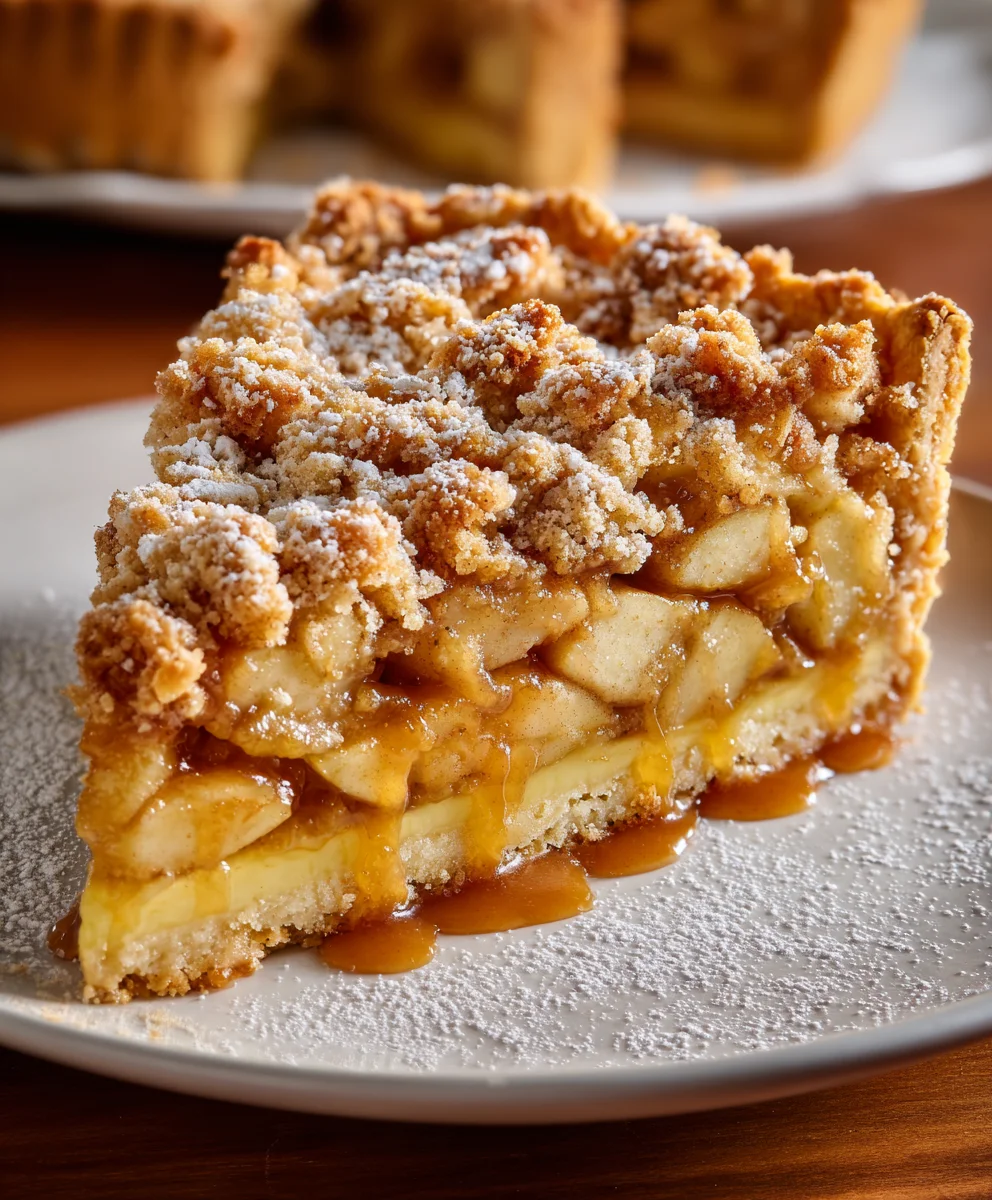
Introduction to Chicago-Style Bakery Apple Slices
There’s something incredibly comforting about a fresh batch of Chicago-Style Bakery Apple Slices wafting through your home. It’s a sweet reminder of bustling bakeries and warm family gatherings. As a busy mom myself, I know moments feel fleeting. That’s why this recipe shines—it’s a quick solution for a busy day, yet sophisticated enough to impress your loved ones. The buttery crust and spiced apple filling blend harmoniously in every bite, making it the perfect crowd-pleaser. Trust me, with every slice, you’ll feel the joy of home cooking right at your fingertips.
Why You’ll Love This Chicago-Style Bakery Apple Slices
These Chicago-Style Bakery Apple Slices are everything you crave in a dessert: easy to make, deliciously comforting, and perfect for sharing. They come together quickly, making them an ideal treat for those busy afternoons when you want something special without the fuss. The rich flavors of spiced apples paired with a buttery crust will have your family begging for seconds. Plus, there’s nothing quite like homemade pastries to warm the heart!
Ingredients for Chicago-Style Bakery Apple Slices
Creating these delightful Chicago-Style Bakery Apple Slices starts with good ingredients. Here’s what you’ll need:
- All-purpose flour: This is the foundation of your crust, giving it the perfect texture.
- Granulated sugar: Adds sweetness to both the crust and apple filling.
- Light brown sugar: This brings a subtle molasses flavor that pairs beautifully with apples.
- Baking powder: Leavens the dough, creating a tender crust.
- Salt: Balances sweetness and enhances all flavors.
- Cold unsalted butter: Essential for a flaky crust; be sure it’s cold for best results.
- Egg: Acts as a binder, helping give structure to the crust.
- Vanilla extract: Infuses the dough with warmth and flavor.
- Apples: Your star ingredient! Granny Smith or Honeycrisp lend a tartness that complements the sweetness beautifully.
- Cornstarch: Thickens the apple filling, ensuring it’s not too runny.
- Cinnamon and nutmeg: These spices create that warm, cozy flavor, perfect for a dessert.
- Lemon juice: Brightens the apple filling and prevents browning.
- Powdered sugar: Makes up the sweet glaze that takes these slices over the top.
- Milk: Added to the glaze to achieve the desired consistency.
For exact quantities, check the bottom of the article, where you’ll find a handy printable version. Feel free to customize or swap ingredients based on what you have at home! Enjoy making this delicious treat!
How to Make Chicago-Style Bakery Apple Slices
Step 1: Preheat and Prepare
First, you’ll want to preheat your oven to 350°F (175°C). This ensures your Chicago-Style Bakery Apple Slices will bake evenly. While that warms up, grab a 9×13-inch baking pan and line it with parchment paper. This simple step prevents sticking and makes cleanup so much easier. Plus, it’s a little trick that keeps your slices looking beautiful when it’s time to serve!
Step 2: Make the Crust
In a large bowl, combine your all-purpose flour, sugars, baking powder, and salt. Whisk them together until well-blended. Next, add in your cold, cubed unsalted butter. Using a pastry cutter or your fingers, mix it in until the mixture resembles coarse crumbs. This is where the magic happens! Then, stir in the egg and vanilla extract. Mix until you form a soft dough that practically begs to be pressed into the pan.
Step 3: Press the Dough
Once your dough is ready, take about two-thirds of it and press it firmly into the bottom of your prepared pan. Make sure you cover the entire base evenly, creating a nice, smooth layer. You’ll want it thick enough to hold the apple filling without breaking apart. I often use the back of a measuring cup for this—it works wonders! Don’t worry if it’s not perfect; it will bake up beautifully!
Step 4: Prepare the Filling
Now, let’s talk about the most delicious part—your apple filling! In a big bowl, toss your peeled, thinly sliced apples with granulated sugar, brown sugar, cornstarch, cinnamon, nutmeg, lemon juice, and vanilla extract. Stir it all together until each slice of apple is beautifully coated. This is where your kitchen will fill with that warm, inviting aroma. Take a moment to savor that smell; it’s the sweet promise of what’s to come!
Step 5: Assemble the Layers
It’s time to make magic happen! Spread the coated apples evenly over the dough in the pan. Make sure every bite gets a taste of that spiced goodness. After that, crumple the remaining dough over the top, creating a delightful texture. The idea here is to leave some apple peeking through—trust me, it makes for a lovely presentation. Your layers should be like a warm hug for those apples!
Step 6: Bake to Perfection
Slide your pan into the oven and let it bake for about 45–50 minutes. Keep an eye on it! You’re looking for a lovely golden-brown color, particularly around the edges. You should also see some bubbling from the filling. That’s the sign that your Chicago-Style Bakery Apple Slices are nearly ready to come out. It’s hard to wait, but trust me—it’ll be worth it!
Step 7: Cooling & Glazing
After baking, let your slices sit in the pan for at least 45 minutes to fully set. This step is crucial; otherwise, the bars can crumble when you cut them! Once they’re cool, whisk together the powdered sugar, milk, and a touch of vanilla for that sweet glaze. Drizzle it over the cooled slices and marvel at your creation. You’re just moments away from a delicious treat!
Tips for Success
- Always use cold butter for a flaky crust—don’t skip this step!
- Slice your apples thinly for even cooking and tenderness.
- Let your Chicago-Style Bakery Apple Slices cool completely before cutting for cleaner edges.
- Experiment with different apple varieties for unique flavors.
- Keep an eye on baking times, as ovens can vary. Check for that golden-brown color!
Equipment Needed
- Baking pan: A 9×13 inch pan works best, but you can use a quarter sheet pan if needed.
- Mixing bowls: One large bowl for the crust and another for the apple filling.
- Whisk: For blending dry ingredients and mixing the glaze.
- Pastry cutter or fork: For cutting butter into the flour.
- Parchment paper: To line the pan and prevent sticking.
Variations of Chicago-Style Bakery Apple Slices
- Nutty Crunch: Add a half-cup of chopped nuts, like pecans or walnuts, to the apple filling for an extra texture and flavor boost.
- Cheesecake Swirl: Create a cheesecake filling by mixing 8oz of cream cheese with sugar and an egg, then swirl it in between the layers of apples for a decadent twist.
- Gluten-Free Option: Substitute all-purpose flour with a gluten-free baking blend for a delicious safe alternative for those with dietary needs.
- Spiced Variation: Incorporate a teaspoon of ginger or allspice along with your cinnamon and nutmeg for extra warmth and depth in flavor.
- Caramel Drizzle: Drizzle warm caramel sauce over the cooled apple slices instead of glaze for a rich, decadent finishing touch.
Serving Suggestions for Chicago-Style Bakery Apple Slices
- Pair with a scoop of vanilla ice cream for warm and cold contrast.
- Serve alongside a dollop of whipped cream for added richness.
- Drizzle with caramel sauce for an extra touch of sweetness.
- Enjoy with a hot cup of cinnamon-spiced tea or coffee.
- Present on a charming platter, garnished with apple slices and mint for a pop of color.
FAQs about Chicago-Style Bakery Apple Slices
As with any delicious recipe, questions often pop up. Here are some of the most common inquiries about Chicago-Style Bakery Apple Slices, answered just for you!
Can I use frozen apples for the filling?
Yes, you can! Just make sure to thaw and drain them well to avoid excess moisture in your filling. Fresh or frozen, both options will give you tasty slices!
How do I store leftovers?
Store your slices in an airtight container at room temperature for up to three days. If they last longer, refrigerate them for freshness. But trust me, they likely won’t last that long!
Can I make the dough ahead of time?
Absolutely! You can prepare the dough and refrigerate it for up to two days. Just let it sit at room temperature for a few minutes before pressing it into the pan.
What other fruits can I use besides apples?
Feel free to get creative! Pears, peaches, or a mix of berries can also work beautifully. Just adjust the sugar based on the fruit’s sweetness.
Is there a way to make this recipe healthier?
Definitely! You can substitute half the sugar with applesauce or use whole wheat flour for a bit more fiber. It’s all about finding a balance you love!
Final Thoughts
Baking a batch of Chicago-Style Bakery Apple Slices is more than just creating a dessert; it’s about invoking cozy memories and sharing joy with loved ones. The delightful aroma fills your kitchen, making every moment spent cooking worth it. With each bite, you’ll experience the perfect blend of spiced apples and buttery crust, offering comfort and satisfaction. Whether enjoyed warm or at room temperature, these slices are truly a treat that brings smiles to the table. So, grab your ingredients and embrace the joy of home-baked goodness—you deserve it!
Print
Chicago-Style Bakery Apple Slices Recipe
- Total Time: 1 hour 20 minutes
- Yield: 12 servings 1x
- Diet: Vegetarian
Description
This Chicago-Style Bakery Apple Slices recipe is a deliciously sweet treat with a buttery crust, spiced apple filling, and optional glaze.
Ingredients
- 2 ½ cups all-purpose flour
- ¾ cup granulated sugar
- ¾ cup light brown sugar packed
- 1 teaspoon baking powder
- ½ teaspoon salt
- 1 cup cold unsalted butter, cubed
- 1 large egg
- 1 teaspoon vanilla extract
- 6 cups peeled thin-sliced apples (Granny Smith or Honeycrisp)
- ½ cup granulated sugar (for filling)
- ¼ cup brown sugar (for filling)
- 2 tablespoons cornstarch
- 1 ½ teaspoon cinnamon
- ¼ teaspoon nutmeg
- 1 tablespoon lemon juice
- 1 teaspoon vanilla (for filling)
- 1 cup powdered sugar (for glaze)
- 2–3 tablespoons milk
- ½ teaspoon vanilla (for glaze)
Instructions
- Preheat oven to 350°F (175°C).
- Line a 9×13-inch pan with parchment paper.
- In a bowl, whisk flour, sugars, baking powder, and salt. Cut in cold butter until crumbly. Mix in egg and vanilla until soft dough forms.
- Press about ⅔ of the dough firmly into the bottom of the pan.
- Toss sliced apples with both sugars, cornstarch, cinnamon, nutmeg, lemon juice, and vanilla until evenly coated.
- Spread apples evenly over the crust. Crumble remaining dough over the top.
- Bake for 45–50 minutes until golden brown and bubbling at the edges.
- Let sit at least 45 minutes to fully set.
- Whisk glaze ingredients and drizzle over cooled bars. Cut into bakery-style squares.
Notes
- For best texture, ensure the butter is cold before mixing.
- Serve warm or at room temperature.
- Store leftovers in an airtight container at room temperature.
- Prep Time: 30 minutes
- Cook Time: 50 minutes
- Category: Dessert
- Method: Baking
- Cuisine: American
Nutrition
- Serving Size: 1 slice
- Calories: 350
- Sugar: 25g
- Sodium: 150mg
- Fat: 18g
- Saturated Fat: 10g
- Unsaturated Fat: 5g
- Trans Fat: 0g
- Carbohydrates: 45g
- Fiber: 2g
- Protein: 3g
- Cholesterol: 30mg