
Introduction to Chocolate Caramel Waffle Cones
Is there anything more delightful than a dessert that combines chocolate and caramel? I think not! Chocolate Caramel Waffle Cones are exactly what you need for a quick yet impressive sweet treat. Whether you’re celebrating a friend’s birthday or just need to brighten up a hectic day, these cones deliver joy in every bite.
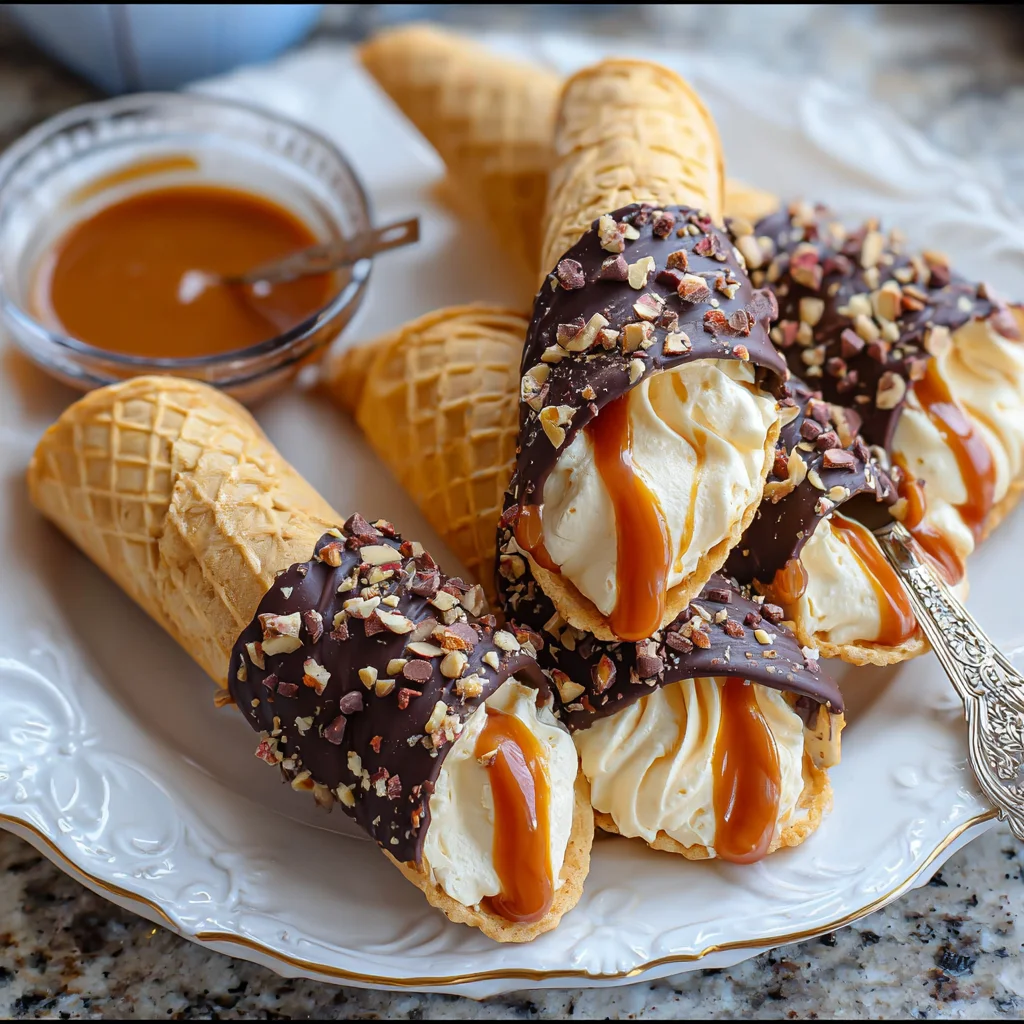
The crispy homemade waffle cones bursting with rich caramel filling and topped with silky chocolate are sure to impress your loved ones. Trust me, they won’t even believe you made them at home!
Why You’ll Love This Chocolate Caramel Waffle Cones
What’s not to love about Chocolate Caramel Waffle Cones? They’re incredibly easy to whip up, making them perfect for busy days. In just 45 minutes, you can create a dessert that feels gourmet. Not only are they crowd-pleasers, but the combination of crispy cones, velvety caramel, and rich chocolate makes for a taste sensation that will have everyone coming back for more. Plus, they’re customizable—perfect for your family’s individual tastes!
Ingredients for Chocolate Caramel Waffle Cones
Gathering the right ingredients is key to crafting these delicious Chocolate Caramel Waffle Cones. Here’s what you’ll need:
- Unsalted butter: You’ll use this to create those crispy waffle cones. Room temperature butter for the filling ensures a smooth texture.
- Granulated sugar: A crucial ingredient that sweetness in both the cones and the filling.
- Whole milk: This gives the batter a creamy richness, helping to create a light and fluffy waffle cone.
- Large eggs: They act as binding agents, providing structure and a delectable richness.
- Vanilla extract: A splash of this aromatic essence elevates the flavors beautifully.
- Sea salt: Just a pinch enhances the sweetness and balances the flavors.
- All-purpose flour: The backbone of our waffle cone batter—it gives structure to the cones.
- Chocolate melts: These are for dipping the ends of the cones to add a decadent chocolate layer.
- Finely diced nuts (optional): Nuts like pistachios or pecans can add a crunchy topping if you fancy.
- Dulce de leche: This rich caramel filling is a luxurious treat, adding sweetness and flavor.
- Powdered sugar: This makes the caramel filling light and airy, perfect for piping into the cones.
You can find most ingredients at your local grocery store, while specialty items like dulce de leche might require a visit to a supermarket or an online order. For exact quantities, check the bottom of the article for details available for printing. Let’s prepare for some delicious fun in the kitchen!
How to Make Chocolate Caramel Waffle Cones
Ready to embark on a sweet adventure? Making Chocolate Caramel Waffle Cones is a delightful process that fills your kitchen with yummy aromas. Let me walk you through each simple step, so you can whip up this tasty dessert with ease!
Step 1: Melt the Butter
Start by melting the unsalted butter in a medium saucepan over medium heat. The butter should be completely liquid, but watch closely to make sure it doesn’t brown. This luscious butter is the base for your waffle cone batter, so you want it to be creamy and smooth!
Step 2: Combine Sugar and Milk
Next, stir in the granulated sugar and whole milk into the melted butter. Blend everything together until the sugar dissolves completely. Remove the saucepan from the heat and set it aside to cool. This cooling step is vital, as it prepares the mixture for the eggs without scrambling them!
Step 3: Mix in Eggs and Flour
Once your mixture is cool, whisk in the large eggs, vanilla extract, and sea salt. Trust me; the vanilla enhances the flavor beautifully! After it’s well combined, fold in the all-purpose flour until the batter is smooth. Let that batter sit for a couple of minutes while you prepare your waffle cone maker.
Step 4: Prepare the Waffle Cone Maker
Preheat your waffle cone maker according to the manufacturer’s instructions. Pour about 1 ½ tablespoons of your batter onto the hot plates. Close the lid and let each cone cook until it’s golden brown and crisp. It usually only takes a couple of minutes!
Step 5: Form the Waffle Cones
Using a spatula, carefully remove the warm waffle from the maker. While it’s still hot, roll it into a cone shape. Use heat-resistant gloves to prevent burns. Hold the cone for about 20 seconds to set its shape. This step makes all the difference in getting that perfect cone!
Step 6: Decorate with Chocolate
Now for the fun part—decoration! In a microwave-safe bowl, melt your chocolate melts until they’re smooth. Dip the ends of each waffle cone into the melted chocolate, allowing any excess to drip off. Set them on parchment paper to cool. The chocolate adds a delicious, rich layer to your cones.
Step 7: Make the Caramel Filling
In a mixing bowl, beat the softened unsalted butter until it’s light and fluffy—about 5 to 7 minutes. Then, add the dulce de leche, vanilla extract, and sea salt, mixing well. Once combined, gradually sift in the powdered sugar. Beat until it’s fluffy, perfect for piping into your cones!
Step 8: Fill the Cones
Transfer the caramel filling into a pastry bag fitted with a star tip. Fill each cone from the bottom up, ensuring to create a delightful swirl. Once filled, refrigerate the cones for about 20 minutes to let the filling set. Then, they’ll be ready to enjoy!
Tips for Success
- Always use room temperature ingredients for a smoother batter.
- Keep a close eye on your waffle cones while cooking to avoid burning.
- If the caramel mixture is too soft, chill it before filling the cones.
- For a crunch, add finely diced nuts atop your chocolate dip.
- Enjoy these cones fresh for the best taste; they’re perfect for sharing!
Equipment Needed
- Waffle cone maker: If you don’t have one, use a stovetop waffle iron.
- Mixing bowls: Essential for combining your ingredients; any size works.
- Microwave-safe bowl: Perfect for melting chocolate; a regular bowl will do.
- Spatula: Handy for shaping your cones and serving.
- Pastry bag with star tip: If unavailable, a zip-top bag with a corner snipped works too.
Variations
- Nut Allergies: Substitute the caramel filling with a sunflower seed butter or a nut-free spread for those with nut allergies.
- Make it Vegan: Use vegan butter and almond milk in the batter, and treat your filling with coconut cream and maple syrup for a dairy-free delight.
- Chocolate Lover’s Dream: Add a drizzle of chocolate sauce over the filled cones for extra indulgence!
- Fruit Infusion: Mix in finely chopped fruits like strawberries or bananas into the caramel filling for a refreshing twist.
- Spice It Up: Add a pinch of cinnamon or a touch of espresso powder to the batter for a unique flavor kick.
Serving Suggestions
- Pair your Chocolate Caramel Waffle Cones with a scoop of vanilla ice cream for an extra indulgent treat.
- Serve with a drizzle of chocolate sauce or caramel for that irresistible touch.
- Consider a side of fresh berries to balance the sweetness beautifully.
- For drinks, a rich coffee or iced tea complements the sweets nicely.
- Presentation tip: Arrange cones in a quirky cone holder or a mason jar for a fun dessert display!
FAQs about Chocolate Caramel Waffle Cones
Let’s tackle some common questions you might have about these delightful Chocolate Caramel Waffle Cones. They’re fun to make, but sometimes we need a little extra guidance!
Can I make the waffle cones ahead of time?
Absolutely! You can prepare the waffle cones in advance and store them in an airtight container. Just remember to fill them with the caramel right before serving for the best texture.
What can I use instead of dulce de leche?
If you can’t find dulce de leche, caramel sauce works as a fantastic alternative. Just make sure to whisk it well before adding it to the filling.
How do I store leftover cones?
Store your unused cones in an airtight container in the fridge for up to three days. Not that they usually last that long in our house!
Can I freeze the filled cones?
While it’s best to enjoy them fresh, you can freeze the filled cones. Just wrap them tightly in plastic wrap and store them in a freezer-safe container. Thaw in the refrigerator before serving.
What toppings can I add to enhance the flavor?
You can sprinkle chopped nuts, drizzle chocolate sauce, or even add fresh fruit. Each topping brings a unique twist to the classic Chocolate Caramel Waffle Cones!
Final Thoughts
There’s something truly magical about creating your own Chocolate Caramel Waffle Cones at home. The joy on your loved ones’ faces as they dig into these delightful treats is priceless. Each crunchy bite is a celebration, combining the decadence of chocolate with the silky smoothness of caramel.
This recipe not only satisfies a sweet tooth but also brings families together, as everyone enjoys crafting and sharing this delicious dessert. So, lace up your apron and let your kitchen be filled with joy and laughter while whipping up these stunning cones. Trust me, they won’t last long!
Print
Chocolate Caramel Waffle Cones: A Delight You Can’t Miss!
- Total Time: 45 minutes
- Yield: 12 cones 1x
- Diet: Vegetarian
Description
Chocolate Caramel Waffle Cones are a delightful dessert combining crispy homemade waffle cones filled with a rich caramel filling and topped with chocolate.
Ingredients
- 1/2 cup unsalted butter (for waffle cones)
- 1 cup white granulated sugar (for waffle cones)
- 1 1/3 cups whole milk (for waffle cones)
- 2 large eggs (for waffle cones)
- 1 tsp vanilla extract (for waffle cones)
- 1/4 tsp sea salt (for waffle cones)
- 2 cups all-purpose flour (for waffle cones)
- 8 oz chocolate melts (for garnish)
- 1 cup finely diced nuts (such as pistachios, almonds, pecans – optional, for garnish)
- 1 cup unsalted butter, softened at room temp (for filling)
- 13 oz dulce de leche (for filling)
- 1 tsp vanilla extract (for filling)
- 1/4 tsp sea salt (for filling)
- 1 cup powdered sugar (for filling)
Instructions
- In a medium saucepan, melt the butter over medium heat.
- Add granulated sugar and milk, stir until sugar dissolves, then remove from heat and allow to cool.
- Once cooled, whisk in eggs, vanilla extract, and salt. Add flour and whisk until smooth.
- Preheat waffle cone maker. Pour 1 ½ tablespoons of batter onto hot plates and cook until golden.
- Using a spatula, remove the waffle and roll it into a cone shape while still hot. Hold for 20 seconds to set the shape.
- For decoration, melt chocolate melts in the microwave and dip the ends of the cones, then set them on parchment paper.
- In a mixing bowl, beat softened butter until light and fluffy (5-7 minutes). Add dulce de leche, vanilla, and salt, mix well.
- Finally, add powdered sugar and beat until fluffy. Transfer to a pastry bag with a star tip.
- Fill each cone from the bottom up with the caramel filling. Refrigerate for 20 minutes to set.
- Enjoy immediately or refrigerate to store for up to 3 days.
Notes
- Use heat-resistant gloves when rolling the warm waffle cones.
- If the filling is too soft, chill it in the refrigerator for 30 minutes before rebeating.
- For best freshness, consume within 3 days for optimal texture.
- Prep Time: 30 minutes
- Cook Time: 15 minutes
- Category: Dessert
- Method: Baking
- Cuisine: American
Nutrition
- Serving Size: 1 cone
- Calories: 300
- Sugar: 25g
- Sodium: 150mg
- Fat: 15g
- Saturated Fat: 10g
- Unsaturated Fat: 5g
- Trans Fat: 0g
- Carbohydrates: 35g
- Fiber: 1g
- Protein: 3g
- Cholesterol: 50mg