Introduction to Easter No-Bake Mini Cheesecakes
As spring blossoms outside, the Easter season invites us to create sweet, unforgettable moments. That’s where these Easter No-Bake Mini Cheesecakes come into play! They’re quick to whip up and absolutely delightful, making them the perfect treat for busy moms like us. Picture this: creamy cheesecake topped with vibrant pastel colors, ready to wow your guests. Whether you’re hosting an Easter brunch or attending a family gathering, these mini cheesecakes will add a cheerful touch. Trust me, with no baking involved, you’ll spend less time in the kitchen and more time with loved ones!
Why You’ll Love This Easter No-Bake Mini Cheesecakes
These Easter No-Bake Mini Cheesecakes are a dream come true for anyone strapped for time. They require minimal effort, allowing you to impress your guests without the hassle of an oven. The creamy texture paired with festive toppings makes each bite a joyous celebration. Plus, you can whip them together in just 30 minutes! What’s not to love? You’ll have a stunning dessert that looks like you spent hours creating it!
Ingredients for Easter No-Bake Mini Cheesecakes
Gathering the right ingredients is half the fun! Here’s what you’ll need to create your delightful Easter No-Bake Mini Cheesecakes:
- Graham cracker crumbs: These will form the buttery crust that’s the perfect base for your cheesecakes. You can crush whole graham crackers if you prefer.
- Unsalted butter: Melted butter holds the crust together, adding that necessary richness. Unsalted is best for controlling the overall saltiness.
- Granulated sugar: Just a touch of sweetness helps balance the flavors in the crust, making it even more delectable.
- Cream cheese: The heart of the cheesecake! Softened cream cheese gives that luscious and creamy texture we’re all craving.
- Powdered sugar: This adds a gentle sweetness to the cheesecake without granules of sugar distracting from its smoothness.
- Vanilla extract: A splash enhances the cheesecake’s flavor, providing a sweet, aromatic balance that’s hard to resist.
- Heavy whipping cream: Whipping cream adds that fluffy texture to your cheesecake filling. This is what helps it reach those dreamy heights!
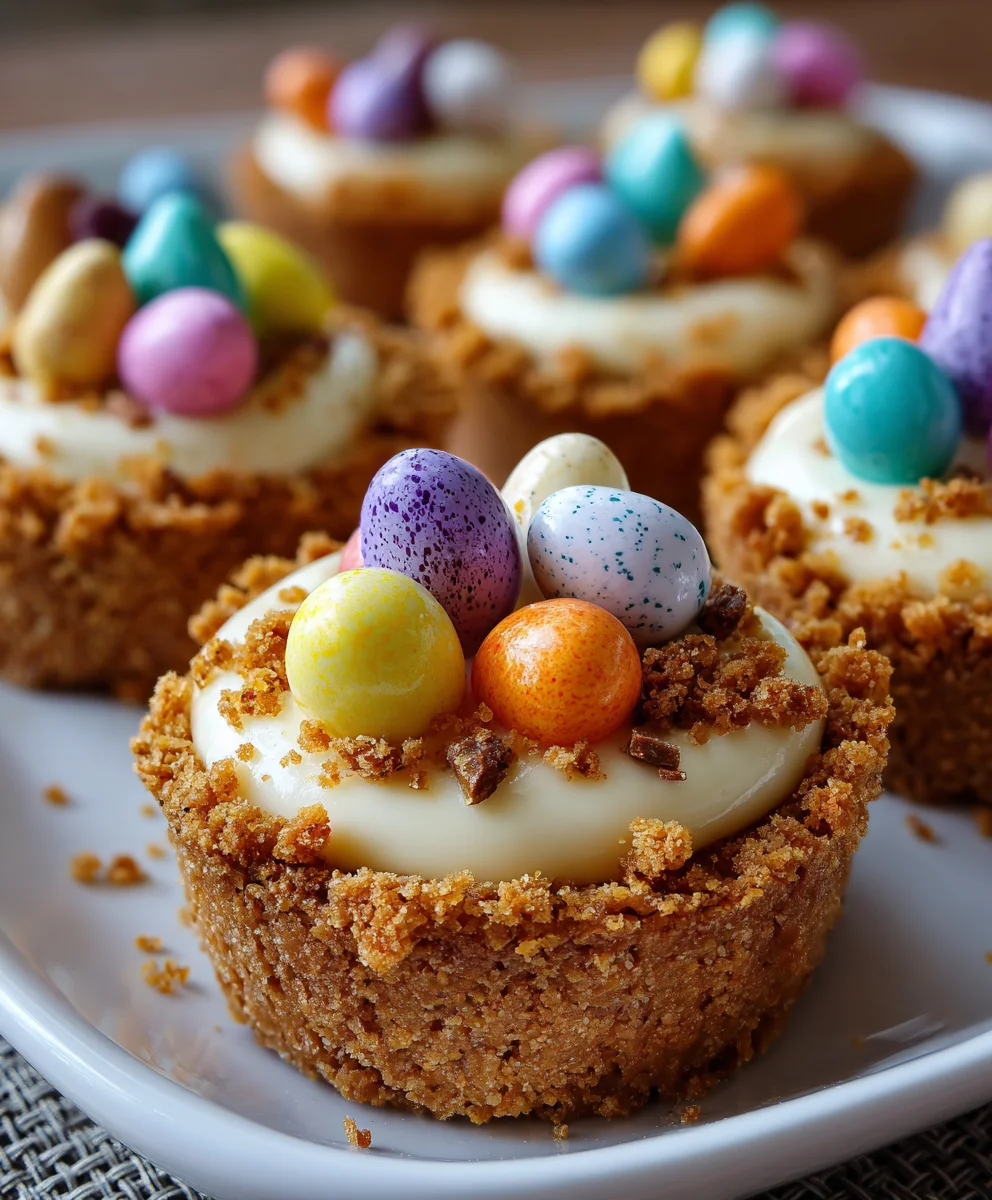
- Pastel-colored candy melts: These not only add a pop of color but also a fun drizzle that brings the Easter spirit to life.
- Mini chocolate eggs or jelly beans: These festive toppings are a delightful surprise for each bite, making your cheesecakes extra special.
- Easter-themed or pastel sprinkles: A sprinkle of these festive decorations ties everything together, making each mini cheesecake a feast for the eyes!
All ingredient quantities can be found at the bottom of the article, making it easy for you to print the recipe and get started!
How to Make Easter No-Bake Mini Cheesecakes
Making these delightful Easter No-Bake Mini Cheesecakes is easy and fun! Follow these simple steps, and you’ll have a beautiful dessert that’s sure to impress. Let’s get started!
Step 1: Prepare the crust
In a medium bowl, combine your graham cracker crumbs, melted butter, and granulated sugar. Mix it until it resembles wet sand. Remember, you want every crumb coated! This creates a delicious base that’s nearly as tasty as the cheesecake itself.
Step 2: Press into muffin tin
Grab your muffin tin and line it with cupcake liners. Press 1 to 2 tablespoons of the crumb mixture into the bottom of each liner. Use the back of a spoon to make sure it’s firmly packed. This step is key for a sturdy crust that holds up perfectly!
Step 3: Chill the crust
Now, it’s time to let the crust chill in the refrigerator for about 15 minutes. This will help it set, making it easier to fill later. Don’t skip this! A firm crust is essential for these mini cheesecakes.
Step 4: Beat the cream cheese
In a mixing bowl, beat the softened cream cheese using an electric mixer until it’s smooth. You should aim for a fluffy, creamy texture with no lumps. This step is where the magic of cheesecake happens!
Step 5: Add sugar and vanilla
Add in your powdered sugar and vanilla extract. Keep mixing until everything is fully combined and creamy. The sweetness and aroma from the vanilla will make your kitchen smell heavenly!
Step 6: Whip the cream
In a separate bowl, use a mixer to whip your heavy cream to stiff peaks. When you lift the beaters, the cream should hold its shape. This is what adds that luscious lightness to your cheesecakes!
Step 7: Fold in the whipped cream
Now, gently fold the whipped cream into your cream cheese mixture. Use a spatula to combine until it’s well mixed. Be careful not to deflate the whipped cream! You want to keep all that airy goodness.
Step 8: Fill the crusts
Spoon or pipe the cheesecake filling evenly over each chilled crust. Don’t worry about being perfect; just smooth the tops with a spatula for a neat finish. You want to create a delightful little masterpiece!
Step 9: Refrigerate to set
Put the filled muffin tin back in the refrigerator and chill for at least 2 hours. This ensures that the filling firms up nicely. Patience is key here—the wait will be worth it!
Step 10: Melt the candy melts
In the meantime, melt your pastel-colored candy melts according to the package instructions. Stir until smooth and free of lumps. This colorful drizzle will add a fun touch to your cheesecakes!
Step 11: Drizzle over cheesecakes
Use a spoon or a fork to drizzle the melted candy over the top of each cheesecake. Aim for playful pastel designs that mimic the spirit of Easter. Your cheesecakes will look just as delightful as they taste!
Step 12: Add toppings
Finally, top each cheesecake with mini chocolate eggs, jelly beans, and a sprinkle of festive sprinkles. This is where you can really let your creativity shine! Each bite will be a colorful celebration.
Tips for Success
- Ensure your cream cheese is at room temperature for easier mixing.
- Use a light hand when folding in the whipped cream to maintain fluffiness.
- Customize your toppings based on what you have on hand or your family’s favorites.
- Don’t rush the chilling process; a well-set cheesecake is key!
- Experiment with different flavors of extracts for a unique twist.
Equipment Needed
- Muffin tin: Essential for shaping your mini cheesecakes. A silicone muffin tray works well too!
- Cupcake liners: Use these for easier removal. If you don’t have any, simply grease your muffin tin.
- Mixing bowls: Grab multiple for mixing crust and filling. Any size will do!
- Electric mixer: This makes beating the cream cheese and whipping the cream a breeze. A whisk can work if you’re feeling adventurous!
- Spatula: Perfect for folding in whipped cream and smoothing filling.
Variations of Easter No-Bake Mini Cheesecakes
- Fruit-flavored: Add some fresh fruit puree, like raspberry or strawberry, to the cream cheese mixture for a fruity twist that complements the creamy texture.
- Chocolate lovers: Incorporate melted chocolate into the cheesecake filling for a rich chocolate flavor. You can also add chocolate shavings as a topping!
- Gluten-free option: Replace graham cracker crumbs with gluten-free cookies or almond flour for a gluten-free crust that everyone can enjoy.
- Dairy-free adaptation: Use vegan cream cheese and coconut cream instead of heavy cream to create a delicious dairy-free version that doesn’t skimp on flavor.
- Nutty crunch: Toss in some finely chopped nuts, such as pecans or walnuts, into the crust for an added crunch and flavor dimension.
Serving Suggestions for Easter No-Bake Mini Cheesecakes
- Fresh fruit: Serve alongside a fruit salad for a refreshing contrast to the rich cheesecakes.
- Iced tea or lemonade: A tall glass of refreshing iced tea or lemonade complements the sweetness beautifully.
- Elegant display: Arrange the mini cheesecakes on a colorful platter, garnished with fresh mint leaves for a pop of color!
- Pair with coffee: A nice cup of coffee balances the sweetness, making for a delightful end to your meal.
- Individual servings: Present each cheesecake on a dessert plate with a fork beside it for a charming touch.
FAQs about Easter No-Bake Mini Cheesecakes
Can I make these Easter No-Bake Mini Cheesecakes ahead of time? Absolutely! These mini cheesecakes can be made a day in advance. Just store them in the fridge until you’re ready to serve. They taste even better after chilling overnight.
What can I use instead of graham cracker crumbs? If you’re out of graham crackers, you can use crushed cookies like Oreos or vanilla wafers, or even try crushed nuts for a gluten-free option. Each will provide a unique flavor!
How can I prevent my filling from being lumpy? To ensure a smooth filling, make sure your cream cheese is at room temperature before mixing. Beat it well before adding any other ingredients, and mix until completely creamy.
Can I customize the toppings for the mini cheesecakes? Definitely! Feel free to get creative with your toppings. You can use fresh fruit, chocolate shavings, or even a drizzle of caramel for a unique twist that fits your family’s taste!
Are Easter No-Bake Mini Cheesecakes suitable for vegetarians? Yes! This recipe is vegetarian-friendly. Just ensure that your candy melts and any optional toppings you choose are also vegetarian to keep everything compliant.
Final Thoughts
Creating these Easter No-Bake Mini Cheesecakes has been a delightful experience that fills your kitchen with warmth and joy. Not only do they look stunning, but each bite is a creamy dream that celebrates the spirit of Easter. Imagine sharing these treats with family and friends, watching their eyes light up with that first precious taste. This recipe allows for creativity and customization, making it a fun project for anyone, especially busy moms. So roll up your sleeves, join in the fun, and let these mini cheesecakes become a sweet tradition in your home!
Print
Easter No-Bake Mini Cheesecakes
- Total Time: 2 hours 30 minutes
- Yield: 12 mini cheesecakes 1x
- Diet: Vegetarian
Description
Delicious and delightful Easter No-Bake Mini Cheesecakes that are perfect for impressing your guests with their creamy texture and festive toppings.
Ingredients
- 1 1/2 cups graham cracker crumbs
- 1/4 cup unsalted butter, melted
- 1 tbsp granulated sugar
- 12 oz cream cheese, softened
- 1/2 cup powdered sugar
- 1 tsp vanilla extract
- 1 cup heavy whipping cream
- Pastel-colored candy melts
- Mini chocolate eggs or jelly beans
- Easter-themed or pastel sprinkles
Instructions
- Prepare the crust: In a medium bowl, mix graham cracker crumbs, melted butter, and sugar until the mixture resembles wet sand. Ensure the crumbs are well-coated with butter for a cohesive crust.
- Press into muffin tin: Press 1 to 2 tablespoons of the crumb mixture into the bottom of each lined cup in a 12-cup muffin tin. Firmly pack the crumbs using the back of a spoon to create a solid base.
- Chill the crust: Place the muffin tin in the refrigerator while you prepare the filling. This helps the crust firm up for easy handling.
- Beat the cream cheese: In a mixing bowl, beat the softened cream cheese until it is smooth and creamy, ensuring no lumps remain.
- Add sugar and vanilla: Add the powdered sugar and vanilla extract to the cream cheese, mixing until fully combined and smooth.
- Whip the cream: In a separate bowl, whip the heavy cream to stiff peaks. The cream should hold its shape well when the beaters are lifted.
- Fold in the whipped cream: Gently fold the whipped cream into the cream cheese mixture. Use a spatula to combine, taking care to maintain the light and airy texture.
- Fill the crusts: Spoon or pipe the filling evenly over the chilled crusts, smoothing the tops with a spatula for a neat finish.
- Refrigerate to set: Place the filled muffin tin back in the refrigerator and chill for at least 2 hours or until the filling is firm.
- Melt the candy melts: Following package instructions, melt the pastel-colored candy melts. Stir until smooth and free of lumps.
- Drizzle over cheesecakes: Use a spoon or fork to drizzle the melted candy melts over the top of each cheesecake in playful pastel designs.
- Add toppings: Top each cheesecake with mini chocolate eggs, jelly beans, and a sprinkle of festive sprinkles for an eye-catching finish.
Notes
- Make sure the cream cheese is at room temperature for easier mixing.
- Chilling time is crucial for a firm cheesecake consistency.
- Feel free to customize toppings based on personal preference.
- Prep Time: 30 minutes
- Cook Time: 0 minutes
- Category: Dessert
- Method: No-Bake
- Cuisine: American
Nutrition
- Serving Size: 1 mini cheesecake
- Calories: 220
- Sugar: 16g
- Sodium: 120mg
- Fat: 15g
- Saturated Fat: 9g
- Unsaturated Fat: 3g
- Trans Fat: 0g
- Carbohydrates: 20g
- Fiber: 1g
- Protein: 3g
- Cholesterol: 45mg