Introduction to Ghoulishly Fun Beetlejuice Mini Trifles
Hey there, fellow home cooking enthusiasts! If you’re like me, finding time to whip up something fun for Halloween can be a challenge. That’s why I’m excited to share my Ghoulishly Fun Beetlejuice Mini Trifles with you! These delightful treats are not just a feast for the eyes but also a breeze to make, perfect for those busy days when you still want to impress. Imagine layers of colorful cake and creamy filling, all packed into a cute jar—your family and friends will absolutely love them!
Why You’ll Love This Ghoulishly Fun Beetlejuice Mini Trifles
These Ghoulishly Fun Beetlejuice Mini Trifles are a lifesaver for busy moms and professionals. With minimal prep time, they deliver a spectacular dessert without overwhelming your schedule. The vibrant colors and whimsical layers not only taste delicious but also bring a festive vibe to your table. Plus, everyone can customize their jar, making them even more fun. Trust me, these trifles will steal the show at any gathering!
Ingredients for Ghoulishly Fun Beetlejuice Mini Trifles
Let’s dive into the fun part—gathering our ingredients! Here’s what you’ll need to create these eye-catching Ghoulishly Fun Beetlejuice Mini Trifles. I’ve included a few options and tips along the way to make this recipe even easier for you!
- White Cake Mix: The base of our trifles. You can substitute it with yellow cake mix for a different flavor profile.
- Instant Vanilla Pudding Mix: This adds luscious creaminess and enhances the flavor. Feel free to experiment with a butterscotch mix for a unique twist.
- Egg Whites: They help the cake stay light and fluffy. Remember, you can use whole eggs if you prefer a richer cake texture.
- Milk: Whole milk will give the best results, but any kind of milk will do in a pinch.
- Sour Cream: This keeps the cake moist and adds a subtle tanginess. Greek yogurt is a great dairy-free alternative!
- Vegetable Oil: It keeps the cake tender. You could also opt for melted coconut oil for added flavor.
- Vanilla Extract: A must for a delightful flavor. Almond extract can work wonders if you want something different.
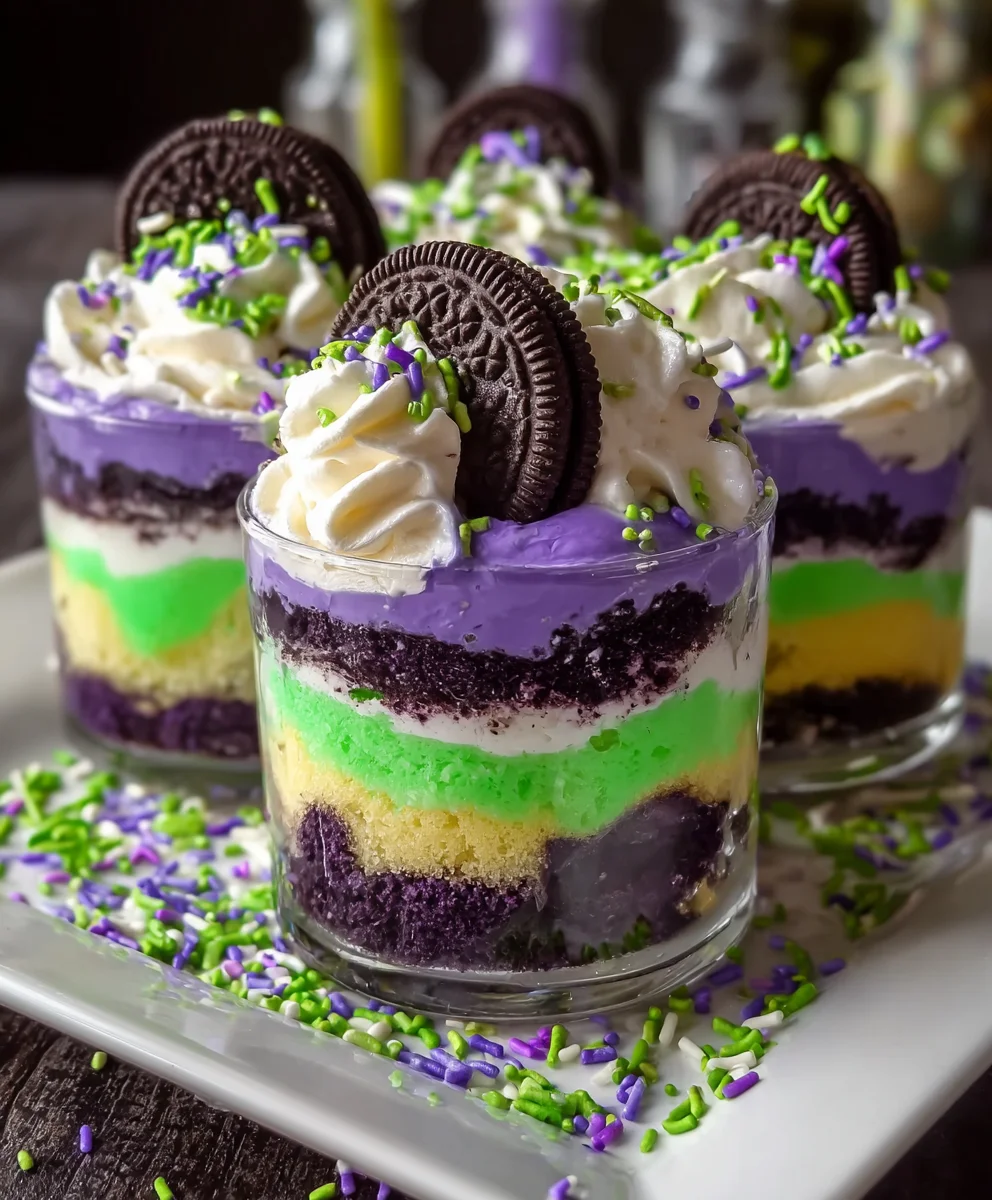
- Food Coloring (green and purple): This is where the magic happens! Create vibrant colors that take your dessert to the next level.
- Heavy Cream: Essential for whipping up that airy cream. If you’re looking for a dairy-free option, coconut cream works beautifully.
- Cream Cheese: It adds richness and creaminess to the filling. Softened cream cheese is key for blending smoothly.
- Powdered Sugar: Used for sweetening the cream filling. Granulated sugar is fine, though it may alter the cream’s texture.
- Oreos: For that crunchy layer between creamy and cake. You can use any chocolate cookie if you’re feeling adventurous!
- Sprinkles (optional): A fun way to decorate your trifles and give an extra festive touch.
All the exact measurements are listed at the bottom of the article, along with a handy printable option, so don’t worry about jotting everything down right now!
How to Make Ghoulishly Fun Beetlejuice Mini Trifles
Now that we have our fun ingredients ready, let’s get to the exciting part: making these Ghoulishly Fun Beetlejuice Mini Trifles! I promise you’ll find each step enjoyable and straightforward, even on a hectic day. Grab your apron, and let’s dive in!
Step 1: Preheat and Prepare
First things first, preheat your oven to 350°F (175°C) to get it nice and warm. This makes sure your cakes bake evenly. Next, grease two 8-inch round cake pans with non-stick spray. Don’t forget to line the bottoms with parchment paper—this little trick prevents any sticky mishaps when you’re ready to remove the cakes.
Step 2: Mix the Batter
In a large mixing bowl, combine the white cake mix, instant vanilla pudding mix, egg whites, milk, sour cream, vegetable oil, and vanilla extract. An electric mixer on medium speed is your best friend here; mix for about 2 minutes. This step is crucial because it helps incorporate air, making your cake light and fluffy!
Step 3: Divide and Color the Batter
Now, it’s time for some fun! Divide the batter into two bowls. Add green food coloring to one and purple to the other. I just love watching the colors swirl as I mix them in. Once you have your colorful batter, pour it into the prepared cake pans, making sure to spread it evenly.
Step 4: Bake the Cakes
Pop those pans into your preheated oven and let them bake for 28-30 minutes. To check if they’re done, insert a toothpick in the center. If it comes out clean or with just a few crumbs, you’re all set. Once baked, let them cool in the pans for about 10 minutes before flipping them onto a wire rack to cool completely.
Step 5: Cool and Cut the Cakes
Once the cakes have cooled, it’s time to cut them into cubes. I like making them about 1-inch squares. This shape is perfect for layering and gives a nice bite. It’s also an easy step to involve your kids if they’d like to help out in the kitchen!
Step 6: Prepare the Cream Filling
Next up, let’s whip up that luscious cream filling. In one bowl, whip the heavy cream until stiff peaks form. In another bowl, beat together the softened cream cheese, powdered sugar, and a splash of vanilla extract until smooth. Now gently fold the whipped cream into this mixture. The goal here is to keep that light, airy texture!
Step 7: Assemble the Trifles
Here comes the fun part—layering it all together! Start with a layer of the green cake cubes at the bottom of your jars. Next, sprinkle in some crushed Oreos for crunch. Follow this with a generous dollop of your creamy filling, then add a layer of purple cake cubes. Repeat the layers until your jars are full and beautiful! You can top them off with more crushed Oreos and sprinkles for an extra festive touch.
Tips for Success
- Use room temperature ingredients for better mixing and a fluffier cake.
- If you’re short on time, consider baking the cakes a day in advance and storing them in an airtight container.
- For even layers, use a kitchen scale to measure your cake cubes.
- Feel free to get creative with your layers; fruit or nuts could add fun textures!
- Chilling the finished trifles for a couple of hours before serving enhances the flavors.
Equipment Needed
- Mixing Bowls: Use glass or stainless steel bowls. They withstand mixing well!
- Electric Mixer: If you don’t have one, a whisk can work, but it’ll take a bit more elbow grease.
- Measuring Cups and Spoons: Essential for accurate ingredient amounts.
- 8-inch Round Cake Pans: You can use square pans if that’s all you have!
- Wire Rack: Handy for cooling cakes, but a plate will do in a pinch.
Variations of Ghoulishly Fun Beetlejuice Mini Trifles
- Chocolate Beetlejuice Trifles: Swap the white cake mix for chocolate cake mix for a rich twist!
- Gluten-Free Option: Use a gluten-free cake mix and make sure all other ingredients are certified gluten-free.
- Fruit Layers: Add layers of fresh fruit like raspberries or blueberries for a burst of color and natural sweetness.
- Vegan Adaptation: Replace egg whites with aquafaba and use coconut cream in place of heavy cream.
- Nutty Surprise: Incorporate chopped nuts between the layers for a crunchy element; almonds or pecans work well!
Serving Suggestions for Ghoulishly Fun Beetlejuice Mini Trifles
- Spooky Drinks: Pair these trifles with Halloween-themed mocktails or apple cider for a festive touch.
- Garnishes: Add whipped cream on top or a sprig of mint for a pop of color.
- Table Presentation: Serve on a colorful tablecloth adorned with Halloween decorations for added flair.
- Sharing Size: Create mini jars for party favors—perfect for guests to take home!
FAQs about Ghoulishly Fun Beetlejuice Mini Trifles
Can I make Ghoulishly Fun Beetlejuice Mini Trifles a day ahead?
Absolutely! These trifles can be made a day in advance. Just layer and store them in the refrigerator. They’ll taste even better after the flavors meld overnight!
How do I store leftover trifles?
Store any leftovers in an airtight container in the refrigerator. They should last for about 3-4 days, although they might not last that long—they’re too delicious!
Can I use a different type of cookie instead of Oreos?
Yes! Feel free to experiment with any chocolate cookie you prefer, but Oreos add that perfect crunch and flavor that pairs excellently with the creamy layers.
What if I don’t have heavy cream?
No worries at all! You can use coconut cream as a dairy-free alternative. It whips beautifully and adds a delicious tropical twist to your trifles.
Can I customize the colors for different occasions?
Definitely! Feel free to mix it up with different food coloring. Pink and blue for baby showers, or red and green for Christmas—just let your creativity run wild!
Final Thoughts
Creating these Ghoulishly Fun Beetlejuice Mini Trifles has been such a joyful journey! Each layer is a celebration of color and flavor that can really transform any gathering with festive flair. I love how they blend whimsy and taste in a delightful way that’s perfect for Halloween or simply when you want to impress your loved ones. Plus, knowing I can whip them up quickly amidst a busy schedule brings me so much satisfaction. So gather your family, unleash your creativity, and enjoy a spooky dessert that brings smiles and sweet memories to the table!
Print
Ghoulishly Fun Beetlejuice Mini Trifles
- Total Time: 1 hour
- Yield: 12 servings 1x
- Diet: Vegetarian
Description
These Ghoulishly Fun Beetlejuice Mini Trifles are a whimsical and delightful dessert that combines layers of colorful cake, creamy filling, and crunchy toppings, perfect for Halloween or any spooky celebration.
Ingredients
- 1 box White Cake Mix
- 1 package Instant Vanilla Pudding Mix
- 3 large Egg Whites
- 1 cup Milk
- 1 cup Sour Cream
- 1/2 cup Vegetable Oil
- 1 teaspoon Vanilla Extract
- 1 teaspoon Food Coloring (green and purple)
- 1 cup Heavy Cream
- 8 oz Cream Cheese
- 1/2 cup Powdered Sugar
- 15 cookies Oreos
- Sprinkles (optional)
Instructions
- Preheat your oven to 350°F (175°C) and grease two 8-inch round cake pans with non-stick spray, lining the bottoms with parchment paper.
- In a large mixing bowl, combine the white cake mix, instant vanilla pudding mix, egg whites, milk, sour cream, vegetable oil, and vanilla extract. Mix with an electric mixer on medium speed for 2 minutes.
- Divide the batter into two bowls. Add green food coloring to one bowl and purple to the other. Pour into prepared cake pans and bake for 28-30 minutes, or until a toothpick comes out clean.
- Let the cakes cool, then cut into small cubes.
- Whip the heavy cream in a bowl until stiff peaks form. In another bowl, beat cream cheese, powdered sugar, and vanilla extract together until smooth. Fold the whipped cream into the mixture.
- Layer green cake cubes, crushed Oreos, cream filling, purple cake cubes, and more Oreos in jars.
- Enjoy immediately or store in the refrigerator until ready to serve.
Notes
- For a different look, substitute with yellow cake mix.
- You can use almond extract instead of vanilla for a different flavor.
- Whipping coconut cream is a great dairy-free alternative for heavy cream.
- Regular sugar can be used, but it may affect the texture of the cream filling.
- Prep Time: 30 minutes
- Cook Time: 30 minutes
- Category: Dessert
- Method: Baking and Layering
- Cuisine: American
Nutrition
- Serving Size: 1 trifle
- Calories: 320
- Sugar: 21g
- Sodium: 210mg
- Fat: 15g
- Saturated Fat: 7g
- Unsaturated Fat: 6g
- Trans Fat: 0g
- Carbohydrates: 43g
- Fiber: 1g
- Protein: 4g
- Cholesterol: 30mg