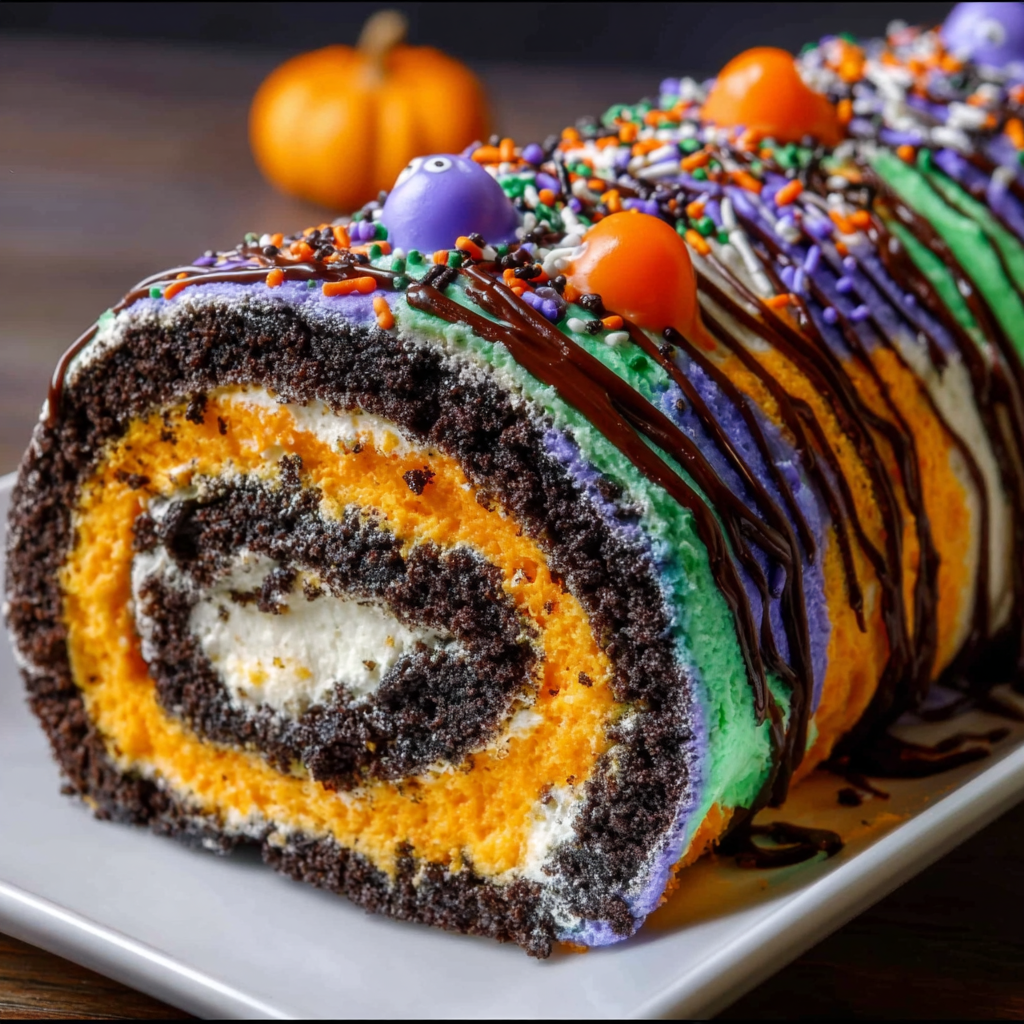
Introduction to Halloween Oreo Roll
With the leaves turning and Halloween just around the corner, it’s the time of year that … and then creates not only sweet treats but special memories with loved ones. The Halloween Oreo Roll isn’t only creepy good but very photogenic, perfect for those moms and professionals short on time yet big on flair. Think of a no-bake dessert that will make everyone smile at how pretty and fun their table is on Halloween night! So, herein lies your quick answer to all your Halloween related problems of taking everyone back home all jolly hearty and happily satiated.
Why You’ll Love This Halloween Oreo Roll
This Halloween Oreo Roll is a tasty and convenient amalgamation of convening and fun. Well, it’s no-bake, so you won’t spend more than 20 minutes making it—the rest of your day filled with all those other holiday activities. The cream, rich filling along with the colorful frosting truly has that taste of both indulgence and festivity. Most importantly, your entire family hypes it up so everyone feels included in the Halloween spirit!
Ingredients for Halloween Oreo Roll
Gathering the right ingredients is the first step toward creating this delightful Halloween Oreo Roll. Here’s what you’ll need:
- Halloween Oreos: Opt for the orange crème version for a festive vibe. These cookies provide the perfect base with their rich flavor.
- Cream Cheese: Full-fat cream cheese is ideal for that smooth, creamy texture that binds everything together. Don’t skip this; it’s the secret to a luscious roll!
- Vanilla Extract: Just a teaspoon adds warmth and depth to the flavor. You can swap this for almond extract if you’re feeling adventurous!
- Halloween-Colored Frosting: Pick shades like purple, green, or orange to give your roll a spooky flair. The frosting adds both sweetness and color.
- Sprinkles: Choose Halloween-themed sprinkles to sprinkle joy on your finished treat. Colors and shapes can make it even more fun!
- Candy Eyes: For a playful, spooky effect, these little candies are optional, but they sure do bring the treat to life!
- Chocolate Drizzle: A touch of melted chocolate adds decadence. It’s entirely optional but oh-so-delicious!
For specific measurements, check the bottom of the article. Happy cooking!
How to Make Halloween Oreo Roll
Step 1: Crush the Oreos
Start by tossing those Halloween Oreos into a zip-top bag. Grab a rolling pin or a heavy object and crush them until they’re a fine powder. You want it to resemble sand, no big chunks allowed! This step is not just about breaking cookies; it sets the foundation for your Halloween Oreo Roll.
Step 2: Mix Ingredients
In a mixing bowl, combine the crushed Oreos with room-temperature cream cheese and vanilla extract. Use a hand mixer or a spatula to blend everything until smooth and well-combined. This should be a thick mixture. Don’t worry; the cream cheese will make it creamy with a lovely flavor. The aroma alone will make your kitchen feel festive!
Step 3: Shape the Mixture
Now, lay a piece of parchment paper on your countertop. Transfer the mix onto the parchment and shape it into a rectangle, roughly 10×14 inches. Getting this shape right is key to rolling it later. Use your hands to press and flatten it into place—don’t be shy; get the mixture snug!
Step 4: Frost the Mixture
Take your Halloween-colored frosting and spread it evenly on top of the Oreo rectangle. You can use a spatula or a butter knife for this. Make sure to cover all the corners; every bite should burst with flavor. Choosing vibrant colors will not only make it delicious but also visually appealing!
Step 5: Roll it Up
With the long side facing you, lift the parchment paper and start rolling the mixture tightly from one end to the other, like a burrito. This is where the magic happens! The parchment helps you get a tight roll without sticking. Seal the ends carefully, so no frosting escapes.
Step 6: Chill the Roll
Place the roll in the refrigerator for at least an hour—or pop it in the freezer for just 20 minutes if you’re in a hurry. Chilling helps it firm up, making slicing easier. Trust me, nobody wants a gooey mess when it’s time to serve!
Step 7: Slice the Roll
Once chilled, take the roll out and grab a warm knife. This helps make clean cuts. Slice the roll into 1-inch rounds. You’ll have pieces that are perfectly portioned and ready for decorating. Enjoy how the colorful layers peek through each slice; it’s a sight to behold!
Step 8: Decorate and Serve
Now comes the fun part! Decorate each slice with sprinkles, candy eyes, or a drizzle of melted chocolate. Get creative—there are no limits here! Finally, place the slices on a platter, ready to wow your family and friends. When you serve these, be prepared for smiles, laughs, and a few “oohs” and “aahs”! Enjoy your delightful Halloween Oreo Roll!
Tips for Success
- Make sure your cream cheese is at room temperature for easy blending.
- Wear disposable gloves if you prefer not to get your hands sticky while shaping.
- Experiment with different frosting colors for added fun!
- Keep the roll tightly sealed when chilling to maintain its shape.
- When slicing, wipe the knife with a damp cloth between cuts for cleaner edges.
Equipment Needed
- Mixing Bowl: Any size will do, but a larger bowl ensures easier mixing.
- Hand Mixer or Spatula: Both work for blending the ingredients smoothly.
- Parchment Paper: This helps in rolling and prevents sticking. You can use wax paper in a pinch.
- Knife: A sharp or warm knife helps slice the roll evenly.
- Zip-Top Bag: Perfect for crushing Oreos; a rolling pin also works great!
Variations of Halloween Oreo Roll
- Gluten-Free Option: Use gluten-free Oreos to make this delicious treat suitable for those with gluten sensitivities.
- Vegan Version: Substitute cream cheese with a dairy-free alternative, like vegan cream cheese or nut-based spreads.
- Nutty Twist: Incorporate crushed nuts, like pecans or walnuts, into the Oreo mixture for added texture and flavor.
- Chocolate Lovers: Use chocolate-flavored Oreos for an extra chocolatey roll that kids and adults will adore!
- Fruit Flavored: Mix in some citrus zest, like orange or lemon, to balance out the sweetness with a refreshing tang.
Serving Suggestions for Halloween Oreo Roll
- Spooky Platter: Serve your Halloween Oreo Roll slices on a black or orange plate to enhance the festive feel.
- Accompanying Drinks: Pair with fun drinks like pumpkin spice lattes or ghostly white hot chocolate.
- Fruit Garnish: Add some fresh fruit, like berries or citrus slices, for a refreshing contrast.
- Extra Chocolate: Serve with a side of chocolate sauce for dipping—pure indulgence!
- Halloween-Themed Decor: Sprinkle some additional Halloween sprinkles around the platter for visual appeal.
FAQs about Halloween Oreo Roll
Can I make the Halloween Oreo Roll ahead of time?
Absolutely! This treat stores well in the fridge for 2-3 days. Just keep it wrapped in parchment paper or plastic wrap to maintain its freshness. It’s perfect for preparing ahead of your Halloween party!
What if I can’t find Halloween Oreos?
No worries! Regular Oreos work just fine. You can enhance their festive flair with colorful frosting, sprinkles, and creative decorations. The taste remains the same and is still delicious!
How do I store leftover slices of Halloween Oreo Roll?
Store any leftovers in an airtight container in the fridge. You’ll want to enjoy them within a few days for the best flavor and texture. Don’t worry; they won’t last long!
I want a more chocolate flavor; what can I do?
Consider using chocolate Oreos or add cocoa powder to the cream cheese mixture for that extra chocolate kick. Drizzling with chocolate or serving with chocolate sauce enhances the chocolatey goodness!
Can kids help with the Halloween Oreo Roll?
Definitely! This recipe is fun and easy, making it a great choice for a family activity. Kids can crush the Oreos, spread the frosting, and even help decorate. Just keep an eye on those candy eyes—everyone loves them!
Final Thoughts
Creating the Halloween Oreo Roll has been a delightful journey filled with laughter and creativity. This recipe not only brings a burst of flavor but also adds a touch of joy to your Halloween festivities. As you watch your family and friends enjoy this whimsical treat, you’ll feel the warmth of connection that only shared food creates. Whether it’s the vibrant colors, the playful toppings, or the ease of making it, this dessert is sure to become a cherished addition to your holiday traditions. So let’s roll into Halloween with smiles, sweets, and unforgettable moments!
Print
Halloween Oreo Roll
- Total Time: 1 hour 20 minutes
- Yield: 12 servings 1x
- Diet: Vegetarian
Description
A fun and spooky treat made with Halloween Oreos, cream cheese, and colorful frosting, perfect for Halloween celebrations.
Ingredients
- 24 cookies Halloween Oreos (Opt for the orange crème version)
- 8 ounces Cream Cheese (Full-fat cream cheese is ideal)
- 1 teaspoon Vanilla Extract (Almond extract can be a delightful swap)
- 1 cup Halloween-Colored Frosting (Choose shades like purple, green, or orange)
- 1 cup Sprinkles (Halloween-themed sprinkles)
- 1 cup Candy Eyes (For a playful, spooky effect)
- 1/2 cup Chocolate Drizzle (For a touch of decadence)
Instructions
- Crush the Oreos until they resemble a fine powder.
- Mix the crushed Oreos with cream cheese and vanilla extract until combined.
- Shape the mixture into a rectangle approximately 10×14 inches on parchment paper.
- Spread the Halloween-colored frosting evenly over the Oreo mixture.
- Roll the mixture tightly from one end into a log shape using parchment paper.
- Seal the roll and chill in the refrigerator for at least 1 hour or freeze for 20 minutes.
- Slice the roll into 1-inch rounds using a warm knife.
- Decorate with optional sprinkles, candy eyes, or chocolate drizzle before serving.
Notes
- Ensure the cream cheese is at room temperature for easier mixing.
- Chilling the roll will help it hold its shape when slicing.
- Feel free to customize the decorations based on your Halloween theme.
- Prep Time: 20 minutes
- Cook Time: 0 minutes
- Category: Dessert
- Method: No-bake
- Cuisine: American
Nutrition
- Serving Size: 1 slice
- Calories: 150
- Sugar: 12g
- Sodium: 150mg
- Fat: 8g
- Saturated Fat: 4g
- Unsaturated Fat: 3g
- Trans Fat: 0g
- Carbohydrates: 19g
- Fiber: 1g
- Protein: 2g
- Cholesterol: 30mg