Introduction to Ice Cream Sandwiches Made with Homemade Brownies Recipe
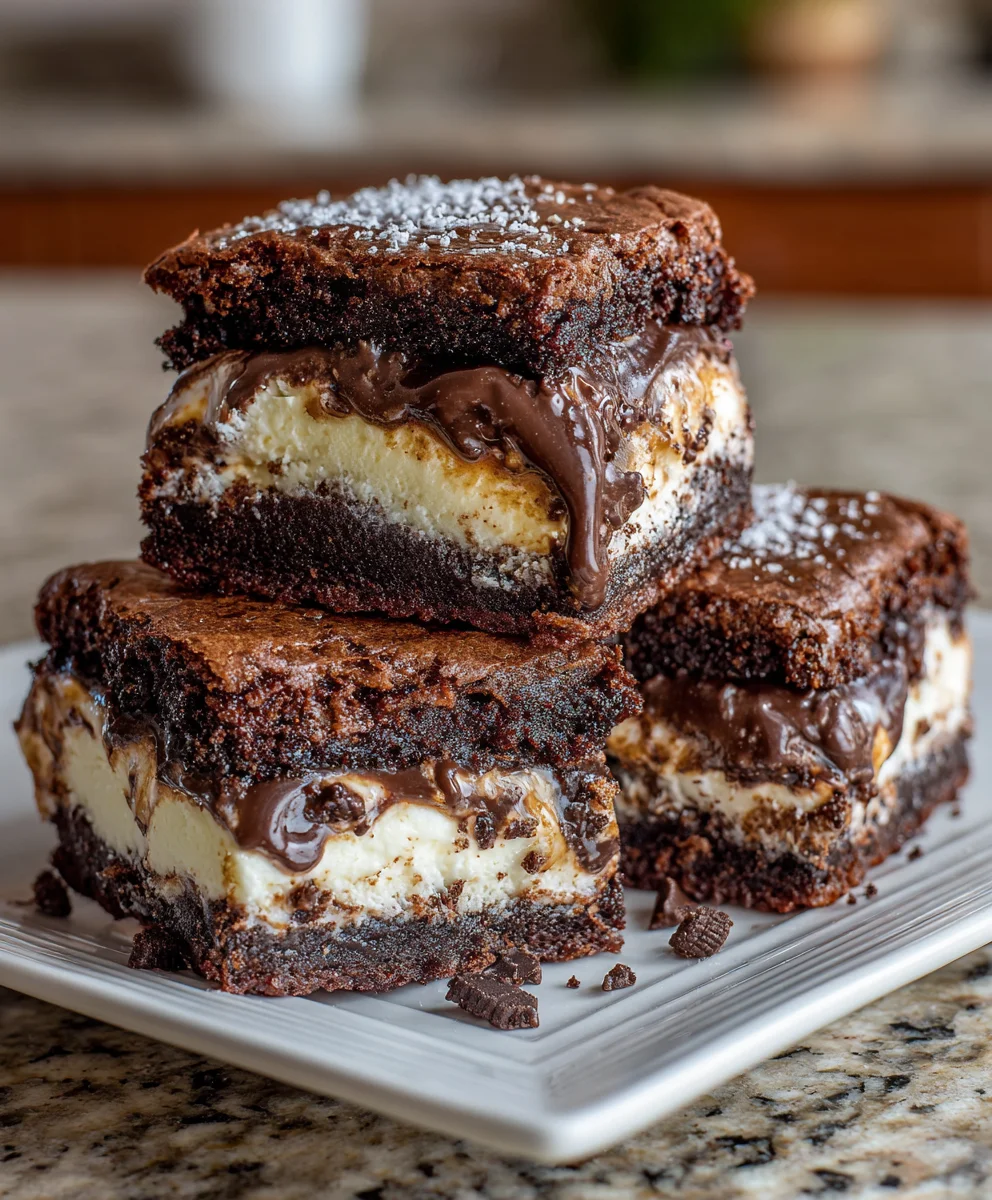
There’s something magical about blending the rich, fudgy goodness of brownies with the sweet, creamy texture of ice cream. That’s where my Ice Cream Sandwiches Made with Homemade Brownies Recipe comes to life. Picture a busy afternoon when you crave a sweet treat that’s not only delightful but also simple to whip together. This recipe is your answer! It’s perfect for impressing loved ones at gatherings or just treating yourself after a long day. Trust me, these ice cream sandwiches will brighten up your day in the most delicious way!
Why You’ll Love This Ice Cream Sandwiches Made with Homemade Brownies Recipe
Let’s be honest—life gets hectic, and we all need a quick, sweet escape now and then! These ice cream sandwiches are a breeze to create. The rich brownies are baked in moments, while the ice cream adds a layer of cool creaminess that balances perfectly. Whether you’re hosting friends or enjoying a quiet night in, this recipe encapsulates joy, simplicity, and irresistible flavor all in one delightful bite!
Ingredients for Ice Cream Sandwiches Made with Homemade Brownies Recipe
Gathering the right ingredients sets the stage for crafting these indulgent treats. Here’s what you’ll need:
- Unsalted Butter: Essential for rich flavor, melting it helps create a fudgy texture.
- Granulated Sugar: This sweetener adds sweetness and enhances the brownies’ moistness.
- Light Brown Sugar: Its molasses content gives the brownies a deeper, more complex flavor.
- Large Eggs: They bind everything together and provide moisture—try to use room temperature eggs for best results.
- Vegetable Oil: Adds richness and helps achieve a gooey brownie base.
- Pure Vanilla Extract: A touch of this is magic—it elevates the overall flavor profile.
- All-Purpose Flour: This is the base of the brownies, providing structure without being too dense.
- Cocoa Powder: Use quality cocoa for that beautiful chocolate essence; it makes a world of difference!
- Salt: Just a pinch balances the sweetness and enhances all the flavors in the brownies.
- Favorite Ice Cream Flavor: This is where you can get creative! Use any flavor that makes your taste buds dance.
All ingredient quantities are at the bottom of the article and are available for printing. Feel free to explore your local store for fresh ingredients or to reach into your pantry for what you have on hand; these sandwiches are all about personalization!
How to Make Ice Cream Sandwiches Made with Homemade Brownies Recipe
Now that we have our ingredients ready, let’s dive into the delightful process of making Ice Cream Sandwiches Made with Homemade Brownies. This is where the fun happens! Follow my lead, and you’ll be on your way to a sweet indulgence in no time.
Preparing the Oven and Baking Pans
First things first—preheat your oven to 350 degrees. While it warms up, grab two 8×8 pans and grease them with butter or a baking spray. This step keeps those brownies from sticking later on. Then, line the bottom with parchment paper. Let that paper hang over the sides, about 4-6 inches. This will make it super easy to lift the brownies out once they’re baked. Trust me, it’s a game-changer!
Mixing the Brownie Batter
In a medium-sized bowl, combine the melted butter with granulated and brown sugar. I like to use a hand mixer on medium speed to get things nice and smooth. Once that’s combined, add the eggs one by one, mixing after each. This incorporation creates that heavenly crackled top we all adore in brownies! Don’t forget to add the vegetable oil and pure vanilla extract next; they give your brownie batter a silken texture.
In another bowl, mix the all-purpose flour, cocoa powder, and salt together. Then, gradually add this dry mix to the wet mixture while reducing your mixer’s speed. Stir until everything is just combined. You want it to be thick and rich—like a beautiful chocolate dream!
Baking the Brownies
Divide the brownie batter between your two prepared pans. Use a rubber spatula to gently spread it evenly. They need to bake for about 30-40 minutes. Check them around the 30-minute mark by inserting a toothpick into the center. If it comes out with just a few moist crumbs, you’re golden! Make sure not to overbake; you want that fudgy texture we all love!
Cooling and Layering with Ice Cream
Once out of the oven, let your brownies cool for about 10 minutes. It’s essential to let them cool adequately, so they hold their shape. Use the parchment paper to lift one brownie layer onto a cooling rack. Wait until it’s completely cool—room temperature is ideal. Then, thaw your favorite ice cream for about 5-10 minutes. This way, it’s easier to spread.
Return the first brownie layer to its pan, removing the parchment paper. Spread the softened ice cream evenly over the brownie. Next, invert the second brownie layer and place it on top. Cover it with aluminum foil or plastic wrap, and freeze for at least 6 hours, or overnight for the best results.
Freezing and Serving
When you’re ready to enjoy your frozen treat, take it out of the freezer. Let it thaw a bit for 5-10 minutes; this makes slicing a breeze. Carefully lift the whole block out using the overhanging parchment paper. With a sharp knife, cut into 8 even squares. Serve immediately and watch the smiles light up the room! Enjoy your delightful Ice Cream Sandwiches Made with Homemade Brownies!
Tips for Success
- Choose high-quality cocoa powder for a richer chocolate flavor.
- Use room temperature eggs for better mixing and texture.
- Don’t overbake the brownies; a little gooeyness is key!
- Let the ice cream soften slightly for easier spreading.
- Make these sandwiches a day ahead for the best taste and texture.
Equipment Needed
- 8×8 Baking Pans: If you don’t have these, any square or rectangular pan will work.
- Mixing Bowls: A medium bowl for mixing and a large one for combining ingredients will do the trick.
- Hand Mixer: A whisk can substitute, but it requires more effort.
- Parchment Paper: If unavailable, greasing your pans thoroughly will help.
- Sharp Knife: A pizza cutter works well for slicing, too!
Variations
- Nutty Brownies: Add chopped walnuts or pecans to the brownie batter for a delightful crunch.
- Decadent Peanut Butter: Swirl in some creamy or chunky peanut butter into the brownie batter before baking for a nutty twist.
- Gluten-Free Option: Substitute all-purpose flour with a 1:1 gluten-free baking blend for a gluten-free treat.
- Ice Cream Flavors: Experiment with ice cream flavors like cookies and cream, mint chocolate chip, or seasonal favorites like pumpkin spice.
- Frozen Yogurt: For a lighter version, use frozen yogurt instead of regular ice cream.
- Extra Toppings: Top your ice cream sandwich with sprinkles, chocolate chips, or drizzles of caramel or chocolate sauce.
Serving Suggestions for Ice Cream Sandwiches Made with Homemade Brownies Recipe
- Perfect Pairing: Serve with a drizzle of warm chocolate sauce for an extra indulgent touch.
- Fresh Berries: Add a side of strawberries or raspberries for a pop of freshness.
- Presentation: Dust with powdered sugar and serve on a colorful plate to impress your guests!
- Chilled Beverages: Pair with milkshakes or your favorite iced coffee for a delightful treat.
FAQs about Ice Cream Sandwiches Made with Homemade Brownies Recipe
Can I use store-bought brownies instead of homemade?
Absolutely! If you’re in a rush or just prefer the convenience, store-bought brownies can serve as a fantastic base. Just ensure they’re thick enough to hold the ice cream without falling apart.
How long can these ice cream sandwiches be stored in the freezer?
These delightful Ice Cream Sandwiches Made with Homemade Brownies can be stored in the freezer for up to a week. Just remember to wrap them well to avoid freezer burn!
What is the best way to slice the sandwiches?
To achieve perfect squares, let the block thaw for 5-10 minutes after removal from the freezer. A sharp knife works wonders, or a pizza cutter can slice through smoothly too!
Can I make these sandwiches ahead of time?
Yes! These sandwiches are perfect for meal prep. Just prepare them a day in advance and let them freeze overnight for the best texture and flavor.
What ice cream flavors work best with these brownies?
The beauty of this recipe is its versatility! Classic chocolate or vanilla works beautifully, but don’t shy away from unique flavors like mint chocolate chip or cookie dough for a fun twist.
Final Thoughts
Ice Cream Sandwiches Made with Homemade Brownies are not just a dessert; they’re an experience filled with joy. The delightful crunch of the brownie paired with the smoothness of ice cream can transport you to your happiest moments. Whether you’re celebrating with family, sharing laughter with friends, or simply taking a moment for yourself, these treats make every occasion a little sweeter. Remember, it’s not just about the ingredients; it’s about the love and memories you create in your kitchen. So, roll up your sleeves, get baking, and let the sweet indulgence take you away!
Print
Ice Cream Sandwiches Made with Homemade Brownies Recipe
- Total Time: 6 hours 55 minutes
- Yield: 8 servings 1x
- Diet: Vegetarian
Description
Delicious ice cream sandwiches made with rich homemade brownies and your favorite ice cream flavor.
Ingredients
- 1 1/2 cups unsalted butter (melted)
- 2 1/4 cups granulated sugar
- 1 1/2 cups light brown sugar (packed)
- 6 large eggs (room temperature)
- 3 tbsp vegetable oil
- 2 tbsp pure vanilla extract
- 2 1/4 cups all purpose flour
- 1 1/2 cups cocoa powder
- 1 1/2 tsps salt
- 1.5 qts favorite ice cream flavor
Instructions
- Preheat the oven to 350 degrees. Grease two 8×8 pans with butter or baking spray, then line the bottom with parchment paper, leaving about 4-6” of paper hanging over the sides.
- In a medium sized bowl, add melted butter, granulated sugar and brown sugar and mix with a hand mixer on medium speed.
- Add eggs one at a time, mixing after each addition to incorporate. Mix well to create the crackled top we all love in brownies.
- Mix in oil and vanilla extract.
- Combine flour, cocoa powder, and salt in a bowl. Reduce speed of mixer.
- In intervals, add flour mixture to wet mixture until all ingredients are incorporated.
- Add half the brownie batter to each pan and use a rubber spatula to gently spread it.
- Bake for 30-40 minutes or until a toothpick inserted into the center comes out just barely clean. Don’t overbake.
- Remove from the oven and allow brownies to cool for 10 minutes.
- Use parchment paper to carefully lift the brownies out onto a cooling rack. Only peel the parchment off one of the halves. Cool until they reach room temperature.
- Thaw the ice cream for 5-10 minutes.
- Return the first half of the brownie to the pan (the one with the parchment paper on it). Spread the ice cream over the top.
- Invert the second half of the brownie and place it over the top. Cover with aluminum foil or plastic wrap and freeze for at least 6 hours or overnight for best results.
- When ready to cut, remove from the freezer and thaw for 5-10 minutes. Use the parchment paper to lift the entire block out, then use a sharp knife to cut into 8 even squares. Serve and enjoy!
Notes
- Feel free to use less ice cream if desired.
- For best results, allow sandwiches to freeze overnight.
- Customize with different ice cream flavors or add-ins.
- Prep Time: 20 minutes
- Cook Time: 35 minutes
- Category: Dessert
- Method: Baking and Freezing
- Cuisine: American
Nutrition
- Serving Size: 1 sandwich
- Calories: 380
- Sugar: 30g
- Sodium: 150mg
- Fat: 19g
- Saturated Fat: 10g
- Unsaturated Fat: 6g
- Trans Fat: 0g
- Carbohydrates: 48g
- Fiber: 3g
- Protein: 6g
- Cholesterol: 80mg