Introduction to No-Knead Dill Gouda Artisan Bread
As a busy mom myself, I know how precious every minute is, especially when it comes to preparing meals. That’s why I fell head over heels for this No-Knead Dill Gouda Artisan Bread. Picture it: warm, crusty bread fresh from the oven, its aroma wrapping around you like a comforting hug. It’s delightful, easy, and requires minimal effort! This recipe is a quick solution for a hectic day while impressing your loved ones at the dinner table. Trust me; once you try this bread, you won’t want to bake anything else!
Why You’ll Love This No-Knead Dill Gouda Artisan Bread
This No-Knead Dill Gouda Artisan Bread is not just easy to make; it’s also packed with flavor that dances on your palate. You only need a handful of ingredients and a little patience. The taste of fresh dill paired with creamy Gouda creates a taste sensation that will have your family asking for seconds. Plus, the no-knead method means you’ll spend less time in the kitchen and more time enjoying life!
Ingredients for No-Knead Dill Gouda Artisan Bread
Gathering the right ingredients is half the fun of baking. For your No-Knead Dill Gouda Artisan Bread, you’ll need a few simple essentials:
- Water: Room temperature is key to activating the yeast. Aim for about 70°F for optimal results.
- Active dry yeast: The magic behind the rise! Ensure it’s fresh or active to achieve that perfect fluffy texture.
- Bread flour: This provides structure and chewiness. All-purpose flour can work in a pinch, but the texture may differ.
- Kosher or fine sea salt: Elevates flavor and strengthens the dough; don’t skip it!
- Freshly ground black pepper: Just a hint adds warmth without overpowering the delicate dill and cheese.
- Fresh dill: Adds a lovely herbal note; if fresh isn’t available, dried dill can work, but it’s not quite the same!
- Gouda cheese: The star of the bread! Its creamy flavor brings richness and pairs beautifully with dill. Feel free to substitute with cheddar for a sharper taste or fontina for a melty treat!
For exact measurements, scroll to the bottom of the article where they’re conveniently listed and printable. Gather these ingredients, and let’s get started on baking this delightful bread together!
How to Make No-Knead Dill Gouda Artisan Bread
Step 1: Prepare the Yeast Mixture
Start by pouring the room-temperature water into a bowl. Add the active dry yeast and let it sit for about 10-15 minutes. This step is essential; warm water is like a gentle wake-up call for the yeast, helping it bloom and become active. You’ll know it’s ready when it’s frothy and bubbly. This bubbly goodness is the magic that raises your dough!
Step 2: Mix the Dry Ingredients
In a large mixing bowl, whisk together the bread flour, kosher salt, freshly ground black pepper, and chopped dill. This doesn’t have to be perfect—just give it a good stir until everything is mixed well. The fragrance of fresh dill will tickle your senses, setting the stage for the deliciousness to come. Take a moment to enjoy it!
Step 3: Combine and Form the Dough
Now, pour your frothy yeast mixture into the bowl containing the dry ingredients. Using a rubber spatula, gently mix until everything starts to come together. You’re aiming for a sticky, shaggy dough, with some flour still clinging to the edge of the bowl. No need for a mixer or kneading! Embrace the messiness of it; that’s part of the charm!
Step 4: First Rise
Cover your mixing bowl with a clean kitchen towel or plastic wrap and find a warm spot in your kitchen. Let the dough rise for about 8-10 hours or until it has doubled in size. Take this time to sip on your coffee or catch up on a favorite show. The dough will develop those lovely flavors, making each bite utterly delightful!
Step 5: Shape the Dough
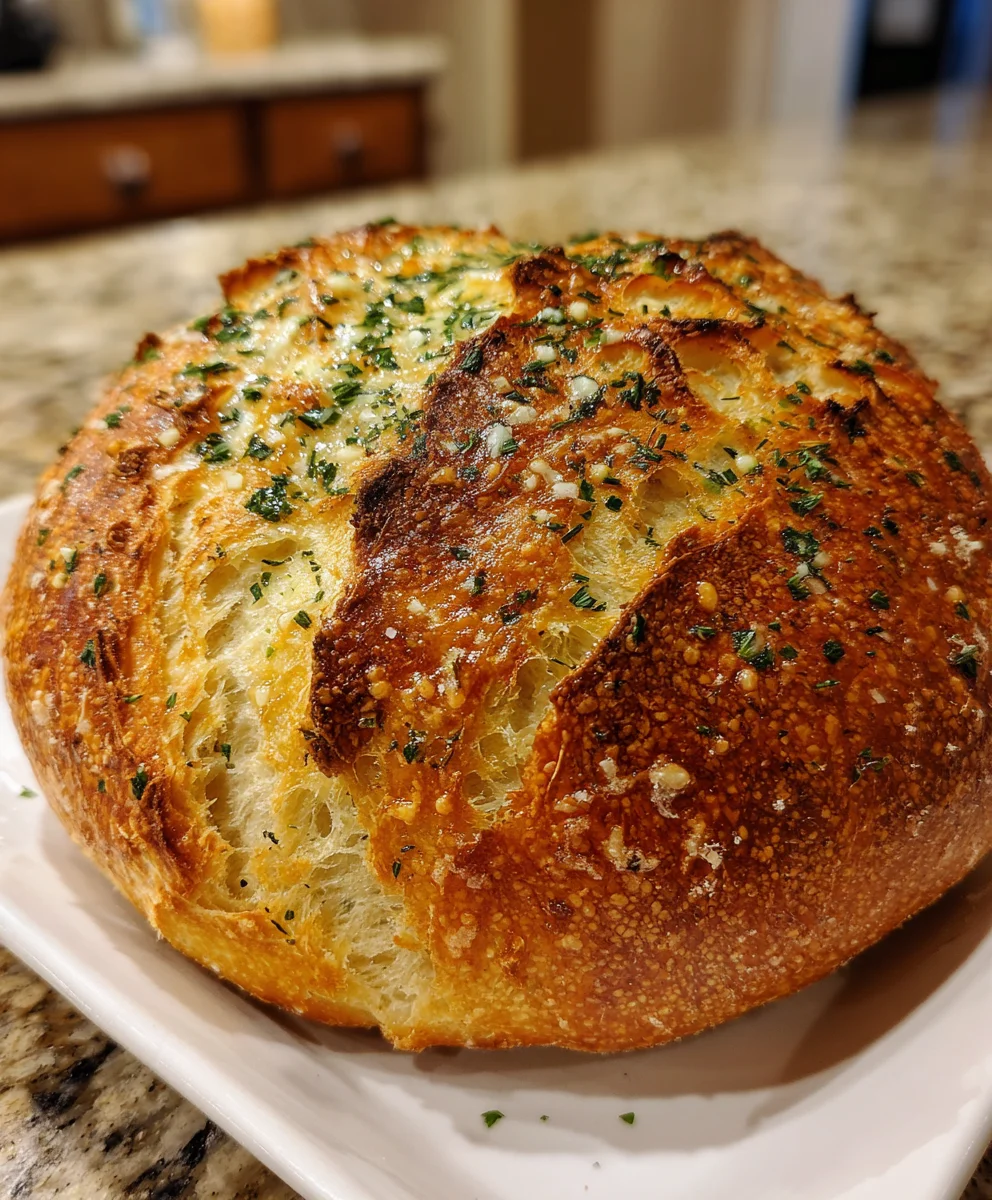
Once your dough has risen, gently turn it out onto a floured surface. With floured hands, fold the dough over itself a few times until it holds together. Shape it into a rectangle and push the cubed Gouda into the dough. Roll it into a log and tuck the ends under. Sprinkle with a little extra flour and shape it into a ball. This is where the magic happens, with gooey Gouda making every bite unforgettable!
Step 6: Refrigeration
Transfer your beautifully shaped dough into a flour-dusted bowl. Cover it up again, this time with plastic wrap, and pop it in the fridge. Let it sit overnight or up to 48 hours! This cold fermentation enhances the flavor and texture. It’s a great option for busy days when you want fresh bread but need to plan ahead.
Step 7: Bake the Bread
When you’re ready to bake, preheat your oven to 450°F (232°C) and place your Dutch oven inside. Take the dough out from the fridge and turn it onto a lightly floured surface, seam side down. Gently mold it into a loaf shape and place it on parchment paper. Score the top with a sharp knife—this allows steam to escape, helping your bread to bake evenly.
Step 8: Cooling the Bread
Carefully remove the hot Dutch oven from your oven and lift the dough (along with the parchment) into it. Cover and bake for 30 minutes, then remove the lid for an additional 15-20 minutes. You want it to be golden brown and sound hollow when tapped. Once it’s baked, transfer the bread to a wire rack and let it cool for at least an hour. Trust me, the aroma will make it hard to wait, but cooling brings out the best flavor!
Tips for Success
- Use room-temperature water to activate the yeast effectively.
- Don’t rush the first rise; longer means better flavor.
- For an easy cleanup, use parchment paper when baking.
- Be generous with flour during shaping to prevent sticking.
- Patience is key; allowing the dough to rest enhances its character.
- Serve with butter or a dip to elevate your bread experience!
Equipment Needed
- Large mixing bowl: Any bowl works, but a glass or stainless steel one makes it easy to monitor rising.
- Rubber spatula: A must for mixing, but a wooden spoon can do in a pinch.
- Dutch oven: If you don’t have one, a large oven-safe pot with a lid is a great substitute.
- Parchment paper: This ensures easy transfer and a less-sticky cleanup; aluminum foil can be used in a bind.
- Wire rack: Ideal for cooling; a cutting board works if you don’t have one!
Variations of No-Knead Dill Gouda Artisan Bread
- Herb Infusion: Add other fresh herbs like thyme or chives alongside dill for a garden-fresh flavor profile.
- Cheese Switch: Try mixing in different cheeses, such as cheddar or feta, to create a unique taste sensation.
- Spice it Up: Incorporate a pinch of red pepper flakes or smoked paprika for a subtle kick.
- Make it Whole Grain: Substitute part of the bread flour with whole wheat flour for added nutrition and nuttiness.
- Nutty Flavor: Add chopped walnuts or sunflower seeds for extra crunch and a hint of earthiness.
- Gluten-Free Option: Use a gluten-free flour blend to cater to dietary restrictions while still enjoying artisan bread.
Serving Suggestions for No-Knead Dill Gouda Artisan Bread
- Butter & Herbs: Spread on some fresh butter mixed with herbs for a deliciously rich topping.
- Pair with Soup: This bread complements creamy soups like potato leek or tomato basil beautifully.
- Cheese Board: Slice it for a cheese platter, alongside wines and assorted cheeses for a delightful gathering.
- Brunch Delight: Serve with eggs and fresh fruit for a Sunday morning treat everyone will love.
- Presentation Tip: For a rustic touch, serve straight from your Dutch oven or on a wooden board.
FAQs about No-Knead Dill Gouda Artisan Bread
Can I use all-purpose flour instead of bread flour? Yes, you can! While bread flour gives a chewier texture, all-purpose flour will still yield delicious results. Just be aware that the texture might be slightly different.
How long can I store the bread? This No-Knead Dill Gouda Artisan Bread is best enjoyed fresh, but you can store it in an airtight container at room temperature for up to three days. For longer storage, slice it and freeze, then reheat as needed.
Can I make this dough ahead of time? Absolutely! Refrigerating the dough enhances its flavor. You can let it sit in the fridge for up to 48 hours before baking. It’s a lifesaver for those busy days.
What if I don’t have a Dutch oven? No worries! Any oven-safe pot with a lid will do. Just ensure it can handle high heat. Alternatively, you can bake the bread on a baking sheet, though it may not have the same crusty texture.
Can I adapt this recipe for different herbs or cheeses? Definitely! This recipe is versatile. Feel free to swap out dill for your favorite herbs, or experiment with different cheeses to suit your palate. The possibilities are endless!
Final Thoughts
Bringing the No-Knead Dill Gouda Artisan Bread to life in your kitchen is more than just baking; it’s a culinary adventure that fills your home with warmth and joy. Watching the dough rise, inhaling that intoxicating aroma, and sharing warm slices with loved ones makes cooking feel like a celebration. With minimal effort and maximum flavor, you can create a dish that brings smiles all around. I hope this bread becomes a beloved staple in your home, right alongside your cherished family stories and laughter. Happy baking, and enjoy the delicious moments this recipe will create!
Print
No-Knead Dill Gouda Artisan Bread
- Total Time: 8-10 hours + overnight refrigeration
- Yield: 1 loaf 1x
- Diet: Vegetarian
Description
A simple and delicious no-knead artisan bread infused with fresh dill and Gouda cheese.
Ingredients
- 1½ cups water, room temperature (at or near 70°F/21°C)
- 1 teaspoon active dry yeast
- 3½ cups bread flour, plus more for dusting
- 1 teaspoon kosher or fine sea salt
- ½ teaspoon freshly ground black pepper
- 2 tablespoons fresh dill, finely chopped
- 1 cup cubed Gouda cheese
Instructions
- Add the yeast to the water and let it sit for 10-15 minutes. In a large bowl, whisk together flour, salt, pepper, and fresh dill until evenly distributed. Let sit for 10 minutes.
- Add yeast mixture to the bowl and stir together using a rubber spatula just until combined. The dough should look a little sticky and shaggy and there should still be a little flour around the edges of the bowl.
- Cover and let rise somewhere warm until it has doubled in size, about 8-10 hours.
- Once the dough has doubled in volume, use your hands to pull the dough out onto a floured surface. Gently fold the dough into itself several times until it holds together. Stretch and smooth out dough into a rectangular shape and press Gouda cubes into the dough. Roll up dough into a log shape and fold the ends underneath. Sprinkle with a little more flour and shape the dough into a flour-covered ball.
- Lift and place the dough into a flour dusted bowl. Dust with flour, cover, and refrigerate overnight or up to 48 hours.
- When ready to bake, preheat oven to 450ºF (232ºC) with your Dutch oven inside.
- Uncover and turn the dough out onto a lightly floured surface seam side down. Gently shape it into a loaf and place on parchment paper. Score the top with a razor blade or sharp knife.
- Once preheated, remove the Dutch oven and transfer the dough on parchment into it. Cover and bake for 30 minutes, then uncover and bake for 15-20 minutes more until browned and hollow sounding.
- Using parchment edges, lift bread from the Dutch oven and transfer to a wire rack to cool for up to an hour before slicing.
Notes
- Make sure to use warm water to activate the yeast.
- The dough can rest in the fridge for up to 48 hours for enhanced flavor.
- Prep Time: 10 minutes
- Cook Time: 45-50 minutes
- Category: Bread
- Method: Baking
- Cuisine: American
Nutrition
- Serving Size: 1 slice
- Calories: 180
- Sugar: 0g
- Sodium: 260mg
- Fat: 5g
- Saturated Fat: 2g
- Unsaturated Fat: 3g
- Trans Fat: 0g
- Carbohydrates: 30g
- Fiber: 1g
- Protein: 6g
- Cholesterol: 10mg