Introduction to Santa Claus Macarons
As the holiday season approaches, I often find myself searching for creative treats to enchant my guests. That’s when I stumbled upon these delightful Santa Claus Macarons. Not only are they visually charming, but they also taste heavenly! Preparing these festive goodies is a wonderful way to bond with family during busy days. Plus, they make perfect gifts or dessert options for parties—because who wouldn’t love a little Santa cheer on their plate? I promise, with a touch of patience and joy, you’ll impress everyone this holiday season with these adorable treats.
Why You’ll Love This Santa Claus Macarons
Let’s be real—between work, kids, and keeping the house in order, time can feel like a luxury. That’s why these Santa Claus Macarons are a game-changer. They’re not only easy to make, but they also offer a delightful burst of flavor that will wow your family and friends. Plus, the festive design adds a spark of joy to any gathering, making these treats the perfect way to spread holiday cheer without a ton of effort.
Ingredients for Santa Claus Macarons
Creating Santa Claus Macarons begins with gathering the right ingredients. Here’s what you’ll need:
- Almond Flour: This nutty base adds a delightful texture and flavor to the macarons.
- Powdered Sugar: Essential for sweetness, it helps to achieve that smooth macaron shell.
- Egg Whites: The backbone of our French meringue, they create the airy structure we love.
- Granulated Sugar: Used in the meringue, it helps the egg whites whip up into stiff peaks.
- Water: A surprising but crucial component, it helps to make the Italian meringue.
- Red Gel Food Coloring: This is what transforms our macarons into festive Santa faces—perfect for the holidays!
- Vanilla Extract: A splash of this aromatic flavoring adds warmth and depth to your treat.
- Buttercream Filling: You can use store-bought or homemade. This creamy filling completes the macaron’s allure!
- White Chocolate: Melt this for Santa’s beard and hat trim; it brings a whimsical touch to your design.
- Edible Pink Dust: This optional decoration creates rosy cheeks, giving a playful character to your Santa.
For precise measurements, check the bottom of this article, where you’ll find everything you need to create these magic treats. You can always play around with substitutes. Use coconut flour for a nut-free option or flavor your buttercream with peppermint extract for a twist. The possibilities are endless as you embark on this delicious journey!
How to Make Santa Claus Macarons
Now that we’ve gathered our ingredients, let’s dive into the fun part—making these fabulous Santa Claus Macarons! With a little patience and a sprinkle of love, you’ll create adorable treats that will leave everyone smiling.
Step 1: Sift the Dry Ingredients
Start by sifting the almond flour and powdered sugar together. This step is crucial! Sifting helps to remove any lumps and creates a smooth texture. It’s like giving your ingredients a little spa treatment, making them ready for their close-up.
Step 2: Prepare the Italian Meringue
Next, let’s prepare the Italian meringue. In a small saucepan, combine granulated sugar and water. Heat it over medium until it reaches a simmer. While that’s cooking, beat the egg whites in a separate bowl until soft peaks form. Once your sugar syrup reaches 240°F, slowly drizzle it into the egg whites as you continue to whisk. This will elevate the meringue to fluffy perfection, giving your macarons their lift and volume.
Step 3: Combine Meringue and Flour Mixture
Gently fold the Italian meringue into the sifted almond flour mixture using a spatula. It’s important to be delicate here! You want to combine them without deflating the airy meringue. Incorporate some red gel food coloring at this stage, stirring until you achieve that vibrant festive hue!
Step 4: Macaronage Technique
This step is where the magic happens! You’ll need to “macaronage” the batter. Keep folding until it flows like lava—smooth and glossy. If it’s too thick, your macarons won’t form those lovely feet. If it flows too quickly, you’ve gone too far. It’s all about finding that sweet spot!
Step 5: Pipe the Macarons
Now, grab a piping bag fitted with a round tip. Fill it with your macaron batter. Pipe about 1.5-inch circles onto parchment paper or a silicone mat. Keep them spaced to avoid any gluing together. Even if it looks a little messy at first, they’ll still shine like holiday stars once they’re baked!
Step 6: Rest the Macarons
Let those adorable circles rest for 30 to 60 minutes at room temperature. You’re waiting for a skin to form on the surface. This dry outer layer is essential for achieving those striking feet when baked, so be patient and enjoy the anticipation!
Step 7: Bake the Macarons
Preheat your oven to 300°F. Bake the rested macarons for about 15 minutes, rotating the tray halfway through to ensure even baking. Keep an eye out for those lovely little feet to rise up, and trust me—the aroma wafting through your kitchen will be like a cozy holiday hug!
Step 8: Cool and Fill
Once the macarons are baked to perfection, let them cool completely before attempting to remove them from the baking surface. Trust me on this one! Once cooled, flip half of them upside down and pipe your favorite buttercream filling on top. Sandwich them together like a festive hug.
Step 9: Decorate Your Santa Claus Macarons
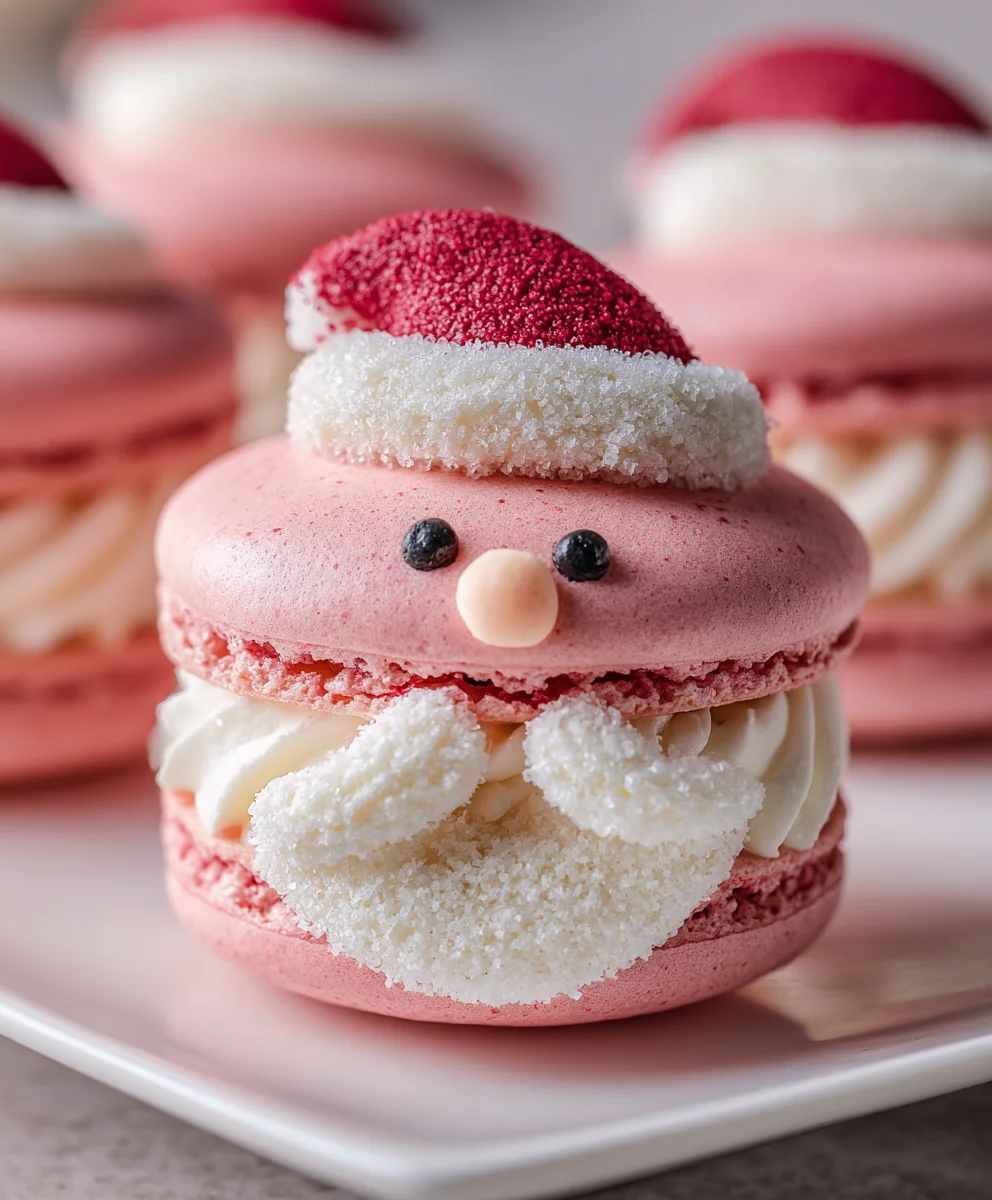
Now comes the fun part—decorating! Melt some white chocolate and drizzle it over the macarons to create Santa’s beard and hat trim. For that additional burst of cheer, dust on some edible pink dust for rosy cheeks. Voilà! Your Santa Claus Macarons are now ready to spread joy and sweetness at your holiday gatherings.
Tips for Success
- Ensure all ingredients are at room temperature for a smoother batter.
- Use a kitchen scale for precise measurements, vital for macaron success.
- Choose a quiet time to make these; distractions can lead to mishaps.
- Practice your piping technique on parchment before piping onto your mat.
- Keep your baking sheets clean and dry for optimal results.
Equipment Needed
- Piping Bag: Essential for shaping the macarons. You can also use a sturdy ziplock bag with a corner cut off!
- Sifting Tool: A fine mesh sieve works wonders for sifting almond flour and powdered sugar, or you can use a simple whisk.
- Baking Sheet: A flat surface for baking. Parchment paper or silicone mats both do the job well!
- Oven Thermometer: To check the oven’s accuracy—ensuring perfect baking every time.
- Spatula: A silicone spatula is best for folding the meringue and batter, but any flexible spatula will do!
Variations
- Coconut Macarons: Swap almond flour with finely shredded coconut for a tropical twist!
- Chocolate Santa Claus Macarons: Add cocoa powder to the dry ingredients for a rich chocolate flavor.
- Peppermint Filling: Mix in peppermint extract with your buttercream for a refreshing holiday kick.
- Nut-Free Option: Use sunflower seed flour instead of almond flour to create nut-free macarons.
- Colorful Sprinkles: Add festive sprinkles to the white chocolate for extra holiday flair!
Serving Suggestions
- Pair with Hot Cocoa: These Santa Claus Macarons go beautifully with a steaming cup of hot cocoa or spiced cider.
- Festive Platter: Arrange them on a bright, colorful platter to create an eye-catching centerpiece for your holiday table.
- Add Fresh Berries: Serve them alongside fresh raspberries or strawberries for a tart contrast to the sweet treats.
- Garnish with Mint Leaves: Toss a few fresh mint leaves on the platter for a pop of color and a hint of freshness.
- Wrapping Them Up: Package them in clear bags tied with festive ribbons as delightful holiday gifts.
FAQs about Santa Claus Macarons
Can I make Santa Claus Macarons in advance?
Absolutely! These delicious treats can be made a day or two ahead of your holiday gatherings. Just store them in an airtight container in the fridge, and let them come to room temperature before serving. They actually taste even better as they sit, as the flavors meld together!
What can I use instead of almond flour?
If you’re looking for a nut-free option, sunflower seed flour works wonders in this recipe! It gives a similar texture while avoiding nuts altogether. Just keep in mind that this might slightly alter the flavor and color of your Santa Claus Macarons.
How do I know when the macarons are properly baked?
That’s a great question! You can tell they’re done when they have a smooth top, set feet, and don’t wobble when you gently touch them. If they stay on the baking sheet when you try to lift them, give them another minute or two but watch closely to avoid over-baking!
Can I color my macarons differently for various holidays?
Absolutely! You can switch up the colors for any holiday theme. Use pastels for Easter, vibrant colors for summer gatherings, or even spooky hues for Halloween! Just remember to match your food coloring to the occasion, and let your creativity shine.
What type of filling is best for Santa Claus Macarons?
While buttercream is a fantastic filling option, you can mix it up! Try chocolate ganache for a rich treat or a tart lemon curd for a refreshing contrast. The key is finding a filling that complements the sweetness of the macarons while giving them that festive flair. Your taste buds will thank you!
Final Thoughts
Creating Santa Claus Macarons isn’t just about baking; it’s an experience that brings joy to your kitchen. As the aromas fill the air, they weave together holiday memories that you’ll treasure. When you serve these delightful treats, you’re not just offering a dessert; you’re sharing a little magic that sparks smiles and laughter. Whether it’s making them with family or presenting them at gatherings, these macarons embody the spirit of the season. I hope you find as much joy in making them as I do. Let the holiday spirit shine brightly in every bite!
Print
Santa Claus Macarons
- Total Time: 1 hour 45 minutes
- Yield: 12–15 macarons 1x
- Diet: Vegetarian
Description
Delight your guests with these festive Santa Claus Macarons, perfect for holiday gatherings!
Ingredients
- 1 cup Almond Flour
- 1 cup Powdered Sugar
- 3 Egg Whites
- 1/2 cup Granulated Sugar
- 1/4 cup Water
- Red Gel Food Coloring
- 1 tsp Vanilla Extract
- Buttercream Filling (to taste)
- White Chocolate (for decoration)
- Edible Pink Dust (for decoration)
Instructions
- Prepare the almond flour and powdered sugar by sifting them together.
- Create an Italian meringue with egg whites, granulated sugar, and water.
- Combine the meringue with the almond flour mixture and add red food coloring.
- Macaronage: Deflate the meringue until the batter flows like lava.
- Pipe consistent circles onto parchment paper or a silicone mat.
- Rest the piped macarons for 30-60 minutes until a skin forms.
- Bake in a preheated oven until the feet develop.
- Cool completely before filling with buttercream.
- Decorate with melted white chocolate for Santa’s beard and hat trim, and edible pink dust for rosy cheeks.
Notes
- Ensure all ingredients are at room temperature for best results.
- Use a silicone mat for easy removal of macarons.
- Make sure to whip the egg whites to stiff peaks for the perfect meringue.
- Prep Time: 30 minutes
- Cook Time: 15 minutes
- Category: Dessert
- Method: Baking
- Cuisine: French
Nutrition
- Serving Size: 1 macaron
- Calories: 120
- Sugar: 15g
- Sodium: 30mg
- Fat: 5g
- Saturated Fat: 3g
- Unsaturated Fat: 2g
- Trans Fat: 0g
- Carbohydrates: 18g
- Fiber: 1g
- Protein: 2g
- Cholesterol: 10mg