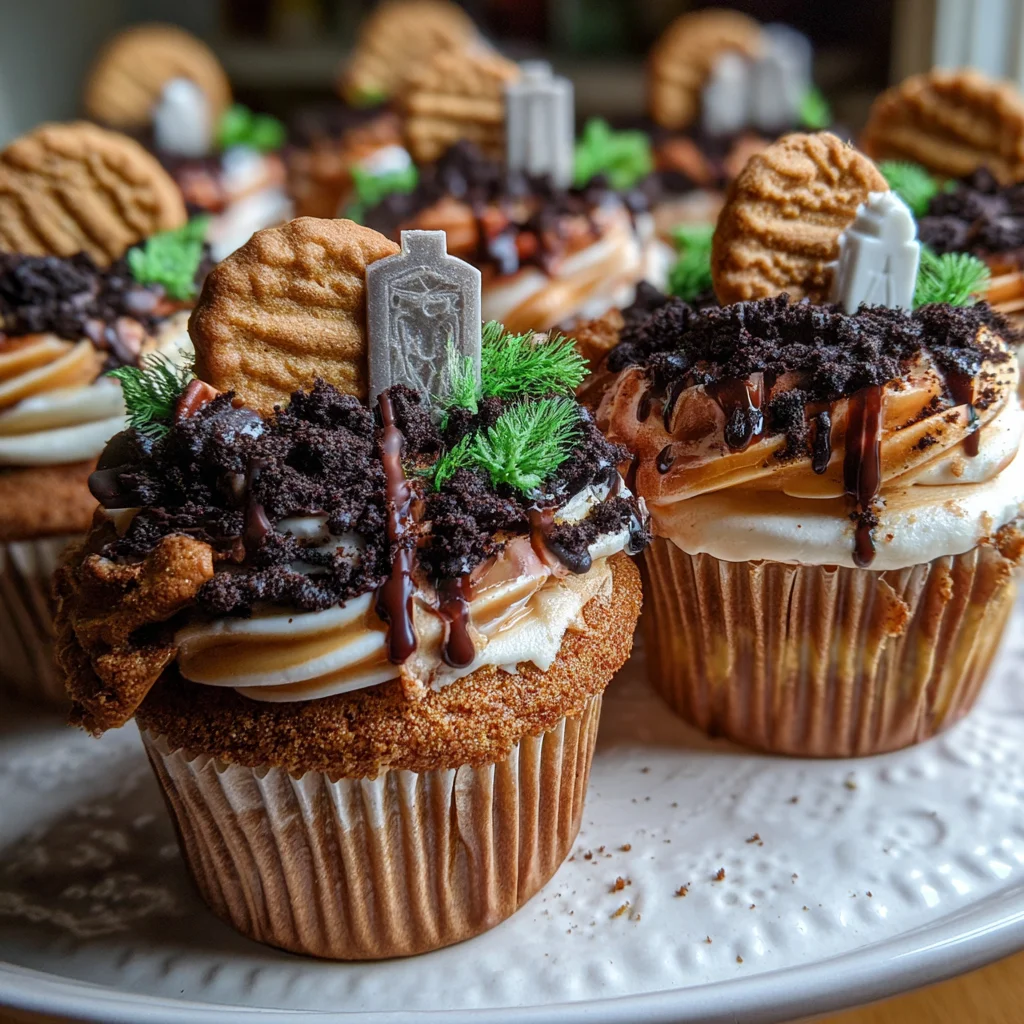
Introduction to Halloween Graveyard Cupcakes
Crisp leaves and cooler air bring with them the perfect time to welcome in the spooky season. Think of a sweet treat that not only tantalizes your taste buds but sparks your creativity. Welcome, Halloween Graveyard Cupcakes! These delightful cups are the perfect cups for busy moms or such professionals as I am who want to infuse a little fun into their dessert tables without spending hours on end in the kitchen making it happen. Apart from tasting great with rich chocolate flavors, they are scarily decorated with graveyard features that your loved ones will make the highlight of a Halloween get-together.
Why You’ll Love This Halloween Graveyard Cupcakes
These little cupcakes are not just treats but experiences to have. Preparation is so hassle-free that it will not keep you tied in the kitchen for long, huffing and puffing over busy schedules. Then, there is that sumptuous chocolate flavor that your taste buds will surely dance with. And of course, decoration-that’s one fun way of bonding with your kids or pals over crafting spooky memories together!
Ingredients for Halloween Graveyard Cupcakes
To create these spooky delights, you’ll need a mix of traditional baking staples and some fun ingredients to make the graveyard theme come alive. Here’s what you’ll gather:
- Lotus biscoff biscuits: These provide the perfect gravestones, adding a delightful crunch.
- Dark chocolate: Rich and velvety, the base of your chocolate-loving heart will rejoice.
- White chocolate: This adds a sweet contrast for the biscuit decorations.
- Baking spread or unsalted butter: Essential for ensuring your cupcakes are moist and flavorful.
- Caster sugar: Fine sugar dissolves quickly, making your batter smooth.
- Large eggs: Vital for structure and richness in your cupcake batter.
- Milk: A splash adds moisture to the batter, keeping your cupcakes fluffy.
- Self-raising flour: This helps your cupcakes rise beautifully, giving them a perfect texture.
- Cocoa powder: The star of the show for that intense chocolate flavor.
- Baking powder: A little extra lift for those soft, fluffy cupcakes.
- Full-fat cream cheese: For the rich and creamy cheesecake filling that surprises you inside.
- Icing sugar: This sweet addition adds to the creaminess of your frosting and filling.
- Crushed Oreos: They add texture both in the filling and as a crumbly decoration.
- Vanilla extract: A hint of vanilla will elevate the flavors beautifully.
- Green food coloring: To give that fun, eerie touch to your buttercream grass.
For ease of use, exact quantities are located at the bottom of the article, which you can easily print for reference.
How to Make Halloween Graveyard Cupcakes
Now that you’ve gathered all the spooky ingredients, let’s get our hands a bit messy! Making Halloween Graveyard Cupcakes is an exciting adventure. Trust me, the joy is in the process, and I guarantee it’ll be worth every sprinkle and smear of chocolate!
Step 1: Prepare the Biscuit Graves
Start by taking those Lotus biscoff biscuits. Snap about a third off the end of each biscuit. This gives them a smaller, gravestone-like appearance. Set them aside and let your creativity flow—every grave can have a different shape!
Step 2: Melt and Decorate the Chocolate Biscuits
Next, let’s melt your dark chocolate. Simply place it in a microwave-safe bowl and heat it in 20-second bursts, stirring in between until it’s fully melted. Dip each biscuit into the silky chocolate, coating the top nicely. Place the chocolate-dipped biscuits on a baking sheet lined with parchment paper and allow them to set. For added flair, melt the white chocolate and pipe fun designs on top of your gravestones. How cute will that look?
Step 3: Prepare and Bake the Cupcake Batter
Now for the fun part—making the batter! Preheat your oven to 140C Fan/160C/325F/Gas Mark 3. In a large bowl, beat the baking spread and caster sugar together for about five minutes until it’s light and fluffy. Then, beat in the eggs and milk until fully combined. Gently fold in the self-raising flour, cocoa powder, and baking powder. Be careful not to overmix—leave a little air in there for fluffiness! Divide this luscious batter into your lined cupcake tin, filling each case about two-thirds full. Bake for 25-30 minutes, or until a skewer comes out clean. Do your happy dance while they cool completely!
Step 4: Create the Oreo Cheesecake Filling
While we wait, let’s whip up the surprise filling! In another bowl, mix the full-fat cream cheese, icing sugar, and vanilla extract until the mixture is smooth and creamy. Take a handful of crushed Oreos and fold them in gently. This filling adds a delicious twist inside your cupcakes. Trust me; it’s a party in there!
Step 5: Make the Buttercream Frosting
For that gorgeous frosting, start with the chocolate buttercream. In a bowl, beat together the softened butter, cocoa powder, and icing sugar. Add some milk gradually until it reaches your desired smoothness. For the green grass buttercream, mix another batch of softened butter and icing sugar. Add vanilla and a couple of drops of green food coloring, mixing until it’s the perfect vibrant shade of grassy green!
Step 6: Assemble and Decorate the Cupcakes
It’s time to bring this graveyard to life! Using a cupcake corer or a sharp knife, make a hole in the center of each cupcake—don’t worry, it won’t be a grave—it’ll be your filling spot! Spoon in your creamy cheesecake mixture, filling it to the brim. Smooth out your chocolate buttercream on top of each cupcake using a spatula. Insert your chocolate-covered biscuit grave into the middle, then sprinkle crushed Oreos in front to represent dirt. Using a piping bag, add green buttercream around the gravestone to create “grass.” Voilà! Your Halloween Graveyard Cupcakes are ready for some spooky fun!
Tips for Success
- Use room temperature ingredients for better mixing and smoother batter.
- Invest in good quality chocolate for richer flavor.
- Don’t overmix the batter; a few lumps are fine!
- Let the cupcakes cool completely before filling to prevent melting.
- Decorate with fun toppings like gummy worms for extra spookiness.
- Get the kids involved; decorating can be a cherished family activity!
Equipment Needed
- Mixing bowls: Any size will do, but a large bowl makes mixing easier.
- Electric whisk: A stand mixer can speed things up, but a hand mixer works just fine.
- Oven: Conventional ovens are perfect for baking these cupcakes; no fancy gadgets needed!
- Cupcake tin: Use a standard cupcake tin for perfect portions.
- Piping bags: If you don’t have any, a resealable plastic bag works just as well.
Variations
- For a gluten-free option, substitute self-raising flour with a gluten-free flour blend and add a teaspoon of xanthan gum for fluffiness.
- Try swapping the chocolate buttercream with a vanilla or almond-flavored one for a different twist!
- If you’re looking for a healthier option, use Greek yogurt instead of cream cheese in the filling.
- For a little spice, add a pinch of cinnamon or nutmeg to the cupcake batter for a warm flavor.
- Switch up the crushed Oreos with graham crackers for a sandy effect!
- Use mini chocolate chips instead of crushed Oreos in the cheesecake filling for a different texture.
Serving Suggestions
- Pair with a glass of chilled milk or a hot chocolate for that cozy Halloween vibe.
- Present on a spooky-themed platter to enhance the graveyard look.
- Add gummy worms around the edges for an extra touch of fun!
- For adult gatherings, serve with a dark chocolate liqueur.
FAQs about Halloween Graveyard Cupcakes
Got questions about these spooky delights? You’re not alone! Here are some frequently asked questions that I’ve come across while crafting these Halloween Graveyard Cupcakes.
Can I make the cupcakes ahead of time? Absolutely! You can bake the cupcakes a day or two in advance. Just store them in an airtight container until you’re ready to decorate.
How can I make these Halloween Graveyard Cupcakes kid-friendly? You can skip the dark chocolate and use milk chocolate instead for a sweeter touch. Kids love getting involved, so let them decorate with fun sprinkles or candy!
What if I can’t find Lotus biscoff biscuits? No biggie! Oreos or any cookie of your choice will work well. Just make sure they can be easily decorated to resemble gravestones.
Can I use a different filling instead of Oreo cheesecake? Of course! Feel free to use whipped cream and fresh fruit for a lighter version or even a chocolate ganache for an extra-rich surprise!
How do I store any leftover cupcakes? Keep your remaining Halloween Graveyard Cupcakes in an airtight container in a cool, dry place. They’ll stay fresh for about three days!
Final Thoughts
Making Halloween Graveyard Cupcakes is more than just baking; it’s an opportunity to create lasting memories with your loved ones. The joy of decorating these spooky delights allows you to unleash your creativity and share some laughter in the kitchen. Picture everyone gathered around, giggling as they pipe grass and place gravestones atop fluffy cupcakes. This recipe not only satisfies that chocolate craving but also brings a whimsical touch to your Halloween festivities. So grab your ingredients and let the fun begin—these cupcakes will surely be the highlight of your spooky season!
Print
Halloween Graveyard Cupcakes
- Total Time: 1 hour
- Yield: 12 cupcakes 1x
- Diet: Vegetarian
Description
A fun and delicious cupcake recipe perfect for Halloween, featuring chocolate cupcakes with a creepy graveyard theme.
Ingredients
- ,
- 12 Lotus biscoff biscuits
,
- 150 g Dark chocolate, melted
,
- 30 g White chocolate, melted
,
- 175 g Baking spread or butter, softened, unsalted
,
- 175 g Caster sugar
,
- 3 large Eggs
,
- 2 tbsp Milk
,
- 150 g Self raising flour
,
- 25 g Cocoa powder
,
- ¼ tsp Baking powder
,
- 115 g Full fat cream cheese
,
- 15 g Icing sugar
,
- 15 g Oreos, crushed (for filling)
,
- ⅛ tsp Vanilla extract (for filling)
,
- 100 g Butter, softened, unsalted (for buttercream)
,
- 165 g Icing sugar (for buttercream)
,
- 35 g Cocoa powder (for buttercream)
,
- 1–2 tsp Milk (for buttercream)
,
- 25 g Butter, softened, unsalted (for grass buttercream)
,
- 50 g Icing sugar (for grass buttercream)
,
- ⅛ tsp Vanilla extract (for grass buttercream)
,
- Green food colouring
,
- 35 g Oreos, crushed (for soil)
,
Instructions
- ,
- Snap about a third of the biscuit off at the end to make them shorter for the cupcakes. Melt the dark chocolate and dip the biscuit into it, then place it onto baking paper to set.
,
- Once the dark chocolate is set, melt the white chocolate, put it in a piping bag, and pipe your chosen designs onto the biscuits. Leave to set.
,
- Preheat your oven to 140C Fan/160C/325F/Gas Mark 3, and line a cupcake tin with cupcake cases.
,
- Mix together the baking spread and caster sugar using an electric whisk or stand mixer with the paddle attachment for 5 minutes.
,
- Add the eggs and milk, and whisk in well.
,
- Gently whisk or fold in the self-raising flour, cocoa powder, and baking powder.
,
- Divide the mixture between the 12 cupcake cases.
,
- Bake them for 25-30 minutes or until a skewer inserted in the centre comes out clean. Leave to cool completely.
,
- While the cupcakes cool, make the Oreo cheesecake filling by mixing together the cream cheese, icing sugar, and vanilla until smooth, then stir in the crushed Oreos.
,
- Use a cupcake corer or knife to make a hole in the middle of each cupcake and fill with the cheesecake mixture.
,
- Make the chocolate buttercream by mixing together the butter, cocoa powder, icing sugar, and milk until smooth.
,
- Make the green grass buttercream by mixing together the butter, icing sugar, vanilla, and green food colouring until smooth.
,
- Pipe the chocolate buttercream onto each cupcake and smooth with a palette knife.
,
- Push a chocolate-covered biscuit gravestone into each cupcake and sprinkle crushed Oreos in front of the biscuit grave.
,
- Pipe the green buttercream around the biscuit to create grass or use a spoon to create texture.
,
- Store in an airtight container in a cool place and consume leftovers within 3 days.
,
Notes
- ,
- You can use more or less green food coloring to achieve the desired shade for the grass buttercream.
,
- Feel free to use any type of chocolate biscuits for the gravestones.
,
- For best results, using a stand mixer speeds up the process of mixing the batters and butters.
,
- Prep Time: 30 minutes
- Cook Time: 30 minutes
- Category: Dessert
- Method: Baking
- Cuisine: American
Nutrition
- Serving Size: 1 cupcake
- Calories: 350
- Sugar: 25g
- Sodium: 150mg
- Fat: 18g
- Saturated Fat: 10g
- Unsaturated Fat: 4g
- Trans Fat: 0g
- Carbohydrates: 48g
- Fiber: 2g
- Protein: 4g
- Cholesterol: 45mg