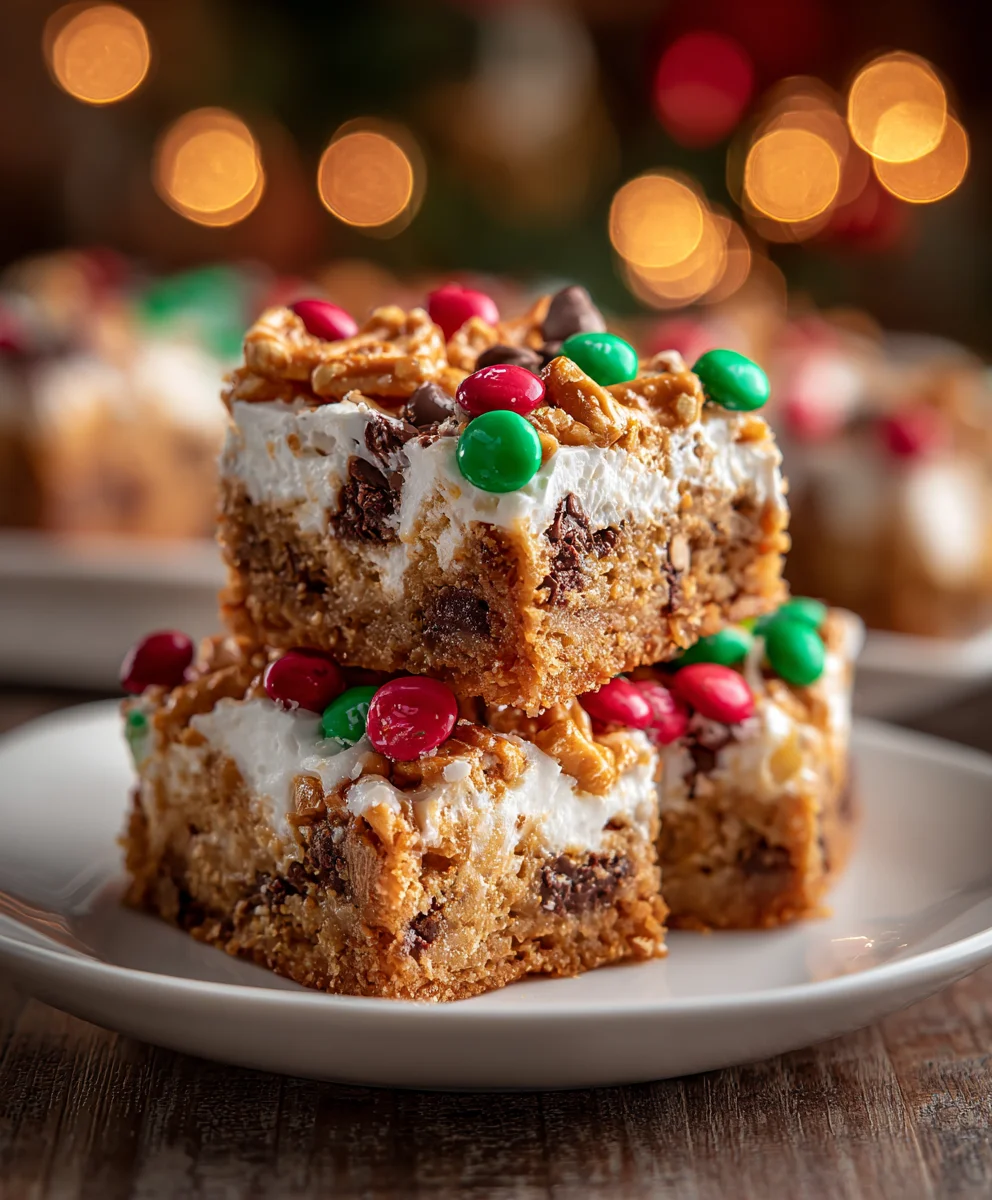
Introduction to Santa’s Trash Cookie Bars
Ah, the holiday season! It’s a magical time filled with joy, laughter, and a touch of chaos. For busy moms like us, finding a quick treat to whip up can save the day. That’s where Santa’s Trash Cookie Bars come into play! These delightful bars are not only a fun baking adventure but also a festive treat that your family will adore. With their sweet and salty flavors, they’re perfect for holiday gatherings or just as a little pick-me-up during a hectic week. Trust me, once you make them, you won’t want to let them go!
Why You’ll Love This Santa’s Trash Cookie Bars
Let’s be honest: we all crave treats that are quick, delicious, and make life a little better, right? Santa’s Trash Cookie Bars check all those boxes! They’re a breeze to make, coming together in less than an hour—perfect for those last-minute holiday parties or cozy nights at home. Plus, who can resist the combination of crunchy pretzels, sweet chocolate, and festive M&Ms? It’s a taste explosion you won’t forget!
Ingredients for Santa’s Trash Cookie Bars
Gathering the right ingredients is half the fun when baking Santa’s Trash Cookie Bars! Here’s what you’ll need for this delightful treat:
- Cornstarch: This helps make the bars chewy on the inside while ensuring a crispy edge. A tiny secret for texture!
- Baking soda: Essential for that light, puffy texture. It works wonders in making these bars rise just right.
- Salt: A pinch enhances flavors, balancing the sweetness with a hint of savory.
- Unsalted butter: Softened to room temperature, it’s the creamy base that brings everything together.
- Granulated sugar: Adds sweetness and a hint of crunch in every bite.
- Light brown sugar: It brings a lovely caramel flavor and moisture to the party.
- Vanilla extract: For that cozy, warm flavor that fills your kitchen with happiness!
- Large eggs: They bind the ingredients, ensuring a perfect structure in every delicious bar.
- Crushed potato chips: These provide a surprising crunch and a touch of saltiness that’s absolutely perfect.
- Crushed pretzels: Like chips, they add saltiness and delightful texture, making each bite even more exciting.
- Chocolate chips: Because who can resist melty chocolate? They’re the sweet spot in every bar.
- Christmas M&Ms: Not just for color, these candy-coated chocolates add bursts of sweetness—an essential festive touch!
- Christmas sprinkles: The icing on the cake (or bar, in this case)! They add cheer and color to your treats.
Feel free to mix things up! You can substitute different types of chips, candies, or even add nuts if your family loves them. For exact measurements, scroll down to the bottom of the article; you’ll find everything ready for easy printing!
How to Make Santa’s Trash Cookie Bars
Now that you have all the ingredients lined up, let’s roll up our sleeves and get baking! Making Santa’s Trash Cookie Bars is super straightforward. Follow these simple steps for a treat that’ll steal the show!
Preheat and Prepare the Pan
Start by preheating your oven to 350 degrees F. This step is essential for baking success!
Next, grab a 9-inch × 13-inch cake pan. Line it with aluminum foil or parchment paper for easy removal later. This little trick will make cleanup a breeze and keep your bars from sticking!
Mix the Dry Ingredients
In a medium bowl, whisk together the flour, cornstarch, baking soda, and salt.
This mix is the backbone of your cookie bars. Sifting the dry ingredients helps prevent lumps and ensures they combine evenly, giving your bars a great texture!
Cream the Butter and Sugars
In a large mixing bowl, use a hand mixer or a stand mixer to cream the softened butter with both sugars and vanilla extract.
Beat them together until the mixture is light and fluffy. You’ll want it to look almost like whipped cream. This step is where the magic begins, as it creates a smooth base full of flavor!
Incorporate the Eggs
Next, add the eggs one at a time.
Mix well after each addition, just about ten seconds each. This ensures the eggs are fully incorporated, providing moisture and structure to the bars. Remember, no one likes rubbery treats!
Combine the Wet and Dry Mixtures
Gently fold the dry ingredients into the butter mixture.
Stir until just combined—don’t overmix! This is where you can add in the crushed potato chips, pretzels, chocolate chips, M&Ms, and most of the sprinkles. You want a delightful mix of textures and flavors for your bars!
Transfer to the Pan
Spread the cookie dough evenly in the prepared pan.
Top with extra M&Ms, chocolate chips, chips, pretzels, and the remaining sprinkles. These additions not only look pretty but create a deliciously crunchy topping!
Bake to Perfection
Pop the pan in the preheated oven and bake for 22 to 25 minutes.
Keep an eye on those edges! They should be golden brown when they’re ready to come out. If a toothpick inserted in the center comes out clean or with just a few crumbs, you’re good to go!
Cool and Slice
Once baked, take the bar pan out and place it on a wire rack.
Let it cool in the pan for at least one hour. When it’s set, lift the bars out using the foil or parchment paper, slice them into squares, and enjoy!
Every bite promises a burst of holiday cheer!
Tips for Success
- Use room temperature ingredients for better mixing.
- Don’t overmix the batter; this keeps your bars tender.
- Experiment with different toppings to create your version of Santa’s Trash Cookie Bars.
- Let the bars cool completely for easier slicing.
- Store leftovers in an airtight container to maintain freshness.
Equipment Needed
- 9-inch × 13-inch cake pan: Or use a similar-sized baking dish.
- Mixing bowls: Handy for separating wet and dry ingredients.
- Hand mixer or stand mixer: A whisk works too, but mixing will take longer!
- Whisk: Perfect for combining dry ingredients smoothly.
- Cooling rack: If you don’t have one, a cutting board will suffice!
Variations of Santa’s Trash Cookie Bars
- Nutty Delight: Add ½ cup of chopped walnuts or pecans for a crunchy twist.
- Peanut Butter Swirl: Mix in ½ cup of peanut butter for a rich, nutty flavor that complements the other ingredients.
- Dark Chocolate Version: Swap out the milk chocolate chips for dark chocolate for a more sophisticated taste.
- Gluten-Free Option: Use a gluten-free flour blend instead of all-purpose flour to accommodate dietary needs.
- Dairy-Free Variation: Use coconut oil or a dairy-free butter substitute for a vegan-friendly treat.
- Holiday Spice: Add a teaspoon of cinnamon or nutmeg for a warm, festive flavor that spices things up!
Serving Suggestions for Santa’s Trash Cookie Bars
- Pair these bars with a warm cup of hot cocoa for a cozy treat.
- Serve alongside vanilla ice cream for a delightful contrast in textures.
- Top with whipped cream and extra sprinkles for festive flair.
- Arrange on a colorful holiday platter for an eye-catching presentation.
FAQs about Santa’s Trash Cookie Bars
Curious about Santa’s Trash Cookie Bars? Here are some common questions I often hear, along with their answers!
Can I make Santa’s Trash Cookie Bars ahead of time?
Absolutely! You can bake these tasty bars a day or two in advance. Just be sure to store them in an airtight container at room temperature to maintain their freshness.
Can I freeze my Santa’s Trash Cookie Bars?
Yes! After they cool completely, slice the bars, and place them in a single layer in a freezer-safe container. These bars freeze beautifully for up to three months. Just thaw them before serving!
What types of substitutions can I make?
Feel free to get creative! You can use any type of chips your family loves—milk chocolate, dark chocolate, or even butterscotch. Additionally, consider using pretzel sticks instead of crushed pretzels for added crunch!
What can I serve with Santa’s Trash Cookie Bars?
These bars are perfect on their own, but you can elevate the experience by pairing them with hot cocoa, coffee, or even a scoop of ice cream. The contrast of flavors is simply delightful!
Are Santa’s Trash Cookie Bars suitable for dietary restrictions?
Great question! While these bars include dairy and gluten, you can adjust them for various diets. Just look at the variations section for fun ideas like making them gluten-free or dairy-free!
Final Thoughts
Making Santa’s Trash Cookie Bars is truly an experience filled with joy and laughter. As you bake these scrumptious treats, your kitchen will be alive with the sounds of crunching pretzels and the sweet aroma of melted chocolate. Sharing them with family and friends during the holidays creates unforgettable memories, each bite a delightful explosion of flavor and texture. Whether it’s a busy weekday or a festive gathering, these bars will surely bring smiles to faces, spread holiday cheer, and maybe even inspire your loved ones to join in on the fun. Happy baking!
Print
Santa’s Trash Cookie Bars
- Total Time: 40 minutes plus cooling time
- Yield: 24 bars 1x
- Diet: Vegetarian
Description
Santa’s Trash Cookie Bars are a festive and fun treat that combines sweet and salty flavors, perfect for the holiday season.
Ingredients
- 1 tablespoon cornstarch
- 1 teaspoon baking soda
- 1 teaspoon salt
- 1 cup unsalted butter softened
- ¾ cup granulated sugar
- ¾ cup light brown sugar packed
- 1 teaspoon vanilla extract
- 2 large eggs
- ¾ cup potato chips crushed
- ¾ cup pretzels crushed
- ¾ cup chocolate chips
- ¾ cup Christmas M&Ms
- 2 tablespoons Christmas sprinkles
Instructions
- Preheat the oven to 350 degrees F and line a 9-inch × 13-inch cake pan with aluminum foil or parchment paper and set aside.
- In a medium bowl, whisk together the flour, cornstarch, baking soda, and salt. Set aside.
- In a large bowl with a hand mixer or in a stand mixer fitted with a paddle attachment, cream together the butter, sugar, brown sugar, and vanilla until light and fluffy.
- Add the eggs one at a time, mixing after each addition for about 10 seconds.
- Add the dry ingredients to the butter mixture and mix just until combined. Fold in the chips, crushed pretzels, chocolate chips, M&M’s, and most of the sprinkles.
- Spread the cookie dough out evenly in the cake pan and top with extra M&M’s, chocolate chips, chips, pretzels, and the remaining sprinkles.
- Bake the cookie bars for 22 to 25 minutes until the edges are golden brown. Remove from the oven and place on a wire rack.
- Allow the bars to cool for at least 1 hour in the pan before removing and slicing them into squares.
Notes
- For a more festive look, top with additional sprinkles before serving.
- Store any leftovers in an airtight container at room temperature.
- Feel free to substitute ingredients based on personal preference, such as using different types of chips or candies.
- Prep Time: 15 minutes
- Cook Time: 25 minutes
- Category: Dessert
- Method: Baking
- Cuisine: American
Nutrition
- Serving Size: 1 bar
- Calories: 200
- Sugar: 15g
- Sodium: 120mg
- Fat: 10g
- Saturated Fat: 6g
- Unsaturated Fat: 2g
- Trans Fat: 0g
- Carbohydrates: 25g
- Fiber: 1g
- Protein: 2g
- Cholesterol: 30mg