Introduction to Pop Tart Gingerbread House
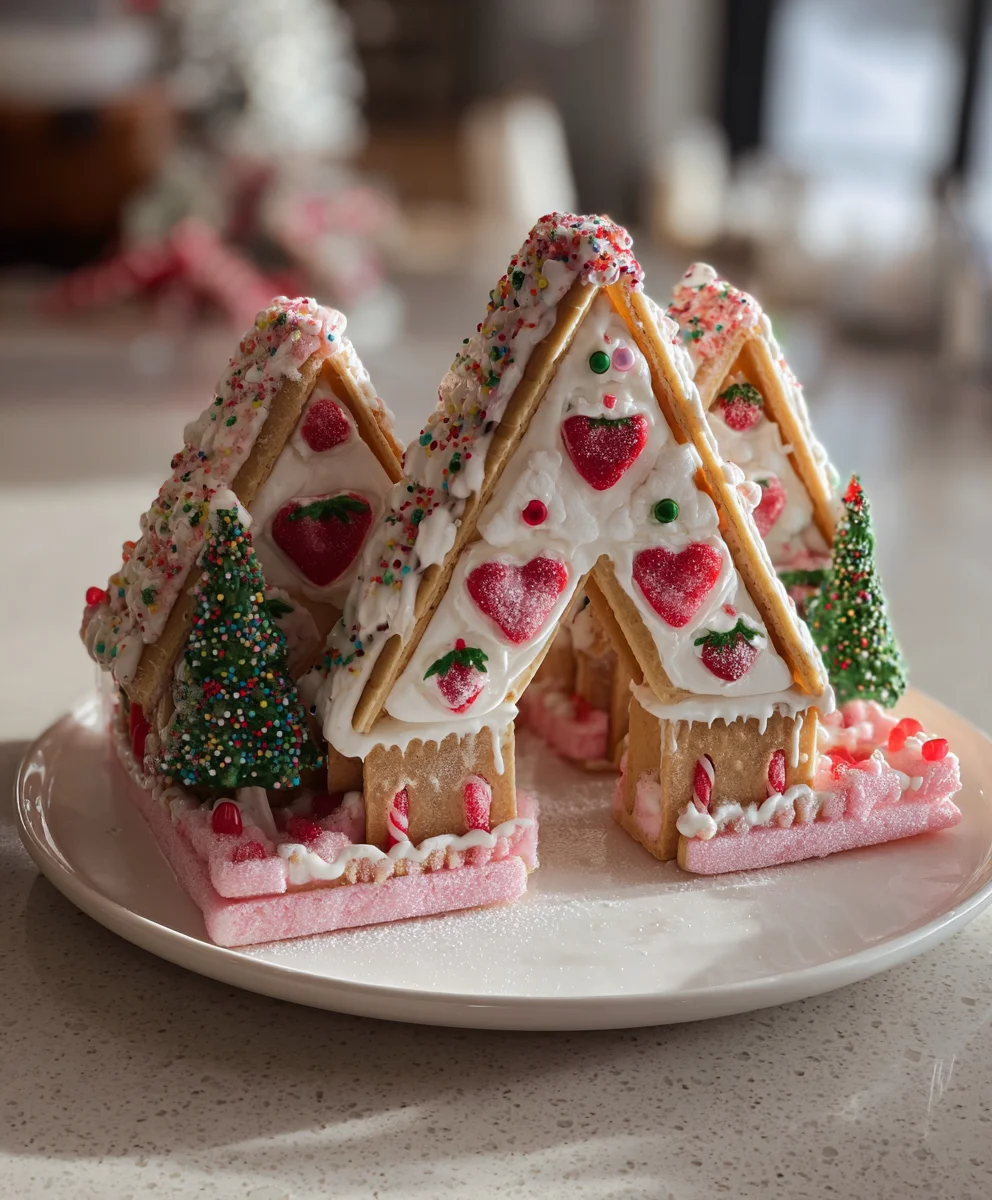
As the holiday season approaches, creating a festive treat can be both fun and delicious. The Pop Tart Gingerbread House is a whimsical twist on the traditional gingerbread house that fits right into my bustling holiday schedule. It’s quick, easy, and requires no baking—perfect for busy moms like us!
Imagine gathering your family around the table, turning simple ingredients into a masterpiece, while laughter and creativity fill the air. This recipe is ideal for bonding moments, and it not only pleases the taste buds but sparks joy during this wonderful time of year.
Why You’ll Love This Pop Tart Gingerbread House
This Pop Tart Gingerbread House brings cheer without the stress! It’s super simple, taking just 20 minutes to whip up, making it perfect for jam-packed days.
The delightful strawberry flavor fills the air as you decorate, and it’s a hit with both kids and adults. Plus, the no-bake aspect means no fighting with flour or messy clean-up. What’s not to love?
Ingredients for Pop Tart Gingerbread House
Gathering the right ingredients is half the fun of creating your Pop Tart Gingerbread House. Here’s what you’ll need:
- Strawberry-flavored Pop Tarts: These playful pastries serve as the foundation of your house, bringing a delightful sweetness to your creation.
- Decorating icing: This edible glue holds everything together! Use a tube for easy application and creativity.
- Assorted holiday-themed confectionery: Think sprinkles, mini candies, and maybe even some festive gumballs! They will add a touch of personality and color to your construction.
Feel free to mix things up! You can opt for different flavors of Pop Tarts—imagine a root beer float or s’mores house! The sky’s the limit when it comes to the sugary adornments you choose.
For those allergic to certain ingredients, consider using gluten-free Pop Tarts or vegan icing.
All exact quantities are listed at the end of this article for easy reference and printing.
How to Make Pop Tart Gingerbread House
Now, let’s dive into the exciting part—crafting your very own Pop Tart Gingerbread House! Follow these simple steps for a fun and creative adventure that’s sure to delight everyone around the table.
Step 1: Prepare Your Workspace
Start by finding a clean, flat surface to work on. I always slip a sheet of parchment paper down to catch any icing spills. It makes clean-up a breeze!
Step 2: Construct the Walls
Grab one strawberry-flavored Pop Tart and stand it vertically; this will be the main wall. Next, place two additional Pop Tarts snugly on either side. Make sure their bases are flush with the central wall. This structure will give your house that iconic shape.
Step 3: Create the Roof
Take a sharp knife and find the mid-point on the top edge of your central Pop Tart. Cut diagonally from this point toward the upper corners of the side Pop Tarts to shape the gables. This is a crucial step for that classic house look. Pretty neat, right?
Step 4: Assemble the House Structure
Now, grab one of the remaining whole Pop Tarts to create the roof. Position your cut Pop Tart atop this whole one and trim as needed to ensure both sides match. Then, place the roof pieces on your walls, keeping everything aligned.
Step 5: Secure the Roof
Grab the decorating icing now! This is your edible glue. Squeeze a generous amount along the seams to adhere all pieces together. Take your time, and hold everything in place until it sets. You want this house to stand tall!
Step 6: Decorate Your Gingerbread House
Here comes the most fun part! Use more icing to affix assorted holiday-themed confectionery all over your house. Sprinkle it with charm and creativity. Maybe a few gumdrops for added flair or sprinkles to emulate snow! Don’t be shy—let your imagination run wild!
Tips for Success
- Let the decorating icing dry completely for at least 30 minutes before moving the house.
- Use a toothpick to help reposition decoration pieces if they slide around.
- Experiment with sprinkles and edible glitter for a magical touch!
- Don’t stress about perfection—quirky shapes add charm to your creation.
- Involve the kids; their creativity can surprise you!
Equipment Needed
- Sharp knife: A regular kitchen knife works; just be careful!
- Decorating icing tube: If you don’t have one, a zip-top bag with a corner snipped works well.
- Parchment paper: Wax paper could also do the trick for easy clean-up.
- Plate or tray: Use a sturdy base for displaying your radiant creation.
Variations
- Flavor Twist: Try using different Pop Tart flavors like s’mores, cookies & cream, or even brown sugar cinnamon for a change!
- Gluten-Free Option: Use gluten-free Pop Tarts to cater to those with dietary restrictions without sacrificing fun.
- Healthier Icing: Blend powdered sugar with almond milk for a lighter icing that still holds your decorations beautifully.
- Non-Dairy Icing: Substitute regular decorating icing with a vegan option or homemade icing using coconut milk.
- Creative Themes: Go beyond the holidays! Construct a beach house with tropical-themed candies or a haunted house for Halloween.
Serving Suggestions
- Pair your Pop Tart Gingerbread House with a steaming cup of hot cocoa for a cozy treat.
- Set it up on a festive platter surrounded by mini marshmallows and candy canes to enhance the display.
- For an extra dash of fun, serve with a plate of sliced strawberries for a fresh touch!
FAQs about Pop Tart Gingerbread House
Can I use other Pop Tart flavors for my gingerbread house? Absolutely! While strawberry-flavored Pop Tarts create a lovely aesthetic, feel free to experiment with other flavors like s’mores or cookies & cream. Each flavor adds its unique twist, making the Pop Tart Gingerbread House even more fun!
How long will my Pop Tart Gingerbread House last? Your masterpiece should last a few days if you store it in a cool, dry place. Just be aware that the icing might start to soften over time. After all the effort, you might just want to admire it for a bit before indulging!
Can I make this recipe gluten-free? Yes, indeed! By using gluten-free Pop Tarts, you can create a tasty and safe version for those with dietary restrictions. It’s a simple way to make this festive treat accessible to everyone.
What if my icing doesn’t set? If your icing isn’t drying as quickly as you’d like, try placing your gingerbread house in a cooler, less humid area. Just give it a little extra time. Patience is key when creating this delightful holiday center piece!
Is this Pop Tart Gingerbread House suitable for kids to make? Definitely! This recipe is perfect for kids. With supervision, they can help with every step from assembling to decorating. It’s a fun, hands-on activity that provides an excellent opportunity for family bonding time!
Final Thoughts
Creating a Pop Tart Gingerbread House is more than just a recipe; it’s about making memories. This delightful activity invites laughter, creativity, and togetherness into your home.
As our families gather around the table, crafting these whimsical houses, I can’t help but smile at the joy and excitement that fills the air.
Whether it’s the simple pleasure of decorating or the fun of sampling leftover candies, every moment becomes special. So, gather your loved ones, unleash your artistic spirit, and enjoy the delightful magic this festive treat brings to life’s celebrations. Let’s make this holiday season unforgettable!
Print
Pop Tart Gingerbread House
- Total Time: 20 minutes
- Yield: 1 gingerbread house 1x
- Diet: Vegetarian
Description
Create a festive gingerbread house using strawberry-flavored Pop Tarts, perfect for the holiday season.
Ingredients
- 6 strawberry-flavoured Pop Tarts
- 1 tube decorating icing
- Assorted holiday-themed confectionery
Instructions
- Arrange a sheet of parchment paper on a flat workspace.
- Position one Pop Tart vertically as the central wall. Align two additional Pop Tarts to the left and right of the central piece, edges flush at the base.
- With a sharp knife, locate the mid-point of the upper edge of the central vertical Pop Tart. Slice diagonally from the mid-point toward the top corners of each adjacent Pop Tart, creating two pointed gable end pieces.
- Place one previously cut Pop Tart atop a remaining whole Pop Tart and trim to replicate the angled rooftop profile, ensuring symmetry.
- Reposition the walls and pointed Pop Tarts to establish the house frame, placing the angled pieces on opposing ends.
- Adhere all structural walls together using decorating icing as edible adhesive. Allow joints to set before proceeding.
- Carefully apply icing to secure roof pieces atop the assembled walls. Permit sufficient drying time for full stability.
- Once edges are fully set, affix assorted holiday confectionery to the surface using additional icing according to preference.
Notes
- Let the icing dry completely for best results.
- You can use different flavors of Pop Tarts for variety.
- Decorate with seasonal colors and themes to make it festive.
- Prep Time: 20 minutes
- Cook Time: 0 minutes
- Category: Dessert
- Method: No-bake
- Cuisine: American
Nutrition
- Serving Size: 1 slice
- Calories: 200
- Sugar: 20g
- Sodium: 150mg
- Fat: 6g
- Saturated Fat: 1g
- Unsaturated Fat: 4g
- Trans Fat: 0g
- Carbohydrates: 36g
- Fiber: 1g
- Protein: 2g
- Cholesterol: 0mg