Introduction to Easter Peep Cake with Multi-Colored Layers
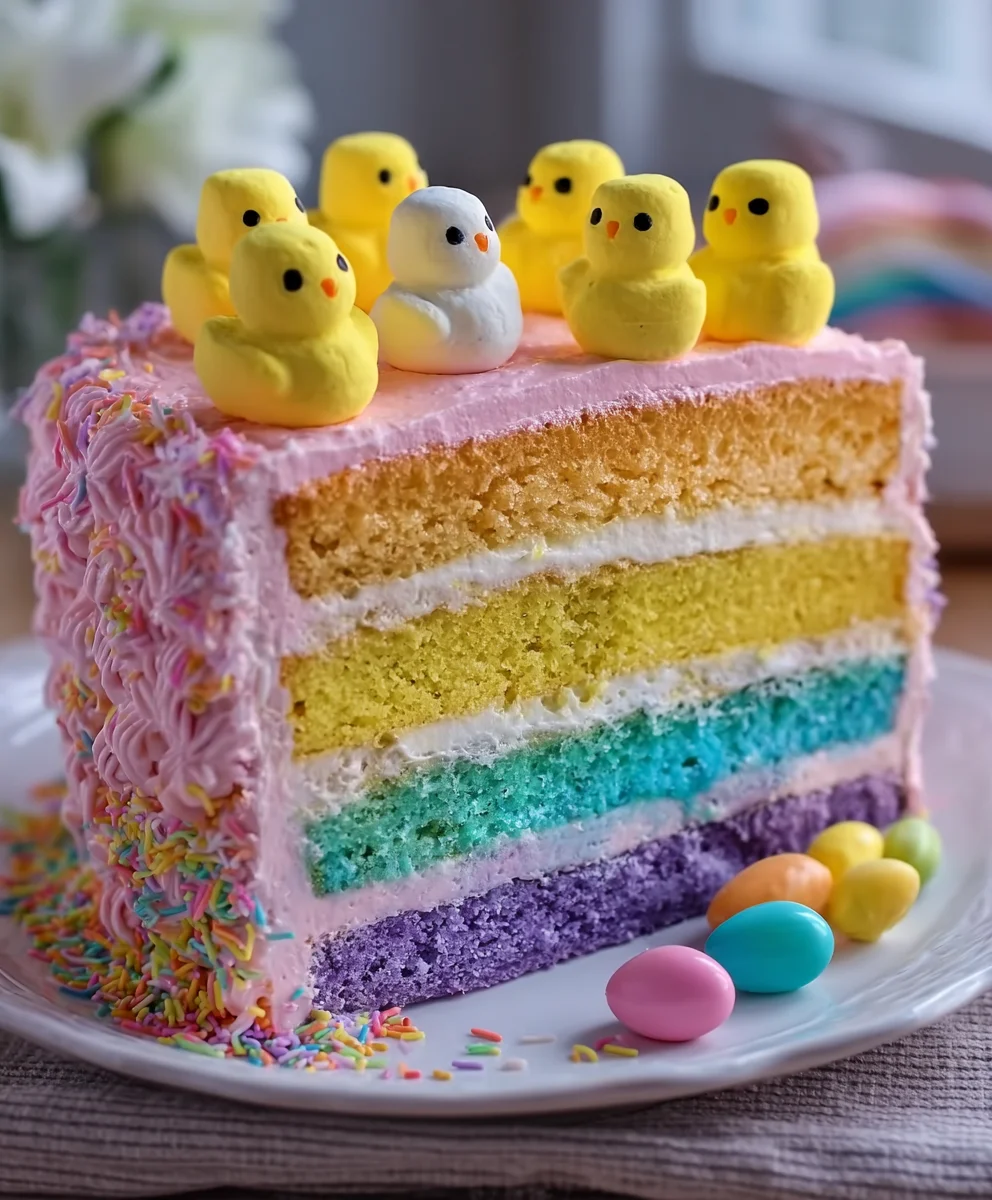
Spring has sprung, and with it comes the joy of Easter celebrations! I can’t think of a more delightful way to capture the spirit of the season than with an Easter Peep Cake with Multi-Colored Layers. This cake is perfect for busy moms like us; it’s not only visually stunning but also surprisingly simple to whip up! Whether you’re hosting family or surprising your kids with a festive treat, this cake will leave everyone smiling. Trust me, nothing says ‘Happy Easter’ like a rainbow of flavors and a sprinkle of nostalgia on your dessert table.
Why You’ll Love This Easter Peep Cake with Multi-Colored Layers
This Easter Peep Cake is a real crowd-pleaser! It’s easy to make, which is a huge win for busy days. The vibrant layers bring a fun twist to your dessert table, making it perfect for kids and adults alike. Plus, every slice is an explosion of sweetness! You’ll adore how quickly it comes together and how it turns any gathering into a festive celebration.
Ingredients for Easter Peep Cake with Multi-Colored Layers
When it comes to creating this beautiful Easter Peep Cake with Multi-Colored Layers, you’ll want to gather some colorful ingredients! Don’t worry; they’re easy to find and oh-so-delicious.
- Cake flour: This helps create a tender crumb. If you’re in a pinch, all-purpose flour works, but the texture may be slightly different.
- Baking powder: The magic ingredient that gives the cake its lift, ensuring it rises beautifully. Always check the expiration date for the best results!
- Salt: Just a pinch enhances all the flavors. It’s surprising how salt can make sweet taste even sweeter!
- Unsalted butter: I love using softened butter for mixing; it blends seamlessly into the batter, adding richness. Make sure it’s at room temperature for easy incorporation.
- Granulated sugar: This sweetener creates a delightful balance and helps with the cake’s moistness. Feel free to experiment with a sugar substitute if you’re watching your intake.
- Egg whites: These help create a light and airy texture. If you’re concerned about wasting yolks, you can save them for another recipe.
- Vanilla extract: Bringing nostalgia to every bite, it adds a warm, comforting flavor. Pure vanilla is best, but imitation works too in a pinch!
- Almond extract (optional): This gives a lovely nutty flavor. It’s a fantastic addition if you’re feeling adventurous.
- Whole milk: Room-temperature milk keeps the batter smooth and helps with the overall fluffiness of the cake.
- Pastel food coloring: Think pink, yellow, blue, and green! You can have fun creating the most colorful layers. A drop or two will do; you can always add more.
- Frosting ingredients: For the frosting, you’ll need more unsalted butter, powdered sugar, heavy cream (or milk), and a dash of salt. Feel free to tint the frosting with more food coloring for extra flair!
- Peeps marshmallow bunnies & chicks: The best part! They’re adorable and bring that authentic Easter vibe to your cake.
- Easter sprinkles: These add a festive crunch and sparkle, perfect for topping off your masterpiece.
- Shredded coconut (optional): If you want a cute ‘grass’ effect, tint shredded coconut green with food coloring, and scatter it on top.
- Mini chocolate eggs (optional): Use these for decoration; they’ll make your cake even more inviting!
You’ll find exact quantities for each ingredient listed at the bottom of the article, ready for printing. Happy baking!
How to Make Easter Peep Cake with Multi-Colored Layers
Now that we’ve gathered all the colorful ingredients, let’s get baking! This Easter Peep Cake with Multi-Colored Layers is a fun process to enjoy. Follow these simple steps, and you’ll have a cake that’ll wow your friends and family!
Step 1: Prepping the Oven and Pans
First things first, preheat your oven to 350°F (175°C).
Next, grease three 8-inch round cake pans. I like using butter or non-stick spray for easy release.
A quick tip: use parchment paper on the bottoms for extra assurance that your layers will pop out without a hitch!
Step 2: Mixing the Dry Ingredients
In a medium bowl, whisk together the cake flour, baking powder, and salt.
Make sure to aerate the flour by fluffing it with a fork first.
This step helps create that light, fluffy texture we want for our cake!
Step 3: Creaming Butter and Sugar
Now it’s time to bring some magic!
In a large mixing bowl, beat your softened butter and granulated sugar together until it’s light and fluffy—around 2 to 3 minutes.
You’ll know it’s ready when it looks pale and creamy. This step helps incorporate air, making our cake rise beautifully!
Step 4: Adding Egg Whites and Extracts
One by one, add the egg whites to the butter-sugar mixture.
Beating well after each addition helps blend everything nicely.
Then stir in your vanilla and almond extracts.
The scent alone will make you smile!
Step 5: Incorporating Wet and Dry Ingredients
Now we bring it all together.
Alternately mix in the dry ingredients and room-temperature milk.
Start by adding a third of the flour mixture, followed by half the milk, and so on.
Mix just until combined; we want to keep it light and fluffy!
Step 6: Coloring the Batter
Divide the batter evenly into four bowls.
Adding a few drops of pastel food coloring—pink, yellow, blue, and green—to each bowl can get a bit messy, but it’s part of the fun!
Gently stir to achieve even color throughout the batter without over-mixing it.
Step 7: Baking the Cake Layers
Pour each colored batter into separate, prepared cake pans.
Tap the pans gently on the counter to release any air bubbles.
Bake for 22-25 minutes, or until a toothpick comes out clean from the center. Patience is key; the scent wafting through your kitchen will be hard to resist!
Step 8: Making the Frosting
While the cakes cool, grab a new bowl to make your buttercream frosting.
Beat your softened butter until creamy, then gradually add powdered sugar.
Incorporate the vanilla extract and a pinch of salt to balance the sweetness.
Finish by adding the heavy cream or milk, whipping until it’s smooth and fluffy!
Step 9: Assembling the Cake
Once the cake layers have cooled completely, it’s time to stack them.
Place one layer on the serving plate and spread a thin layer of frosting on top.
Repeat this for the next layers, creating a colorful tower.
Frost the top and sides with a smooth layer of buttercream. It’s okay if it’s not perfect—the fun is in the process!
Step 10: Decorating with Peeps
The grand finale! Press Peeps marshmallow bunnies and chicks around the sides of the cake.
Top it off with a generous sprinkle of Easter sprinkles.
If you want to get creative, tint shredded coconut green for a grass effect and scatter it on top.
Finish with mini chocolate eggs in the center for that festive touch.
Your Easter Peep Cake with Multi-Colored Layers is now a visual masterpiece!
Tips for Success
- Ensure all ingredients are at room temperature. This helps them combine better for a smoother batter.
- Use a kitchen scale to measure your flour for accuracy. Too much can lead to dense cake!
- Don’t over-mix the batter; it should be just combined to maintain that light, fluffy texture.
- Allow cake layers to cool completely before frosting to prevent melting.
- Use a sharp spatula to achieve smooth frosting on the cake.
Equipment Needed for Easter Peep Cake with Multi-Colored Layers
- Three 8-inch round cake pans—can substitute with two if you bake in batches.
- Medium and large mixing bowls—any size works, even a big pot will do!
- Electric mixer—stand mixers are great, but a hand mixer is perfectly fine too.
- Whisk for dry ingredients—don’t have one? A fork can do the trick!
- Spatula for frosting—an offset spatula is ideal, but any kitchen spatula will suffice.
Variations on Easter Peep Cake with Multi-Colored Layers
- Coconut Cake Variation: Swap out some of the milk for coconut milk and add shredded coconut to the batter for a tropical twist!
- Lemon Zest Addition: Incorporate lemon zest into your batter for a refreshing citrus flavor that pairs beautifully with the sweetness.
- Gluten-Free Option: Use a gluten-free cake flour blend to make this cake suitable for gluten-sensitive guests.
- Vegan Version: Replace eggs with flax eggs (1 tablespoon of ground flaxseed + 2.5 tablespoons water per egg) and use dairy-free butter and almond milk.
- Chocolate Layers: Add cocoa powder to one of the layers for a delicious chocolate flavor contrast with the pastel colors.
Serving Suggestions for Easter Peep Cake with Multi-Colored Layers
- Pair with a light fruit salad for a refreshing contrast to the sweetness of the cake.
- Serve alongside vanilla ice cream to complement the cake’s vibrant flavors.
- For drinks, consider iced tea or lemonade to keep things festive and refreshing.
- Presentation tip: Use a colorful cake stand to showcase your Easter Peep Cake beautifully!
FAQs about Easter Peep Cake with Multi-Colored Layers
Can I make the Easter Peep Cake ahead of time?
Absolutely! You can bake the cake layers a day in advance. Just make sure to wrap them tightly in plastic wrap to keep them fresh. Frost just before serving for the best presentation!
How do I store leftovers of the Easter Peep Cake?
Store any leftover cake in an airtight container at room temperature for up to three days. If longer storage is needed, refrigerate it, but allow it to come to room temperature before enjoying.
Can I use different colors or flavors for the layers?
Yes! Get creative! You can choose any food coloring you like. For flavors, consider adding extracts like lemon or orange to give a fun twist to each layer. It’s your cake—make it personal!
What if I don’t have cake flour?
No worries! You can substitute with all-purpose flour. Just remove 2 tablespoons of flour for each cup to achieve a similar texture. It may not be quite as light, but still delicious.
How do I make the frosting firmer if it’s too soft?
If your frosting turns out too soft, simply add a little more powdered sugar until you reach your desired consistency. If it’s too thick, add a splash of milk or heavy cream to loosen it up.
Final Thoughts on Easter Peep Cake with Multi-Colored Layers
Making this Easter Peep Cake with Multi-Colored Layers is a delightful journey that brings joy to both the baker and those who get to enjoy it. From the vibrant colors to the sweet decorations, it’s an invitation to gather and celebrate. Each slice not only tantalizes the taste buds but also ignites nostalgia and smiles. This cake is more than a dessert; it’s a centerpiece bursting with joy and memories waiting to be made. So roll up your sleeves, gather your loved ones, and create something magical this Easter that will be remembered long after the season fades.
Print
Easter Peep Cake with Multi-Colored Layers
- Total Time: 1 hour
- Yield: 12 servings 1x
- Diet: Vegetarian
Description
A delightful and colorful cake that captures the spirit of Easter with its vibrant layers and festive decorations featuring Peeps, sprinkles, and chocolate eggs.
Ingredients
- 2 1/2 cups cake flour
- 2 1/2 teaspoons baking powder
- 1/2 teaspoon salt
- 3/4 cup unsalted butter, softened
- 1 3/4 cups granulated sugar
- 5 large egg whites
- 1 tablespoon vanilla extract
- 1/2 teaspoon almond extract (optional)
- 1 cup whole milk, room temperature
- Pastel food coloring (pink, yellow, blue, and green)
- 1 cup unsalted butter, softened (for frosting)
- 4 cups powdered sugar
- 1/4 cup heavy cream or milk
- 2 teaspoons vanilla extract (for frosting)
- Pinch of salt (for frosting)
- Food coloring (optional, for colored frosting)
- Peeps marshmallow bunnies & chicks (for decoration)
- Easter sprinkles (for decoration)
- Shredded coconut (optional, for grass effect)
- Mini chocolate eggs (optional)
Instructions
- Preheat oven to 350°F (175°C) and grease three 8-inch round cake pans.
- In a bowl, whisk together cake flour, baking powder, and salt.
- In a large mixing bowl, beat butter and sugar until light and fluffy (2-3 minutes).
- Add egg whites one at a time, mixing until well combined.
- Stir in vanilla and almond extract.
- Alternately add flour mixture and milk, mixing until just combined.
- Divide the batter evenly into four bowls.
- Add a few drops of pastel food coloring to each bowl (pink, yellow, blue, and green), stirring gently.
- Poor batter into cake pans and bake for 22-25 minutes, or until a toothpick inserted in the center comes out clean.
- Let cakes cool in pans for 10 minutes, then transfer to a wire rack to cool completely.
- In a large bowl, beat butter until creamy for the frosting.
- Gradually add powdered sugar, mixing well after each addition.
- Add vanilla extract, salt, and heavy cream, beating until smooth and fluffy (2-3 minutes).
- If desired, tint the frosting with pastel food coloring.
- Place one cake layer on a serving plate and spread a thin layer of frosting.
- Repeat with the remaining cake layers, stacking them evenly.
- Frost the top and sides of the cake with a smooth layer of buttercream.
- Press Peeps marshmallow bunnies and chicks around the sides of the cake.
- Sprinkle Easter sprinkles on top.
- (Optional) Tint shredded coconut green with food coloring for a ‘grass’ effect and scatter on top.
- Arrange mini chocolate eggs in the center for a festive touch.
Notes
- Ensure all ingredients are at room temperature before starting.
- Use a toothpick to test the cake layers for doneness.
- Store leftovers in an airtight container at room temperature or in the fridge.
- The optional ingredients can be adjusted based on personal preference.
- Prep Time: 30 minutes
- Cook Time: 25 minutes
- Category: Dessert
- Method: Baking
- Cuisine: American
Nutrition
- Serving Size: 1 slice
- Calories: 450
- Sugar: 40g
- Sodium: 220mg
- Fat: 20g
- Saturated Fat: 10g
- Unsaturated Fat: 8g
- Trans Fat: 0g
- Carbohydrates: 65g
- Fiber: 1g
- Protein: 4g
- Cholesterol: 45mg