
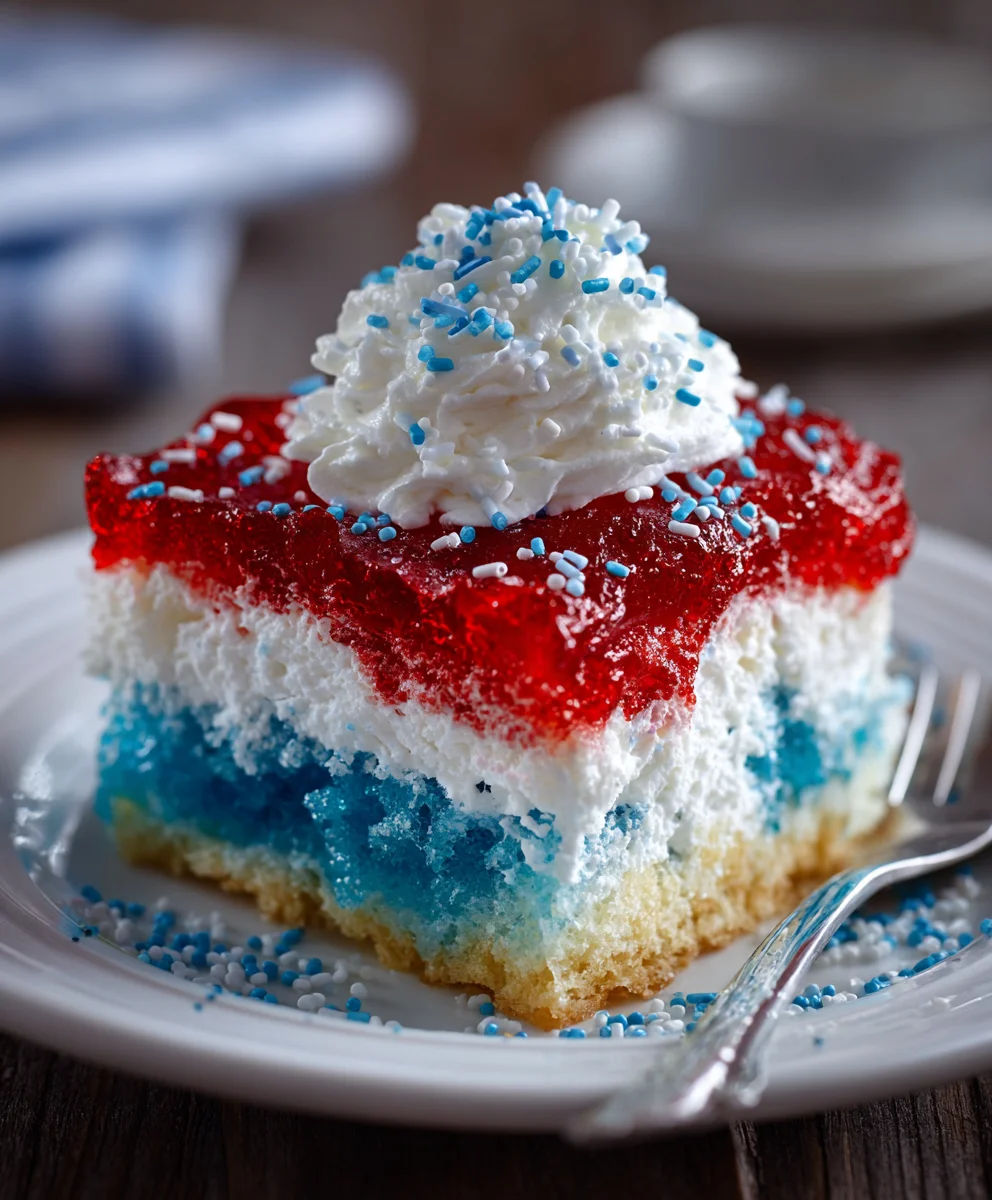
Introduction to Red, White, and Blue Poke Cake
There’s something so delightful about a red, white, and blue poke cake that instantly brings a smile. Whether it’s for a family barbecue or a festive gathering, this cake is a showstopper! As a busy mom myself, I always look for recipes that create joy without taking hours of my time. This poke cake is simple yet stunning, making it a perfect solution for those moments when you want to impress your loved ones without breaking a sweat. Plus, who can resist those vibrant colors and delicious flavors? Let’s dive into this sweet adventure together!
Why You’ll Love This Red, White, and Blue Poke Cake
This red, white, and blue poke cake is a fantastic treat that checks all the boxes! It’s incredibly easy to whip up, requiring minimal effort and only a few ingredients. With its vibrant colors and luscious layers, it’s not just a cake; it’s a centerpiece! Plus, the taste is refreshing and sweet, giving everyone a reason to come back for seconds. It’s the perfect dessert for all occasions!
Ingredients for Red, White, and Blue Poke Cake
Let’s gather our ingredients for this festive red, white, and blue poke cake. Each element contributes to the overall flavor, color, and fun. Here’s what you’ll need:
- White cake mix: This is the base of our poke cake, light and fluffy. You can choose your favorite brand for a hassle-free deliciousness.
- Water, oil, and eggs: These are the essential ingredients listed on the cake mix box. They ensure the cake has the right texture and moisture.
- Red jello and blue jello: The stars of our colorful creation! These add that vibrant splash and fun fruity flavor. Feel free to experiment with sugar-free versions if preferred.
- Boiling water: This helps dissolve the jello, making it easy to mix and pour into our cake. Remember, it should be hot for best results!
- Cold water: It cools down the jello just enough to handle without burning your fingers.
- Whipped topping: This adds a fluffy layer on top of the cake, making it light and airy. You can swap it for Greek yogurt for a healthier twist!
- Powdered sugar: A hint of sweetness to our whipped topping, making it irresistibly delicious. Adjust the amount to fit your taste.
- Sprinkles: The final touch! They’re great for decorating and really make the cake pop. Choose your favorite colors to match the theme.
For exact measurements, check the bottom of the article where you can print out the recipe. Now, let’s get our hands a little messy and dive into this delightful creation!
How to Make Red, White, and Blue Poke Cake
Ready to embark on this sweet journey? Making a red, white, and blue poke cake is fun and satisfying. With each step, you’ll see how easy and gratifying it is to create this colorful dessert. Let’s get started!
Step 1: Baking the Cake
Begin by preheating your oven according to the package directions for your chosen white cake mix.
Prepare the cake batter as instructed, mixing in water, oil, and eggs. Pour the batter into your greased baking pan and pop it in the oven. Bake until golden brown, about 30 minutes.
Once baked, allow the cake to cool for at least 30 minutes on a wire rack. Letting it cool is crucial; you don’t want a mushy masterpiece!
Step 2: Poking Holes
Now comes the fun part! Take the end of a wooden spoon (or a similar tool) and gently poke holes across the surface of the cooled cake.
These holes should be about ½ to ¾ deep; just don’t poke all the way through. Trust me—this is what makes the jello seep in and create that delightful flavor!
Step 3: Preparing the Jello
In a large measuring cup or small bowl, dissolve the red jello in 1 cup of boiling water. Stir until the powder completely disappears.
Next, stir in ½ cup of cold water to cool it down. Repeat this step with the blue jello in a separate bowl. The colorful magic begins here!
Step 4: Adding the Jello to the Cake
Carefully pour the red jello into alternating holes in the cake. Then follow it with the blue jello. Be cautious when doing this—mixing the two colors will create an unexpected shade of purple!
Take your time—this is the step that adds to the creative flair of your red, white, and blue poke cake.
Step 5: Refrigeration
After filling the holes, cover the cake and pop it in the fridge for at least 2 hours. This is where the magic happens; the jello needs time to set.
Trust me, the wait will be worth it! The anticipation only makes each slice taste better.
Step 6: Whipping the Topping
While the cake chills, let’s prepare the topping. In a medium bowl, whisk the whipped topping together with the powdered sugar until smooth and creamy.
This fluffy layer will add a heavenly touch to your cake. Feel free to sample a bit for quality control! It’s hard to resist, I know.
Step 7: Finishing Touches
Once the cake has chilled and the jello is set, it’s time for the final flourish.
Spread the whipped topping evenly over the cake, making sure to cover it beautifully.
To make it festive, sprinkle on your favorite colorful sprinkles. They add that extra pop, making your red, white, and blue poke cake a true showstopper!
Tips for Success
- For the best results, use room temperature ingredients like eggs and water; this helps the cake rise nicely.
- Don’t rush the cooling process; allow the cake to cool fully before poking holes.
- Experiment with different jello flavors or colors for a fun twist.
- Want a healthier option? Use sugar-free jello and whipped topping.
- Always keep a whisk handy—it’s great for mixing and aerating!
Equipment Needed
- Baking pan: A 9×13 inch pan works perfectly. If you don’t have one, a similar-sized dish will do.
- Mixing bowls: Use any bowls you have on hand; just make sure they are big enough for mixing.
- Whisk or mixer: A whisk is ideal, but a hand mixer makes it even easier.
- Wooden spoon: Essential for poking holes, but any sturdy utensil will suffice!
Variations of Red, White, and Blue Poke Cake
- Fruit Fest: Add fresh strawberries or blueberries on top of the whipped topping for a real fruity burst!
- Chocolate Delight: Use chocolate cake mix instead for a decadent twist. The jello still shines through with a delicious chocolate flavor!
- Healthier Version: Substitute the whipped topping with Greek yogurt for a lighter, tangy flavor. Choose sugar-free jello to cut back on calories!
- Vegan Option: Use a vegan cake mix and replace eggs with applesauce or flaxseed meal.
- Layered Look: For a stunning presentation, make the cake in layers. Alternate red and blue layers for a beautiful stacked effect.
Serving Suggestions for Red, White, and Blue Poke Cake
- Ice Cream: Serve with a scoop of vanilla or strawberry ice cream for a delicious contrast.
- Fresh Berries: Garnish with blueberries and strawberries on top for a fresh touch.
- Summer Drinks: Pair with lemonade or iced tea for a refreshing beverage.
- Festive Plates: Use themed plates and napkins to elevate the festive vibe!
FAQs about Red, White, and Blue Poke Cake
As you embark on your journey to create this magnificent red, white, and blue poke cake, you might have a few questions in mind. Here are some common queries that might help you out:
Can I make this poke cake in advance?
Absolutely! This festive cake can be made a day in advance. In fact, letting it sit overnight allows the flavors to meld beautifully. Just remember to keep it covered in the fridge.
What if I don’t like jello?
No worries! You can skip the jello and opt for fruit purees or flavored pudding for a different twist. Just ensure that it complements the texture of the cake.
How can I store leftovers?
Store any leftover cake in an airtight container in the fridge. It should stay fresh for about 3-4 days, but trust me, it won’t last long!
Can I use a different cake mix flavor?
Definitely! While I love the classic white cake, feel free to experiment with lemon, vanilla, or even chocolate cake mixes. Each will give your red, white, and blue poke cake a unique flavor.
Is this recipe suitable for kids?
Oh, yes! Kids will love making this colorful cake with you. Just keep an eye on the boiling water, and let them help with pouring the jello. It’s a fantastic way to spark their interest in baking!
Final Thoughts
Making a red, white, and blue poke cake is more than just a recipe; it’s an experience that brightens any occasion. The vibrant colors and textures create a festive charm that draws everyone in, turning ordinary moments into cherished memories. Each slice offers a delightful burst of flavor that brings joy to family gatherings or casual get-togethers. Plus, it’s a breeze to whip up, making it the perfect treat for busy days. As you dive into this sweet celebration, remember—it’s not just about the cake but the smiles and laughter it brings with each bite!

CookingLayer Recipes
Discover delicious recipes, meal plans and save your favorites with our free iPhone app.

Red, white, and blue poke cake
- Total Time: 3 hours
- Yield: 12 servings 1x
- Diet: Vegetarian
Description
A festive poke cake decorated in red, white, and blue, perfect for celebrations.
Ingredients
- 1 white cake mix plus ingredients listed on the box (1 cup water, ½ cup oil, 3 eggs)
- 1 3 oz package red jello
- 1 3 oz package blue jello
- 2 cups boiling water divided
- 1 cup cold water divided
- 1 8 oz tub whipped topping thawed
- ¼ cup powdered sugar
- Sprinkles
Instructions
- Bake your cake according to the package directions and let it cool for at least 30 minutes.
- Using the end of a wooden spoon poke holes over the entire cake. They should be about ½ – ¾ the depth of the cake, just don’t poke all the way through.
- In a small bowl or large measuring cup dissolve red jello in 1 cup of boiling water. When jello powder is dissolved stir in ½ cup cold water.
- In a separate small bowl or large measuring cup dissolve the blue jello in 1 cup of boiling water. When the jello powder is dissolved stir in ½ cup cold water.
- Carefully pour the red and blue jello into alternating holes in the cake. Be careful not to mix them or you will end up with a purple cake.
- Cover and refrigerate for at least 2 hours.
- In a medium bowl whisk together whipped topping and powdered sugar.
- Spread whipped topping over the cake and top with sprinkles.
Notes
- For best results, use both jello flavors that are sugar-free if desired.
- Can be prepared a day in advance for easier serving.
- Feel free to adjust the amount and type of sprinkles used for decoration.
- Prep Time: 30 minutes
- Cook Time: 30 minutes
- Category: Dessert
- Method: Baking
- Cuisine: American
Nutrition
- Serving Size: 1 slice
- Calories: 230
- Sugar: 25g
- Sodium: 210mg
- Fat: 8g
- Saturated Fat: 2g
- Unsaturated Fat: 6g
- Trans Fat: 0g
- Carbohydrates: 37g
- Fiber: 0g
- Protein: 3g
- Cholesterol: 30mg