Introduction to Creamy Cheesecake Balls
There are days when you crave something sweet but don’t have the energy to whip up a complicated dessert. That’s where these Creamy Cheesecake Balls come in! They’re simple to make and utterly satisfying, a delightful treat that will impress your family or friends. Picture this: rich, creamy goodness coated in luscious chocolate, ready to pop in your mouth. Whether it’s a busy weeknight or a festive gathering, this no-bake dessert is your go-to solution. Trust me, you’ll want to keep this recipe close to your heart for when those sweet tooth cravings hit!
Why You’ll Love This Creamy Cheesecake Balls
If you’re like me, life can get hectic, and finding time to bake can feel impossible. But fear not! These Creamy Cheesecake Balls are incredibly easy to whip up, and they require no oven time. With just a few ingredients and minimal effort, you’ll end up with delightful bites that melt in your mouth. They’re perfect for a sweet finish to a dinner, or as a fun treat for gatherings. Who can resist a chocolate-covered bite of cheesecake?
Ingredients for Creamy Cheesecake Balls
To create these Creamy Cheesecake Balls, you won’t need an extensive grocery list. Here’s what you’ll need.
- Cream cheese: The star ingredient! It gives the cheesecake its rich, creamy texture. Make sure it’s softened for easy mixing.
- Powdered sugar: This sweetens the cream cheese without the graininess of granulated sugar. It’s key for that silky-smooth finish.
- Vanilla extract: A splash of this aromatic extract brings warmth and depth to your cheesecake flavor.
- Finely crushed graham crackers: Optional but recommended! They add a delightful crunch and classic cheesecake flavor.
- Dried cranberries or chocolate chips: These optional surprises can be folded into your mixture for added texture and burst of sweetness.
- Chocolate (white or milk): The coating! It wraps each cheesecake ball in a delectable layer that elevates the indulgence.
- Extra crushed graham crackers or powdered sugar: These toppings can finish off the presentation with a sprinkle of sweetness or crunch.
You can find all the exact quantities at the bottom of the article, ready for printing to make your shopping a breeze!
How to Make Creamy Cheesecake Balls
Prepare the cheesecake mixture
Let’s get started on our Creamy Cheesecake Balls! In a medium bowl, begin beating the softened cream cheese. You want it to be smooth and creamy—like a fluffy cloud. As you mix, gradually add in the powdered sugar, followed by the vanilla extract. Keep beating until everything is blended well—no lumps allowed!
If you’re opting for that delicious graham cracker crunch, gently fold it into your mixture. And don’t forget those surprise mix-ins! Fold in some dried cranberries or chocolate chips for a burst of flavor. The final texture should be thick yet spreadable, another hint that you’re on the right path to a no-bake delight!
Shape into balls
Now comes the fun part! Scoop small portions of that irresistible cheesecake mixture, about one tablespoon each. Roll them between your palms to form smooth, round balls. Don’t worry if they aren’t perfect; they’ll still taste heavenly!
As you form the balls, place them on a parchment-lined tray, which will keep them from sticking. Once all the mixture is shaped, pop that tray into the fridge for about 30 to 45 minutes. This chilling time is key, as it helps the balls firm up, making them easier to dip in chocolate later. Plus, waiting just builds anticipation for the treat ahead!
Coat with chocolate
While your cheesecake balls chill, it’s time to tackle the chocolate coating! Grab your choice of white or milk chocolate and melt it in a microwave-safe bowl. Heat it in 20-second intervals, stirring each time until it’s silky smooth.
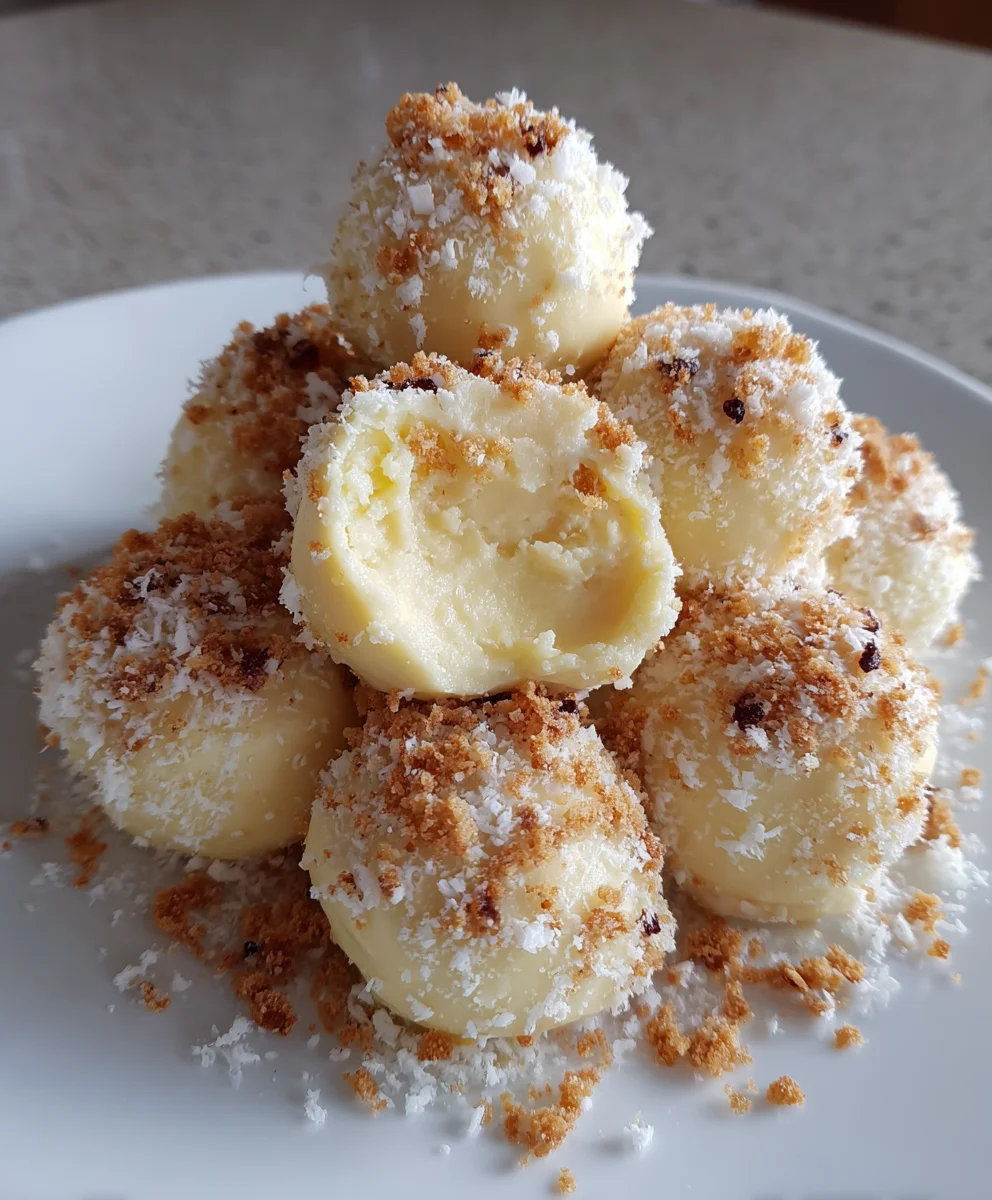
When your cheesecake balls are firm, dip each one into the melted chocolate, letting any excess drip off. I find using a fork works wonders here. Place the chocolate-coated balls back on the parchment-lined tray, where they’ll set. To add a beautiful finish, sprinkle them with crushed graham crackers or a dusting of powdered sugar immediately after coating. That little extra touch is what makes them sing!
Finish & chill
Now that your cheesecake balls are coated and sprinkled, it’s time for another chill session. Pop them back into the fridge for about 20 minutes to let the chocolate set. This step ensures the chocolate hardens perfectly around the luscious cheesecake inside.
Presentation is key, so take a moment to arrange them nicely on a plate. You can place them in mini cupcake liners for an adorable touch, making it easy for guests to grab one. No one can resist a beautiful treat!
Serve & enjoy
To enjoy your Creamy Cheesecake Balls, keep them refrigerated until you’re ready to serve. These little bites of joy are best served chilled, as that’s when their creamy goodness shines. They can last up to a week in the fridge—if they last that long, that is!
Tips for Success
- Use room temperature cream cheese for easier mixing.
- Chill the cheesecake balls thoroughly before dipping to prevent them from losing shape.
- Feel free to experiment with different toppings, like crushed nuts or colorful sprinkles.
- For a smoother chocolate coating, use a high-quality chocolate.
- Remember to work quickly when coating the balls to prevent the chocolate from hardening.
Equipment Needed
- Mixing bowl: Any medium bowl will do for your cheesecake mixture.
- Electric mixer: A hand mixer makes it speedy, but a whisk works too—just be prepared for a workout!
- Spoon or cookie scoop: For portioning out the cheesecake balls.
- Parchment paper: A must to keep your cheesecake balls from sticking.
- Microwave-safe bowl: Perfect for melting your chocolate smoothly.
Variations for Creamy Cheesecake Balls
- Nutty Delight: Add finely chopped nuts, like pecans or almonds, to the cheesecake mixture for added crunch and flavor.
- Fruit Fusion: Incorporate pureed fruits like strawberries or blueberries into the mixture for a fruity twist that adds both flavor and color.
- Mini Cheesecake Cups: Instead of rolling into balls, press the mixture into mini cupcake liners for a fun twist on presentation!
- Vegan Option: Use vegan cream cheese and swap powdered sugar for a plant-based sweetener to create delicious vegan-friendly cheesecake balls.
- Flavor Infusions: Experiment by adding extracts such as almond or coconut for a unique flavor profile that keeps your cheesecake balls exciting.
Serving Suggestions for Creamy Cheesecake Balls
- Serve alongside fresh fruit, like strawberries or raspberries, for a refreshing contrast.
- Pair with a cup of coffee or herbal tea for a cozy afternoon treat.
- Arrange on a decorative platter with colorful mini cupcake liners for a festive touch.
- Drizzle with chocolate sauce or caramel for added decadence.
- Garnish with mint leaves for a pop of color and freshness.
FAQs about Creamy Cheesecake Balls
I know you might have some burning questions about these Creamy Cheesecake Balls, so let’s dive in! Here are a few queries I often hear from fellow home cooks.
Can I make these cheesecake balls ahead of time?
Absolutely! These treats store beautifully. You can make them a few days in advance and just pop them in the fridge. They’ll be ready when you are!
What are some good mix-ins for the cheesecake?
The beauty of these Creamy Cheesecake Balls is their versatility! Chocolate chips, dried fruits, or even a dash of citrus zest can elevate the flavor. Feel free to get creative!
How should I store leftover cheesecake balls?
Keep your cheesecake balls refrigerated in an airtight container. They can last up to a week, but trust me, they won’t last that long once you start sneaking bites!
Can I freeze these cheesecake balls?
Yes, you can! Just make sure to wrap them individually in plastic wrap and then place them in a freezer-safe container. They can be frozen for up to three months.
What can I use instead of cream cheese?
For a lighter option, you can use ricotta cheese or even Greek yogurt. Just adjust the powdered sugar to taste for sweetness!
Final Thoughts
These Creamy Cheesecake Balls are more than just a dessert; they’re a little bundle of joy that can brighten any occasion. Whether you’re indulging after a long day or impressing guests at your next gathering, these bites bring smiles and satisfaction. They’re a reminder that sweet treats don’t have to be complicated. Plus, the creative possibilities are endless, making every batch a new adventure! So grab your ingredients and start whipping up these delights. You’ll be treated to creamy bliss wrapped in chocolate, and I promise, your taste buds will thank you!
Print
Creamy Cheesecake Balls
- Total Time: 1 hour
- Yield: 20 cheesecake balls 1x
- Diet: Vegetarian
Description
Deliciously creamy cheesecake balls coated in chocolate, perfect for a sweet treat.
Ingredients
- 8 oz (225 g) cream cheese, softened
- 1/4 cup powdered sugar
- 1 tsp vanilla extract
- 2–3 tbsp finely crushed graham crackers (optional, for texture)
- 2–3 tbsp dried cranberries or chocolate chips (optional, for surprise filling)
- 8 oz (225 g) white chocolate or milk chocolate, melted
- Extra crushed graham crackers or powdered sugar for topping
Instructions
- Prepare the cheesecake mixture: In a medium bowl, beat cream cheese, powdered sugar, and vanilla until smooth and creamy. Fold in crushed graham crackers and any optional mix-ins (cranberries or chocolate chips).
- Shape into balls: Scoop small portions (about 1 tablespoon each) and roll into smooth balls. Place on a parchment-lined tray and refrigerate for 30–45 minutes to firm up.
- Coat with chocolate: Melt the chocolate in a microwave-safe bowl in 20-second intervals, stirring until smooth. Dip each chilled cheesecake ball into melted chocolate, allowing excess to drip off.
- Finish & chill: Place coated balls back on parchment, sprinkle with crushed graham crackers or powdered sugar, and refrigerate until chocolate is set (about 20 minutes).
- Serve & enjoy: Keep refrigerated until serving. Best enjoyed chilled for that creamy bite!
Notes
- Optional mix-ins add a delightful surprise to every bite.
- Chilling the balls before coating helps them maintain their shape.
- Can be stored in the refrigerator for up to a week.
- Prep Time: 15 minutes
- Cook Time: 0 minutes
- Category: Dessert
- Method: No-Bake
- Cuisine: American
Nutrition
- Serving Size: 1 cheesecake ball
- Calories: 120
- Sugar: 10g
- Sodium: 40mg
- Fat: 7g
- Saturated Fat: 4g
- Unsaturated Fat: 3g
- Trans Fat: 0g
- Carbohydrates: 12g
- Fiber: 0g
- Protein: 1g
- Cholesterol: 15mg