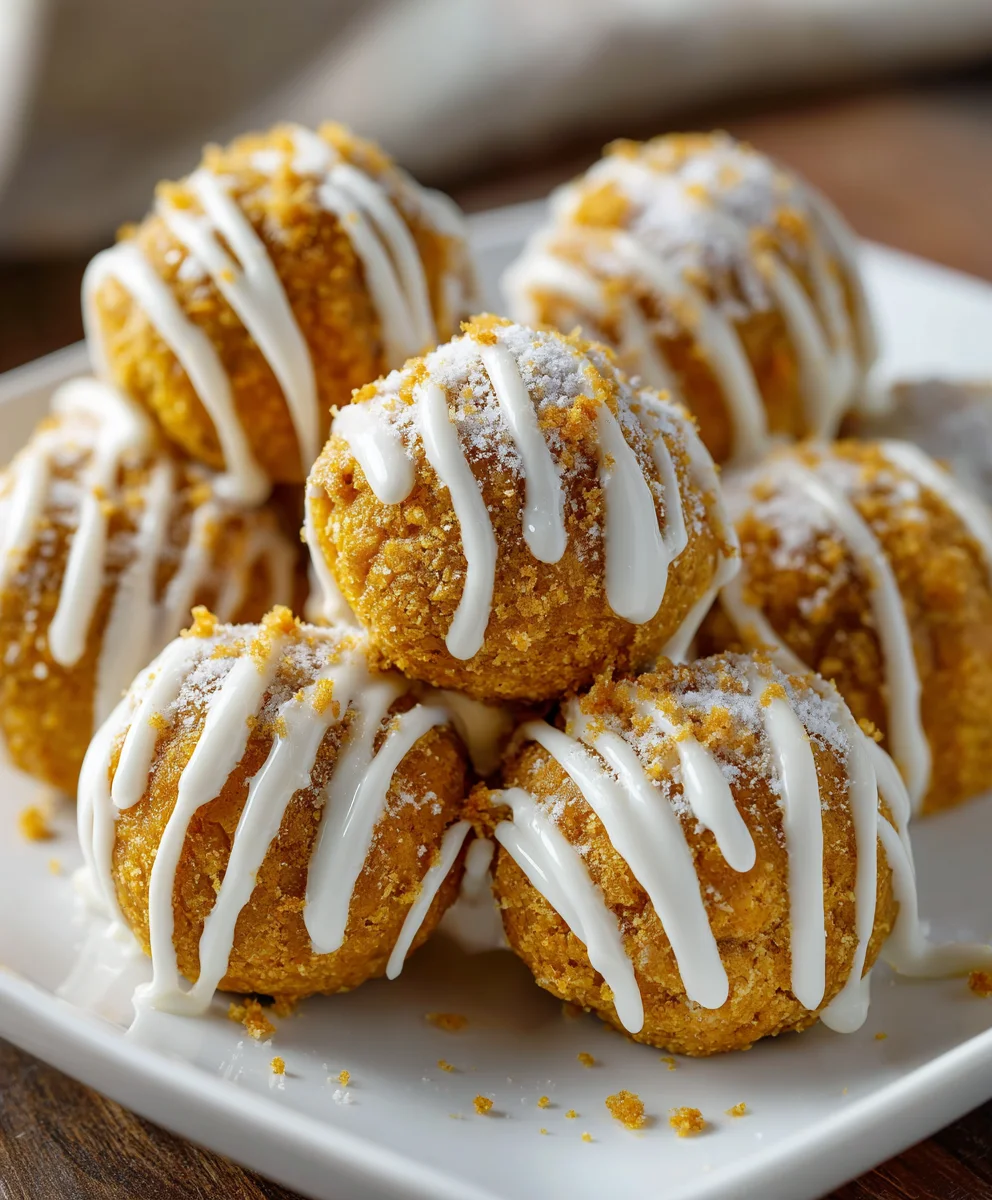
Introduction to No-Bake Pumpkin Cheesecake Balls
As the autumn leaves fall, I can’t help but think of all the cozy gatherings and warm flavors that fill the air. What better way to celebrate this season than with delightful No-Bake Pumpkin Cheesecake Balls? These little bites of heaven bring the comfort of pumpkin spice right to your fingertips. Perfect for busy moms and professionals like us, this recipe is a quick solution for a hectic day, allowing you to impress friends and family without spending hours in the kitchen. Trust me, once you try them, you’ll want to make them a fall tradition!
Why You’ll Love This No-Bake Pumpkin Cheesecake Balls
If you’re like me, juggling a busy life while craving something delicious can be a challenge. These No-Bake Pumpkin Cheesecake Balls are a lifesaver! They come together in just 20 minutes, which means you can whip them up even on the craziest days. Plus, their creamy, spiced flavor dances on your taste buds, making them the perfect treat for both gatherings and quiet evenings at home. Who says comforting desserts can’t be easy?
Ingredients for No-Bake Pumpkin Cheesecake Balls
Gathering the right ingredients is half the fun of cooking, and for these No-Bake Pumpkin Cheesecake Balls, it couldn’t be easier! Here’s what you’ll need:
- Pumpkin puree: This velvety base gives our balls a rich fall flavor while providing moisture and nutrients.
- Cream cheese: Softened cream cheese adds creaminess and a delightful tang, perfectly balancing the sweetness of the dessert.
- Graham cracker crumbs: These crumbs bring that traditional cheesecake crust flavor and a satisfying crunch.
- Powdered sugar: A fine sweetener that blends effortlessly, giving that sugary touch without any grit.
- Pumpkin pie spice: This magical blend of cinnamon, nutmeg, and ginger infuses that classic autumn flavor, making your taste buds sing!
- Vanilla extract: Just a splash adds a warm, sweet aroma, enhancing the overall flavor profile.
- Pinch of salt: A tiny bit helps to balance the sweetness and brighten the flavors. Trust me, it makes a difference!
- White chocolate: We’ll melt this to coat our cheesecake balls, adding a creamy and decadent finish. You can substitute with dark chocolate if you prefer a richer taste.
You’ll find the exact measurements for all these ingredients at the bottom of the article, ready for you to print out and use. Happy cooking!
How to Make No-Bake Pumpkin Cheesecake Balls
Step 1: Prepare the Cream Cheese Mixture
To start, take your softened cream cheese and pumpkin puree and place them in a large mixing bowl. Using an electric mixer, blend the two together until the mixture is smooth and well combined. I love to start at a low speed and gradually increase it to prevent splatters. The colors should marry into a lovely orange hue, and you want to ensure there are no lumps left behind. This creamy base is the heart of your No-Bake Pumpkin Cheesecake Balls. If there are still bits of cream cheese sticking around, just keep mixing until you achieve that velvety consistency. It’s like creating a cozy blanket of flavor for the rest of the ingredients to snuggle into!
Step 2: Combine the Dry Ingredients
Next up, it’s time to introduce the dry ingredients. Grab another bowl and add the graham cracker crumbs, powdered sugar, pumpkin pie spice, vanilla extract, and a pinch of salt. I like to whisk these ingredients together first before adding them to the pumpkin mixture. This little step helps distribute everything evenly, making sure each cheesecake ball bursts with flavor! Slowly fold this dry mix into the creamy pumpkin mixture. As you do, the enticing smells will fill your kitchen—trust me, you’ll already be dreaming of those delicious balls! Once everything is blended and combined, you should have a gooey mixture that you can easily mold into shape.
Step 3: Form the Cheesecake Balls
Now comes the fun part: forming those adorable cheesecake balls! With clean hands, scoop out about a tablespoon of the mixture and roll it gently into a ball. I find that slightly dampening my hands makes this process smoother, as the mixture can get a bit sticky. Place each ball on a baking sheet lined with parchment paper. Since these little guys are going to chill out a bit later, make sure they have some space between them. You want them to have some room to breathe and firm up nicely while they chill.
Step 4: Chill the Balls
Once you’ve formed all the balls, it’s time for a little chill session! Pop the baking sheet into the refrigerator and let those beauties chill for at least an hour. This step is crucial, as it firms them up, making them easier to handle when you’re ready to dip them in chocolate. While they chill, you might want to tidy up your kitchen or even sneak a taste of the leftovers—believe me, it’s irresistible! I often fantasize about the flavors mingling together while they’re getting all set and excited for their next adventure!
Step 5: Coat with White Chocolate
Once your cheesecake balls are nice and firm, it’s coating time with that melted white chocolate! Take your bowl of melted chocolate and dip each chilled ball into it, swirling it around so it’s fully coated. A fork works wonders here; it helps shake off any excess chocolate for a smooth finish. Carefully return each coated ball to the parchment-lined baking tray and repeat the process until all are covered. The shiny, chocolatey exterior makes these balls not only delicious but truly eye-catching! Let them sit until the chocolate firms up, and then they’re ready to shine at your next gathering!
Tips for Success
- Always use softened cream cheese for a smooth blend with pumpkin puree.
- Chill the balls for at least one hour to ensure the best texture.
- Adjust the sweetness by experimenting with powdered sugar to suit your taste.
- Try using a small cookie scoop for uniform ball sizes.
- For a fun twist, add a sprinkle of chopped nuts or coconut flakes on top after coating.
Equipment Needed
- Mixing bowl: A large one for combining ingredients; alternatively, a stand mixer can do the job.
- Electric mixer: This helps achieve a smooth consistency; you can use a whisk if you enjoy a workout!
- Baking sheet: Use any flat tray; just line it with parchment paper to prevent sticking.
- Measuring cups: Essential for accurate ingredient portions; a kitchen scale can also work in a pinch.
- Cookie scoop: Handy for rolling uniform balls; a spoon will suffice if you don’t have one.
Variations of No-Bake Pumpkin Cheesecake Balls
- Chocolate Pumpkin Cheesecake Balls: Swap white chocolate for semi-sweet or dark chocolate for a richer flavor. The contrast of dark chocolate with the pumpkin is simply divine!
- Nutty Twist: Incorporate chopped nuts like walnuts or pecans into the mixture for added crunch and nutritional benefits—just be sure to communicate with any picky eaters about this addition!
- Gluten-Free Option: Use gluten-free graham cracker crumbs or almond flour instead of regular crumbs. You won’t sacrifice flavor but can accommodate those with dietary restrictions.
- Coconut-Lime Style: Add shredded coconut or a squeeze of fresh lime juice to the mixture to elevate the flavor profile with a tropical twist that’s unexpected yet delightful!
- Vegan Version: Replace cream cheese with vegan cream cheese and use maple syrup instead of powdered sugar for a wholesome, plant-based treat!
Serving Suggestions for No-Bake Pumpkin Cheesecake Balls
- Serve on a festive platter with autumn leaves or mini pumpkins for a charming display.
- Pair with a warm cup of spiced chai or pumpkin latte to enhance the fall experience.
- Dust with extra pumpkin pie spice or crushed graham crackers for a gorgeous finish.
- These balls also make a delightful addition to dessert tables at holiday gatherings.
- Enjoy them as a snack on cozy movie nights with family!
FAQs about No-Bake Pumpkin Cheesecake Balls
Can I freeze No-Bake Pumpkin Cheesecake Balls? Absolutely! These treats freeze beautifully. Just place them in an airtight container, separating layers with parchment paper, and they can last up to three months. When you’re ready to enjoy them, just let them thaw in the fridge.
How can I make these balls less sweet? If you prefer a less sweet treat, simply reduce the amount of powdered sugar in the mixture. You can also try using a sugar substitute like stevia, but remember to adjust based on the sweetness level you desire.
Can I substitute ingredients for dietary restrictions? Yes! You can use vegan cream cheese for a dairy-free version or gluten-free graham cracker crumbs for a gluten-free option. These adaptations allow everyone to enjoy the flavors of fall.
How long do No-Bake Pumpkin Cheesecake Balls last in the fridge? They can last for about five days in the fridge when stored in an airtight container. But I doubt they’ll stick around that long—they’re too delicious!
What other toppings or dips work well? Besides white chocolate, you can drizzle melted dark chocolate or sprinkle chopped pecans on top. A caramel drizzle can also take these bites to the next level!
Final Thoughts on No-Bake Pumpkin Cheesecake Balls
Creating No-Bake Pumpkin Cheesecake Balls is like wrapping your taste buds in a warm, delicious hug. The joy of combining comforting pumpkin flavors with creamy goodness brings a little bit of magic to your kitchen. The process is quick and simple, making it perfect for busy days or family gatherings. Each bite is a taste of fall, igniting beautiful moments and sweet memories. With these delightful treats in your recipe arsenal, you’re sure to impress loved ones and indulge in seasonal delight, making this autumn truly unforgettable!
Print
No-Bake Pumpkin Cheesecake Balls
- Total Time: 1 hour 20 minutes
- Yield: 24 balls 1x
- Diet: Vegetarian
Description
Delicious no-bake pumpkin cheesecake balls, perfect for fall festivities and easy to make.
Ingredients
- 1 cup pumpkin puree
- 8 oz cream cheese, softened
- 1 cup graham cracker crumbs
- 1/2 cup powdered sugar
- 1 tsp pumpkin pie spice
- 1/2 tsp vanilla extract
- Pinch of salt
- 1/2 cup white chocolate, melted (for coating)
Instructions
- In a large bowl, mix together the pumpkin puree and softened cream cheese until smooth.
- Add the graham cracker crumbs, powdered sugar, pumpkin pie spice, vanilla extract, and salt. Mix until well combined.
- Roll the mixture into small balls and place them on a baking sheet lined with parchment paper.
- Chill the balls in the refrigerator for at least 1 hour to firm up.
- Dip each ball into the melted white chocolate to coat, then return to the parchment paper to set.
- Refrigerate until the chocolate is firm, then serve.
Notes
- Make sure the cream cheese is softened to blend well with the pumpkin puree.
- Feel free to adjust the sweetness by adding more or less powdered sugar to taste.
- These can be made ahead of time and stored in the refrigerator.
- Prep Time: 20 minutes
- Cook Time: 0 minutes
- Category: Dessert
- Method: No-Bake
- Cuisine: American
Nutrition
- Serving Size: 1 ball
- Calories: 135
- Sugar: 7g
- Sodium: 50mg
- Fat: 8g
- Saturated Fat: 4g
- Unsaturated Fat: 3g
- Trans Fat: 0g
- Carbohydrates: 15g
- Fiber: 1g
- Protein: 2g
- Cholesterol: 15mg