Introduction to No-Bake Marshmallow Whip Cheesecake
As a busy mom, I know the whirlwind of daily life can often leave us craving something sweet but feeling short on time. That’s where my No-Bake Marshmallow Whip Cheesecake shines bright like a sunbeam on a Monday morning. It’s simple, delicious, and an absolute showstopper that’s perfect for gatherings or cozy family nights. This cheesecake is a delightful blend of creamy goodness, airy marshmallows, and a buttery graham cracker crust that everyone will love. So, roll up your sleeves, and let’s dive into this easy and scrumptious dessert that will sweep you off your feet!
Why You’ll Love This No-Bake Marshmallow Whip Cheesecake
This No-Bake Marshmallow Whip Cheesecake is a lifesaver on those busy days! With minimal prep time, you can whip it up in just 30 minutes, and it sets beautifully in the fridge while you tackle other tasks. The fluffy, sweet marshmallow filling dances on your taste buds, capturing the hearts of both kids and adults. Plus, there’s no baking involved. That means less mess, more time to savor those delightful moments!
Ingredients for No-Bake Marshmallow Whip Cheesecake

Gathering your ingredients is half the fun, and for this No-Bake Marshmallow Whip Cheesecake, you’ll need a few simple essentials that pack a big flavor punch!
- Graham cracker crumbs: The foundation of our cheesecake, giving it that delicious, buttery crunch.
- Granulated sugar: Adds a hint of sweetness to the crust, balancing the richness of the filling.
- Unsalted butter: Helps bind the crust while adding a rich flavor. Unsalted is best to control the saltiness.
- Cream cheese: The star of the filling! It provides that rich, creamy texture we crave in cheesecake.
- Powdered sugar: This will sweeten the cream cheese without the graininess of granulated sugar.
- Vanilla extract: Just a splash for depth of flavor, elevating the sweetness of the cheesecake.
- Marshmallow fluff: This fluffy wonder is the heart of our dish, bringing that nostalgic sweetness and lightness.
- Heavy whipping cream: Whipped to stiff peaks, this creates a pillow-y texture, making the filling airy and decadent.
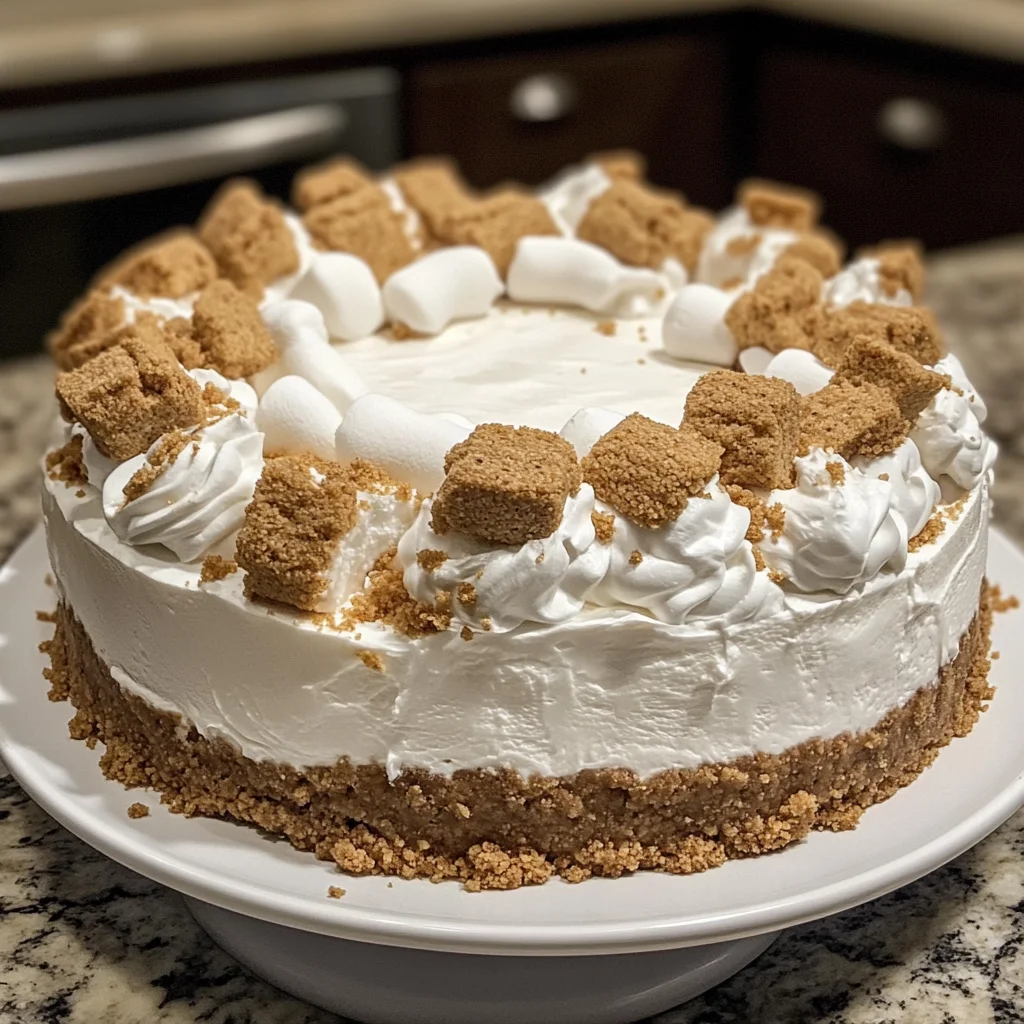
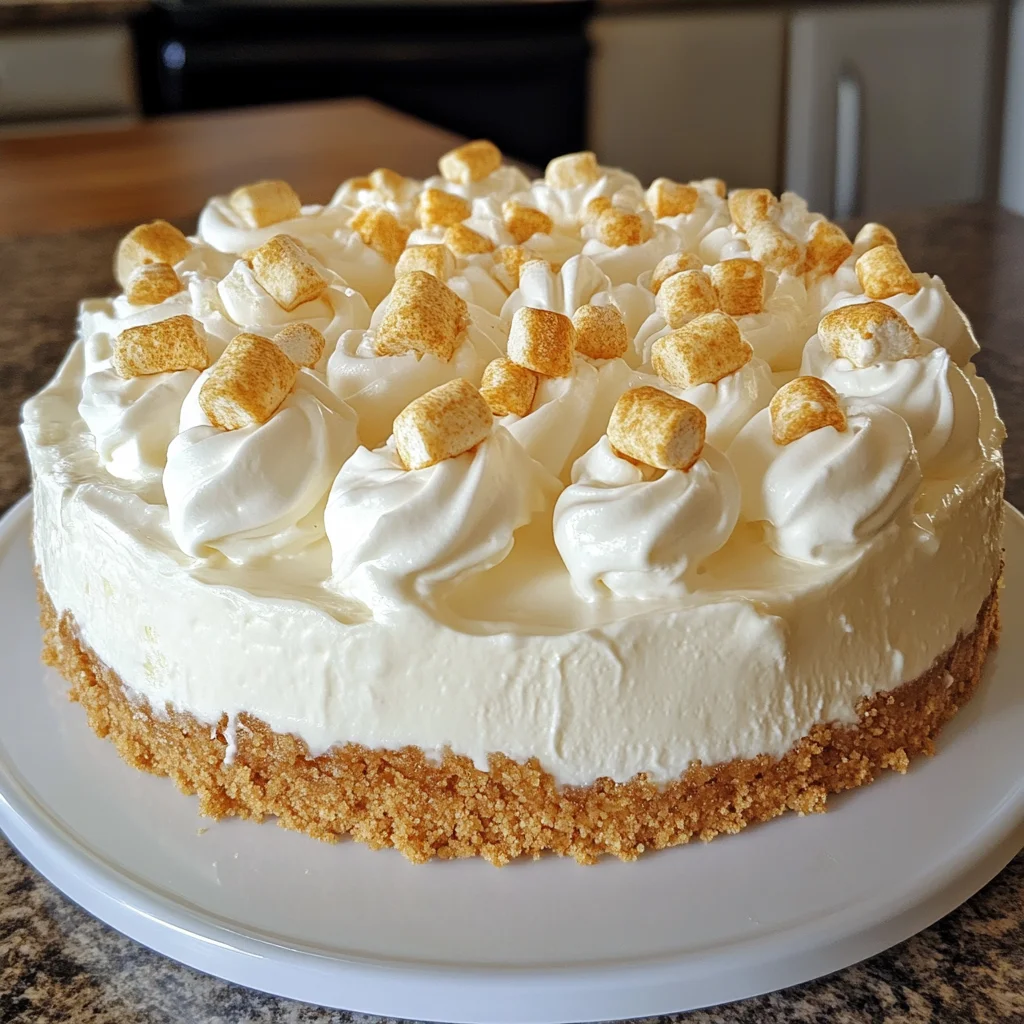
- Mini marshmallows or crushed graham crackers (optional for garnish): These little touches add fun textures and a pop of color for presentation!
For exact quantities, don’t worry! You’ll find them at the bottom of the article ready for printing when you’re ready to whip this beauty up!
How to Make No-Bake Marshmallow Whip Cheesecake
Step 1: Make the Crust
To kick off this delightful No-Bake Marshmallow Whip Cheesecake, let’s start with the crust. In a mixing bowl, combine your graham cracker crumbs and granulated sugar. Blending these two ingredients brings out the sweetness of the crust. Now, drizzle in the melted unsalted butter and mix until everything is evenly moistened. The texture should resemble damp sand, holding together when squeezed together. Next, grab a 9-inch springform pan. Press the crumb mixture firmly into the bottom. Make sure it’s packed tightly for a sturdy base. Once it’s uniformly flat, pop the pan into the fridge. Letting it chill while you prepare the filling is key. It will not only firm up but also enhance the texture of our cheesecake.
Step 2: Prepare the Filling
Now, onto the heart of your No-Bake Marshmallow Whip Cheesecake—the filling! In a large mixing bowl, beat your softened cream cheese until it’s silky smooth. Then, add the powdered sugar and a splash of vanilla extract. Blend until these ingredients are harmoniously combined, creating a sweet, dreamy mixture. Next, it’s time to gently fold in that luscious marshmallow fluff. This helps incorporate air and lightens the texture. Finally, take your whipped heavy cream, already whipped to stiff peaks, and fold it into the cheesecake mixture gently. This step is crucial; don’t overmix! You want to keep the fluffiness intact. Once combined, you’ll have a cloud-like filling that’s just irresistible.
Step 3: Assemble the Cheesecake
With the crust chilled and the filling ready, it’s time to assemble! Spoon the airy filling over your chilled crust, then use a spatula to smooth the top. Take your time with this; a smooth surface makes for beautiful presentation. Once it’s beautifully spread, cover the springform pan with plastic wrap. Now, it’s off to the fridge! Allow your No-Bake Marshmallow Whip Cheesecake to set for at least six hours or overnight. The longer, the better! You want it to have a perfect form when it’s time to slice.
Step 4: Top It Off
Before serving, let’s give that cheesecake a delightful topping! In a mixing bowl, gently combine another cup of marshmallow fluff with a cup of whipped heavy cream. It should be light and fluffy. Spread this heavenly topping over the cheesecake, reaching every corner. For an extra touch, sprinkle mini marshmallows or crushed graham crackers on top. When serving, use a knife dipped in hot water for cleaner slices. Every slice should look as good as it tastes!
Tips for Success
- Always use room temperature cream cheese for a smooth, creamy filling.
- Whip your cream to stiff peaks for the perfect light texture.
- Chill your cheesecake overnight for the best flavor and texture.
- For easy slicing, dip your knife in hot water before cutting.
- Feel free to experiment with toppings; the possibilities are endless!
Equipment Needed
- 9-inch springform pan: Ideal for easy removal. A regular pie dish can work too.
- Mixing bowls: Use both large and medium for convenience.
- Hand mixer or stand mixer: For effortless blending of the filling. A whisk will do the job, but it’ll take longer.
- Spatula: Perfect for smoothing the filling and topping.
- Plastic wrap: To cover the cheesecake while it sets.
Variations for No-Bake Marshmallow Whip Cheesecake
- Chocolate Indulgence: Add cocoa powder to the filling for a rich chocolate cheesecake. Top with chocolate shavings for an extra treat.
- Fruit Fusion: Mix in pureed strawberries or raspberries into the filling, or garnish each slice with fresh fruit for a burst of color and flavor.
- Nutty Delight: Fold in crushed nuts like almonds or pecans for added crunch. You can also sprinkle them on top for decoration.
- Gluten-Free Option: Substitute graham cracker crumbs with gluten-free cookie crumbs to create a delightful gluten-free crust.
- Low-Sugar Alternative: Use sugar substitutes or reduced-sugar marshmallow fluff to create a healthier version while still enjoying the delicious taste.
- Flavor Infusions: Experiment with different extracts like almond or coconut to give your cheesecake a unique twist.
Serving Suggestions
- Pair your cheesecake with a scoop of vanilla ice cream for extra indulgence.
- Serve alongside fresh berries like strawberries or blueberries for a pop of color.
- A dollop of whipped cream can elevate each slice beautifully.
- For drinks, a glass of cold milk or refreshing lemonade complements the sweetness perfectly.
- Presentation tip: Use a cake stand to showcase your cheesecake in all its glory!
FAQs about No-Bake Marshmallow Whip Cheesecake
How long does the No-Bake Marshmallow Whip Cheesecake need to chill?
Your cheesecake will need at least six hours to set, but I recommend chilling it overnight for optimal texture. The longer it rests, the better the flavors meld and the firmer it becomes.
Can I use low-fat cream cheese?
Absolutely! Low-fat cream cheese can be a tasty substitute in this No-Bake Marshmallow Whip Cheesecake. Just remember that the texture may be slightly less creamy, but it will still be delicious.
What can I do if I don’t have a springform pan?
No worries! If you don’t have a springform pan, a regular pie dish works just fine. Ensure you serve it carefully to keep the slices intact. You might need to use a spatula to help lift the pieces out.
How do I store leftover cheesecake?
Store your leftover No-Bake Marshmallow Whip Cheesecake in an airtight container in the fridge. It should stay fresh for up to five days, but good luck keeping it around that long!
Can I freeze the cheesecake?
Yes! You can freeze the cheesecake, but it’s best enjoyed fresh! If you choose to freeze it, wrap it tightly in plastic wrap and then in aluminum foil. Thaw it in the fridge before serving to restore its creamy goodness.
Final Thoughts
Whipping up a No-Bake Marshmallow Whip Cheesecake is more than just making a dessert; it’s about creating joyful memories. The delightful combination of creamy marshmallow filling nestled in a crispy graham cracker crust strikes the perfect balance of textures. Every slice holds the promise of sweetness and nostalgia. Whether you’re celebrating special moments or simply indulging after a long day, this cheesecake brings smiles all around the table. I hope this recipe becomes a cherished part of your dessert repertoire, filling your home with warmth and laughter. Enjoy every bite you take!
PrintNo-Bake Marshmallow Whip Cheesecake: A Delightful Treat!
- Total Time: 6 hours 30 minutes
- Yield: 1 cheesecake (9 inches) 1x
- Diet: Vegetarian
Description
A delightful no-bake cheesecake made with marshmallow fluff, cream cheese, and a graham cracker crust.
Ingredients
- Crust:
- 1 ½ cups graham cracker crumbs
- ¼ cup granulated sugar
- ½ cup unsalted butter, melted
- Filling:
- 16 oz (2 blocks) cream cheese, softened
- 1 cup powdered sugar
- 1 tsp vanilla extract
- 1 ½ cups marshmallow fluff
- 1 cup heavy whipping cream, whipped to stiff peaks
- Topping:
- 1 cup marshmallow fluff
- 1 cup heavy whipping cream, whipped to stiff peaks
- Optional: mini marshmallows or crushed graham crackers for garnish
Instructions
- Make the Crust: In a bowl, combine graham cracker crumbs and sugar. Pour in melted butter and mix until evenly moistened. Press the mixture firmly into the bottom of a 9-inch springform pan. Chill in the fridge while you prepare the filling.
- Prepare the Filling: In a large bowl, beat softened cream cheese until smooth. Add powdered sugar and vanilla extract, mixing well. Fold in marshmallow fluff until incorporated, then gently fold in whipped cream until the mixture is light and airy.
- Assemble the Cheesecake: Spoon the filling over the chilled crust and smooth the top. Refrigerate for at least 6 hours or overnight until fully set.
- Top It Off: Before serving, gently fold together 1 cup of marshmallow fluff and 1 cup of whipped cream for the topping. Spread over the cheesecake and garnish with mini marshmallows or crushed graham crackers if desired.
Notes
- For best results, refrigerate the cheesecake overnight to allow it to set properly.
- Use a springform pan for easy removal and serving.
- Feel free to customize the topping with your favorite garnishes.
- Prep Time: 30 minutes
- Cook Time: 0 minutes
- Category: Dessert
- Method: No-Bake
- Cuisine: American
Nutrition
- Serving Size: 1 slice
- Calories: 450
- Sugar: 30g
- Sodium: 320mg
- Fat: 30g
- Saturated Fat: 18g
- Unsaturated Fat: 8g
- Trans Fat: 0g
- Carbohydrates: 40g
- Fiber: 1g
- Protein: 4g
- Cholesterol: 80mg