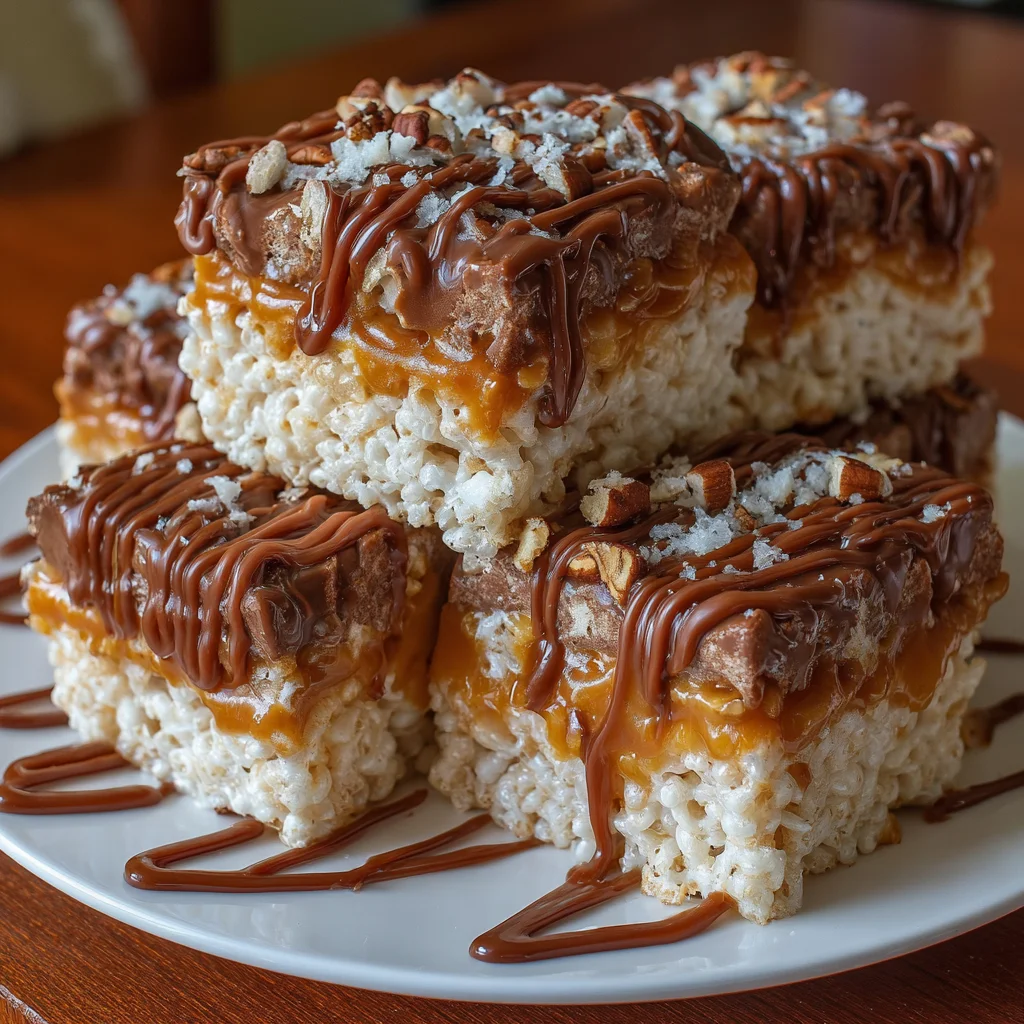
Introduction to Turtle Rice Krispie Treats
Hey there, fellow busy moms and professionals! If you’re like me, life can feel like a juggling act. That’s why I’m excited to share my Turtle Rice Krispie Treats recipe with you. These delightful treats combine all the best elements of a classic dessert into one easy to make, delectable dish. With layers of gooey caramel, rich chocolate, and crunchy pecans, they’re sure to impress your family or friends. Plus, they require just a bit of your time—perfect for those hectic days when you want something special made with love!
Why You’ll Love This Turtle Rice Krispie Treats
Let’s be honest: the sweeter the treat, the better the day! That’s exactly why these Turtle Rice Krispie Treats become a go-to in my household. They’re super quick to whip up, taking just 25 minutes from start to finish. Plus, the combination of chewy caramel, melty chocolate, and crunchy pecans makes every bite an indulgent experience. If you have little ones or picky eaters, they’ve never turned down these delights— making them a guaranteed crowd-pleaser!
Ingredients for Turtle Rice Krispie Treats
Gathering the ingredients for your Turtle Rice Krispie Treats is part of the fun! Here’s what you’ll need:
- Butter: This adds richness and binds everything together. Always good to use unsalted for better control over flavor.
- Mini Marshmallows: These create that classic gooey texture we all love. You can also use regular marshmallows, but mini gives a better melt!
- Rice Krispie Cereal: The foundation of this treat! Crunchy and light, it’s what makes this dessert oh-so-satisfying.
- Soft Caramels: Use pre-packaged caramels for convenience. These bring the chewy, indulgent layer that plays beautifully with the chocolate.
- Heavy Cream: This is your secret weapon for silkiness in your caramel layer. It elevates the caramel from sticky to luxurious!
- Chocolate Chips: Chocolate is the shining star that brings sweetness and depth. Use semi-sweet for a balanced flavor or milk chocolate if you prefer it sweeter.
- Chopped Pecans: These provide crunch and a nutty flavor that complements the caramel and chocolate perfectly. If you’re nut-free, you can skip them entirely.
Each ingredient plays a role in creating this delightful treat. It’s important to remember that while there are specific amounts listed at the bottom of the article, feel free to tweak them according to your taste! Happy cooking!

How to Make Turtle Rice Krispie Treats
Step 1: Melt Butter
Start by melting your butter over medium-low heat in a large saucepan. Make sure to keep an eye on it! The butter is ready when it becomes fully liquid and bubbling gently. Watch closely to prevent it from burning, as burned butter can ruin the flavor of your treats.
Step 2: Melt Marshmallows
Once your butter is melted, add the mini marshmallows to the pan. Stir continuously to ensure they melt evenly. This step is crucial! If you stop stirring, the marshmallows can easily scorch at the bottom of the pan. Continue mixing until the marshmallows are perfectly gooey, forming a smooth mixture combined with the butter.
Step 3: Mix in Rice Krispie Cereal
Now it’s time for the fun part—adding the Rice Krispie cereal! Gently pour the cereal into the marshmallow mixture. Stir until every piece is coated and the cereal feels sticky yet crunchy. Be careful not to overmix, as you want that delightful texture to shine through!
Step 4: Press into the Pan
Pour the cereal mixture into a 9×13 inch pan. Using a spatula or lightly greased hands, press the mixture down evenly. Avoid squishing too much; you want to create a firm base without compressing the cereal too tightly. This balance ensures your Turtle Rice Krispie Treats will hold together just right.
Step 5: Prepare the Caramel
In a medium saucepan, combine the soft caramels and heavy cream over medium heat. Stir continuously until the caramels melt and the mixture turns smooth and glossy. Adding heavy cream not only helps everything melt together beautifully but also gives that decadent, creamy texture that we love in a caramel layer!
Step 6: Add Caramel Layer
Carefully pour the melted caramel over the top of your Rice Krispie base. Use a spatula to spread the caramel evenly across the surface. This really seals in all that goodness! Be gentle, as you don’t want to disturb the crispy layer underneath while creating that luscious caramel finish.
Step 7: Melt Chocolate Chips
Let’s move on to the chocolate! Place the chocolate chips in a microwave-safe bowl. Heat them in the microwave in 30-second increments, stirring after each time. This method keeps the chocolate smooth and prevents burning. You’re aiming for a velvety consistency that will melt deliciously over the caramel.
Step 8: Spread Chocolate and Finish
Once your chocolate is melted and silky, pour it over the caramel layer. Use a spatula to spread it evenly, ensuring every bite is rich in chocolate flavor. Then, sprinkle the chopped pecans evenly across the top for a delightful crunch. This extra layer adds texture that pairs perfectly with the gooeyness beneath!
Step 9: Let Set
Lastly, it’s time for patience! Allow the chocolate to set completely at room temperature. This could take about 30 minutes to an hour. Waiting is key to achieving perfect squares when you cut into them. Trust me, the wait is worth it once you see those delicious treats come together!
Tips for Success
- Always measure your ingredients accurately for the best consistency.
- Use parchment paper in the pan for easy removal of your treats.
- Stir continuously while melting marshmallows to prevent burning.
- Press the Rice Krispie mixture gently, just enough to hold its shape.
- Let each layer cool slightly before adding the next for a cleaner finish.
Equipment Needed
- Large saucepan: A sturdy pot works well for melting ingredients.
- Spatula: A silicone spatula is perfect for mixing and spreading.
- 9×13 inch pan: Any similar-sized baking dish will do.
- Microwave-safe bowl: You can also use a double boiler if preferred.
Variations on Turtle Rice Krispie Treats
- Chocolate Variations: Swap the semi-sweet chocolate chips for dark chocolate or white chocolate for a different flavor profile!
- Nut Alternatives: If you have nut allergies, try using seeds like sunflower or pumpkin seeds for a crunchy texture without the nuts.
- Flavor Infusions: Add a splash of vanilla extract or a sprinkle of sea salt on the caramel layer for an extra burst of flavor.
- Festive Add-ins: Mix in mini marshmallows or crushed candy canes during holiday seasons to enhance visual appeal and flavor.
- Healthier Options: Use brown rice cereal for a healthier twist or substitute agave nectar for sugar in the caramel layer for a lighter option.
Serving Suggestions for Turtle Rice Krispie Treats
- Pair your Turtle Rice Krispie Treats with a glass of cold milk for the ultimate sweet experience.
- Serve warm, topped with a scoop of vanilla ice cream for a luscious dessert.
- Add a garnish of fresh berries for a pop of color and freshness on your dessert platter.
- Cut into fun shapes using cookie cutters for playful party treats.
- Wrap individually in colorful cellophane for delightful homemade gifts that are sure to impress!
FAQs about Turtle Rice Krispie Treats
Can I make Turtle Rice Krispie Treats ahead of time?
Absolutely! You can prepare these tasty treats in advance. Just store them in an airtight container. They stay fresh for up to a week, making them a perfect option for meal prep or for special occasions!
What can I substitute for heavy cream in the caramel?
If you’re looking to lighten things up, you can use evaporated milk or half-and-half. Both will work to achieve that creamy consistency without sacrificing flavor!
How do I store leftover Turtle Rice Krispie Treats?
Keep them in an airtight container at room temperature. If it’s really hot and humid, you might want to refrigerate them. Just remember to let them sit out for a bit before enjoying so they can soften up!
Can I use different types of chocolate chips?
For sure! Feel free to play around with milk chocolate, dark chocolate, or even white chocolate for a twist. Each will give a slightly different flavor profile to your Turtle Rice Krispie Treats!
What’s the best way to cut the treats?
Once set, use a sharp knife to cut your Turtle Rice Krispie Treats. For neat squares, lightly grease the knife with butter or cooking spray. This helps to get clean cuts without mess!
Final Thoughts
As I reflect on my journey of making Turtle Rice Krispie Treats, it fills me with joy knowing that simple ingredients can create such delicious moments. There’s something magical about watching smiles light up as friends and family share these treats. Whether you’re whipping them up for a party, a family gathering, or just to satisfy that sweet tooth, these treats wrap you in comfort. So, don your apron and dive into this easy and delightful recipe. Trust me, creating these Turtle Rice Krispie Treats will bond you with your loved ones over memories of sweetness and love!
Print
Turtle Rice Krispie Treats: Indulge in This Easy Recipe!
- Total Time: 25 minutes
- Yield: 12 servings 1x
- Diet: Vegetarian
Description
Turtle Rice Krispie Treats are a delightful twist on the classic treat, featuring layers of gooey caramel and chocolate topped with crunchy pecans.
Ingredients
- ¼ cup butter
- 5 cups mini marshmallows
- 5½ cups rice krispie cereal
- 16 oz soft caramels (1½ 11oz bags, unwrapped)
- 3 TBS heavy cream
- 2 cups chocolate chips
- ½ cup chopped pecans
Instructions
- Melt your butter over medium low heat in a large saucepan.
- Add in marshmallows, and stir together till marshmallows are completely melted.
- Pour in your rice krispie cereal and stir together till cereal is completely coated.
- Pour cereal into a 9×13 inch pan and press down evenly. (Don’t squish too much!)
- In a medium sized saucepan combine caramels and heavy cream over medium heat.
- Stir until caramel is melted and smooth.
- Pour and spread caramel evenly over the top of rice krispie treats.
- Melt chocolate chips in the microwave in 30 second increments (for about 90 seconds total), stirring after each until smooth.
- Pour chocolate over the caramel layer and spread evenly.
- Sprinkle chopped pecans over the top of the chocolate evenly.
- Let chocolate set completely and cut and serve.
Notes
- Make sure to stir the marshmallows continuously to prevent burning.
- Use parchment paper for easy removal from the pan.
- Store in an airtight container for up to one week.
- Prep Time: 15 minutes
- Cook Time: 10 minutes
- Category: Dessert
- Method: Stovetop and Microwave
- Cuisine: American
Nutrition
- Serving Size: 1 piece
- Calories: 250
- Sugar: 24g
- Sodium: 100mg
- Fat: 12g
- Saturated Fat: 6g
- Unsaturated Fat: 4g
- Trans Fat: 0g
- Carbohydrates: 35g
- Fiber: 1g
- Protein: 2g
- Cholesterol: 15mg