Introduction to Banana Icebox Cake
Have you ever craved a dessert that’s both simple and delicious? Look no further! This Banana Icebox Cake is a delightful treat that combines creamy banana goodness with the crunch of graham crackers. As a busy mom, I know how important it is to find recipes that are quick to make yet impressive enough to wow your loved ones. This no-bake dessert is perfect for any occasion—whether it’s a family gathering or just a treat for yourself. With minimal effort, you can enjoy a slice of this heavenly cake, making it a go-to recipe for those hectic days!
Why You’ll Love This Banana Icebox Cake
This Banana Icebox Cake is a dream for busy women like us—quick to prepare and even quicker to impress! It’s a dessert that offers a perfect blend of creamy sweetness and refreshing fruitiness. Plus, with no baking required, it saves time and keeps your kitchen cool. Whether you’re serving it at a summer BBQ or for a cozy family night, every bite feels like a comforting hug from home!
Ingredients for Banana Icebox Cake
To create this luscious Banana Icebox Cake, you’ll need a few simple ingredients that come together to form layers of bliss. Here’s a quick rundown:
- Whole Milk: This is the base of the pudding mixture, giving it that creamy texture. You can also use almond or oat milk for a dairy-free option.
- Banana Instant Pudding Mix: This magical ingredient infuses the cake with that unmistakable banana flavor, and it thickens beautifully. You can experiment with different flavors if you’re feeling adventurous!
- Whipped Topping (like Cool Whip): Adding lightness and fluffiness, this is essential for your cake’s creamy layers. For a healthier twist, you can swap it for homemade whipped cream.
- Graham Crackers: These crunchy little gems form the cake’s structure. If you need a gluten-free option, there are gluten-free graham crackers available in most stores.
- Ripe Bananas: Your star player! With their natural sweetness, they and provide flavor and texture. Look for bananas that are just a touch overripe for the best results.
Each ingredient is key to crafting this delightful treat. For precise measurements, feel free to scroll to the bottom of the article where you’ll find them ready for printing!
How to Make Banana Icebox Cake
Prepare the Banana Pudding Mixture
First things first, grab a large bowl. Pour in your whole milk and sprinkle the banana instant pudding mix over it. Then whip it all together, just until the pudding thickens up—this usually takes about 1 to 2 minutes. The result should be a smooth, creamy mixture that starts to look like a soft cloud. Once you’ve achieved that texture, gently fold in 8 ounces of the whipped topping. This is the secret to making your pudding light and fluffy! Make sure there are no lumps, and you’ll have a dreamy banana pudding filling ready to go!
Layer the Graham Crackers
Now, let’s set the stage with graham crackers. Take a 9×13 inch pan and lay down a solid layer of graham crackers at the bottom. You might need to break a few crackers in half to fit them snugly in the pan—don’t be afraid to get a little creative! This base is crucial, as it gives your Banana Icebox Cake structure. These crunchy layers will soak up moisture from the pudding, giving them that delightful texture we’re all after. Trust me; you want them to be fully covered for the best results!
Add Banana Slices
It’s time to bring in the bananas! Peel and slice your ripe bananas into thin, even rounds. I recommend making the slices about a quarter-inch thick. Once they’re ready, layer them evenly on top of your graham cracker base. This is where the magic begins, as the sweet banana flavor seeps into the layers below. It not only adds taste but also a beautiful presentation. Keep it even, people! That way, every slice will be a banana lover’s dream!
Build Additional Layers
Now we repeat the fun! Spread one-third of your banana pudding mixture over the banana slices. Then, add another layer of graham crackers on top, and repeat the banana and pudding layers two more times. Just make sure the final touch is a covering of graham crackers to seal the cake. It’s like building a delicious lasagna, but way more fun! Each layer brings its own flavor and texture, creating a truly unforgettable dessert.
Chill the Cake
Here comes the hardest part—waiting! Cover your creation with plastic wrap, ensuring it’s sealed well. This helps the flavors mingle while the cake chills. For the best and creamiest results, let it chill in the fridge for 4 to 6 hours; overnight is even better! This patiently allows the crackers to soften and the pudding to set into that creamy wonderland. Trust me; the wait will be worth every delightful bite!
Tips for Success
- Use ripe bananas for the best flavor and texture; they should have a few brown spots.
- For a firmer cake, chill overnight to allow all layers to set perfectly.
- Don’t rush the pudding—mix until it’s thick and creamy; lumps will ruin the texture!
- Feel free to layer in extras like chocolate chips or nuts for an exciting twist.
- Cover the cake tight; this keeps it fresh and prevents odors from your fridge.
Equipment Needed
- Mixing Bowl: A large bowl is essential for mixing the pudding. If you don’t have one, a deep pot can work too!
- Whisk: You’ll need a whisk to blend the pudding mix with milk. A fork can work in a pinch!
- 9×13 Inch Pan: This is perfect for layering. A similar-sized dish will do if you’re in a bind.
- Plastic Wrap: You’ll need this to cover the cake while it chills. A lid can be a good alternative!
Variations of Banana Icebox Cake
- Add peanut butter to the pudding mixture for a delightful twist that complements the bananas beautifully!
- For a nutty flavor, layer in crushed walnuts or pecans between the layers of banana and pudding.
- Try using vanilla wafers instead of graham crackers for a different texture and taste.
- Substitute the banana pudding with other flavors like chocolate or vanilla for a fun variation.
- For a lighter dessert, swap out the whipped topping with Greek yogurt for a creamy but healthier option.
Serving Suggestions
- Pair your Banana Icebox Cake with a scoop of vanilla ice cream for an extra creamy treat!
- Serve alongside fresh berries like strawberries or blueberries to brighten the plate.
- Garnish each slice with a sprig of mint for a pop of color and freshness.
- Offer chilled lemonade or iced tea to enhance the refreshing experience.
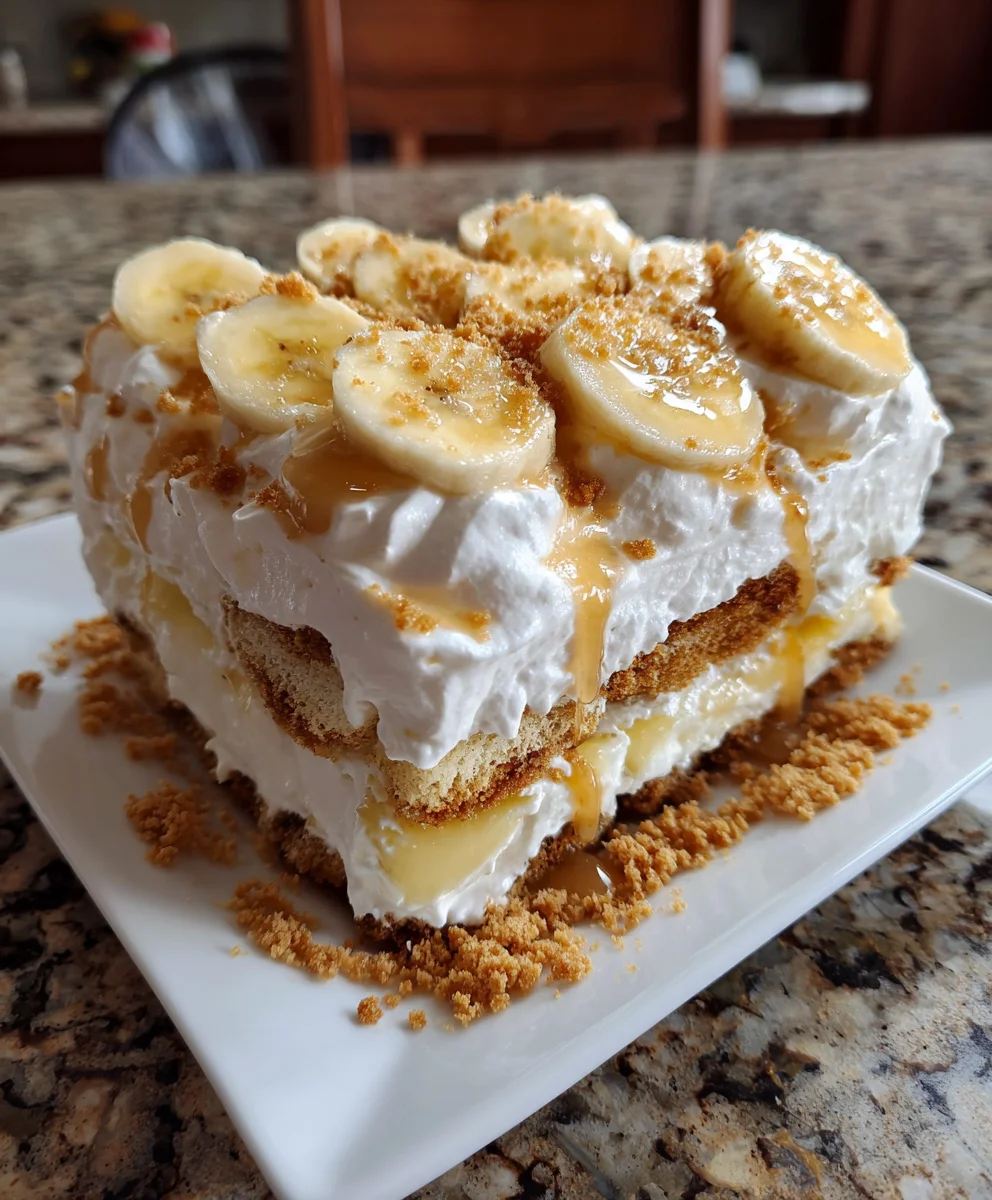
- For a stunning presentation, drizzle caramel sauce over each slice before serving.
FAQs about Banana Icebox Cake
Can I make Banana Icebox Cake in advance?
Absolutely! In fact, making it a day ahead is ideal. This allows the flavors to meld perfectly, enhancing the taste. Just remember to cover it tightly to keep it fresh!
Can I substitute ingredients in this recipe?
You sure can! If you’re looking for a twist, consider using almond milk instead of whole milk. You can also swap the banana pudding for another flavor, like vanilla or chocolate, to delight your taste buds!
How should I store leftovers?
Store any leftover Banana Icebox Cake in the refrigerator. Just make sure it’s covered to keep it fresh and prevent odors from seeping in. It should last for about 3-4 days!
Can I use fresh whipped cream instead of Cool Whip?
Yes, using fresh whipped cream creates a deliciously rich flavor. Just whip it until peaks form and fold it gently into your pudding mixture. It will give your cake a lovely homemade touch!
What can I do with leftover bananas?
If you have more ripe bananas, consider using them in smoothies, muffins, or even pancakes! They can also be frozen for later use in baking or smoothies.
Final Thoughts
The joy that this Banana Icebox Cake brings is truly something special. Picture gathering around the table with your loved ones, indulging in this creamy, dreamy dessert that dances on your palate. It’s more than just a sweet treat; it’s a memory in the making. From the simple layers to the delightful banana flavor, each bite transports you back to simpler times, evoking smiles and laughter. So, whether it’s a family dinner or a gathering with friends, this cake is sure to be a crowd-pleaser. Trust me, you’ll be savoring every moment as you share this delightful experience!
Print
Banana Icebox Cake
- Total Time: 4-6 hours (plus chilling time)
- Yield: 8–10 servings 1x
- Diet: Vegetarian
Description
A creamy and delicious Banana Icebox Cake that combines layers of banana, pudding, and graham crackers for a delightful treat.
Ingredients
- 3 cups whole milk
- 2 3.4 ounce packages banana instant pudding mix
- 16 ounces whipped topping (Cool Whip), thawed, divided
- 1 box (3 sleeves, 14.4 ounces) graham crackers
- 3–4 ripe bananas
Instructions
- In a large bowl, combine milk with banana pudding and mix until the pudding thickens (1-2 minutes). Gently fold in 8 ounces of the whipped topping.
- To a 9×13 inch pan, add a layer of graham crackers. You may need to break a few to fit them in and cover the whole bottom of the pan.
- Peel and slice the bananas, and add an even layer of banana slices. Then spread ⅓ of the banana pudding over the bananas. Repeat 2 times, then spread one last layer of graham crackers to cover completely.
- Spread the remaining whipped topping as the final layer to the edges. Cover with plastic wrap and chill in the fridge for 4-6 hours and preferably overnight.
- Decorate with crushed up graham crackers, whipped cream and slices of banana (optional). Slice and serve.
Notes
- For best flavor, chill overnight.
- Can be decorated with additional bananas and whipped cream before serving.
- Prep Time: 30 minutes
- Cook Time: 0 minutes
- Category: Dessert
- Method: No-Bake
- Cuisine: American
Nutrition
- Serving Size: 1 slice
- Calories: 300
- Sugar: 18g
- Sodium: 150mg
- Fat: 12g
- Saturated Fat: 7g
- Unsaturated Fat: 4g
- Trans Fat: 0g
- Carbohydrates: 42g
- Fiber: 1g
- Protein: 3g
- Cholesterol: 30mg