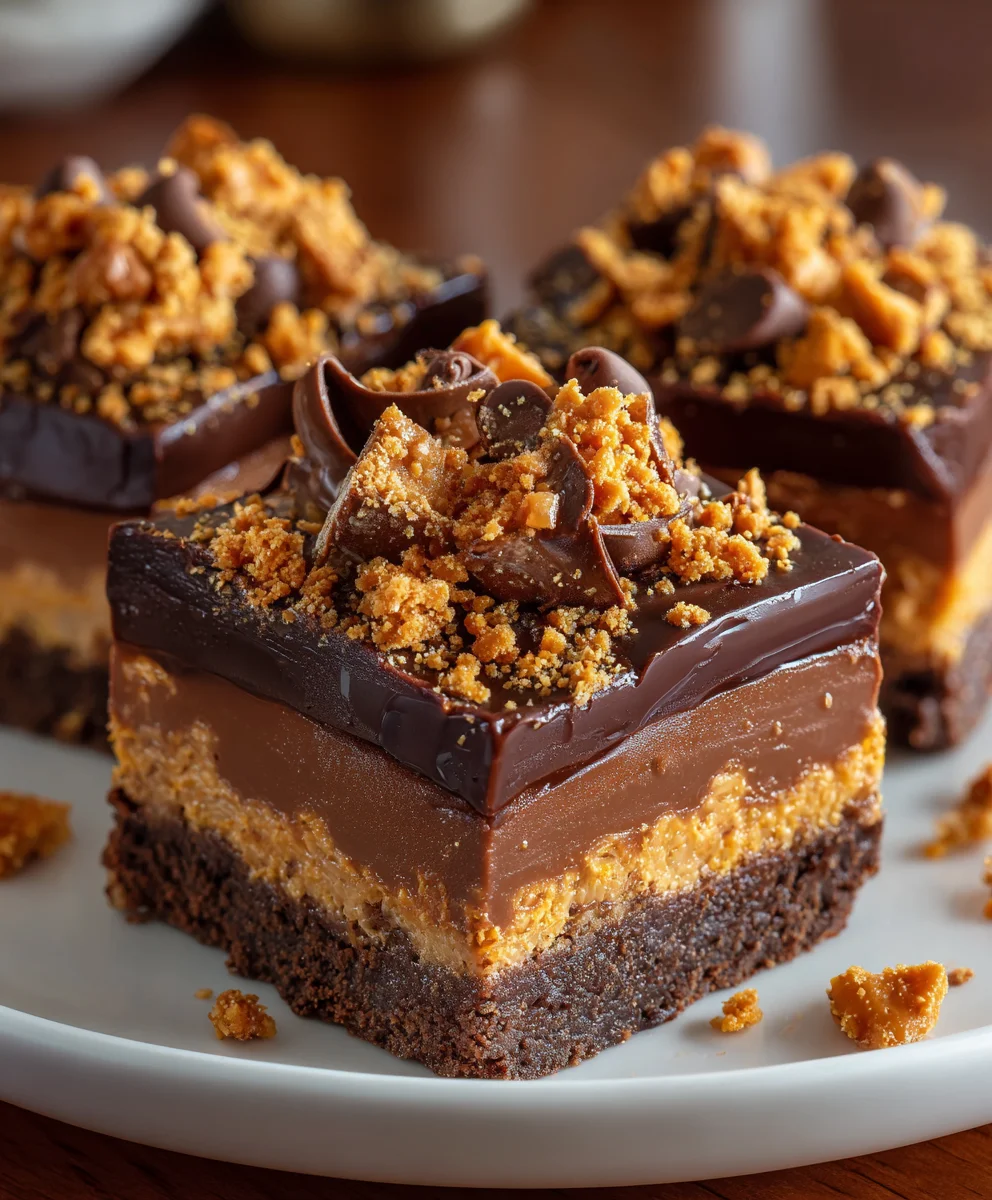
Introduction to Butterfinger Chocolate Fudge Squares
I know how valuable time can be, especially when you’re craving something sweet! That’s where these Butterfinger chocolate fudge squares come in. They’re the perfect quick fix for those chocolate cravings that hit after a long day. Imagine creamy chocolate melting in your mouth, with that delightful crunch of Butterfinger candy. Whether you’ve got kids running around or work deadlines looming, this recipe is a simple way to treat yourself or impress your loved ones at gatherings. Trust me; you won’t be able to eat just one!
Why You’ll Love This Butterfinger Chocolate Fudge Squares
These Butterfinger chocolate fudge squares are not just delicious; they’re incredibly easy to whip up! With minimal prep time and no baking required, you can make these in a snap. Plus, the combination of rich chocolate and crunchy Butterfinger creates a flavor explosion that will leave your taste buds dancing. Whether it’s a family movie night or a cozy gathering with friends, these squares are sure to be a hit.
Ingredients for Butterfinger Chocolate Fudge Squares
Gathering the right ingredients is half the fun! Here’s what you’ll need for these delectable Butterfinger chocolate fudge squares:
- Semi-sweet chocolate chips: I love using Ghirardelli for its rich flavor. This is the star of our fudge!
- Sweetened condensed milk: This creamy treat adds sweetness and the thick texture we love in fudge. It’s a game-changer!
- Heavy cream: A splash of this elevates the texture, making the fudge even creamier. You can substitute with whole milk if you’re in a pinch.
- Butterfinger candy bars: The delicious, crunchy bits are essential for that delightful flavor. Chop them roughly for mixing and finely for topping.
- Nonstick cooking spray: A little spritz makes sure your fudge pops out of the pan without a battle. Trust me, it’s worth it!
For precise quantities, check the bottom of this article, where you can find everything you need for printing. Happy cooking!
How to Make Butterfinger Chocolate Fudge Squares
Prepare Your Pan
The first step is a bit of prep work. Line a 9×9 inch baking pan with aluminum foil. Leave some overhang; it’ll be your handy little helper later! This makes it super easy to lift the fudge out. Now, lightly spray the foil with nonstick cooking spray. You want our squares to come out without a hitch, don’t you?
Melt the Chocolate Mixture
Next, grab a 3-quart saucepan. Over medium heat, throw in those lovely semi-sweet chocolate chips, sweetened condensed milk, and heavy cream. Stir continuously for about 5 to 6 minutes. Watch closely as the chocolate melts into a smooth, luxurious mixture. It’s like a little chocolate magic show! Remove it from the heat promptly to avoid any burnt bits.
Fold in Butterfingers
Now, let’s bring in the stars of the show—the Butterfinger pieces! Gently fold in 2 cups of roughly chopped Butterfinger candy bars into your melted chocolate mixture. Be a little tender here; you want to keep those delightful crunchy bits intact. The sweet-salty combo is where the pure joy lies!
Pour and Smooth
Carefully pour the fudge mixture into your prepared baking pan. Use a spatula to spread it evenly. Don’t rush—take a moment to admire your work! The silky texture is already calling out for a taste test, but patience is key here.
Add Toppings
Time to beautify! Grab the cup of finely chopped Butterfinger bits and sprinkle them evenly over the fudge. Gently press them into the surface; this will ensure they stay put. Think of it as giving the fudge a little accessory; who doesn’t love some bling?
Refrigerate to Set
Here’s where the waiting game begins. Pop the pan into the refrigerator for 1 to 2 hours. This time allows the fudge to set up perfectly. The creamy chocolate will become firm, and your patience will be rewarded!
Cut into Squares
Once firm, use a large sharp knife to cut the fudge into 36 squares, approximately 1½ by 1½ inches each. I like to dip the knife in hot water for a smooth cut; it works wonders! Now, take a moment to admire your creation! These Butterfinger chocolate fudge squares are ready to be devoured or shared with friends and family.
Tips for Success
- Use high-quality chocolate chips for the best flavor; I swear by Ghirardelli!
- Make sure the chocolate mixture is completely smooth before folding in the Butterfinger.
- Keep an eye on the heating process; too much heat can burn the chocolate.
- Let the fudge cool completely before cutting for cleaner squares.
- Store leftover squares in an airtight container for freshness.
Equipment Needed
- 9×9 inch baking pan: This is essential for shaping your fudge. If you don’t have one, a similarly sized dish will work.
- 3-quart saucepan: Perfect for melting the chocolate. A medium pot can also do the job.
- Spatula: Ideal for smoothing the fudge. A wooden spoon can serve as an alternative.
- Sharp knife: To cut into squares. A pizza cutter can work in a pinch!
Variations of Butterfinger Chocolate Fudge Squares
- Crunchy Peanut Butter Fudge: Swap out some semi-sweet chocolate chips for peanut butter chips. It adds a delightful nutty flavor to the mix!
- Dark Chocolate Delight: Use dark chocolate chips instead of semi-sweet for a richer, more intense chocolate experience.
- Nutty Addition: Incorporate chopped walnuts or pecans into the fudge mixture for an extra crunch.
- Gluten-Free Option: Ensure your candy bars and any other ingredients are gluten-free. The fudge itself is naturally gluten-free!
- Minty Fresh: Add a few drops of peppermint extract to the melted chocolate for a refreshing minty twist.
- Vegan Version: Substitute the sweetened condensed milk with coconut or almond condensed milk and use dairy-free chocolate chips.
Serving Suggestions for Butterfinger Chocolate Fudge Squares
- Pair with Ice Cream: Serve warm fudge squares over a scoop of vanilla ice cream for a decadent dessert.
- Coffee Companion: Enjoy these squares alongside a hot cup of coffee or a creamy latte; the flavors complement beautifully!
- Presentation: Arrange squares on a decorative platter and drizzle them with chocolate sauce for an eye-catching display.
- Gift Idea: Wrap fudge squares in cellophane bags as sweet treats for friends or family.
FAQs about Butterfinger Chocolate Fudge Squares
Can I make Butterfinger chocolate fudge squares ahead of time?
Absolutely! These fudge squares are perfect for prepping ahead of time. You can make them up to a week in advance and store them in an airtight container in the refrigerator. This allows the flavors to develop even more!
What can I use instead of Butterfinger candy bars?
If you want to mix things up, other crunchy candy bars like Snickers or Milky Way can be delightful substitutes. Just chop them into similar-sized pieces, and you’ll still get that satisfying crunch in your fudge!
How do I store leftover fudge squares?
Any leftover Butterfinger chocolate fudge squares should be stored in an airtight container in the refrigerator. They’ll stay fresh and delicious for about a week — if they last that long!
Can I freeze these fudge squares?
You sure can! Wrap the fudge squares tightly in plastic wrap or foil, then place them in an airtight container. They can be frozen for up to three months. Just thaw them in the fridge before enjoying.
Is this recipe suitable for vegetarians?
Yes, these fudge squares are vegetarian-friendly! Just be sure to check that the chocolate chips and Butterfingers you use meet your dietary preferences. Enjoying these sweet treats is guilt-free!
Final Thoughts
Making Butterfinger chocolate fudge squares is more than just baking; it’s about creating moments of joy. Whether you’re treating yourself after a hectic day or sharing with family and friends, these little squares pack a punch of happiness. The creamy chocolate combined with the crunchy Butterfinger is simply irresistible! Plus, the ease of preparation makes it a guilt-free indulgence for busy moms like us. So next time you need a sweet pick-me-up, whip up this recipe. I promise, each bite will take you to chocolate heaven!
Print
Butterfinger chocolate fudge squares
- Total Time: 1 hour 25 minutes
- Yield: 36 squares 1x
- Diet: Vegetarian
Description
Delicious Butterfinger chocolate fudge squares perfect for chocolate lovers!
Ingredients
- 3 cups semi-sweet chocolate chips (Ghirardelli brand)
- 14 ounces sweetened condensed milk
- ¼ cup heavy cream
- 2 cups roughly chopped Butterfinger candy bar
- 1 cup finely chopped Butterfinger candy bar for topping
Instructions
- Line a 9×9 inch straight-sided baking pan with aluminum foil, leaving an overhang for easy removal. Lightly spray the foil with nonstick cooking spray and set aside.
- In a 3-quart saucepan over medium heat, combine the semi-sweet chocolate chips, sweetened condensed milk, and heavy cream. Stir constantly for 5 to 6 minutes until the chocolate chips are fully melted and the mixture is smooth. Remove from heat promptly to prevent burning.
- Fold 2 cups of roughly chopped Butterfinger pieces gently into the melted chocolate mixture until evenly incorporated.
- Pour the fudge mixture into the prepared baking pan and smooth the surface evenly with a spatula.
- Evenly distribute the 1 cup of finely chopped Butterfinger candy over the top of the fudge and gently press them into the surface to adhere.
- Refrigerate the fudge for 1 to 2 hours until firm and set.
- Using a large sharp knife, cut the fudge into 36 squares measuring approximately 1½ by 1½ inches each.
Notes
- For best results, ensure the chocolate mixture is well mixed and smooth before folding in the Butterfinger pieces.
- Store leftover fudge squares in an airtight container in the refrigerator.
- Prep Time: 15 minutes
- Cook Time: 10 minutes
- Category: Dessert
- Method: No-Bake
- Cuisine: American
Nutrition
- Serving Size: 1 square
- Calories: 120
- Sugar: 10g
- Sodium: 50mg
- Fat: 7g
- Saturated Fat: 4g
- Unsaturated Fat: 2g
- Trans Fat: 0g
- Carbohydrates: 14g
- Fiber: 1g
- Protein: 2g
- Cholesterol: 10mg