
Introduction to Cherry Poke Cake
I know how challenging it can be to whip up a dessert that pleases everyone. That’s where my beloved Cherry Poke Cake comes in! This delightful cake marries the moistness of a fluffy white cake with the vibrant sweetness of cherry jello. It’s not only a feast for the eyes but also for the taste buds. Whether it’s a family gathering or a casual get-together with friends, this Cherry Poke Cake effortlessly steals the show. Trust me, it’s a guaranteed crowd-pleaser that’ll make you the star of any occasion!
Why You’ll Love This Cherry Poke Cake
This Cherry Poke Cake is a game changer in the busy kitchen. It’s incredibly easy to make, and you won’t believe how quickly it comes together! The layers of cherry flavor create a taste explosion that’s simply irresistible. Plus, it’s a delightful way to use simple ingredients to create something spectacular. You get to impress your family and friends without spending hours in the kitchen. What’s not to love?
Ingredients for Cherry Poke Cake
- White cake mix: This acts as the base for our cake, providing a light and airy texture.
- Egg whites: They help the cake rise and keep it moist without the extra fat from the yolks.
- Water: Essential for mixing the cake batter to the perfect consistency.
- Vegetable or canola oil: This adds moisture to the cake, ensuring each bite is tender.
- Cherry jello: The star of this dessert! It infuses the cake with that luscious cherry flavor.
- Boiling water: Used to dissolve the jello completely, ensuring a smooth mix with no clumps.
- Cold water: This balances the temperature, allowing for a perfect jello pour.
- Cream cheese: This adds a rich, creamy element to our frosting, making it irresistible.
- Powdered sugar: This sweetens the frosting while ensuring it maintains a smooth texture.
- Heavy whipping cream: When whipped, it turns into a light, fluffy topping that balances the cake’s sweetness.
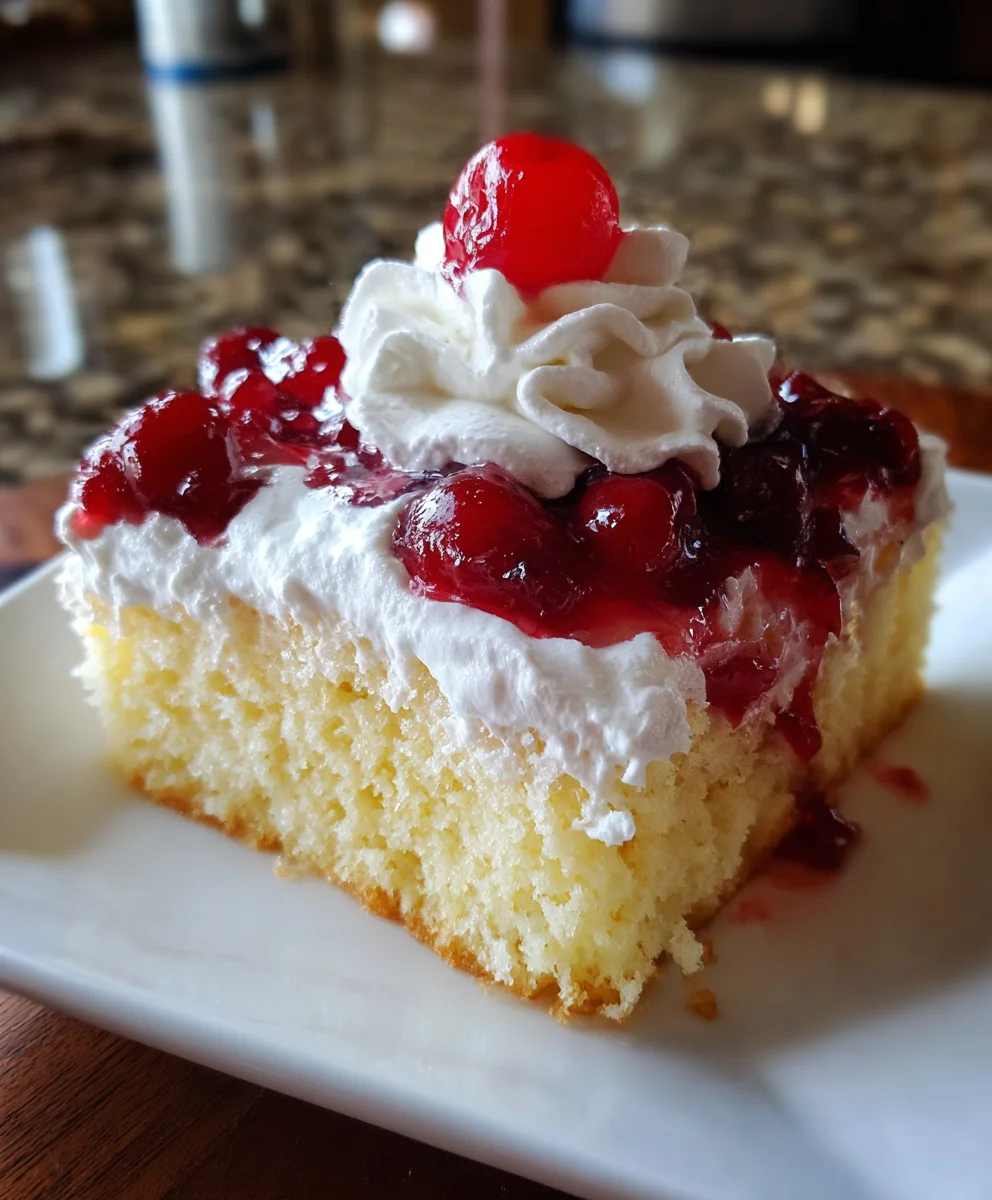
- Cherry pie filling: Topping it off with this adds a beautiful finish and enhances the cherry flavor.
Curious about the exact amounts? Don’t worry! You’ll find all the precise details at the bottom of this article, ready for printing!
How to Make Cherry Poke Cake
Step 1: Preheat and Prepare the Pan
Let’s kick things off by preheating your oven to 350℉. This is crucial for baking the perfect Cherry Poke Cake. While it warms, grab a 9×13 baking dish and give it a good spray with non-stick cooking spray. This step ensures our cake will slide right out later, all pristine and ready for decoration.
Step 2: Combine the Cake Ingredients
In a large mixing bowl, combine your white cake mix, egg whites, water, and oil. I prefer using an electric mixer because it makes things super easy and quick. Beat the mixture until it’s smooth, and you can’t see any lumps. Once it’s just right, pour the batter into your prepared pan, taking care to smooth it out with a spatula. Your Cherry Poke Cake journey has begun!
Step 3: Bake the Cake
Slide that pan into the oven and let it bake for 25-30 minutes. Keep an eye on it, though! A toothpick should come out clean when poked in the center. You’ll also notice the edges pulling slightly away from the pan and turning a lovely golden brown. It’s like a little angel has sung the cake into existence!
Step 4: Poke the Cake
Once baked, remove your cake from the oven and let it cool for about 10 minutes. This is your moment to poke! Using the end of a wooden spoon, make holes about an inch apart all over the surface. This may sound odd, but these holes are what will let the cherry jello soak in beautifully.
Step 5: Prepare the Cherry Jello Mixture
Now, in a heat-proof bowl, whisk together the cherry jello powder and boiling water. Stir until the jello is completely dissolved—no clumps allowed! As you continue whisking, add in the cold water. This mixture will become the delightful cherry infusion for our cake.
Step 6: Soak the Cake
It’s time for the cherry jello to work its magic! Pour the jello mixture evenly over the cake, ensuring it seeps into those lovely holes you made. You want each bite to burst with that sweet cherry flavor. Don’t hold back on this step; this is what makes the Cherry Poke Cake so special!
Step 7: Chill the Cake
Cover your cake with plastic wrap or a lid and shove it into the refrigerator for at least 4 hours. This chilling time is vital as it allows the jello to set and the flavors to meld together, resulting in that moist Cherry Poke Cake you dream about late at night.
Step 8: Make the Frosting
While your cake is chilling, let’s whip up that creamy frosting. In a mixing bowl, beat together the softened cream cheese and powdered sugar until smooth. Then, add in the heavy whipping cream. Keep mixing until you see those stiff peaks form. You’re creating a heavenly topping here!
Step 9: Frost the Cake
Now for the fun part—frosting that cake! Spread the whipped cream cheese frosting over the chilled cake in an even layer, pushing some right into those holes for an extra burst of flavor. When you take a bite, you want those layers of deliciousness to shine.
Step 10: Add Cherry Pie Filling
Finally, top your masterpiece with cherry pie filling. You can spread it over the frosting or dollop it on top of each slice when serving. Either way, you’ll add a delightful finish to your Cherry Poke Cake, resulting in a visual feast everyone will love!
Tips for Success
- Make sure your egg whites are at room temperature for better volume.
- Don’t skip the cooling time; it helps the cake set properly.
- For easy frosting, chill your mixing bowl and beaters before whipping the cream.
- Feel free to experiment with other jello flavors for a fun twist!
- Keep a close eye on the baking time to avoid overcooking.
Equipment Needed
- 9×13 baking dish: Essential for baking your cake; a glass or metal pan works fine.
- Electric hand mixer: Makes mixing effortless; you can also whisk by hand if you’re feeling adventurous.
- Mixing bowls: A couple of medium to large bowls for mixing and whisking.
- Wooden spoon: Perfect for poking holes in the cake and mixing ingredients.
- Plastic wrap or lid: Necessary for covering the cake during chilling.
Variations for Cherry Poke Cake
- Chocolate Cherry Poke Cake: Swap the white cake mix for chocolate cake mix for a decadent twist on classic flavor.
- Pineapple Poke Cake: Replace cherry jello with pineapple jello and top with crushed pineapple for a tropical vibe.
- Gluten-Free Option: Use a gluten-free cake mix to make this dessert suitable for those with dietary restrictions.
- Vegan Version: Substitute egg whites with unsweetened applesauce and use a dairy-free cream cheese and whipping cream for the frosting.
- Nutty Flavor: Add crushed almonds or walnuts to the frosting for an exciting crunch and a touch of richness.
Serving Suggestions
- Pair with a scoop of vanilla ice cream for a delightful contrast.
- Serve alongside a fresh fruit salad to balance the sweetness.
- Consider a chilled glass of sparkling water or lemonade for a refreshing drink.
- Garnish with mint leaves for an elegant touch.
FAQs about Cherry Poke Cake
Can I use a different flavor of jello for my Cherry Poke Cake?
Absolutely! While cherry jello is traditional, you can get creative. Raspberry, strawberry, or even lime jello can work wonderfully. Each will give your cake a unique flavor twist!
How long can I keep leftover Cherry Poke Cake?
Your Cherry Poke Cake will stay fresh in the refrigerator for about 3-4 days. Just make sure to keep it covered to maintain that creamy frosting and yummy jello infusion!
Can I make Cherry Poke Cake ahead of time?
Yes, it’s perfect for that! You can bake the cake and add the jello a day in advance. Just frost it right before serving for the best texture. It’s a great way to save time during busy weeks.
What can I serve with Cherry Poke Cake?
This delightful dessert pairs well with a scoop of whipped cream, vanilla ice cream, or even a refreshing fruit salad. A chilled glass of lemonade also makes for a lovely side!
Can I freeze Cherry Poke Cake?
I wouldn’t recommend freezing it after it’s been topped with frosting. However, you can freeze just the cake itself! Just wrap it well before freezing, and thaw it in the fridge before adding the jello and frosting.
Final Thoughts
Baking a Cherry Poke Cake is not just about creating a dessert; it’s about sharing moments of joy with loved ones. From the fragrant aroma wafting through your kitchen to the laughter around the table, this cake brings everyone together. Each delightful bite transports you to your happiest memories, reminding you that life is sweeter with a little cherry magic. Whether you’re celebrating a special occasion or just enjoying a quiet evening at home, this Cherry Poke Cake will surely elevate your experience. So go ahead, bake this cake, and let the joy unfold with every slice!

CookingLayer Recipes
Discover delicious recipes, meal plans and save your favorites with our free iPhone app.


Cherry Poke Cake
- Total Time: 4 hours 50 minutes
- Yield: 12 servings 1x
- Diet: Vegetarian
Description
A delightful Cherry Poke Cake that combines moist white cake with cherry jello and a creamy frosting, perfect for any occasion.
Ingredients
- 1 box (14.25 oz) white cake mix
- 4 large egg whites
- 3/4 cup water
- 1/2 cup vegetable or canola oil
- 1 box (3 oz) cherry jello
- 1 cup boiling water
- 1/2 cup cold water
- 4 ounces cream cheese, softened
- 1/2 cup powdered sugar
- 1½ cups heavy whipping cream
- 1 can (21 oz) cherry pie filling
Instructions
- Preheat the oven to 350℉. Spray a 9×13 baking dish with non-stick cooking spray and set it aside.
- In a large mixing bowl, add the white cake mix, egg whites, water, and oil. Use an electric hand mixer to beat until the batter is smooth. Pour the cake batter into the prepared pan and smooth out the top.
- Bake for 25-30 minutes or until a toothpick poked into the center of the cake comes out clean. The edges of the cake should be pulled away from the pan and lightly golden brown.
- Remove the cake from the oven and let it cool for 10 minutes before ‘poking the holes’ into the cake.
- Use the end of a wooden spoon to poke holes into the cake that are 1-inch apart from each other.
- In a small, heat-proof bowl, whisk together the cherry jell-o powder and boiling water until the jello has completely dissolved. While continuing to whisk, slowly add in the cold water. Pour gelatin mixture over the cake making sure that the jello goes into all of the holes.
- Cover the cake pan with plastic wrap, or a lid, and place it in the refrigerator for 4 hours.
- In a mixing bowl, using an electric hand mixer, beat the cream cheese and powdered sugar until smooth and creamy. Add in the heavy whipping cream and continue beating until stiff peaks form and the mixture is thick.
- Spread the whipped cream cheese frosting over top of the cake in an even layer. Be sure and push some of the frosting into the holes to help finish filling them all the way.
- Spread the cherry pie filling over top the whipped topping layer. Cut into squares and serve!
Notes
- You can also cover the cake with plastic wrap and refrigerate it for several hours before serving it. I prefer doing this because I like the whipped cream cheese frosting chilled for serving.
- Leave the cherry pie filling off of the cake if wanted and dollop spoonfuls of it over each slice before serving.
- Prep Time: 20 minutes
- Cook Time: 30 minutes
- Category: Dessert
- Method: Baking
- Cuisine: American
Nutrition
- Serving Size: 1 square
- Calories: 320
- Sugar: 18g
- Sodium: 240mg
- Fat: 18g
- Saturated Fat: 10g
- Unsaturated Fat: 3g
- Trans Fat: 0g
- Carbohydrates: 38g
- Fiber: 0g
- Protein: 3g
- Cholesterol: 50mg