
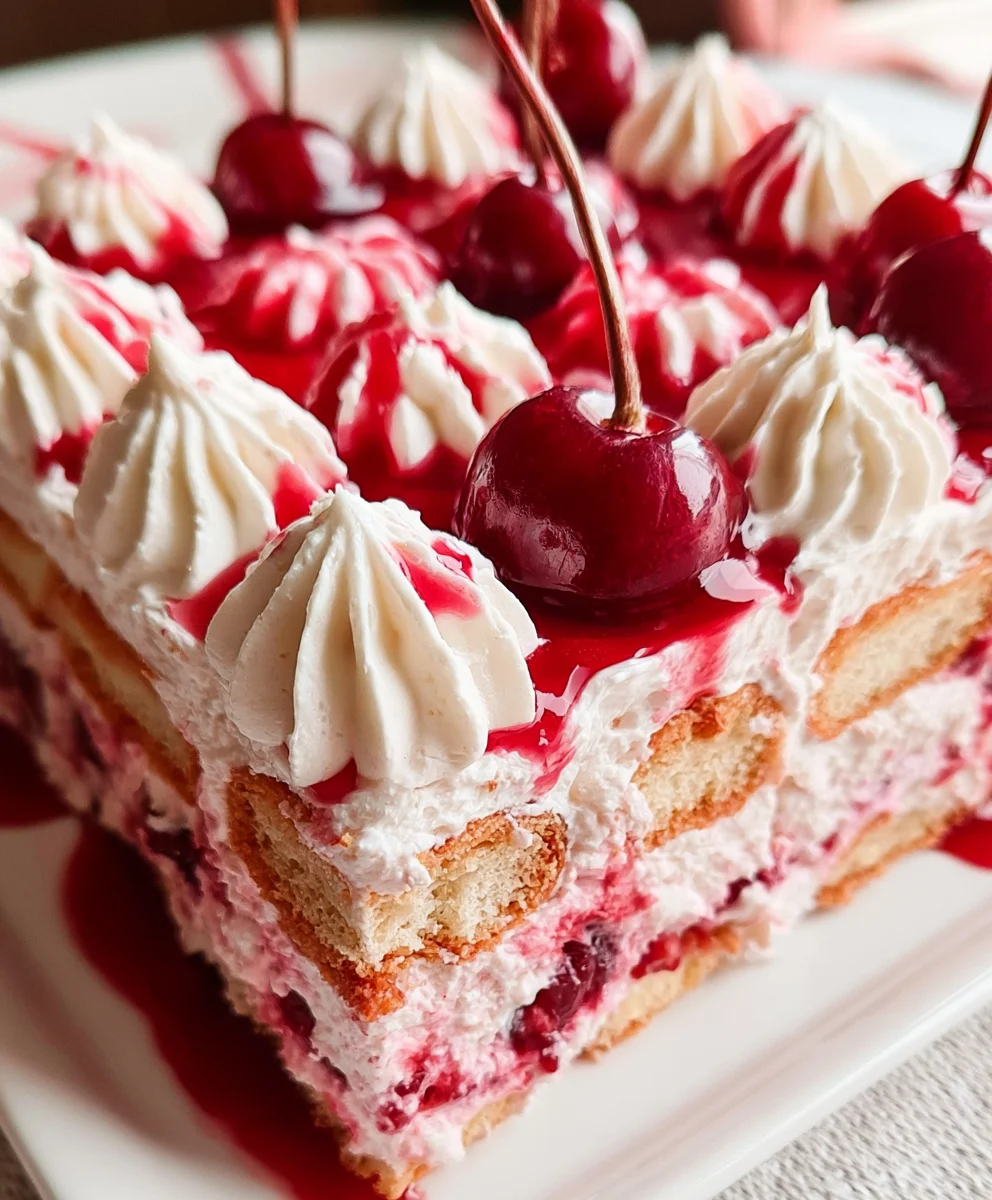
Introduction to Cherry Tiramisu
Welcome to my kitchen, where every dish tells a story! If you’re looking for a dessert that feels special but comes together with ease, let me introduce you to Cherry Tiramisu. This vibrant twist on the classic Italian dessert embraces the sweetness of cherries, creating a symphony of flavors that’s simply irresistible. As a busy mom, I know you want to impress your family without spending the entire day in the kitchen. So, let’s dive into this delightful recipe that not only saves you time but also makes every gathering feel like a celebration!
Why You’ll Love This Cherry Tiramisu
This Cherry Tiramisu is a game-changer for busy evenings and special occasions alike! It’s simple to whip up, requiring just a handful of ingredients. With layers of creamy mascarpone and luscious cherry syrup, the flavor combination sings. Plus, you can prepare it ahead of time, giving you more freedom to spend with your loved ones. Trust me, once you serve this dessert, it’ll become a cherished favorite in your home!
Ingredients for Cherry Tiramisu
Creating a delicious Cherry Tiramisu starts with gathering a few key ingredients that are easily found at your local grocery store.
- Pitted Cherries: Fresh or frozen, these are the stars of this recipe. Their natural sweetness and tanginess create a delightful contrast.
- Water: Essential for cooking the cherries and extracting their juicy goodness.
- Granulated Sugar: This sweetener helps balance the tartness of the cherries, enhancing the overall flavor.
- Lemon Juice: A splash of acidity that brightens the cherry syrup. Fresh lemon juice is ideal!
- Heavy Whipping Cream: This is what gives the mascarpone cream its luscious texture. A must-have for that dreamy consistency!
- Mascarpone Cheese: The creamy base of this tiramisu, adding richness and smoothness to each bite.
- Confectioners’ Sugar: A finer sugar that melts easily, keeping the cream airy and sweet.
- Cherry Syrup: A reserve from the cherries, enhancing flavors even further. This syrup adds that beautiful cherry flavor to the cream.
- Vanilla Extract: A splash of this adds warmth, elevating the taste to new heights.
- Almond Extract (optional): A little goes a long way if you’re a fan of nutty flavors! It lends a unique twist to the dessert.
- Ladyfinger Cookies: These sponge-like cookies soak up the cherry syrup perfectly, creating those fabulous layers.
- Fresh Cherries (for garnishing): Not only do they look beautiful on top, but they also provide a burst of flavor when served.
- Extra Cherry Syrup (for drizzling): This is purely an indulgence to add on top right before serving.
Don’t worry; I’ve included the exact measurements at the bottom of this article for easy printing!
How to Make Cherry Tiramisu
Prepare the Cherry Syrup
To begin, grab a medium saucepan and toss in the pitted cherries along with the water. Heat it over medium-high until it starts to bubble. Gently mash the cherries with a potato masher; this releases all that sweet juice. Once it’s bubbling, drop the heat to medium-low and let it simmer for 2-3 minutes. Afterward, strain the mixture through a fine mesh sieve into a large bowl. This will save the juicy goodness while leaving behind the cherry pulp. Return the strained juice to the pot, add granulated sugar and lemon juice, then gently boil for a few minutes until it thickens slightly.
Make the Mascarpone Cream
When your cherry syrup is chilled, it’s time to whip up the mascarpone cream! In a large mixing bowl, combine the chilled mascarpone cheese, heavy cream, confectioners’ sugar, 1 cup of your cherry syrup, and both extracts. Using a hand mixer or stand mixer, beat this mixture on medium-high speed. As you mix, watch for soft peaks to form. This can take anywhere from 3 to 8 minutes. You’ll end up with a smooth and fluffy cream that is absolutely divine. If you’re feeling extra adventurous, add a hint of almond extract!
Assemble the Cherry Tiramisu
Now comes the fun part: assembling your Cherry Tiramisu! Start by lightly dipping each ladyfinger into the cherry syrup. Arrange them in a single layer in a 9×13-inch baking dish. Once they’re snugly in place, spread half of your mascarpone cream over the ladyfingers. Repeat with another layer of soaked ladyfingers followed by the remaining cream. For a nice finishing touch, transfer the last bit of mascarpone cream to a piping bag and pipe dollops on top, or simply dollop and swirl. It doesn’t need to be perfect; it’s all about that homemade charm!
Chill and Serve
Cover your masterpiece and let it chill in the refrigerator for at least 6 hours, or overnight for the best texture. This step is crucial for all those flavors to meld together beautifully. Before serving, sprinkle some fresh cherries on top and give it a drizzle of extra cherry syrup. Your guests will be absolutely delighted!
Tips for Success
- Make your cherry syrup a day ahead for maximum flavor!
- Use cold tools and bowls when whipping the cream for better results.
- Ensure ladyfingers are just lightly dipped—too soggy won’t hold up!
- Feel free to switch up the cherries—mixed berries could work beautifully!
- Let your Cherry Tiramisu chill overnight for a creamier texture.
Equipment Needed
- Medium Saucepan: Essential for making the cherry syrup. A small skillet can work too!
- Fine Mesh Sieve: This ensures a smooth syrup. A cheesecloth can be a great alternative.
- Mixing Bowl: Any large bowl will do for mixing the mascarpone cream.
- Hand Mixer or Stand Mixer: For whipping the cream. A whisk works, but it requires more elbow grease!
- 9×13-inch Baking Dish: Perfect for layering the tiramisu. A similar-sized dish can also work.
Variations on Cherry Tiramisu
- Chocolate Cherry Tiramisu: Add cocoa powder to the mascarpone cream mix or layer grated chocolate between the cream and ladyfingers for a rich indulgence.
- Berry Medley Tiramisu: Swap cherries for a mix of your favorite berries like raspberries, blueberries, and strawberries for a refreshing twist.
- Gluten-Free Option: Use gluten-free ladyfingers or sponge cake to make this dessert suitable for gluten-sensitive guests.
- Dairy-Free Version: Substitute mascarpone with a creamy dairy-free alternative and use coconut whipped cream for a unique flavor.
- Mini Tiramisu Cups: Layer the ingredients into individual cups for personal desserts, perfect for gatherings or parties.
Serving Suggestions with Cherry Tiramisu
- Pair your Cherry Tiramisu with a dollop of whipped cream for extra richness.
- Serve alongside a refreshing mint tea or a bold espresso to balance the sweetness.
- Garnish with fresh mint leaves for a pop of color and flavor.
- For a stunning presentation, plate slices with a drizzle of extra cherry syrup.
- Consider adding a side of chocolate-covered strawberries for a delightful contrast!
FAQs about Cherry Tiramisu
Can I use frozen cherries instead of fresh?
Absolutely! Frozen cherries work wonderfully and can be a great time-saver. Just thaw and drain them before use.
How long can I store Cherry Tiramisu in the fridge?
You can store it in the refrigerator for up to 3 days. Just remember to cover it well to keep it fresh!
Can I make this dessert ahead of time?
Yes! In fact, I recommend making it a day in advance. The flavors really develop when it chills overnight.
What’s the best way to serve Cherry Tiramisu?
Serve it chilled, garnished with fresh cherries and a drizzle of cherry syrup. It’s the perfect sweet treat for any occasion!
Is Cherry Tiramisu suitable for a gluten-free diet?
Definitely! Simply use gluten-free ladyfingers or sponge cake to accommodate gluten-sensitive guests.
Final Thoughts
Bringing a Cherry Tiramisu to your table isn’t just about serving dessert; it’s about creating moments of joy and warmth with loved ones. Each layer of creamy mascarpone and cherry syrup invites smiles and contentment, brightening even the busiest of days. Whether it’s for a family gathering or a quiet evening treat, this dessert celebrates life’s little pleasures. Trust me, when you see your family savor each bite, you’ll know you’ve created something truly special. So gather your ingredients, unleash your inner chef, and make memories with this delicious Cherry Tiramisu!
Print
Cherry Tiramisu
- Total Time: 6 hours 45 minutes
- Yield: 12 servings 1x
- Diet: Vegetarian
Description
A delightful twist on classic tiramisu, featuring layers of cherry syrup and mascarpone whipped cream.
Ingredients
- 6 cups pitted cherries
- ¾ cup water
- 1 ¼ cups granulated sugar
- 2 tablespoons lemon juice
- 2 ½ cups heavy whipping cream
- 16 ounces mascarpone cheese
- 1 cup confectioners’ sugar
- 1 cup cherry syrup
- 1 teaspoon vanilla extract
- ½ teaspoon almond extract (optional)
- 40 ladyfinger cookies
- Fresh cherries (for garnishing)
- Extra cherry syrup (for drizzling)
Instructions
- To a medium saucepan, add the cherries, water, and heat over medium-high heat.
- Gently mash the cherries with a potato masher to release their juices.
- Once it begins to bubble, reduce heat to medium-low and simmer for 2–3 minutes.
- Remove from the heat and strain through a fine mesh sieve to remove the pulp, collecting the juice over a large bowl.
- Return the strained juice to the saucepan, stir in the granulated sugar and lemon juice, and bring to a gentle boil. Simmer for 4–5 minutes, or until slightly thickened.
- Transfer to a container and chill completely in the refrigerator, about 1 hour.
- Reserve and use 1 cup for the cream filling after it’s chilled.
- To a large mixing bowl, add chilled mascarpone, heavy cream, confectioners’ sugar, 1 cup of cherry syrup, vanilla extract, and optional almond extract.
- Beat on medium-high speed until thickened and soft peaks form (3-8 minutes).
- Lightly dip each ladyfinger into the cherry syrup and arrange in a single layer in a 9×13-inch baking dish.
- Spread half of the cherry mascarpone cream evenly over the soaked ladyfingers.
- Repeat with another layer of dipped ladyfingers and the remaining mascarpone cream.
- Transfer the last portion of mascarpone cream filling to a piping bag and pipe dollops across the top, or simply dollop it and swirl as desired.
- Cover and refrigerate for at least 6 hours, preferably overnight.
- Before serving, garnish with fresh cherries and a drizzle of extra cherry syrup.
- Slice and serve.
Notes
- Don’t use warm syrup in the following steps as it will prevent the filling from whipping and setting.
- Chill overnight for the best texture.
- You can trim ladyfingers if needed to fit them in the dish.
- Prep Time: 30 minutes
- Cook Time: 15 minutes
- Category: Dessert
- Method: Chilling and assembly
- Cuisine: Italian
Nutrition
- Serving Size: 1 slice
- Calories: 450
- Sugar: 25g
- Sodium: 50mg
- Fat: 28g
- Saturated Fat: 15g
- Unsaturated Fat: 8g
- Trans Fat: 0g
- Carbohydrates: 43g
- Fiber: 2g
- Protein: 7g
- Cholesterol: 85mg