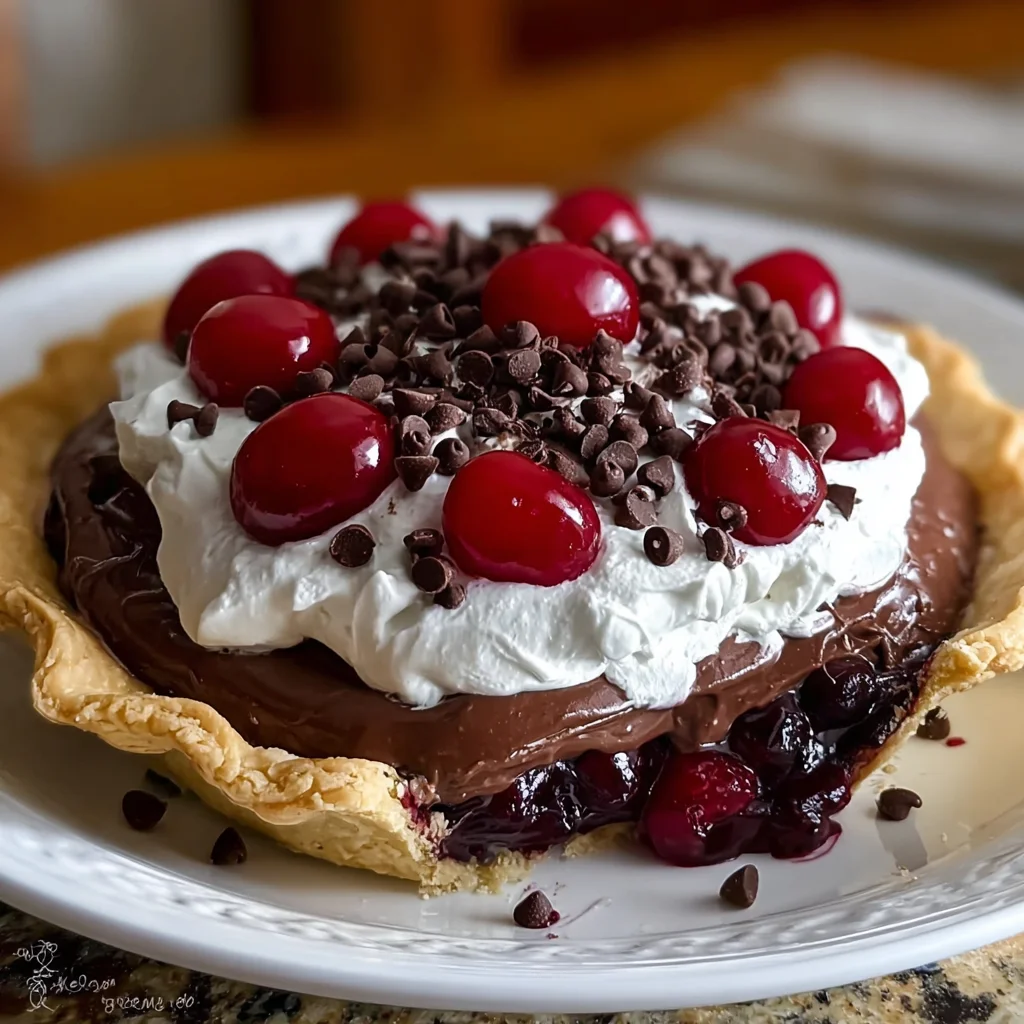
Introduction to Chocolate Cherry Cream Pie
Hey there, fellow dessert enthusiasts! If you’re like me, you know that the perfect indulgence can brighten even the busiest days. That’s where my beloved Chocolate Cherry Cream Pie comes in. With its luscious layers of cherry filling and rich chocolate pudding topped with fluffy whipped cream, it’s a delightful treat that pleases everyone. Whether you need a quick dessert for a family gathering or a sweet surprise for a friend, this no-bake beauty will have them raving. Trust me, this pie isn’t just food; it’s a celebration of flavors that’s simple yet impressive!
Why You’ll Love This Chocolate Cherry Cream Pie
This Chocolate Cherry Cream Pie is a lifesaver for busy moms and professionals like us. It’s quick to assemble, requiring just a bit of mixing and layering. You don’t need to be a pastry pro to impress your family or guests. The balance of tart cherries with rich chocolate is pure bliss, creating a flavor harmony that leaves everyone wanting more. Plus, it’s a no-bake wonder, saving you precious time in the kitchen!
Ingredients for Chocolate Cherry Cream Pie
Let’s dive into the deliciousness! This Chocolate Cherry Cream Pie features a handful of simple yet flavorful ingredients that you likely have on hand. Each one brings a special touch to this treat, and here’s what you’ll need:
- Pre-baked 9-inch pie crust: Whether homemade or store-bought, a crispy crust cradles all the lovely layers inside.
- Cherry pie filling: You can use a can of cherry pie filling for convenience or make your own with fresh or frozen cherries for a delightful homemade touch.
- Chocolate pudding mix: This instant mix is a game changer! It adds that deep chocolate flavor and creamy texture we all love.
- Cold milk: Use whole milk or your favorite non-dairy milk to prepare the pudding. Don’t forget to keep it cold for the best results!
- Whipped cream: Whether homemade or store-bought, whipped cream adds the perfect, light finishing touch to this dessert.
- Chocolate chips: Semi-sweet or dark chocolate chips make for a scrumptious topping. Try a mix of both for a fun flavor twist!
- Fresh cherries: Optional, but they make a lovely garnish, adding a pop of color and freshness to your pie.
For exact quantities, be sure to check the end of this article where you can find everything listed for easy printing. Now, let’s gather these ingredients and get ready to create a masterpiece that your family will adore!

How to Make Chocolate Cherry Cream Pie
Ready to dive into the process of making this delicious Chocolate Cherry Cream Pie? Follow these simple steps for a dessert that’s sure to impress. I promise, it’s easier than it looks! Let’s get our hands a little messy and have some fun in the kitchen.
Step 1: Pre-Bake the Pie Crust
First things first, we need a perfectly pre-baked pie crust. It’s crucial that your crust is completely cooled before we start layering. This ensures that your pie holds its shape and prevents sogginess. If you’re in a pinch, don’t hesitate to grab a store-bought crust. They can be a real time-saver without sacrificing taste. Just follow the package instructions for baking. If you’re feeling adventurous, a homemade crust is a delightful option that adds a personal touch!
Step 2: Spread Cherry Pie Filling
Now it’s time to drop that cherry goodness! Open your can of cherry pie filling and spread it evenly across the bottom of your cooled crust. Using an offset spatula or the back of a spoon makes this super simple. This layer is essential because it gives our pie that delightful tartness that pairs so beautifully with the chocolate. Ensure it’s spread out to cover every inch of the crust so you get delicious cherry goodness with every slice!
Step 3: Prepare Chocolate Pudding
Next up, let’s tackle the chocolate pudding. In a mixing bowl, combine your chocolate pudding mix with the cold milk, following the package instructions. Whisk until it’s smooth and thickened, usually just a couple of minutes. The key here is to add the milk slowly while whisking to get that perfect creamy texture. Once it’s thickened, gently spread this chocolate layer over your cherry filling. It’s like a sweet, velvety hug for the cherries!
Step 4: Layer the Whipped Cream
Now, we introduce the light, airy whipped cream. Whether homemade or from a tub, you’ll want to gently spread it over the chocolate pudding. Start from the center and work your way outwards with a spatula. The goal is to create a smooth, even layer without mixing it into the chocolate too much. This fluffy topping adds a lightness that perfectly balances the richness of the chocolate!
Step 5: Garnish and Chill
Finally, it’s time to jazz up your pie! Sprinkle the chocolate chips over the whipped cream for an extra touch of chocolatey goodness. If you have fresh cherries, toss those on top too! They add a splash of color and freshness. Now, pop your completed pie into the refrigerator for at least two hours. Chilling allows the layers to set, making it easier to slice. Think of it as a waiting game—trust me, the wait is worth it!
Tips for Success
- Make sure your pie crust is cooled completely; this helps avoid a soggy bottom.
- Use quality chocolate pudding mix for the best flavor and texture.
- Try chilling your mixing bowls before whipping cream; it speeds up the process!
- Mix different types of chocolate chips for added depth of flavor.
- Let your pie chill longer than two hours for a firmer slice!
Equipment Needed
- 9-inch pie dish: A standard glass or ceramic pie dish works beautifully. You can also use a tart pan for a fancier look.
- Mixing bowls: A medium bowl for pudding and a larger one for whipped cream.
- Whisk or electric mixer: Whisk by hand or use an electric mixer for fluffy results.
- Offset spatula: Perfect for spreading your layers evenly!
Variations on Chocolate Cherry Cream Pie
- Vegan Version: Substitute the chocolate pudding mix with a plant-based option and use almond or soy milk. Opt for coconut whipped cream to keep it dairy-free.
- Berry Fusion: Replace cherry pie filling with mixed berries for a delightful twist. Strawberries, blueberries, and raspberries can create a colorful and fruity version.
- Chocolate Cookie Crust: Swap out the traditional pie crust for a chocolate cookie crust made from crushed chocolate cookies and butter for an extra chocolatey experience.
- Nutty Crunch: Add crushed nuts like walnuts or pecans between the layers for a lovely crunch and enhanced flavor profile.
- Mint Chocolate Variation: Fold in a few drops of mint extract into the chocolate pudding for a refreshing minty touch that complements the flavors beautifully.
Serving Suggestions for Chocolate Cherry Cream Pie
- Pair with a scoop of vanilla ice cream for a warm and cold contrast that’s divine.
- Serve alongside a cup of freshly brewed coffee for a delightful afternoon treat.
- Garnish with mint leaves for a fresh pop of color and flavor.
- For presentation, dust with cocoa powder before serving for a touch of elegance.
FAQs about Chocolate Cherry Cream Pie
Can I make this Chocolate Cherry Cream Pie ahead of time?
Absolutely! This pie is perfect for making ahead. Just assemble it a day in advance and let it chill overnight. The flavors meld beautifully, making it even tastier!
Is there a gluten-free option for the pie crust?
You bet! Opt for a gluten-free pie crust made from almond flour or gluten-free graham crackers. They offer a delicious alternative without sacrificing texture.
Can I use homemade chocolate pudding instead of mix?
Of course! If you prefer the richness of homemade pudding, whip up a batch using cocoa powder, sugar, and cornstarch. Just make sure it has time to cool before layering it in your pie.
How do I store leftovers?
Store any leftover pie in an airtight container in the fridge. It’s best enjoyed within 3-4 days, but I doubt it’ll last that long!
What can I substitute for cherries if my family doesn’t like them?
If cherries aren’t a hit in your household, feel free to swap them for your family’s favorite fruit! Blueberries, peaches, or even a chocolate-only pie are all delicious alternatives.
Final Thoughts
Making this Chocolate Cherry Cream Pie is more than just baking; it’s about creating delicious memories with the people you love. The joyful smiles as you serve it, the delighted sounds of pleasure from your family, and that first bite bursting with flavors are priceless moments. This dessert is like a warm hug on a plate, effortlessly bringing everyone together. So, whether you whip it up for a special occasion or just a Wednesday night treat, your heart will be full and your home happy. Get ready to share slices of bliss!
Print
Chocolate Cherry Cream Pie: Irresistible Delight Awaits!
- Total Time: 2 hours 30 minutes
- Yield: 8 servings 1x
- Diet: Vegetarian
Description
A delicious Chocolate Cherry Cream Pie featuring layers of cherry filling, rich chocolate pudding, and whipped cream.
Ingredients
- 1 pre-baked 9-inch pie crust
- 1 can (21 oz) cherry pie filling (or homemade)
- 1 box (3.9 oz) chocolate pudding mix
- 2 cups cold milk (for pudding mix)
- 1 ½ cups whipped cream (homemade or store-bought)
- ½ cup chocolate chips (semi-sweet or dark)
- Fresh cherries for garnish (optional)
Instructions
- Ensure the pie crust is pre-baked and fully cooled before assembling.
- Spread the cherry pie filling evenly across the bottom of the crust.
- Prepare the chocolate pudding according to the package instructions using cold milk. Let it thicken slightly, then spread it over the cherry layer.
- Gently spread whipped cream over the chocolate layer, creating a smooth, even topping.
- Sprinkle chocolate chips over the whipped cream, and add fresh cherries for extra flavor and presentation.
- Chill the pie in the refrigerator for at least 2 hours to allow the layers to set.
- Slice and serve chilled for a rich and creamy chocolate-cherry treat!
Notes
- For a homemade cherry pie filling, use fresh or frozen cherries with sugar and cornstarch.
- Substitute milk with a non-dairy alternative for a vegan version.
- Use different types of chocolate chips for varied flavor profiles.
- Prep Time: 20 minutes
- Cook Time: 10 minutes
- Category: Dessert
- Method: No-Bake
- Cuisine: American
Nutrition
- Serving Size: 1 slice
- Calories: 350
- Sugar: 20g
- Sodium: 370mg
- Fat: 20g
- Saturated Fat: 10g
- Unsaturated Fat: 5g
- Trans Fat: 0g
- Carbohydrates: 40g
- Fiber: 2g
- Protein: 5g
- Cholesterol: 30mg