
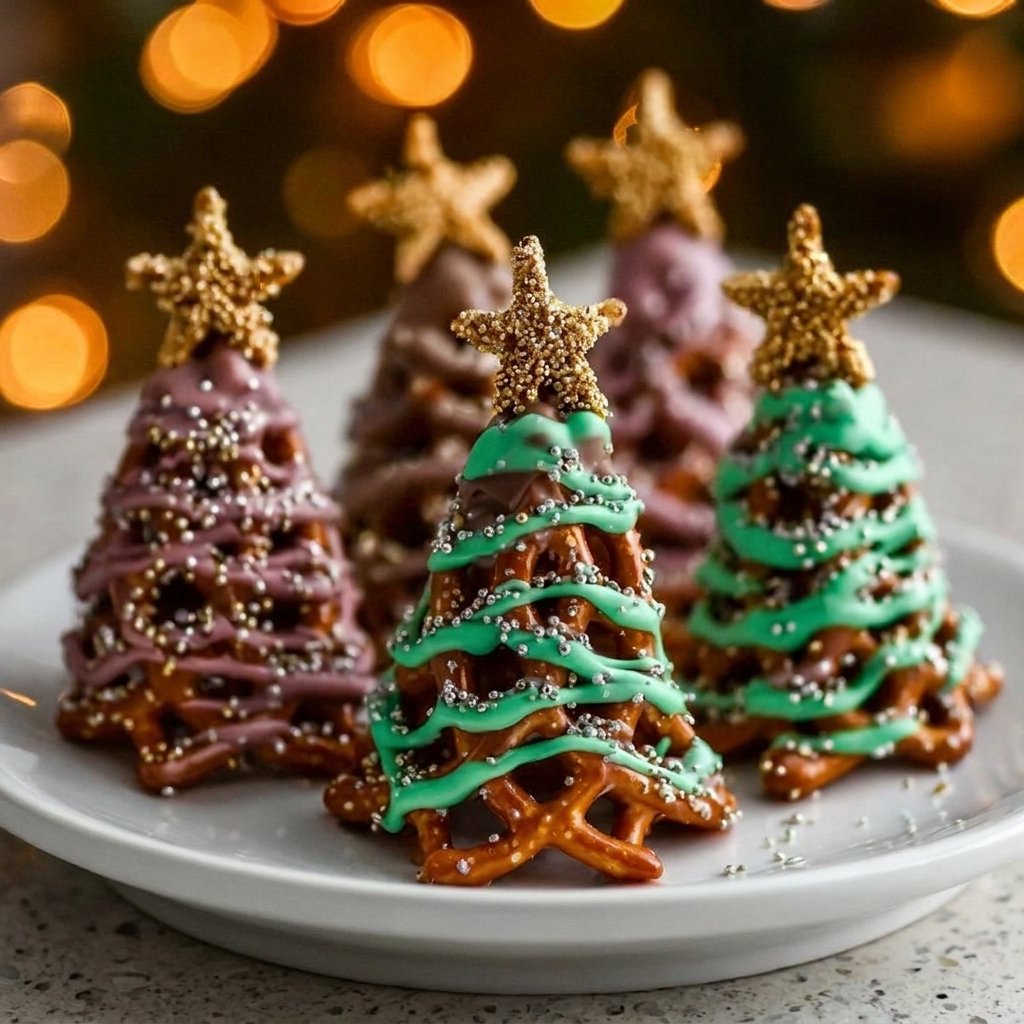
Introduction to Chocolate Pretzel Trees
Whenever the holidays roll around, I find myself on a quest for fun, festive treats that bring smiles all around. Chocolate Pretzel Trees fit that bill perfectly! These delightful little creations make for an easy, no-bake dessert that’s sure to impress family and friends alike. In just about 20 minutes, you can whip up these scrumptious trees, perfect for holiday gifting or sharing at family gatherings. Plus, they’re so simple that even the kids can help out, making it a wonderful bonding experience in the kitchen.
Why You’ll Love This Chocolate Pretzel Trees
Chocolate Pretzel Trees are not only visually stunning but also incredibly easy to make. If you’re pressed for time, these no-bake delights come together in just 20 minutes, making them a quick solution for those busy days. The sweet and salty combination satisfies every craving, and the creative decoration possibilities allow your personality to shine through. Everyone will love these treats, whether it’s for a festive gathering or simply an afternoon snack!
Ingredients for Chocolate Pretzel Trees
Before we dive into the fun of making these enchanting Chocolate Pretzel Trees, let’s gather our key players!
- Chocolate (milk or dark) – This is the star ingredient. Choose your favorite type for that rich, melty goodness.
- Regular-sized twisted pretzels – These add the perfect crunch and shape for our trees. If you can’t find them, stick pretzels work too!
- Green icing – This is what turns our pretzel trunks into vibrant tree foliage. Look for squeeze bottles for easy decorating.
- Candy decorations (sprinkles, M&Ms, etc.) – Get creative! Use whatever colorful candies you have to sprinkle on your trees. They add a bit of whimsy and fun!
For those who might have dietary needs, consider using dark chocolate for a healthier option, or gluten-free pretzels if necessary.
Feel free to adapt and mix up the decorations. The exact quantities of each ingredient are at the bottom of the article, ready for you to print out and use in your own kitchen adventures.
How to Make Chocolate Pretzel Trees
Now, let’s get to the exciting part: creating those adorable Chocolate Pretzel Trees! Follow these simple, step-by-step instructions, and you’ll have scrumptious treats ready in no time.
Step 1: Melt the Chocolate
Start by melting your chocolate. You can use a microwave-safe bowl or a double boiler. I prefer the microwave for its convenience. Heat the chocolate in increments of 30 seconds, stirring each time. This helps to prevent burning. You want it smooth and creamy—like a warm hug for your pretzels!
Step 2: Dip the Pretzels
Once the chocolate is silky, it’s time for a dip! Grab your twisted pretzels, and dip them into the melted chocolate. Make sure each pretzel is well-coated, ensuring every inch is covered. This is where you create that rich, chocolatey flavor. Let the excess chocolate drip back into the bowl.
Step 3: Shape the Trees
Now, here comes the fun part! Place the coated pretzels upright on a parchment-lined baking sheet. Arrange them to resemble little trees. You can use two or more pretzels for each tree if you want them fuller. Just like decorating a holiday tree, let your creativity shine!
Step 4: Decorate the Trees
It’s time to bring your trees to life! Use the green icing to create vibrant foliage on your pretzels. Get creative! You can squeeze it into swirls, zigzags, or whatever design you fancy. Don’t forget to sprinkle your favorite candy decorations on top. Each tree can be as unique as your own holiday spirit!
Step 5: Set the Trees
Finally, let those beautiful Chocolate Pretzel Trees set. You can either leave them at room temperature or pop them in the fridge for quicker results. Once the chocolate hardens, they’ll be ready for your table or to share with loved ones. Trust me; you’ll want to dig in right away!
Tips for Success
- Use high-quality chocolate for a richer flavor that everyone will adore.
- Make sure the pretzels are completely cool before dipping to maintain the chocolate’s integrity.
- Experiment with different candy decorations for a fun twist.
- Work in a clean, tidy space to keep things organized and hassle-free.
- Don’t rush the melting process; patience is key to achieving a smooth consistency.
Equipment Needed
- Microwave-safe bowl – Alternatively, use a double boiler for melting chocolate.
- Parchment paper – This ensures easy cleanup and prevents sticking.
- Spatula or spoon – To stir your melted chocolate smoothly.
- Decorating bags – Or simple plastic bags for piping the icing.
Variations of Chocolate Pretzel Trees
- Dark chocolate – Swap in dark chocolate for a richer, less sweet option that’s perfect for chocolate lovers.
- White chocolate – For a creamy twist, use white chocolate. Add colored sprinkles for a festive effect.
- Gluten-free pretzels – Use gluten-free pretzels to make this treat accessible to everyone, ensuring nobody feels left out.
- Dairy-free chocolate – Substitute with dairy-free chocolate to cater to vegan or dairy-sensitive friends.
- Coconut flakes – Add coconut flakes on top for a tropical flair, making your trees look like they’ve just come from an island paradise!
- Peanut butter drizzle – Drizzle melted peanut butter on top for a delicious flavor combination that’ll have everyone going nuts for these trees.
Serving Suggestions for Chocolate Pretzel Trees
- Pair with hot cocoa or your favorite holiday beverage for a cozy treat.
- Serve on a festive platter adorned with holly or seasonal decorations.
- Include alongside a fruit platter for a balanced sweet and savory spread.
- Wrap in clear cellophane tied with a ribbon for thoughtful gifts.
FAQs about Chocolate Pretzel Trees
Can I make Chocolate Pretzel Trees in advance?
Absolutely! These treats can be made a few days ahead of time. Just store them in an airtight container at room temperature to maintain their crunchiness.
What type of chocolate works best for these trees?
Using high-quality chocolate is key for flavor and texture. Both milk and dark chocolate work wonderfully, so choose what you love most!
Can I customize the decorations?
Oh, definitely! You can use any candy decorations you like. Sprinkles, mini candies, or even edible glitter can add charm to your trees.
How do I store leftover Chocolate Pretzel Trees?
Leftover trees can be stored in a cool, dry place in an airtight container for a fresh taste. Just be careful with humidity, as it can affect the chocolate.
Are these pretzel trees suitable for kids to make?
Yes, they’re perfect for little chefs! Kids will have fun dipping and decorating, making it a delightful family activity during the holidays.
Preparation Cues and Common Mistakes
To make your Chocolate Pretzel Trees a success, paying attention to preparation cues and avoiding common mistakes is essential. Here are some tips to enhance your experience!
- Chocolate Temperature: Maintain the chocolate at the proper temperature while melting. If it begins to harden, gently reheat it in short increments. It’s better to keep it a touch warmer during decorating than to start with chocolate that has begun to set up too much.
- Proper Coating: Ensure pretzels are fully coated in chocolate. If you see any bare spots, dip them again to maintain flavor consistency. This prevents parts of the tree from being overly salty.
- Spacing on the Sheet: Leave adequate space between trees on the baking sheet to prevent them from sticking together as they set. If they touch, you might lose the tree shape upon tearing them apart.
- Work Quickly with Icing: Green icing can set quickly, especially if the chocolate is warm. If piping is delayed, consider keeping the icing warm using a small water bath to ensure easy decorating.
- Decorating order: Apply candy decorations immediately after icing to ensure they stick well. If the icing dries without candies, they may not adhere properly.
- Chilling Time: Be mindful of chilling the trees too long. Over-chilling can cause chocolate to develop a dull finish or even develop white streaks, known as “bloom.” Instead, let them set just until firm.
- Cleanup: Tidy up your workspace as you go. Chocolate can be tricky to clean once hardened, so wiping spills or splatters quickly helps maintain a clean cooking area.
By being aware of these cues and potential pitfalls, you’ll create Chocolate Pretzel Trees that are not only visually appealing but also a pleasure to eat. Happy crafting!
Make-Ahead, Storage, and Serving Tips
For those planning ahead, the Chocolate Pretzel Trees can be made a few days in advance, allowing you to spread out your holiday baking tasks. Once completed, let the trees set fully and then store them in a cool, dry place. An airtight container is essential to keep them fresh and crispy.
When it comes to storage, it’s best to separate layers of trees with parchment paper if you stack them in the container; this prevents any decorations from getting smudged or damaged. Humidity can also compromise your treats, so avoid storing them in areas prone to moisture.
If you want to make them extra festive for serving, consider the following options:
- Display the trees in a decorative tin or a clear jar with a lid to add flair while keeping them protected. You could even embellish your container with ribbons or holiday-themed stickers.
- For a fun presentation, place the trees on a platter decorated with faux snow (like coconut flakes) and scattered candy for a whimsical winter wonderland vibe.
- Rotate between different chocolate types and decorations to create a colorful assortment that appeals to a variety of tastes, making your dessert table inviting and festive.
- Consider pairing your Chocolate Pretzel Trees with a complementary dessert. For example, match them with a rich hot chocolate bar featuring marshmallows, flavored syrups, and whipped cream for an interactive treat experience!
- If you’re preparing, serving, or gifting, remember that the visual appeal of these treats is just as important. Use colorful plates and utensils to enhance their festive charm.
By planning ahead and considering your storage and serving strategies, your Chocolate Pretzel Trees will not only taste delightful but also look stunning for all your festive gatherings!
Ingredient Choices and Practical Substitutions
Selecting the right ingredients can transform your Chocolate Pretzel Trees into a personalized delight. Here are a few practical substitutions and choices that can enhance your creation:
- Chocolate Variations: Consider using flavored chocolates such as mint or orange for a unique twist. They provide not just a different taste but also elevate the overall theme.
- Nut Butter Options: Use almond or cashew butter instead of peanut butter for a distinct flavor if you want to drizzle something fun over your trees without the peanut allergy concern.
- Coloring Icing: If green icing isn’t available, opt for different colored icings to match party themes or personal preferences, ensuring your trees remain vibrant.
- Alternative Toppings: Instead of traditional sprinkles, consider toppings like crushed pretzels for extra crunch, mini marshmallows for a fluffy texture, or dried fruits for a splash of color and flavor.
- Vegan Options: Use coconut cream or cashew cheese for a non-dairy icing alternative to cater to vegan guests while retaining a creamy consistency.
Exploring these substitutions allows you to tailor the Chocolate Pretzel Trees to fit dietary preferences and seasonal themes while keeping them delightful and festive.
Final Thoughts on Chocolate Pretzel Trees
Creating Chocolate Pretzel Trees is more than just a cooking activity; it’s a way to stir up joy and capture the spirit of the holidays. As you dip, decorate, and design each tree, you’re crafting sweet memories that linger long after the treats are gone. The laughter shared in the kitchen, the excitement of choosing the perfect candies, and the delight when you present these charming creations are invaluable. These trees are not just delicious; they embody warmth, love, and creativity, making every bite a cherished moment with family and friends. Happy decorating!
PrintChocolate Pretzel Trees
- Total Time: 20 minutes
- Yield: Makes about 12-15 trees
- Diet: Vegetarian
Description
Chocolate Pretzel Trees are a fun and festive treat, perfect for holiday gifting or family gatherings.
Ingredients
- Chocolate (milk or dark)
- Regular-sized twisted pretzels
- Green icing
- Candy decorations (sprinkles, M&Ms, etc.)
Instructions
- Melt the chocolate in a microwave-safe bowl or using a double boiler, in increments of 30 seconds, stirring each time.
- Dip the pretzels in the melted chocolate, ensuring they are well-coated.
- Shape the coated pretzels upright on a parchment-lined baking sheet to form tree shapes.
- Decorate the pretzel trees with green icing and your choice of candy decorations.
- Let the chocolate harden at room temperature or place in the fridge for quicker results.
- Enjoy your Chocolate Pretzel Trees immediately or package them for gifting.
Notes
- Use good-quality chocolate for the best flavor.
- Work patiently and test for doneness as chocolate thickens when cooling.
- Prep Time: 15 minutes
- Cook Time: 5 minutes
- Category: Dessert
- Method: No-bake
- Cuisine: American
Nutrition
- Serving Size: 1 pretzel tree
- Calories: 120
- Sugar: 10g
- Sodium: 50mg
- Fat: 7g
- Saturated Fat: 4g
- Unsaturated Fat: 3g
- Trans Fat: 0g
- Carbohydrates: 14g
- Fiber: 1g
- Protein: 2g
- Cholesterol: 5mg