
Introduction to Christmas Black Forest Cheesecake Cups
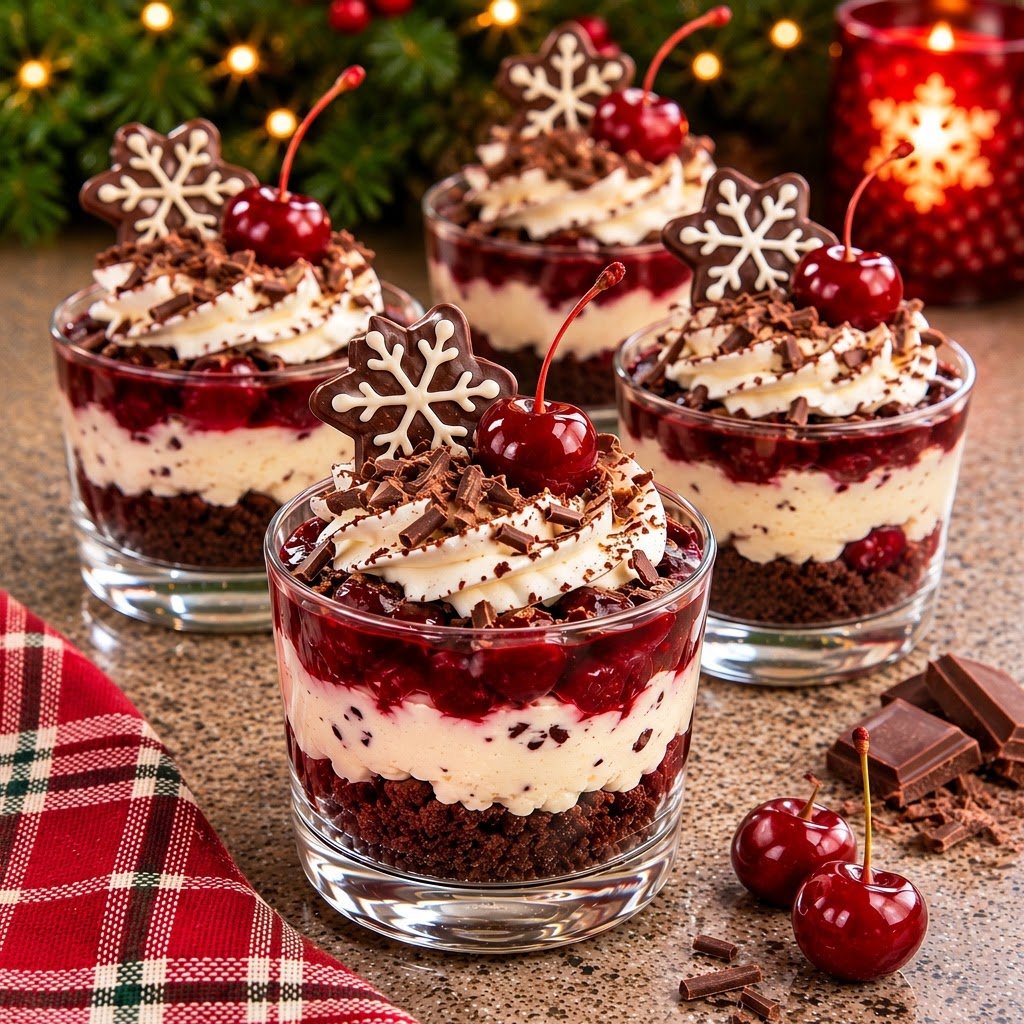
When the holiday season rolls around, I find myself craving something truly special. That’s where these Christmas Black Forest Cheesecake Cups come into play! Not only are they simple to whip up, but they also provide that wow factor that friends and family love. Who doesn’t appreciate layers of chocolate and cherry during festive gatherings? These delightful cups are a quick solution for dessert dilemmas, making them a perfect choice for busy days. Trust me, with this recipe, you’ll impress your loved ones and fill your home with festive cheer!
Why You’ll Love This Christmas Black Forest Cheesecake Cups
These Christmas Black Forest Cheesecake Cups are an absolute joy to make! They’re quick and easy to prepare, letting you focus on what truly matters—creating memories with loved ones. The combination of creamy cheesecake, rich chocolate, and sweet cherries is simply irresistible. Plus, they bring a festive flair to your table, making every bite feel like a celebration. You’ll love how they satisfy even the pickiest eaters with that classic flavor combo!
Ingredients for Christmas Black Forest Cheesecake Cups
Creating these Christmas Black Forest Cheesecake Cups is a delightful journey, and it all starts with gathering the right ingredients. Here’s what you’ll need:
- Crushed chocolate cookies: These become the luscious base of your cups. You can use store-bought options or crush your favorite chocolate cookies for a personal touch.
- Melted butter: This helps bind the cookie crumbs together, giving your crust that perfect crumbly texture.
- Cream cheese: The star of the show, cream cheese adds creaminess and richness. Make sure it’s softened to allow for easy mixing.
- Heavy whipping cream: When whipped, it adds a light and fluffy texture to the cheesecake filling. Opt for cold cream for the best volume.
- Powdered sugar: This sweetener gives the cheesecake a smooth, sweet finish. You can adjust the amount based on your sweetness preference.
- Vanilla extract: A must-have for flavor, this adds warmth and enhances the dessert’s overall taste.
- Dark chocolate: Finely chopped, this chocolate adds depth to the cheesecake filling. You can use semi-sweet or bittersweet varieties, depending on your taste.
- Pitted cherries: Fresh or frozen, they bring that essential fruity layer. Ensure they’re pitted for hassle-free eating!
- Sugar: Used to sweeten the cherry filling. Feel free to adjust for desired sweetness.
- Lemon juice: A splash brightens the cherry filling and balances the sweetness beautifully.
- Cornstarch: When mixed with water, it helps thicken the cherry filling, creating a luscious consistency.
- Whipped cream: Perfect for decorating, it adds extra creaminess and elegance to your dessert.
- Chocolate shavings: These add a touch of sophistication and beautiful presentation.
- Red cherries: Fresh cherries make for stunning garnishes, adding color and appeal.
- Chocolate snowflake cookies: Optional, but they can be a whimsical decoration that elevates your treat.
For exact measurements, refer to the end of the article, where everything is available for printing!
How to Make Christmas Black Forest Cheesecake Cups
Now that we have our ingredients lined up, let’s dive into making these delightful Christmas Black Forest Cheesecake Cups! Follow these steps, and you’ll have a festive dessert that dazzles!
Step 1: Prepare the Cookie Crust
Begin by combining your crushed chocolate cookies with melted butter in a mixing bowl. This mixture should look like damp sand. Once it’s well-mixed, take small amounts and press them firmly into the bottoms of your clear dessert glasses. A flat-bottomed glass or measuring cup works wonders here! This crust is like a sturdy little foundation for the creamy bliss to come.
Step 2: Create the Cheesecake Filling
In another bowl, beat the softened cream cheese until it’s smooth. This step is crucial—make sure there are no lumps! Then, add the powdered sugar and vanilla extract, mixing until well combined. Next, whip the cold heavy cream in a separate bowl until stiff peaks form. Gently fold this whipped cream into your cream cheese mixture. Finally, fold in the finely chopped dark chocolate to give your filling an extra rich touch. The filling should be velvety and oh-so-delicious!
Step 3: Cook the Cherry Filling
In a saucepan, toss the pitted cherries with sugar and a splash of lemon juice over medium heat. Allow them to cook for about 5–7 minutes until they soften and burst with flavor. Keep stirring gently! Afterward, mix cornstarch with water in a small bowl, then add this thickening agent to your cherry mixture. Cook for another minute until it thickens, then remove from heat and let it cool completely. You want those cherries to shine brightly in your dessert!
Step 4: Assemble the Dessert
Now comes the fun part! Spoon the luscious cheesecake filling over the chilled cookie crusts, creating an even layer. Next, take that cooled cherry filling and layer it over the cheesecake. Be generous here; it’s all about balance! Each bite should offer that delightful contrast of flavors—chocolate, cream, and tart cherries. Don’t worry about perfection; just focus on enjoyment!
Step 5: Chill and Decorate
Cover your dessert cups and refrigerate them for at least 2 hours. This chilling time allows everything to set beautifully. Just before serving, you can add some whipped cream on top for extra creaminess, sprinkle chocolate shavings, and place a fresh cherry or two as garnishes. If you’re feeling whimsical, add a chocolate snowflake cookie for that extra festive flair. Trust me, your guests will be in for a treat!
Tips for Success
- Make sure your cream cheese is thoroughly softened for easy mixing.
- Chill your mixing bowl and beaters before whipping the cream for better volume.
- Use a piping bag for an elegant cheesecake layer.
- Cool the cherry filling completely to prevent it from melting the cheesecake layer.
- Feel free to prepare the cups a day ahead; just add decorations before serving!
Equipment Needed
- Mixing bowls: Use any size, but a large one is best for mixing the cheesecake filling.
- Hand mixer or stand mixer: A whisk can work too, but a mixer saves time!
- Spatula: For folding the ingredients together smoothly.
- Clear dessert glasses: These make for beautiful presentations.
- Saucepan: Essential for cooking the cherry filling.
Variations for Christmas Black Forest Cheesecake Cups
- Gluten-Free Option: Swap chocolate cookies for gluten-free varieties to cater to those with dietary restrictions.
- Vegan Twist: Use plant-based cream cheese and coconut cream instead of heavy cream for a delightful vegan cheesecake filling.
- Different Fruits: Try swapping cherries for raspberries or strawberries for a fresh spin on flavor, still deliciously festive!
- Nutty Crust: Combine crushed chocolate cookies with chopped nuts for added crunch and flavor in the crust.
- Extra Indulgence: Drizzle chocolate sauce over the cheesecake layer before adding the cherry topping for a chocolate lover’s dream!
Serving Suggestions for Christmas Black Forest Cheesecake Cups
- Festive Plates: Serve these cups on colorful holiday-themed plates for an extra festive touch.
- Beverage Pairing: Pair with a warm cup of spiced apple cider or a rich coffee to complement the dessert.
- Slice of Cake: Offer a slice of traditional chocolate cake on the side for added indulgence.
- Presentation: Garnish the dessert table with pine branches or Christmas ornaments for a seasonal display.
- Make it a Delight: Consider serving with a scoop of vanilla ice cream for an irresistible combination!
FAQs about Christmas Black Forest Cheesecake Cups
Can I make these Christmas Black Forest Cheesecake Cups in advance?
Absolutely! You can prepare these cups a day ahead. Just wait to add the decorative toppings until right before you serve them. This makes for a stress-free presentation!
What can I substitute for the pitted cherries?
If cherries aren’t your thing, you can easily swap them out for other fruits. Raspberries or chopped strawberries make delicious alternatives that still keep the festive spirit alive.
How should I store leftover cheesecake cups?
Store any leftovers in the refrigerator, covered with plastic wrap or in an airtight container. Enjoy them within a couple of days for the best taste and texture!
Can I freeze these cheesecake cups?
While I recommend enjoying them fresh, you can freeze them before adding the whipped cream and garnishes. Just ensure you’re using freezer-safe containers. Thaw them overnight in the fridge when you’re ready to indulge!
Is there a way to make this recipe more suitable for kids?
Of course! You can reduce the sugar in the cherry filling to suit younger palates or use milk chocolate in the cheesecake for a sweeter touch. Kids also love the fun decorations!
Preparation Cues and Common Mistakes
To maximize your success when preparing these Christmas Black Forest Cheesecake Cups, pay attention to a few essential cues and avoid common pitfalls. A little preparation can save time and ensure a delightful outcome!
- Room Temperature Ingredients: Ensure your cream cheese is at room temperature to avoid lumps. For best results, let it sit out for about an hour prior to mixing.
- Measuring Precise Ingredients: Use a kitchen scale for accurate measurements, especially for ingredients like flour or sugar, to maintain consistency and achieve the intended texture.
- Gentle Mixing: When folding whipped cream into your cream cheese mixture, do so gently. Over-mixing can deflate the cream, resulting in a dense filling.
- Even Crust Layer: When pressing the cookie crust, ensure it’s evenly distributed across the bottom of each cup. This prevents uneven textures and makes for a more aesthetically pleasing dessert.
- Cool Completely: Allow the cherry filling to cool completely before adding it to the cheesecake layer. This step prevents it from melting the filling and maintains the beautiful layered effect.
Final Thoughts
Creating these Christmas Black Forest Cheesecake Cups is a joyous adventure that fills your kitchen with delightful aromas and holiday cheer. Each layer tells a story—a rich chocolate crust cradling creamy cheesecake, topped with a sweet cherry burst, all dressed up in festive decorations. Serving these cups not only brings smiles to faces but also evokes warm memories shared around the table with loved ones. Plus, they’re simple enough to make without stress, allowing you to savor every moment this holiday season. Trust me, once you experience the joy of this dessert, it will become a festive favorite!
Print
Christmas Black Forest Cheesecake Cups
- Total Time: 2 hours 40 minutes
- Yield: 4 servings 1x
- Diet: Vegetarian
Description
A festive and indulgent dessert featuring layers of chocolate cookie crust, creamy chocolate chip cheesecake, and a sweet cherry filling, perfect for the holiday season.
Ingredients
- 1½ cups crushed chocolate cookies
- 3 tablespoons melted butter
- 8 oz (225 g) cream cheese, softened
- ¾ cup (180 ml) cold heavy whipping cream
- ⅓ cup powdered sugar
- 1 teaspoon vanilla extract
- ⅓ cup finely chopped dark chocolate
- 2 cups (300 g) pitted cherries
- 3 tablespoons sugar
- 1 teaspoon lemon juice
- 1 teaspoon cornstarch mixed with 1 tablespoon water
- Whipped cream for decoration
- Chocolate shavings for decoration
- Red cherries for decoration
- Chocolate snowflake cookies for decoration
Instructions
- Combine crushed chocolate cookies with melted butter. Press into the bottoms of 4 clear dessert glasses.
- Beat cream cheese, powdered sugar, and vanilla until smooth.
- Whip the cold heavy cream until stiff peaks form. Fold it gently into the cream cheese mixture, followed by chopped dark chocolate.
- Cook pitted cherries, sugar, and lemon juice for 5–7 minutes. Add the cornstarch mixture and cook until thickened. Cool completely.
- Pipe the cheesecake filling over the chocolate cookie crust.
- Spoon the cooled cherry filling over the cheesecake.
- Refrigerate for at least 2 hours.
- Decorate with whipped cream, chocolate shavings, a cherry, and a chocolate snowflake cookie. Remove cherry stems before eating.
Notes
- Ensure the cream cheese is well softened for easy mixing.
- For a sweeter cherry filling, adjust the sugar to taste.
- This dessert can be prepared a day in advance; just add decorations before serving.
- Prep Time: 30 minutes
- Cook Time: 10 minutes
- Category: Dessert
- Method: No-Bake
- Cuisine: American
Nutrition
- Serving Size: 1 dessert cup
- Calories: 350
- Sugar: 25g
- Sodium: 160mg
- Fat: 24g
- Saturated Fat: 14g
- Unsaturated Fat: 8g
- Trans Fat: 0g
- Carbohydrates: 34g
- Fiber: 2g
- Protein: 5g
- Cholesterol: 60mg