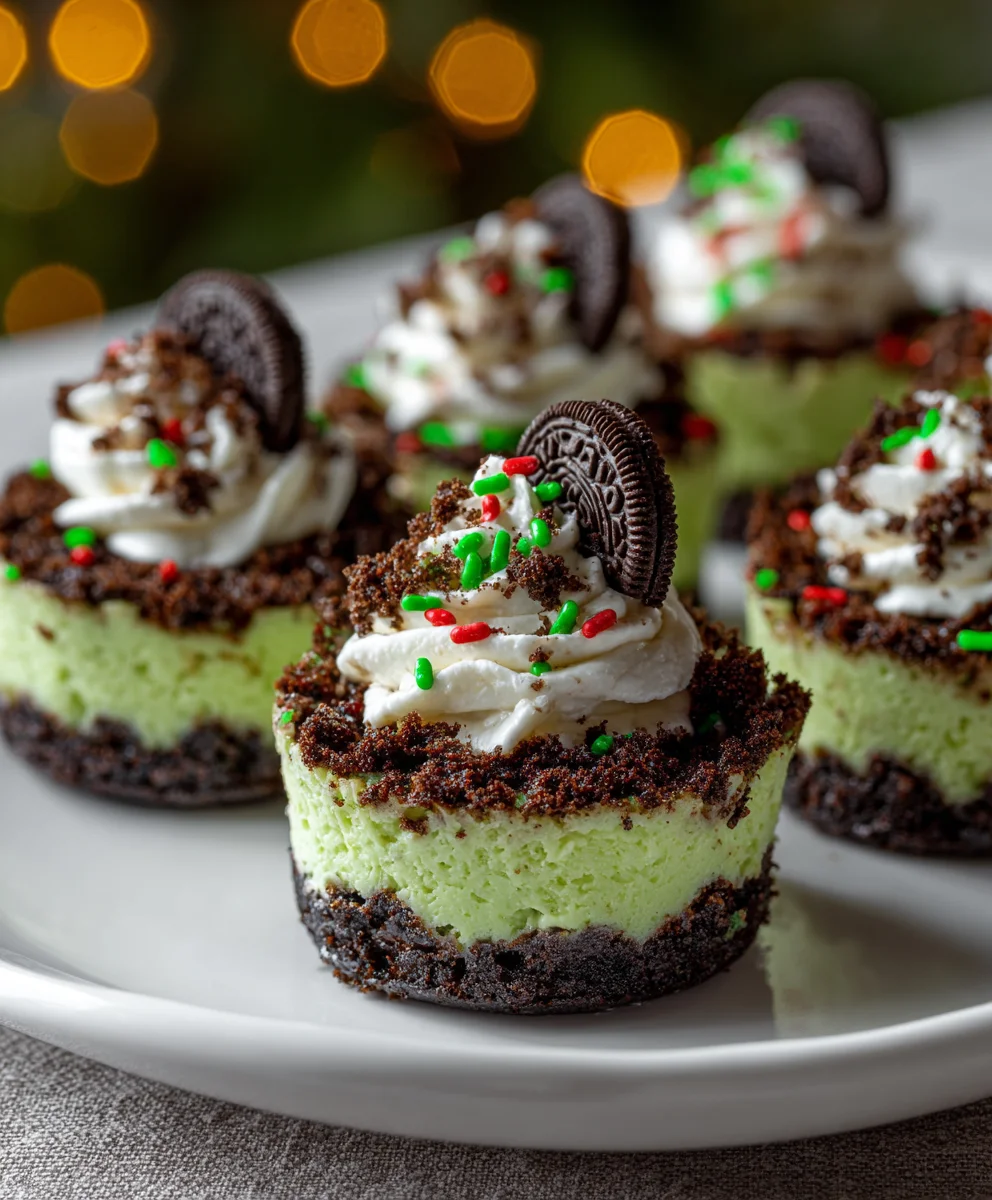
Introduction to Grinch Mini Cheesecakes
There’s something magical about the holidays, isn’t there? The twinkling lights, the laughter, and the sweet aroma of festive treats wafting through the kitchen. This is where my Grinch Mini Cheesecakes come in—deliciously festive delights that are sure to make your gatherings extra special! Perfect for busy moms and professionals, these mini cheesecakes come together in a snap, allowing you to whip up a delightful dessert without the stress. With their vibrant green hue and chocolatey crust, they’re a treat that’s as fun to make as they are to eat. Let’s dive into this cheerful recipe!
Why You’ll Love This Grinch Mini Cheesecakes
These Grinch Mini Cheesecakes are not just adorable; they’re a breeze to make! With minimal prep and bake time, you can create a festive dessert that dazzles your guests. Bursting with creamy sweetness and crunchy chocolate crust, they’re sure to win over even the pickiest eaters. Perfect for family gatherings or holiday parties, these treats spread joy and cheer with every bite. It’s like capturing the spirit of the season in a mini cheesecake!
Ingredients for Grinch Mini Cheesecakes
Gathering the right ingredients is key to making these delightful Grinch Mini Cheesecakes. You’ll need Oreo crumbs for the crust, which add that perfect chocolatey crunch and a touch of nostalgia. Melted butter binds those crumbs together beautifully, creating a solid foundation. The creamy filling consists of softened cream cheese for that dreamy texture, sugar for sweetness, and eggs that help it set perfectly. Don’t forget the splash of vanilla for an aromatic touch! And of course, the neon green food coloring brings the Grinch theme to life! For precise measurements, check the bottom of the article, happy baking!
How to Make Grinch Mini Cheesecakes
Preparing the Cupcake Pan
First things first, let’s get that oven preheated to 350 degrees! This step is crucial for baking those dreamy mini cheesecakes. Next, line your cupcake pan with festive cupcake liners. Not only do they add a pop of color, but they also make removing the cheesecakes a breeze. Trust me; you’ll thank yourself later for taking the time to prepare the pan. Ready for the next step?
Making the Oreo Crust
Now it’s time to make that delicious Oreo crust! Grab your food processor and toss in about 10 to 11 Oreos—no need to separate the cream! Pulse them until you achieve fine crumbs. Then, melt your butter and combine it with those delicious crumbs until it resembles wet sand. You want the mixture to hold together when pressed, so don’t skip this crucial step. Can you smell that chocolatey goodness yet?
Mixing the Cheesecake Filling
Let’s move on to the star of the show—our cheesecake filling! In a medium bowl, beat your softened cream cheese and sugar until it’s wonderfully smooth. It’s important to use softened cream cheese; it blends effortlessly and prevents lumps. Next, crack in the eggs, add a splash of vanilla, and don’t forget that neon green food coloring! Mix until you achieve a vibrant Grinch-like hue that makes you smile. It’s pure magic and adds to the fun!
Baking the Mini Cheesecakes
Now for the fun part—filling those lined cups! Spoon about 1/4 cup of the cheesecake mixture into each cup, filling them evenly. Slide the cupcake pan into your preheated oven and bake for 15-17 minutes. Keep an eye on them! The centers should be slightly jiggly—this is a sign of the perfect cheesecake. Let them bake, and soon your kitchen will smell heavenly!
Cooling and Storing
Once baked, remove the pan from the oven and let the cheesecakes cool completely right in the pan. This step is so important as it allows the flavors to develop beautifully. After they cool to room temperature, pop them in the fridge until they’re firm. This will enhance their texture and make them even more delightful. Trust me; it’s worth the wait!
Tips for Success
- Make sure your cream cheese is at room temperature for easy blending.
- Check for doneness by gently shaking the pan; they should be slightly jiggly but not liquid.
- For a firmer texture, refrigerate the cheesecakes overnight before serving.
- Store leftovers in an airtight container in the fridge for up to 5 days.
- Feel free to double the recipe for larger gatherings!
Equipment Needed
- Food processor (or a zip-top bag and rolling pin for crushing Oreos)
- Cupcake liners (for easy removal)
- Mixing bowl (a large one for blending ingredients)
- Hand mixer or whisk (to beat the cream cheese smoothly)
- Measuring cups (to get those ingredients just right)
Variations
- Swap regular Oreos for gluten-free Oreos to make these mini cheesecakes suitable for gluten-sensitive friends.
- Experiment with different cream cheese flavors like strawberry or chocolate for a fun twist!
- Add festive toppings like crushed peppermint, colorful sprinkles, or even a drizzle of chocolate ganache to elevate their appearance.
- Mix in some orange zest for a citrusy surprise that pairs beautifully with the sweetness!
Serving Suggestions
- Serve these Grinch Mini Cheesecakes on a festive platter garnished with fresh mint leaves for a pop of color.
- Pair them with hot cocoa topped with whipped cream for a cozy treat.
- Add edible glitter to your cheesecakes for that extra festive flair.
- Offer a side of seasonal fruit like strawberries or raspberries for a refreshing contrast.
FAQs about Grinch Mini Cheesecakes
How long can I store Grinch Mini Cheesecakes?
These delightful treats can be stored in an airtight container in the refrigerator for up to 5 days, making them a great make-ahead option for holiday gatherings.
Can I use a different type of cookie for the crust?
Absolutely! While Oreos give a wonderful chocolatey flavor, feel free to experiment with graham crackers or even chocolate chip cookies for a unique twist.
Is it possible to make these mini cheesecakes dairy-free?
Yes! You can substitute regular cream cheese with a dairy-free alternative and use vegan butter for the crust.
Can I freeze these mini cheesecakes?
Yes! They freeze beautifully for up to 2 months. Just make sure to wrap them tightly in plastic wrap before freezing.
What flavors can I add to the cheesecake filling?
Consider adding peppermint extract or chocolate chips for a festive flavor boost that complements the Grinch theme!
Final Thoughts
As the holidays approach, these Grinch Mini Cheesecakes bring more than just delightful flavor; they add a sprinkle of magic to your celebrations. Their fun vibrant green color not only brings a smile to your face but also transforms any gathering into a festive occasion. Plus, with their quick prep and easy baking, they’re perfect for busy parents and professionals. Gather your loved ones, whip up these cheerful treats, and watch how they turn any evening into a joyous feast. Remember, it’s not just dessert; it’s a memory waiting to happen!
Print
Grinch Mini Cheesecakes
- Total Time: 37 minutes
- Yield: 12 mini cheesecakes 1x
- Diet: Vegetarian
Description
Deliciously festive mini cheesecakes inspired by the Grinch, perfect for holiday celebrations.
Ingredients
- 1 cup Oreo Crumbs
- 2 1/2 tbsp Butter, Melted
- 2 (8 oz) Cream Cheese, Softened
- 1/2 cup Sugar
- 2 Eggs
- 1 tsp Vanilla
- Neon Green Food Coloring
Instructions
- Preheat oven to 350 degrees. Line a cupcake pan with liners.
- Pulsate about 10-11 Oreos in a food processor to make crumbs. Then pulse in melted butter until well combined.
- Divide crumbs evenly between each liner and press down firmly.
- In a medium size bowl, beat softened cream cheese and sugar until smooth. Beat in eggs and vanilla.
- Mix in neon green food coloring until desired Grinchy color is reached.
- Spoon about 1/4 cup mixture into each cup, filling them evenly.
- Bake for 15-17 minutes. The centers of the cheesecakes should be slightly jiggly. Remove from oven and let completely cool in the pan. Then refrigerate until firm.
- Top with whipped cream and sprinkles if desired.
Notes
- Ensure the cream cheese is softened for easy mixing.
- Customize the food coloring for a lighter or darker shade of green.
- Can be made ahead of time and stored in the refrigerator.
- Prep Time: 20 minutes
- Cook Time: 17 minutes
- Category: Dessert
- Method: Baking
- Cuisine: American
Nutrition
- Serving Size: 1 cheesecake
- Calories: 200
- Sugar: 10g
- Sodium: 200mg
- Fat: 15g
- Saturated Fat: 9g
- Unsaturated Fat: 4g
- Trans Fat: 0g
- Carbohydrates: 18g
- Fiber: 1g
- Protein: 3g
- Cholesterol: 50mg