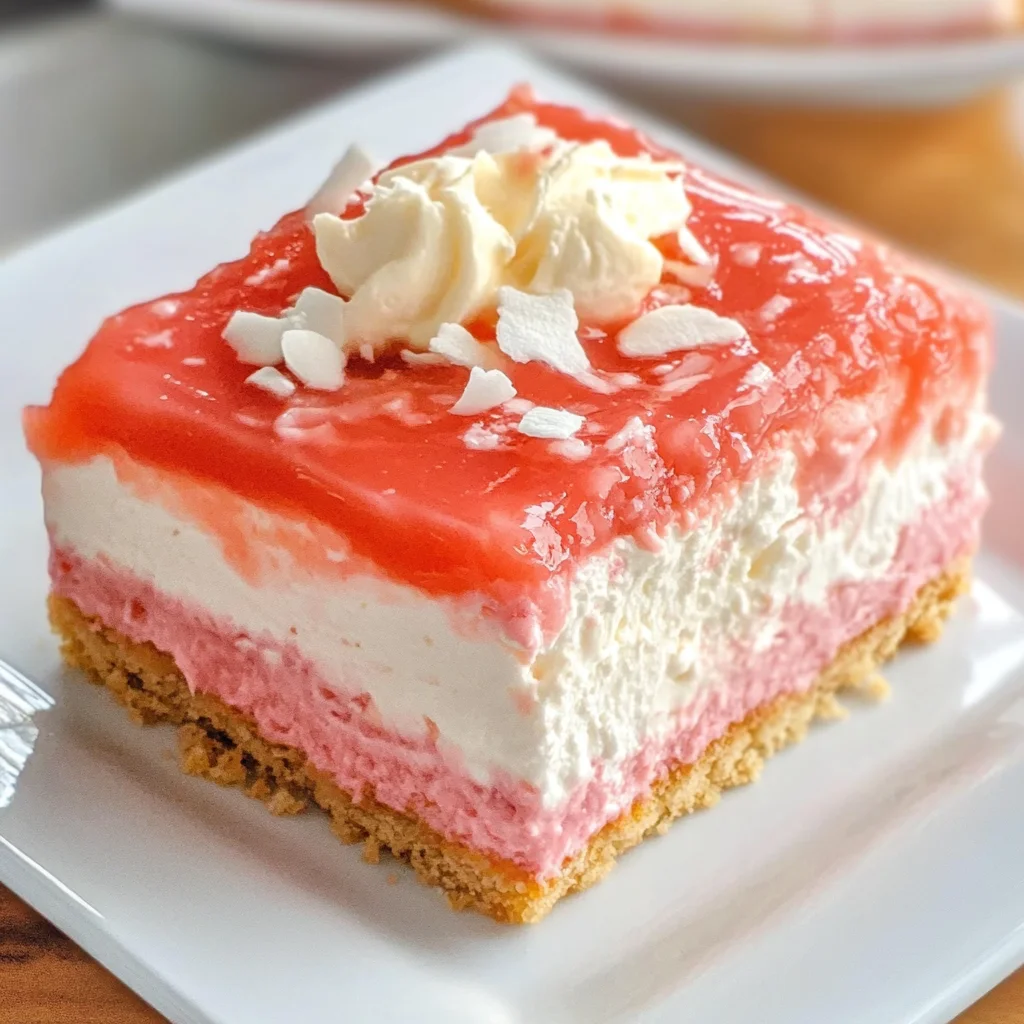
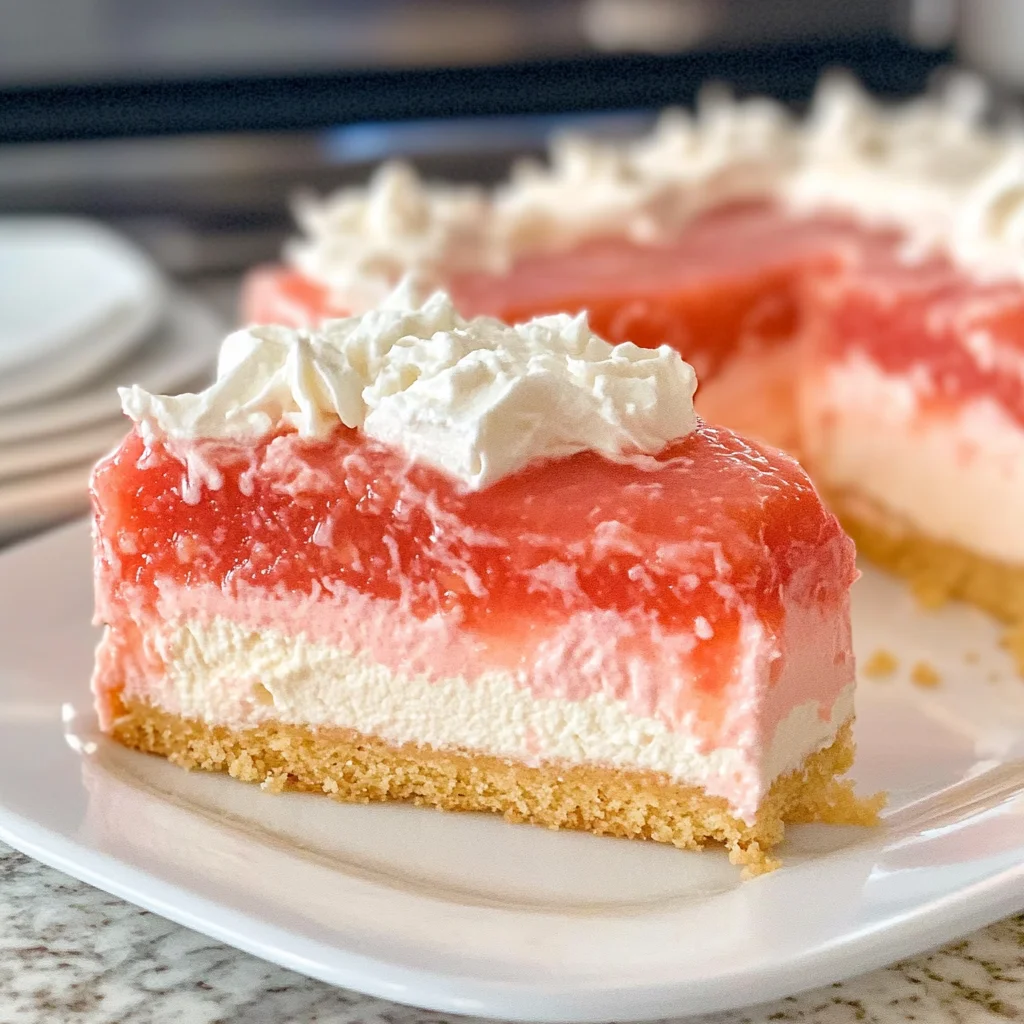
Introduction to Hawaiian Guava Cake
As a passionate home cook, I often seek recipes that whisk us away to sunny destinations, and Hawaiian Guava Cake does just that! This tropical treat combines the sweet essence of guava with a fluffy cake and a creamy layer that will make your taste buds dance. Perfect for busy moms like me, who juggle family, work, and an endless to-do list, this dessert is not just easy to whip up but also a surefire way to impress your loved ones. Trust me, even the pickiest eaters will swoon over this delightful creation!
Why You’ll Love This Hawaiian Guava Cake
This Hawaiian Guava Cake is a baking gem that scores high on flavor and convenience! With just a handful of ingredients, you’ll find this recipe a breeze to assemble. The fluffy cake is a tropical escape, while the rich cream cheese layer creates an indulgent touch. Plus, it’s a great option for gatherings or a cozy family night, making it a cherished favorite in my home. You can’t go wrong with this one!
Ingredients for Hawaiian Guava Cake

Gathering the right ingredients is key to crafting the perfect Hawaiian Guava Cake. Here’s what you’ll need:
- Strawberry Cake Mix: The foundation of our cake. Look for a brand you trust, as it gives a lovely texture and subtle sweetness.
- Guava Nectar or Guava Juice: This is where the magic happens! Choose Kern’s, Jumex, or Goya for authentic guava flavor. Remember, pink guava juice enhances the visual appeal!
- Eggs: Room temperature eggs help create a fluffy cake. They’re essential for binding all the ingredients together beautifully.
- Coconut Oil: This adds moisture and a hint of coconut flavor. If you prefer, you can substitute with vegetable oil or melted butter.
- Cream Cheese: This creamy delight makes the frosting rich and luscious. Remember to let it sit out until it’s at room temperature for easy mixing!
- Granulated Sugar: Sweetness is vital! It balances out the tangy guava flavor and enhances the overall taste of the cake.
- Vanilla Extract: A splash of vanilla brings warmth and depth to the flavor. Pure extract is always best!
- Cool Whip: This ready-made whipped topping adds lightness to the cream cheese mixture. You can swap with homemade whipped cream if you’re up for it!
- Cornstarch: This thickening agent is crucial for our guava gel. It ensures the glaze sets up just right.
- Water: Needed to make the cornstarch slurry. Simple, yet essential!
- Sweetened Coconut Flakes: Optional, but they add a tropical finish. Toss them on to give a lovely crunch and extra flair.
For exact measurements, check at the bottom of the article where you can find everything you need available for printing!
How to Make Hawaiian Guava Cake
Step 1: Prepare the Oven and Baking Dish
Let’s get this tropical party started! First, preheat your oven to 350°F. This allows your Hawaiian Guava Cake to bake evenly. While the oven warms up, grab a 13 x 9 baking dish and coat it with vegetable spray. This ensures easy removal of the cake once it’s baked – no one likes a stuck cake!
Step 2: Mix the Cake Batter
Now it’s time to mix the magic. In a mixing bowl, combine the strawberry cake mix, guava juice, eggs, and coconut oil. Start on low for about 30 seconds to avoid a flour explosion. Then, scrape the sides of the bowl and increase to medium-high for 2 minutes. This step incorporates air, creating a fluffy batter that will make your cake light and delicious!
Step 3: Bake the Cake
Pour that beautiful batter into your prepared pan. Bake for 24-26 minutes, until the edges turn light golden. You’ll know your cake is done when a toothpick inserted into the center comes out clean or with a few crumbs. Let it cool completely on a wire rack. Patience is key here; this keeps the cream cheese layer from melting.
Step 4: Prepare the Cream Cheese Layer
Next, let’s whip up that luscious cream cheese layer! In a bowl, beat room temperature cream cheese until fluffy, about 2-3 minutes. Add in the sugar and vanilla extract, mixing until well combined. Gently fold in the Cool Whip. This creamy blend is essential as it balances the cake’s sweetness with a rich touch. Refrigerate it until the cake is cool.
Step 5: Assemble the Cake
When your cake has cooled down, it’s time to spread the cream cheese mixture evenly over the top. Make sure to cover every inch of cake for that delicious creaminess in every bite. Once spread, pop the cake back in the fridge or freezer for a bit to set the cream cheese layer. Trust me, it makes a big difference!
Step 6: Create the Guava Gel
Now let’s get to that vibrant glaze! In a medium saucepan, bring the remaining guava juice and sugar to a gentle boil. While that’s heating, mix your cornstarch and water to make a slurry. Once the juice mixture is boiling, remove it from heat and stir in the cornstarch slurry using a whisk. Return it to low heat and boil for one more minute until thickened. Timing is crucial—this will help the glaze set properly. Let it cool in the fridge.
Step 7: Final Assembly and Refrigeration
Once your guava gel has thickened and cooled, it’s time for the final touch. Pour it over the cream cheese layer, gently spreading it out. This colorful glaze not only adds flavor but also makes your Hawaiian Guava Cake stunning. Refrigerate until you’re ready to serve. Slice it up, maybe add some coconut flakes on top, and enjoy this delightful tropical treat!
Tips for Success
- Make sure all your ingredients, especially the cream cheese and eggs, are at room temperature for smoother mixing.
- For a lighter texture, beat the cake batter thoroughly—air is your friend!
- Let the cake cool completely before adding any layers to prevent melting.
- Feel free to experiment with flavors by using a different cake mix or adding fresh fruits.
- Keep the guava gel refrigerated; this ensures a beautiful, glossy finish.
Equipment Needed
- 13 x 9 baking dish: A standard size for even baking. You can use any similar-sized pan if needed.
- Mixing bowls: Having two or three can make mixing easier.
- Electric mixer: A hand mixer works great, but a stand mixer is even more efficient.
- Whisk: Essential for blending the guava gel smoothly.
- Rubber spatula: Perfect for scraping the bowl clean and folding ingredients.
Variations on Hawaiian Guava Cake
- Gluten-Free Version: Substitute regular cake mix with a gluten-free cake mix. There are lots of reliable brands that still deliver scrumptious results!
- Fruitier Cake: Add diced fresh guava or other tropical fruits like pineapple or mango into the batter for more sweetness and flavor bursts.
- Vegan Option: Replace eggs with flax eggs (1 tablespoon of ground flaxseed mixed with 3 tablespoons of water) and use a plant-based whipped topping instead of Cool Whip.
- Chocolate Lovers: Swap out the strawberry cake mix for chocolate cake mix for a chocolate guava twist. The contrasting flavors can be heavenly!
- Nuts and Seeds: Fold in some toasted macadamia nuts or coconut flakes into the batter for a delightful crunch and extra tropical flavor.
Serving Suggestions for Hawaiian Guava Cake
- Pair with a glass of chilled guava juice for a refreshing contrast.
- Serve alongside a scoop of vanilla ice cream to elevate the dessert experience.
- Garnish individual slices with fresh kiwifruit or berries for a pop of color.
- A sprinkle of additional coconut flakes enhances the tropical vibe.
- For special occasions, present on a beautiful platter for an eye-catching centerpiece!
FAQs about Hawaiian Guava Cake
Can I use fresh guava instead of guava juice?
Absolutely! If you have fresh guava, you can puree it to create a delicious fresh flavor. Just make sure to strain it to remove any pulp for a smooth cake.
How do I store leftover Hawaiian Guava Cake?
To keep your magical creation fresh, store it in an airtight container in the refrigerator. It should last up to 3-4 days. Just remember to enjoy it chilled!
Can I freeze Hawaiian Guava Cake?
Yes! This cake freezes well. Just wrap individual slices tightly in plastic wrap and place them in a freezer bag. They can last up to 2 months. Thaw it in the fridge before serving.
What can I substitute for Cool Whip?
If you’re feeling adventurous, homemade whipped cream is a fantastic alternative! Just whip heavy cream with a little sugar until it reaches soft peaks. It will provide the same light texture!
Is this cake suitable for special dietary needs?
Yes! This Hawaiian Guava Cake can be tailored to various diets. Check out the variations section for options like gluten-free, vegan, and even chocolate lovers’ twists!
Final Thoughts
Making Hawaiian Guava Cake is like bringing a slice of paradise into my kitchen. Every bite transports me to a sun-kissed beach, filled with vibrant flavors and joyful memories. This delightful treat not only satisfies my family’s sweet cravings but also sparks joy during family gatherings and celebrations. The ease of preparation means I can focus on what truly matters—creating those cherished moments with loved ones. So, why not indulge in this tropical adventure? After all, life is too short not to enjoy a little sweetness, especially when it tastes this good!
PrintHawaiian Guava Cake: A Delightful Tropical Treat!
- Total Time: 1 hour 30 minutes
- Yield: 12 servings 1x
- Diet: Vegetarian
Description
Hawaiian Guava Cake is a delightful tropical treat that combines the flavors of guava with a fluffy cake and creamy layers.
Ingredients
- 1 Strawberry Cake Mix (15 oz)
- 1 ½ cups Guava Nectar or Guava Juice (Kern’s, Jumex, or Goya)
- 3 eggs (room temperature)
- ⅓ cup Coconut Oil (liquid)
- 10 oz Cream Cheese (room temperature)
- ½ cup granulated sugar
- 1 teaspoon Vanilla extract
- 8 oz Cool Whip (thawed)
- 2 ½ cups Guava Nectar or Guava Juice (Pink is better)
- ½ cup granulated sugar
- 4 tablespoons Cornstarch
- 3 tablespoons Water
- 4 tablespoons sweetened Coconut Flakes (to garnish, optional)
Instructions
- Preheat the oven to 350°F, and coat a 13 x 9 baking dish with vegetable spray.
- Mix together the Cake Mix, Guava Juice, Eggs, and Coconut Oil in mixer, and blend for 30 seconds on low, scrape bowl, then beat for 2 minutes on medium-high.
- Pour the batter into the prepared pan, and bake for 24-26 minutes, until light golden on edges. Cake is done when an inserted toothpick comes out clean, or with a few crumbs.
- Remove from oven, and transfer to a wire cooling rack to cool completely.
- Beat Cream Cheese with mixer until fluffy. Add Sugar and Vanilla and mix well. Slowly fold in the Cool Whip, and refrigerate until ready to use.
- When the cake has cooled, spread the cream cheese mixture evenly over the cake. Place in fridge (or freezer) until the cream cheese layer sets.
- In a medium saucepan, bring the 2 ½ cups Guava Juice and sugar to a low boil over medium heat for 2 minutes. Make a slurry of the Cornstarch and Water. Remove Guava Juice mixture from heat and stir in the Cornstarch mixture with whisk.
- Return to heat and bring back to a low boil, and boil for one minute. Cool in the refrigerator.
- Glaze the top of the cake with Guava Gel, gently spreading it over the cream cheese layer.
- Refrigerate until ready to serve. Slice and garnish with Coconut Flakes if desired. Enjoy with milk, guava juice, or ice cream!
Notes
- Ensure the cream cheese is at room temperature for easier mixing.
- Use pink guava juice for a prettier glaze.
- Allow the cake to cool completely before adding the cream cheese layer.
- Prep Time: 30 minutes
- Cook Time: 26 minutes
- Category: Dessert
- Method: Baking
- Cuisine: Hawaiian
Nutrition
- Serving Size: 1 slice
- Calories: 423
- Sugar: 44g
- Sodium: 136mg
- Fat: 23g
- Saturated Fat: 16g
- Unsaturated Fat: 5g
- Trans Fat: 0g
- Carbohydrates: 53g
- Fiber: 2g
- Protein: 4g
- Cholesterol: 78mg