
Introduction to Hawaiian Pineapple Cake
Welcome to a slice of paradise in your kitchen. Welcome, everyone, to this Hawaiian Pineapple Cake that fills the heart with a tropical escape and lights up even the gloomiest and busiest of days with its flavors. This is the voice of another busy mom; time is so valuable. Quick fixes need to be, but they have to be pretty delightful. And just imagine the smiles on your loved ones’ faces as they tuck into this incredibly moist, yummy cake. So, because of its very vibrant pineapple taste along with creamy frost, you will like it for serving guests and even as parlous at home. Let’s dive in in such yummy to eat tropical treat!
Why You’ll Love This Hawaiian Pineapple Cake
This Hawaiian Pineapple Cake is every baker’s secret wish on busy work days. It is so easy to prepare in about 55 minutes or less from start to finish. The combination of super moist pineapple base and cream cheese topping equals a fusion of tropical flavors in each slice. Not to forget, it’s so versatile. May it be for a family feast or just an occasion on Tuesday, it brings the sunshine into your house.
Ingredients for Hawaiian Pineapple Cake
Gathering your ingredients is half the fun! For this Hawaiian Pineapple Cake, you’ll need some all-star players that come together for a delicious tropical treat.
- All-purpose flour: The backbone of any cake, providing structure and stability.
- Granulated sugar: Sweetness to balance the tropical flavors and keep your cake moist.
- Baking soda: This little miracle worker gets your cake rising, ensuring a light and fluffy texture.
- Salt: Just a pinch enhances all the flavors, making every bite more delightful.
- Eggs: They bind everything together and add moisture for a perfect cake crumb.
- Crushed pineapple (with juice): The star of the show! It makes the cake moist and adds that iconic tropical flavor.
- Vanilla extract: A splash of vanilla brings warmth and depth to the cake.
- Unsweetened shredded coconut (optional): For those who love a bit of texture, this adds a delightful chew and extra tropical flair.
- For the frosting:
- Cream cheese: This provides the rich, creamy base for the frosting.
- Unsalted butter: Adds a smooth texture and delicious flavor to the frosting.
- Powdered sugar: This sweetens the frosting without making it grainy.
- Vanilla extract: Just like in the cake, it adds that lovely aromatic flavor.
- Crushed pineapple (drained): A hint of pineapple in the frosting ties everything together – it’s a match made in heaven!
You’ll find the exact measurements for each ingredient at the bottom of the article, perfect for printing. Now, let’s get ready to mix up some magic!
How to Make Hawaiian Pineapple Cake
Ready to dive into the world of Hawaiian Pineapple Cake? Let’s bring this tropical delight to life step by step. Each instruction is designed to help you create a beautiful cake with ease. So, roll up your sleeves, and let’s get started!
Step 1: Preheat and Prepare
First up, preheat your oven to 350°F (175°C). This is crucial because a hot oven will give your cake that perfect rise. While it’s warming up, grab a 9×13-inch baking pan and give it a good grease with butter or cooking spray. This will keep the cake from sticking, making your life easier when it’s time to slice and serve.
Step 2: Mix Dry Ingredients
Next, in a large bowl, whisk together your flour, sugar, baking soda, and salt. This is where the magic begins! Mixing these dry ingredients properly is vital. It helps evenly distribute the baking soda, which is your rising agent. So, give it a gentle mix—no lumps allowed!
Step 3: Combine Wet Ingredients
Now it’s time for the fun part! Add in your eggs, crushed pineapple (juice included), and vanilla extract. Stir it all together until just combined. Remember, overmixing can lead to a dense cake. We want it light and fluffy, so mix gently, like you’re coaxing a shy friend to join a party!
Step 4: Fold in Coconut
If you’re adding shredded coconut, fold it into the batter now. Use a spatula to carefully mix it in. By folding, you retain the airiness of the batter, giving the cake a lovely texture. It’s like tucking a fluffy blanket around your cake batter—a perfect layer of warmth!
Step 5: Bake
Pour the batter into your prepared baking pan and place it in the oven. Bake for 35-40 minutes. The aroma will fill your kitchen, making it hard to resist a sneak peek! To check if it’s done, insert a toothpick into the center. If it comes out clean, your cake is ready. If not, give it another five minutes and check again!
Step 6: Cool After Baking
Once baked, take the pan out of the oven and let it cool completely in the pan. This is crucial! Allowing it to cool properly helps the flavors meld together and makes cutting easier. Patience is key here; it’s worth the wait!
Step 7: Make the Frosting
While your cake cools, let’s whip up the frosting. In a bowl, beat together softened cream cheese and butter until they’re smooth and creamy. Then gradually add powdered sugar, followed by vanilla extract and the drained crushed pineapple. Continue mixing until it’s perfectly blended. You want it dreamy and luscious, like a cloud of tropical goodness!
Step 8: Frost the Cake
Once the cake has cooled, it’s time to frost! Spread the frosting evenly over the top, using a spatula to create swirls or decorative peaks. This presentation makes it look professional and inviting. Just remember, a little frosting on the side of the plate enhances the aesthetics!
Step 9: Chill Before Serving
For the best results, place your frosted cake in the refrigerator for at least 30 minutes. Chilling allows the frosting to set up and firms everything together, making each slice a beautiful experience. Plus, the cold cake is irresistibly refreshing on a warm day!
And there you have it—your homemade Hawaiian Pineapple Cake is ready to steal the show! Enjoy every bite, and don’t forget to share with family and friends!
Tips for Success
- Always measure ingredients accurately for the best results.
- Don’t skip cooling the cake completely; it ensures a nice slice.
- For extra moisture, use fresh pineapple juice in the batter.
- Feel free to experiment with toppings like chopped nuts or cherries.
- Measure the cream cheese for the frosting accurately to avoid lumps.
Equipment Needed
- 9×13-inch baking pan: You can use a glass or metal pan; both work well.
- Mixing bowls: A set of varying sizes is handy for mixing ingredients.
- Whisk and spatula: Great for mixing and folding without damaging the batter.
- Electric mixer: Makes frosting prep quicker, but you can use a hand whisk too!
- Measuring cups and spoons: Essential for accurately measuring ingredients.
Variations on Hawaiian Pineapple Cake
- Gluten-Free Option: Replace all-purpose flour with a gluten-free flour blend for a delicious gluten-free Hawaiian Pineapple Cake.
- Vegan Version: Substitute eggs with flaxseed meal (1 tablespoon flaxseed meal + 2.5 tablespoons water = 1 egg) and use a vegan cream cheese for the frosting.
- Healthier Sweeteners: Consider using coconut sugar or honey in place of granulated sugar for a natural sweetening option.
- Extra Fruit: Add diced fresh bananas or mangoes to the batter for a unique tropical twist.
- Chocolate Variation: Mix in some cocoa powder to the batter for a richer, chocolate-infused Hawaiian delight!
- Nutty Addition: Fold in chopped walnuts or macadamia nuts for an added crunch and nutty flavor.
- Layered Cake: Bake in two round pans and layer the cake with frosting in between for a stunning presentation.
Serving Suggestions with Hawaiian Pineapple Cake
- Refreshing Drinks: Pair your cake with a tall glass of iced tea or a tropical fruit punch for a vibrant complement.
- Fruity Sides: Consider a fresh fruit salad on the side for an extra burst of flavor!
- Presentation Tips: Dust with toasted coconut flakes or add maraschino cherries on top for an inviting look.
FAQs about Hawaiian Pineapple Cake
Curious minds often have questions, especially when it comes to creating this delightful Hawaiian Pineapple Cake. Here are some common queries that fellow bakers might ask:
Can I use fresh pineapple instead of canned?
Absolutely! Fresh pineapple can bring a vibrant taste and is a great substitute. Just be sure to chop it finely and use the juice for added flavor.
What’s the best way to store leftover cake?
Store leftovers in an airtight container in the refrigerator. It stays fresh for up to five days. Chilling also enhances the flavors!
Can I freeze Hawaiian Pineapple Cake?
Yes! You can freeze the cake either frosted or unfrosted. Wrap it tightly in plastic wrap and foil. It will keep for up to three months. Just thaw it in the fridge overnight before serving.
How can I make my cake more moist?
Adding a touch of extra crushed pineapple or using fresh pineapple juice can enhance moisture. Also, ensure you don’t overbake the cake!
What’s a good pairing with Hawaiian Pineapple Cake?
This cake pairs beautifully with a scoop of vanilla ice cream or a dollop of whipped cream. You can also enjoy it with a refreshing cup of chamomile tea!
Final Thoughts
Baking this Hawaiian Pineapple Cake is more than just whipping up a dessert; it’s about creating moments of joy and connection with family and friends. The vibrant flavors and delightful texture transport you to an island paradise, even if you’re just at home. It’s a treat that makes any gathering feel special and puts smiles on everyone’s faces. So, whether you’re celebrating a milestone or just enjoying a sunny day, this cake is your perfect partner. Trust me, after one slice, you’ll be hooked and planning your next baking adventure!
Print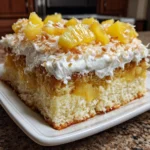
Hawaiian Pineapple Cake that Will Brighten Your Day!
- Total Time: 55 minutes
- Yield: 12 servings 1x
- Diet: Vegetarian
Description
A delicious and refreshing Hawaiian Pineapple Cake that is perfect for any occasion!
Ingredients
- 2 cups all-purpose flour
- 2 cups granulated sugar
- 1 teaspoon baking soda
- 1/4 teaspoon salt
- 2 large eggs
- 1 (20 oz) can crushed pineapple with juice
- 1 teaspoon vanilla extract
- 1/2 cup unsweetened shredded coconut (optional)
- For the Frosting:
- 1 (8 oz) package cream cheese, softened
- 1/2 cup unsalted butter, softened
- 2 cups powdered sugar
- 1 teaspoon vanilla extract
- 1/2 cup crushed pineapple (drained)
Instructions
- Preheat your oven to 350°F (175°C) and grease a 9×13-inch baking pan.
- In a large bowl, whisk together the flour, sugar, baking soda, and salt.
- Add the eggs, crushed pineapple (with juice), and vanilla extract. Mix until just combined.
- Fold in the shredded coconut, if using. Pour the batter into the prepared baking pan.
- Bake for 35-40 minutes, or until a toothpick inserted into the center comes out clean. Remove from the oven and let the cake cool completely in the pan.
- For the frosting, beat together the cream cheese and butter until smooth and creamy.
- Gradually add in the powdered sugar, vanilla extract, and crushed pineapple. Mix until fully incorporated.
- Once the cake has cooled, spread the frosting evenly over the top.
- Refrigerate the cake for at least 30 minutes before serving for best results.
Notes
- Using unsweetened shredded coconut adds texture and flavor to the cake.
- For a more intense pineapple flavor, you can add extra crushed pineapple to the frosting.
- This cake is best served chilled.
- Prep Time: 15 minutes
- Cook Time: 40 minutes
- Category: Dessert
- Method: Baking
- Cuisine: Hawaiian
Nutrition
- Serving Size: 1 slice
- Calories: 450 kcal