

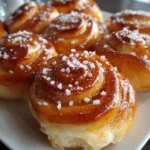
Introduction to Magic Buns
Every now and then, you come across a recipe that feels like a warm hug. That’s exactly how I feel about these Magic Buns. They’re not just your average sweet rolls; they’re fluffy delights bursting with a rich, buttery taste and a hint of orange zest. Imagine serving these heavenly treats at breakfast or a family gathering. It’s a quick solution for busy mornings or an impressive dish to wow your loved ones. Plus, they’re surprisingly simple to make, leaving you with more time to enjoy those moments that matter most!
Why You’ll Love This Magic Buns
Magic Buns are a delightful blend of flavor and convenience. They come together smoothly, making them perfect for busy moms juggling countless tasks. The aroma of fresh buns baking in the oven? It’s enough to lift anyone’s spirits! Each fluffy bite melts in your mouth, offering a sweet escape from everyday chaos. Plus, you can impress guests or treat your family without spending hours in the kitchen! What’s not to love?
Ingredients for Magic Buns
Getting the ingredients right is half the battle in baking these delightful Magic Buns. Here’s a rundown of what you’ll need to create these fluffy rolls:
- Whole Milk: This creamy base helps activate the yeast and gives the buns that rich, soft texture.
- Active Dry Yeast: Essential for that magical rise! Make sure your yeast is fresh for best results.
- All-Purpose Flour: The backbone of our buns, providing structure. You can substitute some with whole wheat flour for a healthier twist.
- White Sugar: Just a hint of sweetness counteracts the buttery richness and helps with browning.
- Eggs: These are the glue! They add moisture and richness, creating that melt-in-your-mouth experience.
- Unsalted Butter: The star of the show! It adds flavor and a flakiness that makes these buns feel indulgent.
- Kosher Salt: A pinch heightens all the flavors. Don’t skip it—it’s more than just seasoning!
- Vanilla Extract: This adds a warm, inviting flavor. You could swap for almond extract if you fancy something different!
- Light Brown Sugar: Its molasses content gives an additional depth of sweetness and a hint of caramel flavor.
- Cinnamon: It’s what makes these buns taste like home! A sprinkling of cinnamon warms everything up and adds a cozy aroma.
- Orange Zest: This brightens the filling, providing a refreshing contrast to the buttery richness!
- Triple Sec: An optional ingredient, it enhances the orange flavor even more. If you prefer, orange juice will do the trick!
- Pinch of Salt: A small but mighty addition that balances the sweetness beautifully.
For exact measurements, check below or print the recipe for your kitchen adventures!
How to Make Magic Buns
Creating these Magic Buns is a delightful adventure. With every step, you’ll feel the enchantment unfold. Let’s dive into the process, ensuring you understand how to make these fluffy delights right at home.
Step 1: Prepare the Yeast Mixture
Start by heating the whole milk in a large microwave-safe bowl until it’s warm but not boiling. Stir in the active dry yeast. Here’s the magic: let it sit for about five minutes. This activation time is crucial, as it wakes up the yeast, getting them ready to make your buns rise beautifully.
Step 2: Mix the Dough
Once the yeast mixture is bubbly and fragrant, it’s time to mix in the eggs, white sugar, and three cups of all-purpose flour. Remember to cover this mixture with plastic wrap or a kitchen towel. This resting period allows the dough to develop a hint of flavor and helps it rise nicely.
Step 3: Prepare the Butter Mixture
In another bowl, combine the sticks of unsalted butter, a half cup of flour, and one teaspoon of kosher salt. Mix until it’s just combined. Shape this mixture into an 8×8 inch square, wrap it up in plastic, and toss it in the fridge for about 30 minutes. This will create a deliciously flaky texture in your buns.
Step 4: Knead the Dough
After resting, return to your yeast mixture. Add the remaining three tablespoons of sugar, flour, and kosher salt, along with the vanilla extract and melted butter. Knead the dough on a floured surface for about five minutes. The goal is a smooth, elastic dough that feels slightly tacky. This texture is key to fluffy buns!
Step 5: Rolling and Shaping
Next, roll the dough into a 20×20 inch square. This part can be fun! Lay the chilled butter mixture in the center and fold the dough over it like an envelope. Ensure you press those edges to seal. This is where your buns begin to take shape, so make it a good seal!
Step 6: The Folding Technique
Now, roll your sealed dough out onto a lightly floured surface into a 10×20 inch rectangle. Fold it into thirds, like a business letter. This folding method creates layers that lead to that coveted fluffiness in the final bake. Rotate your dough a quarter turn and continue rolling and folding. It’s a bit like giving the dough a cozy blanket of flour!
Step 7: Resting the Dough
Refrigerate this folded dough for 30 minutes. This resting step is crucial for developing flavors and improving the texture. Trust me, patience pays off in the end!
Step 8: Prepare for Baking
Preheat your oven to 350 degrees F. While that’s heating, grease a muffin pan with butter and dust it with sugar—this gives a lovely sweet crust to your buns! In a medium bowl, mix together the light brown sugar, cinnamon, orange zest, triple sec, and a pinch of salt for your filling.
Step 9: Shaping the Buns
Time to roll out your dough! Flatten it into a generous 15×20 inch rectangle and spread that delicious filling mixture evenly over the top. Roll the dough tightly into a 20-inch long tube. Cut this tube into 12 equal slices. Place those swirl sides up in your prepared muffin tin. They’re looking beautiful already!
Step 10: Final Rise and Baking
Loosely cover the muffin tin with plastic wrap and let those lovely buns rise for 30 to 40 minutes, or until they double in size. Finally, bake them in the preheated oven for 25 to 30 minutes, until golden brown. A tip? Right after baking, roll them in some additional sugar for a sweet finish. Serve these delights warmly and watch them disappear!
Tips for Success
- Always ensure your yeast is fresh. Old yeast means flat buns.
- Use room temperature ingredients to help the dough mix seamlessly.
- Don’t skip resting times—this helps the dough rise and taste heavenly.
- Measure your flour properly to avoid dry buns; spoon it into the measuring cup and level it off.
- Experiment with fillings! Chocolate chips or nuts make for a delightful twist.
Equipment Needed
- Mixing Bowls: Use any size you have. A large one is great for the yeast mixture.
- Rolling Pin: If you don’t have one, a wine bottle works in a pinch!
- Muffin Tin: Essential for shaping those cute Magic Buns, but a baking dish works too.
- Plastic Wrap: Helps with resting the dough. A clean kitchen towel is a good alternative!
- Measuring Cups & Spoons: Accurate measurements ensure your buns come out just right!
Variations of Magic Buns
- Cinnamon Roll Magic Buns: Add an extra layer of cinnamon and brown sugar filling for an intense flavor!
- Chocolate Chip Magic Buns: Sprinkle chocolate chips throughout the filling for a sweet, gooey surprise.
- Nutty Magic Buns: Incorporate chopped nuts like pecans or walnuts for added crunch and goodness.
- Fruit-Infused Magic Buns: Mix in dried fruits like cranberries or apricots for a chewy texture and a pop of flavor.
- Vegan Magic Buns: Substitute the butter with coconut oil and use a flax egg instead of regular eggs to make this recipe vegan-friendly.
- Gluten-Free Magic Buns: Opt for a gluten-free flour blend to make these delicious buns suitable for gluten-sensitive friends.
Serving Suggestions for Magic Buns
- Pair these Magic Buns with a steaming cup of coffee or a fruity herbal tea for a delightful breakfast.
- Serve them warm, dusted with powdered sugar or a drizzle of honey for that extra touch.
- For a lovely brunch spread, include fresh fruit or a light yogurt parfait.
- Present your buns on a rustic wooden board for an inviting experience!
FAQs about Magic Buns
Can I make Magic Buns ahead of time? Absolutely! You can prepare them and let them rise in the fridge overnight. Just take them out the next morning to let them warm up before baking. It’s a real time-saver!
What other flavors can I add to the filling? The possibilities are endless! Consider adding chocolate chips, chopped nuts, or even a splash of homemade caramel. These additions elevate the flavor, turning your buns into a truly magical treat.
Can I freeze leftover Magic Buns? Yes, you can! Allow the buns to cool completely, then wrap them tightly in plastic wrap and foil. They’ll keep in the freezer for up to three months. Just reheat them in the oven when you’re ready to enjoy!
How do I know when my Magic Buns are done baking? Keep an eye on that golden brown color! Additionally, you can check for an internal temperature of 190°F. They should feel light and sound hollow when tapped.
What can I do if my dough doesn’t rise? Don’t fret! Ensure your yeast is fresh and the milk is warm (not hot!). If the dough doesn’t rise, it might be too cold; try putting it in a warmer spot to encourage fermentation. Magic awaits!
Final Thoughts on Magic Buns
There’s something simply enchanting about home-baked Magic Buns. Each step of the process, from mixing to baking, feels like a cozy time spent in the kitchen. The moment you pull them out of the oven, the warm, buttery aroma wrapping around you is pure bliss. Share them with family, friends, or simply treat yourself! These fluffy delights aren’t just about taste; they create memories and bring smiles. So, roll up your sleeves, turn on that oven, and let the magic happen. Trust me, you’ll be happy you did! Enjoy the flavorful journey of these incredible buns!

CookingLayer Recipes
Discover delicious recipes, meal plans and save your favorites with our free iPhone app.

Magic Buns
- Total Time: 2 hours 30 minutes
- Yield: 12 servings 1x
- Diet: Vegetarian
Description
Magic Buns are fluffy delights that are perfect for any occasion, featuring a rich buttery taste and a delicious orange-infused filling.
Ingredients
- 1 ¾ Cups Whole Milk
- 2 ¼ Teaspoons Active Dry Yeast
- 6 Cups All Purpose Flour
- 5 Tablespoons White Sugar Plus More For Dusting
- 2 Eggs
- 4 Sticks Unsalted Butter Plus 2 Tablespoons Melted
- 2 Tablespoons 1 Teaspoon Kosher Salt Divided
- 2 Teaspoons Vanilla Extract
- 1 ½ Cups Light Brown Sugar Packed
- 1 ½ Tablespoons Cinnamon
- Zest of 1 Orange
- 1 ½ Tablespoons Triple Sec
- Pinch of Salt To Taste
Instructions
- In a large microwave safe bowl, heat milk. Stir in yeast. Allow to sit for 5 minutes.
- Stir in eggs, 2 tablespoons of sugar, and 3 cups of flour until just combined. Cover with plastic wrap or a kitchen towel, and set aside.
- In a separate large bowl, combine butter, ½ cup of flour, and 1 teaspoon of salt until just combined. Place in plastic wrap, and form into an 8×8 inch square. Refrigerate for 30 minutes.
- Return to yeast mixture. Add remaining 3 tablespoons sugar, 2 ½ cups flour, 2 tablespoons salt, vanilla, and 2 tablespoons melted butter until well combined.
- Knead on a floured surface for 5 minutes. Form into a square, wrap in plastic, and refrigerate for at least 30 minutes.
- Then roll dough into a 20×20 inch square. Lay butter mixture into the center of the 20×20 inch square. Fold inward over butter. Press edges to seal, and refrigerate for 30 minutes.
- Then roll out onto a lightly floured surface into a 10 x 20 inch rectangle. Fold into thirds like a business letter.
- Rotate ¼ of the way and continue rolling and folding.
- Refrigerate for 30 minutes, then roll/fold dough twice more. Refrigerate for 30 more minutes.
- Preheat oven for 350 degrees F. Grease a muffin pan with butter, and dust with sugar.
- In a medium bowl, combine brown sugar, cinnamon, orange zest, triple sec, and salt.
- On a lightly floured surface roll the dough out into a 15 x 20 inch rectangle. Evenly spread the filling mixture. Roll up into a 20 inch long tube.
- Cut into 12 equal slices. Lay swirl side up in prepared muffin tin. Loosely cover with plastic wrap and rise for 30-40 minutes or until doubled in size.
- Bake for 25-30 minutes or until golden brown. Then immediately, roll in additional sugar. Serve immediately.
Notes
- Ensure the yeast is fresh for the best rise.
- Use room temperature ingredients to help the dough come together smoothly.
- Adjust the baking time as necessary based on your oven’s characteristics.
- Prep Time: 2 hours
- Cook Time: 30 minutes
- Category: Dessert
- Method: Baking
- Cuisine: American
Nutrition
- Serving Size: 1 bun
- Calories: 280
- Sugar: 12g
- Sodium: 220mg
- Fat: 10g
- Saturated Fat: 5g
- Unsaturated Fat: 3g
- Trans Fat: 0g
- Carbohydrates: 40g
- Fiber: 1g
- Protein: 5g
- Cholesterol: 50mg