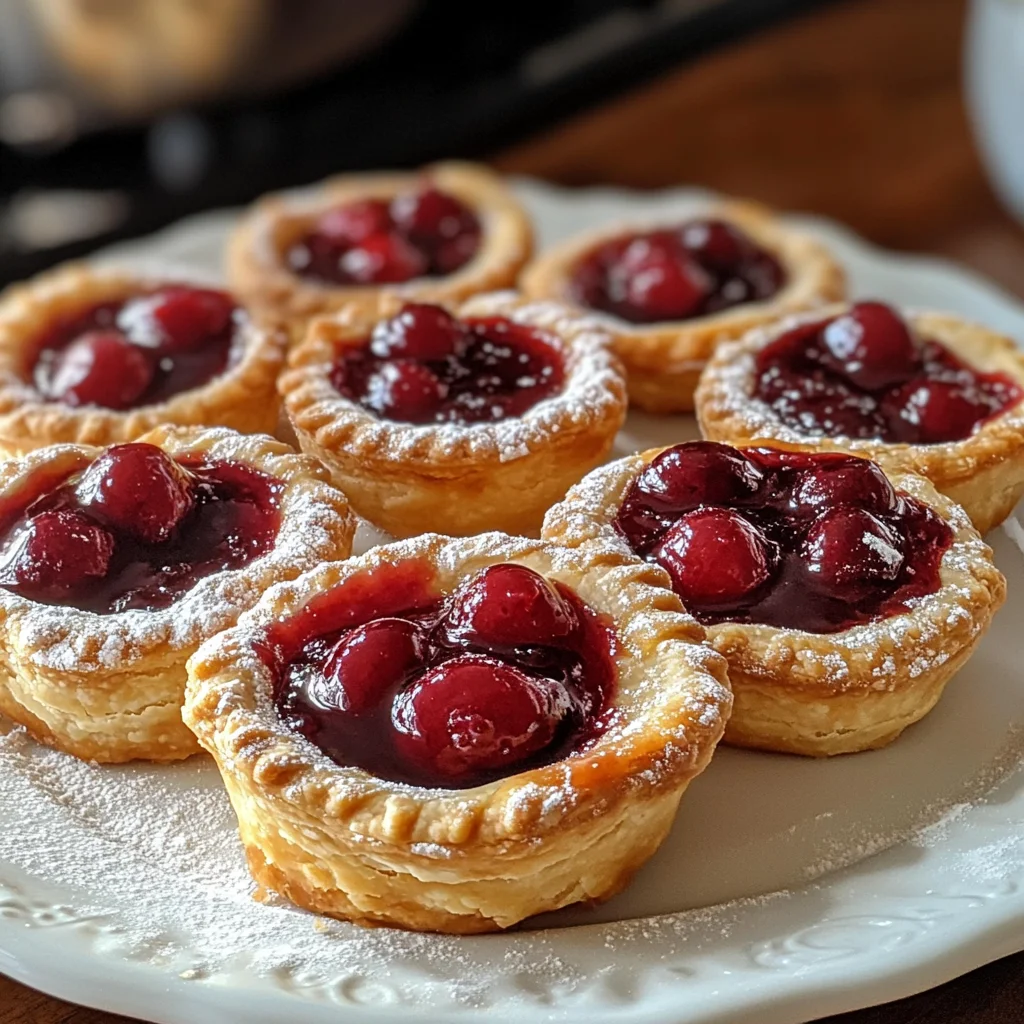
Introduction to Mini Cherry Pies
There’s something uniquely comforting about the smell of fresh-baked pie wafting through your home.
Mini Cherry Pies are not just desserts; they’re little bundles of joy that brighten up any occasion.
Whether you’re looking for a quick solution for a busy day or a sweet treat to impress your family, these delightful bites are your answer.
The sweet cherry goodness wrapped in flaky crust is guaranteed to bring smiles to cherished faces.
So grab your apron, and let’s dive into this fun baking adventure together!
Why You’ll Love This Mini Cherry Pies
Life can sometimes feel like a race, can’t it? That’s why these Mini Cherry Pies are a lifesaver.
They’re not only quick to whip up but also burst with flavor that’s sure to delight everyone at your table.
With their charming presentation, they’re perfect for gatherings, parties, or simply indulging after a long day.
Plus, who can resist that satisfying crunch of flaky crust paired with juicy cherry filling?
Ingredients for Mini Cherry Pies

Gathering the right ingredients is the first step to creating these delightful Mini Cherry Pies. Here’s what you’ll need:
- Cherries: Fresh or frozen, these jewels of summer bring that irresistible sweetness.
- Sugar: This essential ingredient helps balance the tartness of the cherries, making them a perfect treat.
- Cornstarch: A handy thickening agent that ensures your cherry filling isn’t too runny. It keeps things just right!
- Lemon Juice: Just a splash adds a refreshing zing that brightens the cherry flavor.
- Vanilla Extract: This adds warmth and depth, elevating your pies from good to unforgettable.
- Refrigerated Pie Crusts: For a quick shortcut, these premade crusts are a time-saver, but feel free to use homemade dough if you’re feeling adventurous!
- Egg and Milk: Whisked together, these create an egg wash that gives the pies a beautiful golden finish.
- Optional: Powdered Sugar: Dust a little on top for a touch of sweetness and presentation, making these mini pies really pop.
If you’re looking for exact quantities, don’t worry! You can find all the details at the bottom of the article—ready for printing.
How to Make Mini Cherry Pies
Now that you have all your ingredients ready, it’s time to bring these Mini Cherry Pies to life!
Follow these simple steps to create your sweet masterpieces.
Trust me; it’s easier than you think!
Step 1: Preheat Your Oven
Start by preheating your oven to 375°F (190°C).
This crucial step ensures your pies bake evenly and become perfectly golden!
While the oven warms up, there’s a cozy atmosphere building—just imagine the aroma of cherries and pastry!
Step 2: Prepare the Cherry Filling
In a medium saucepan, mix together your cherries, sugar, cornstarch, lemon juice, and vanilla extract.
Stir the mixture over medium heat until it starts to bubble and thicken, about 5-7 minutes.
This step helps the flavors meld together, creating a juicy filling that’s simply irresistible.
Once it’s ready, let the filling cool slightly—this prevents your dough from becoming soggy!
Step 3: Cut Out the Pie Crusts
Rolling out your pie crust can be therapeutic!
Dust your countertop with flour and roll out the refrigerated pie crusts until they’re about 1/8 inch thick.
Use a round cutter (about 4 inches in diameter) to cut out circles from the dough.
Feel free to get creative; you can even use cookie cutters for fun shapes if you’d like!
Step 4: Assemble the Mini Pies
Now comes the exciting part!
Take a tablespoon of the delicious cherry filling and place it in the center of each pastry circle.
Fold the dough over to form a semi-circle, pressing the edges together to seal.
To make it fancy, use a fork to crimp the edges—this adds a lovely touch and keeps the filling inside.
Step 5: Egg Wash and Steam Venting
Whisk together the egg and milk in a small bowl to create an egg wash.
Brush this mixture over the tops of your mini pies for that golden finish you’ll swoon over!
Don’t forget to cut a small slit in the top of each pie.
This simple move lets steam escape during baking, keeping your pies light and flaky.
Step 6: Bake to Perfection
Place your mini pies on a baking sheet lined with parchment paper.
Pop them into the preheated oven and bake for 20-25 minutes or until they turn golden brown.
The ticking timer builds anticipation!
Once done, allow the pies to cool just a bit.
Dust them with powdered sugar, and you’re all set to enjoy these delightful cherry treats!
Tips for Success

- Use chilled pie crusts for better flakiness; it makes a world of difference!
- Don’t skip the egg wash—it creates a beautiful, shiny finish that’s Instagram-worthy.
- Make sure your cherry filling cools slightly before assembling; it helps keep the crust crisp.
- Experiment with spices like cinnamon or nutmeg in the filling for an extra flavor boost.
- Ensure even spacing on the baking sheet for uniform baking—no mini pie left behind!
Equipment Needed
- Baking Sheet: A standard one works; you can also use a jelly roll pan if that’s what you have.
- Parchment Paper: Great for easy cleanup; aluminum foil is a decent alternative.
- Rolling Pin: If you don’t have one, a clean wine bottle does the trick.
- Round Cutter: Use a glass or jar if you don’t have a cutter.
- Medium Saucepan: Essential for cooking the cherry filling; any pot can do!
Variations
- Almond Joy: Add a touch of almond extract to the cherry filling for a rich, nutty flavor that beautifully complements the cherries.
- Berry Medley: Mix it up by adding other berries like raspberries or blueberries to your cherry filling for a vibrant mix and a burst of flavor.
- Grain-Free Option: Use almond flour or a gluten-free pie crust for those avoiding gluten, ensuring everyone can indulge!
- Simplified Sugar: Substitute brown sugar for granulated sugar for a deeper, caramel-like sweetness in your Mini Cherry Pies.
- Spicy Twist: Sprinkle a pinch of cayenne pepper or ginger into the cherry filling for a cheeky kick that surprises the taste buds.
Serving Suggestions for Mini Cherry Pies
- Pair these pies with a scoop of vanilla ice cream for a classic dessert experience.
- Serve alongside a drizzle of warm chocolate sauce for an indulgent twist.
- Complement with fresh mint leaves for a pop of color and a hint of freshness.
- Enjoy with a cup of hot tea or coffee for a cozy afternoon treat.
- Arrange them on a vintage platter to elevate your presentation for special occasions.
FAQs about Mini Cherry Pies
Curious about Mini Cherry Pies? Let’s dive into some common questions you might have while baking these delightful treats!
Can I use frozen cherries for Mini Cherry Pies?
Absolutely! Frozen cherries work perfectly. Just make sure to thaw and drain excess moisture before cooking to avoid a soggy filling.
How do I prevent the crust from getting soggy?
To keep your crust crispy, let your cherry filling cool slightly before adding it to the pie crust. Using cornstarch helps thicken the filling as well!
Can I make the filling ahead of time?
Yes, you can prepare the cherry filling a day in advance. Just store it in an airtight container in the fridge until you’re ready to assemble your Mini Cherry Pies.
What is the best way to store leftovers?
Keep any remaining mini pies in an airtight container at room temperature for up to two days. If you want them to last longer, you can refrigerate or freeze them.
Can I add other fruits to the filling?
Definitely! Feel free to mix in other fruits, like blueberries or raspberries, to create your unique flavor combo. The sky’s the limit!
Final Thoughts on Mini Cherry Pies
Creating Mini Cherry Pies is more than just baking; it’s about the joy that fills your home and the smiles you share around the table.
These delightful treats are a sweet escape from the everyday hustle, inviting everyone to pause and savor the moment.
With their golden crusts and luscious cherry filling, each bite takes you to a happier place.
So, whether it’s a family gathering or a quiet night in, keep this recipe close.
Trust me, your heart and taste buds will thank you for it time and time again!
Print
Mini Cherry Pies
- Total Time: 40 minutes
- Yield: 12 servings 1x
- Diet: Vegetarian
Description
Mini Cherry Pies are delightful bite-sized pastries filled with sweet cherry goodness, perfect for any occasion.
Ingredients
- 1 ½ cups fresh or frozen cherries, pitted
- ½ cup granulated sugar
- 1 tablespoon cornstarch
- 1 tablespoon lemon juice
- 1 teaspoon vanilla extract
- 1 package refrigerated pie crusts (or homemade)
- 1 egg (for egg wash)
- 1 tablespoon milk (for egg wash)
- Optional: powdered sugar for dusting
Instructions
- Preheat your oven to 375°F (190°C).
- In a medium saucepan, combine the cherries, sugar, cornstarch, lemon juice, and vanilla extract. Stir over medium heat until the mixture begins to bubble and thicken, about 5-7 minutes. Remove from heat and let cool slightly.
- Roll out the pie crusts on a floured surface and use a round cutter (about 4 inches in diameter) to cut out circles from the dough.
- Place a tablespoon of the cherry filling in the center of each pastry circle. Fold the dough over to create a semi-circle and press the edges together to seal. Use a fork to crimp the edges for a decorative finish.
- Place the mini pies on a baking sheet lined with parchment paper. In a small bowl, whisk together the egg and milk to create an egg wash, then brush it over the tops of the pies.
- Cut a small slit in the top of each pie to allow steam to escape. Bake in the preheated oven for 20-25 minutes or until golden brown.
- Allow the pies to cool slightly before serving. Dust with powdered sugar if desired.
Notes
- For a richer flavor, consider adding almond extract to the cherry filling.
- These pies can be served warm or at room temperature.
- Store any leftovers in an airtight container at room temperature for up to 2 days.
- Prep Time: 15 minutes
- Cook Time: 25 minutes
- Category: Dessert
- Method: Baking
- Cuisine: American
Nutrition
- Serving Size: 1 pie
- Calories: 210
- Sugar: 10g
- Sodium: 80mg
- Fat: 8g
- Saturated Fat: 2g
- Unsaturated Fat: 6g
- Trans Fat: 0g
- Carbohydrates: 32g
- Fiber: 1g
- Protein: 2g
- Cholesterol: 30mg