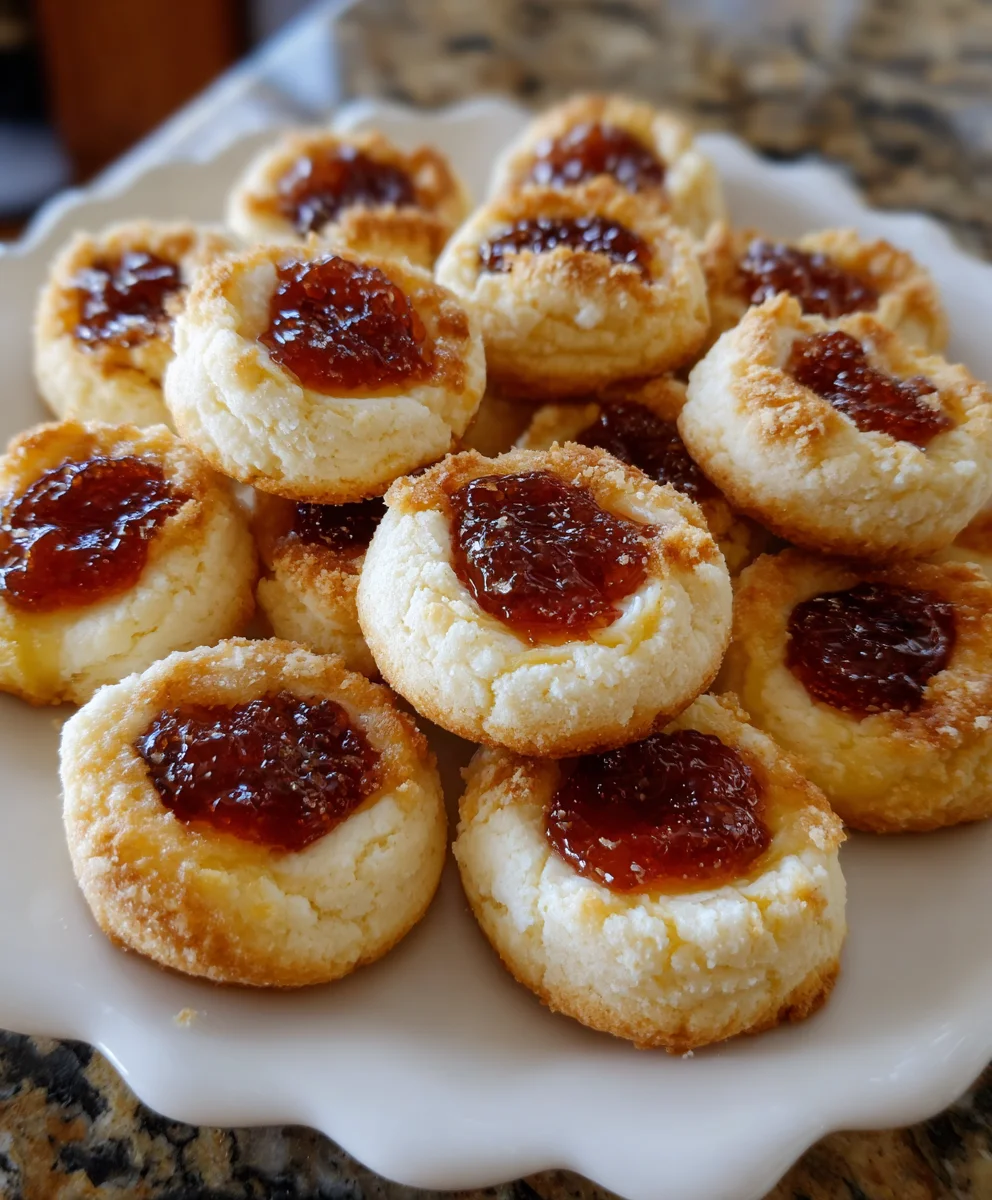
Introduction to Mouthwatering Cheesecake Thumbprint Cookies
Ah, the joy of baking! If you’re like me, you know that nothing warms the heart quite like freshly baked cookies. These Mouthwatering Cheesecake Thumbprint Cookies are perfect for adding a splash of delight to your day. They combine the creamy goodness of cheesecake with a burst of jam, making them an irresistible treat for busy moms or professionals needing a quick, sweet escape. Whether you’re making them for a cozy family gathering or just because, trust me—they’re bound to impress. Let’s dive into this deliciously simple recipe!
Why You’ll Love This Mouthwatering Cheesecake Thumbprint Cookies
What’s not to love about these Mouthwatering Cheesecake Thumbprint Cookies? They’re easy to whip up, even on busy days when time is tight. With just a few ingredients, you’ll create a delightful treat that tastes gourmet. Plus, you can customize the jam flavor to fit your mood or the season. These cookies are a crowd-pleaser, ensuring smiles from family and friends with each delicious bite.
Ingredients for Mouthwatering Cheesecake Thumbprint Cookies
Gathering the right ingredients is essential for baking these delightful Mouthwatering Cheesecake Thumbprint Cookies. Here’s what you need:
- Unsalted butter: It brings rich flavor and creamy texture to the dough.
- Granulated sugar: This sweetener helps your cookies achieve that perfect balance of sweetness.
- Egg yolk: It adds moisture and helps bind the ingredients together.
- Vanilla extract: A touch of vanilla elevates the flavor profile, making each cookie comforting and delicious.
- All-purpose flour: The backbone of your cookie, giving it structure and stability.
- Cream cheese: The star of the cheesecake filling, ensuring a rich and creamy experience.
- Powdered sugar: This sweetener dissolves easily, enhancing the filling’s smooth texture.
- Jam or preserves: Choose your favorite flavor—strawberry, raspberry, or apricot—for a fun twist!
Don’t forget, measurements are provided at the bottom of the article for easy printing. Feel free to experiment with any substitutes—margarine for butter or dairy-free cream cheese work well for a different twist! Now, let’s get baking!
How to Make Mouthwatering Cheesecake Thumbprint Cookies
Step 1: Prepare the Dough
Let’s get this cookie party started! In a large bowl, cream together your softened unsalted butter and granulated sugar until it’s light and fluffy. This is where the magic begins, creating a smooth and delightful base. After that, add in one egg yolk and a splash of vanilla extract to enhance the flavor. Mix this all thoroughly until it’s well combined. Next, gradually add your all-purpose flour to the mixture. Keep stirring until a soft dough forms that you can easily shape. This is the heart of our Mouthwatering Cheesecake Thumbprint Cookies. It’s simple but oh-so-rewarding, and trust me, the taste will mesmerize you!
Step 2: Chill the Dough
Now, here’s a crucial step—chilling the dough! Cover your bowl with plastic wrap and pop it into the fridge for about 30 minutes. Why is this so important, you ask? Chilling helps to prevent the dough from spreading too much while baking, resulting in gorgeous, plump cookies. Plus, it allows the flavors to meld beautifully, making each bite even more delicious. In just 30 minutes, you’ll have perfectly shaped cookies that will hold their form while baking!
Step 3: Make the Cheesecake Filling
While the dough chills, it’s time to whip up our heavenly cheesecake filling. In a separate bowl, combine your softened cream cheese, powdered sugar, and an extra splash of vanilla extract. Using an electric mixer, beat these ingredients together until smooth and creamy. The texture should be luscious—think of how delightful it will taste nestled inside those cookies! This rich mixture is what brings a luxurious touch to your Mouthwatering Cheesecake Thumbprint Cookies, so don’t rush through this step.
Step 4: Shape Cookies and Add Filling
After the chilling time, it’s time to shape our cookies! Preheat your oven to 350°F (175°C) and line your baking sheets with parchment paper. Scoop tablespoon-sized balls of dough and place them on the baking sheets, spaced out enough to allow for spreading. Now for the fun part! Use your thumb (or a spoon if you prefer) to make an indentation in the center of each dough ball. Fill each thumbprint with about a teaspoon of your luscious cheesecake filling, followed by half a teaspoon of your favorite jam. This combination creates a delightful surprise in every bite! Each cookie should look adorable and ready for the oven.
Step 5: Bake the Cookies
Slide the baking sheets into your preheated oven and let the magic happen! Bake for 13 to 15 minutes, keeping an eye on them as they bake. You’ll know they’re done when the edges have turned lightly golden. Avoid overbaking, as you want them to remain soft and chewy in the center. When they come out of the oven, they should look like little nuggets of joy, just waiting to delight your taste buds!
Step 6: Cool and Store
Once baked, allow your cookies to cool on the baking sheets for a few minutes before transferring them to wire racks to cool completely. This resting period gives them the chance to set nicely. After they’re cool, store your Mouthwatering Cheesecake Thumbprint Cookies in an airtight container. They’ll stay fresh for up to a week, though I doubt they’ll last that long in your house! Enjoy every delectable bite, knowing you’ve created a little piece of heaven.
Tips for Success
- Make sure the butter is softened to room temperature for easy blending.
- Don’t skip the chilling step—it’s crucial for maintaining shape!
- Experiment with different jams to find your favorite flavor combination.
- Use a mini ice cream scoop for perfectly uniform dough balls.
- Watch the cookies closely while baking to avoid overbaking.
Equipment Needed
- Mixing bowls: Use any size you have on hand; they’re essential for combining your ingredients.
- Electric mixer: A hand mixer works great, but a whisk and some elbow grease can do the job too!
- Baking sheets: Line with parchment paper; a silicone mat is a good alternative.
- Cookie scoop: If you don’t have one, a tablespoon will work just fine for portioning dough.
Variations on Mouthwatering Cheesecake Thumbprint Cookies
- Berry Blast: Swap out traditional jam for homemade berry compote. Blueberries, raspberries, or blackberries add a refreshing twist.
- Chocolate Lover’s Delight: Mix cocoa powder into the dough for a chocolate cookie base, then fill with chocolate ganache instead of cream cheese.
- Nutty Indulgence: Add chopped nuts like pecans or walnuts to the dough for a crunchy texture that contrasts with the creamy filling.
- Seasonal Flavors: Use pumpkin puree and spice in the filling during fall, or fresh lemon zest for a zesty summer treat.
- Gluten-Free Option: Substitute all-purpose flour with a gluten-free blend to accommodate dietary needs while keeping the texture delightful.
Serving Suggestions for Mouthwatering Cheesecake Thumbprint Cookies
- Pair with a cup of freshly brewed coffee or tea for a cozy afternoon treat.
- Serve alongside a scoop of vanilla ice cream to elevate the dessert experience.
- Arrange cookies on a decorative platter for a lovely presentation at gatherings.
- Garnish with mint leaves for a pop of color and freshness.
FAQs about Mouthwatering Cheesecake Thumbprint Cookies
Can I freeze Mouthwatering Cheesecake Thumbprint Cookies?
Absolutely! You can freeze the baked cookies in an airtight container for up to three months. Just remember to separate layers with parchment paper to prevent sticking. When you’re ready to enjoy, thaw them at room temperature or warm them briefly in the oven.
What can I substitute for cream cheese in the filling?
If you’re looking for a dairy-free option, try using cashew cream or vegan cream cheese. These alternatives still create a creamy texture that pairs perfectly with your jam of choice while accommodating different dietary needs.
How do I prevent my cookies from spreading too much?
Chilling the dough is essential! It helps the cookies maintain their shape during baking. Also, make sure your butter isn’t too soft; it should be just softened, not melted.
What’s the best way to store leftover cookies?
Store your Mouthwatering Cheesecake Thumbprint Cookies in an airtight container at room temperature. They’ll stay fresh for about a week, but trust me, they’re so good, they may not last that long!
Can I make these cookies without eggs?
Definitely! Just replace the egg yolk with a flaxseed egg (1 tablespoon of ground flaxseed mixed with 2.5 tablespoons of water). Let it sit for a few minutes to thicken, and you’re good to go!
Final Thoughts
Making these Mouthwatering Cheesecake Thumbprint Cookies is more than just baking; it’s an experience that fills your kitchen with warmth and joy. Each cookie is a small bite of happiness that uplifts your spirit, whether they’re served at a family gathering or enjoyed during a quiet moment with a cup of tea. I love how simple ingredients transform into something decadent and delightful. So, grab your apron, ignite that passion for baking, and create these scrumptious treats. Trust me; they’re bound to bring smiles and sweet memories to your home!
Print
Mouthwatering Cheesecake Thumbprint Cookies
- Total Time: 1 hour
- Yield: 24 cookies 1x
- Diet: Vegetarian
Description
Delicious thumbprint cookies filled with creamy cheesecake and your choice of jam.
Ingredients
- 1 cup unsalted butter, softened
- 2/3 cup granulated sugar
- 1 large egg yolk
- 1 teaspoon vanilla extract
- 2 cups all-purpose flour
- 8 oz cream cheese, softened
- 1/3 cup powdered sugar
- 1/2 teaspoon vanilla extract
- 1/3 cup jam or preserves (your choice of flavor)
Instructions
- In a large bowl, cream together butter and granulated sugar until light and fluffy.
- Add egg yolk and vanilla extract, mixing until well combined.
- Gradually mix in flour until a soft dough forms. Chill dough for 30 minutes.
- In a separate bowl, beat cream cheese, powdered sugar, and vanilla extract until smooth.
- Preheat oven to 350°F (175°C) and line two baking sheets with parchment paper.
- Scoop tablespoon-sized dough balls, place on sheet, and make thumbprint indentations.
- Fill each indentation with 1 teaspoon of cream cheese filling and 1/2 teaspoon of jam.
- Bake for 13–15 minutes, or until edges are lightly golden.
- Cool completely on wire racks before serving or storing.
Notes
- Chilling the dough helps to prevent spreading during baking.
- Feel free to experiment with different jam flavors.
- Store cookies in an airtight container for up to a week.
- Prep Time: 15 minutes
- Cook Time: 15 minutes
- Category: Dessert
- Method: Baking
- Cuisine: American
Nutrition
- Serving Size: 1 cookie
- Calories: 150
- Sugar: 8g
- Sodium: 75mg
- Fat: 8g
- Saturated Fat: 5g
- Unsaturated Fat: 2g
- Trans Fat: 0g
- Carbohydrates: 20g
- Fiber: 0g
- Protein: 2g
- Cholesterol: 30mg