
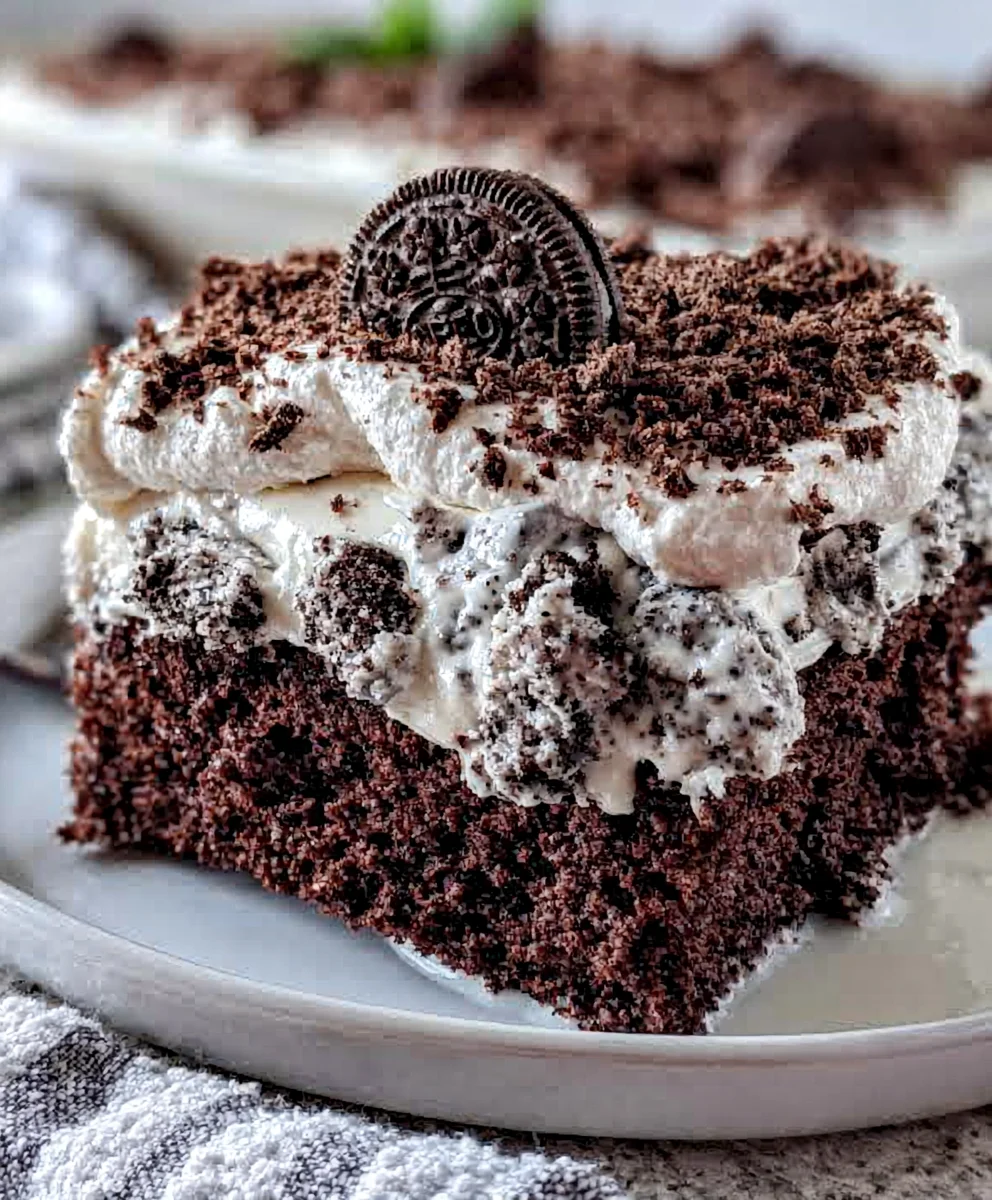
Introduction to Oreo Poke Cake
As a busy mom, I’ve found that life can sometimes feel like a whirlwind. Between juggling work, kids, and everything in between, finding time to bake can be a challenge. That’s where my Oreo Poke Cake comes in like a sweet savior! This dessert is not just a breeze to whip up; it also makes a captivating centerpiece for gatherings or a delightful treat after dinner. With rich chocolate cake soaked in luscious flavors, it’s guaranteed to dazzle your loved ones. Trust me, this cake will transform any ordinary day into a celebration!
Why You’ll Love This Oreo Poke Cake
This Oreo Poke Cake is the ultimate dessert for busy lifestyles. It’s incredibly easy to make, requiring minimal hands-on time and just a few simple ingredients. Each slice offers a delightful burst of chocolate and creamy Oreo goodness that’s sure to please everyone around the table. Plus, it’s a great make-ahead option, allowing you to chill it in the fridge while you tackle other tasks. What’s not to love?
Ingredients for Oreo Poke Cake
Getting the right ingredients is key to creating this mouthwatering Oreo Poke Cake. Here’s what you’ll need:
- Chocolate Cake Mix: The star of the show. Choose your favorite brand, and make sure to grab the additional ingredients listed on the box, like eggs and oil.
- Sweetened Condensed Milk: This creamy delight adds a rich sweetness and ensures your cake is perfectly moist.
- Cookies and Cream Pudding Mix: This pudding mix infuses creamy, chocolatey flavor into the filling, making it irresistible.
- Whole Milk: A simple addition to mix with the pudding, enhancing the overall creaminess of the filling.
- Oreos: The classic cookie! You’ll need these crushed for topping and mixing into the filling, bringing that cookies-and-cream taste.
- Whipped Topping: This light and airy element is key for fluffy texture in your frosting. You can also use homemade whipped cream if you’re feeling extra fancy.
Feeling adventurous? You can swap the chocolate cake mix for a vanilla or red velvet cake mix to create new flavor combinations! For a gluten-free option, try using a certified gluten-free cake mix. Remember, the ingredients with exact quantities are at the bottom of the article and available for printing, making it easy when you’re ready to bake!
How to Make Oreo Poke Cake
Ready to dive into creating this scrumptious Oreo Poke Cake? Let’s break it down into easy steps. With a little love and patience, you’ll have a dessert that makes hearts melt. Grab your apron and let’s get started!
Step 1: Bake the Cake
Begin by preheating your oven according to the instructions on the chocolate cake mix box. I usually set mine to 350°F.
Then, mix the cake batter as directed and pour it into a greased 9×13 inch pan.
Bake until a toothpick inserted in the center comes out clean. This usually takes about 30 minutes.
The aroma wafting from the oven will be unbelievable!
Step 2: Cool the Cake
After baking, remove your cake from the oven. Let it cool on a wire rack for at least 30 minutes.
This waiting period not only ensures your cake doesn’t crumble apart but also is a perfect moment to daydream about how delicious it will be when ready.
Step 3: Poke Holes
Once your cake has cooled, grab the end of a wooden spoon.
Gently poke holes all over the surface, making sure to create a pattern.
These little pockets will soak up the sweetened condensed milk, which is where all the magic happens!
Step 4: Prepare Filling
In a bowl, combine the dry cookies and cream pudding mix with ½ cup of whole milk.
Whisk until the mixture is smooth.
Next, fold in the whipped topping. This step gives your filling a dreamy, airy texture that pairs perfectly with the dense cake.
Step 5: Mix in Crushed Oreos
Now comes the fun part! Take 10 Oreos, place them in a zip lock bag, and crush them using a rolling pin.
Add these crushed cookies to your creamy filling.
Stir gently until everything is well combined. It’s going to look like cookies and cream heaven!
Step 6: Frost the Cake
Spread that luscious Oreo filling over your poke cake evenly.
Make sure to get it into those holes for extra flavor.
Then, crush the remaining Oreos and sprinkle them generously on top for that finishing touch.
Step 7: Chill and Serve
Lastly, pop your cake in the fridge for at least one hour.
This chilling time allows the flavors to meld beautifully together.
Once ready, slice it up and get ready for compliments. Every bite will be a slice of joy!
Tips for Success
- Ensure your chocolate cake is completely cool before poking holes; this prevents it from falling apart.
- Feel free to adjust the sweetness by using less sweetened condensed milk for a more balanced flavor.
- Chilling the cake is crucial—give it the full hour to enhance that creamy goodness!
- For an extra treat, drizzle chocolate syrup over individual servings.
Equipment Needed
- 9×13 Inch Baking Pan: Essential for baking the cake. If you don’t have one, any similar-sized pan will do.
- Mixing Bowls: Great for combining ingredients. You can use a large bowl or two medium-sized bowls.
- Whisk: Perfect for mixing the pudding. A fork will work in a pinch.
- Wooden Spoon: Ideal for poking holes in the cake. A chopstick or any long utensil will serve just as well!
Variations
- Red Velvet Oreo Poke Cake: Swap chocolate cake mix with red velvet for a vibrant twist that is as stunning as it is delicious.
- Gluten-Free Version: Use a gluten-free chocolate cake mix to make this dessert enjoyable for those with gluten sensitivities.
- Peanut Butter Lovers: Mix in some creamy peanut butter with the whipped topping for a delectable combination that pairs beautifully with Oreos.
- Mint Oreo Poke Cake: Use mint Oreo cookies instead of regular ones for a refreshing twist. Add a hint of peppermint extract to the filling for extra flavor!
- Fruit-Infused: Consider layering fresh raspberries or strawberries between the cake and filling for a burst of fruity freshness that contrasts beautifully with chocolate and cream.
Serving Suggestions for Oreo Poke Cake
- Pair it with Ice Cream: A scoop of vanilla or cookies and cream ice cream elevates the experience.
- Fresh Berries: Serve alongside strawberries or raspberries for a lovely color contrast.
- Chocolate Drizzle: Drizzle melted chocolate over the top for a gourmet touch.
- Presentation: Slice into squares and garnish with an Oreo half on each piece for a beautiful display.
FAQs about Oreo Poke Cake
As I’ve shared my beloved Oreo Poke Cake with family and friends, a few common questions pop up. Here are the answers to keep you baking and enjoying without any hassle!
Can I use a different cake flavor for my Oreo Poke Cake?
Absolutely! While the chocolate cake mix is a classic choice, feel free to use vanilla or red velvet cake instead. Each variation offers a unique twist that still pairs perfectly with the creamy Oreo filling.
How long does Oreo Poke Cake last in the fridge?
This cake can be stored in the fridge for up to three days. Just ensure it’s covered tightly with plastic wrap or stored in an airtight container to maintain its delicious flavors!
Can I make this cake ahead of time?
Yes! This cake is perfect for making in advance. Just prepare it the day before an event, and let it chill in the fridge overnight. The flavors develop beautifully, making it even more enjoyable the next day!
Can I freeze Oreo Poke Cake?
While it’s best fresh, you can freeze the cake for up to a month. Just make sure it’s well-wrapped and then thaw it overnight in the fridge when you’re ready to serve it again.
What if I don’t have whipped topping?
No worries! You can easily substitute it with homemade whipped cream. Just whip heavy cream with a bit of sugar until soft peaks form. This will give your cake a lovely, fresh taste!
Final Thoughts
This Oreo Poke Cake is more than just a dessert—it’s a joyful experience wrapped in layers of chocolatey goodness and creamy delight. Each slice takes you back to simpler, sweeter moments, whether shared with family at the dinner table or enjoyed during a late-night treat. I love how it brings people together, sparking laughter and stories over every slice. With minimal effort and maximum flavor, this recipe is a wonderful reminder that even on the busiest days, you can create something special. So, roll up your sleeves, bake, and let the happiness flow!
Print
Oreo Poke Cake
- Total Time: 1 hour 30 minutes
- Yield: 12 servings 1x
- Diet: Vegetarian
Description
A deliciously rich and creamy Oreo Poke Cake, perfect for any dessert occasion.
Ingredients
- 15.25 ounce chocolate cake mix plus ingredients on the box
- 14 ounces sweetened condensed milk
- 4 ounces cookies and cream pudding mix
- 1/2 cup whole milk
- 20 Oreos crushed
- 8 ounces whipped topping
Instructions
- Bake your chocolate cake as directed on the box using a 9×13 pan.
- Let the cake cool before proceeding. Once the cake has cooled for a minimum of 30 minutes begin the filling.
- Take the end of a wooden spoon and poke holes throughout the cake. Open your can of sweetened condensed milk and pour it all over the cake making sure to pour the most in the holes.
- In a bowl add your dry pudding mix with 1/2 cup milk and whisk to combine. Now stir in whipped topping until well combined.
- Take 10 Oreos and place them in a zip lock bag and seal. Crush the Oreos using a rolling pin. Now add your crushed Oreos in your whipped topping. Stir gently until everything is mixed, then spread on cake.
- Crush the remaining Oreos and add to the top of the cake.
- Chill for 1 hour prior to serving.
Notes
- Make sure the cake is completely cool before poking holes.
- Chilling the cake helps it set and enhances the flavors.
- Prep Time: 30 minutes
- Cook Time: 30 minutes
- Category: Dessert
- Method: Baking
- Cuisine: American
Nutrition
- Serving Size: 1 slice
- Calories: 350
- Sugar: 28g
- Sodium: 300mg
- Fat: 18g
- Saturated Fat: 10g
- Unsaturated Fat: 5g
- Trans Fat: 0g
- Carbohydrates: 43g
- Fiber: 1g
- Protein: 4g
- Cholesterol: 30mg