
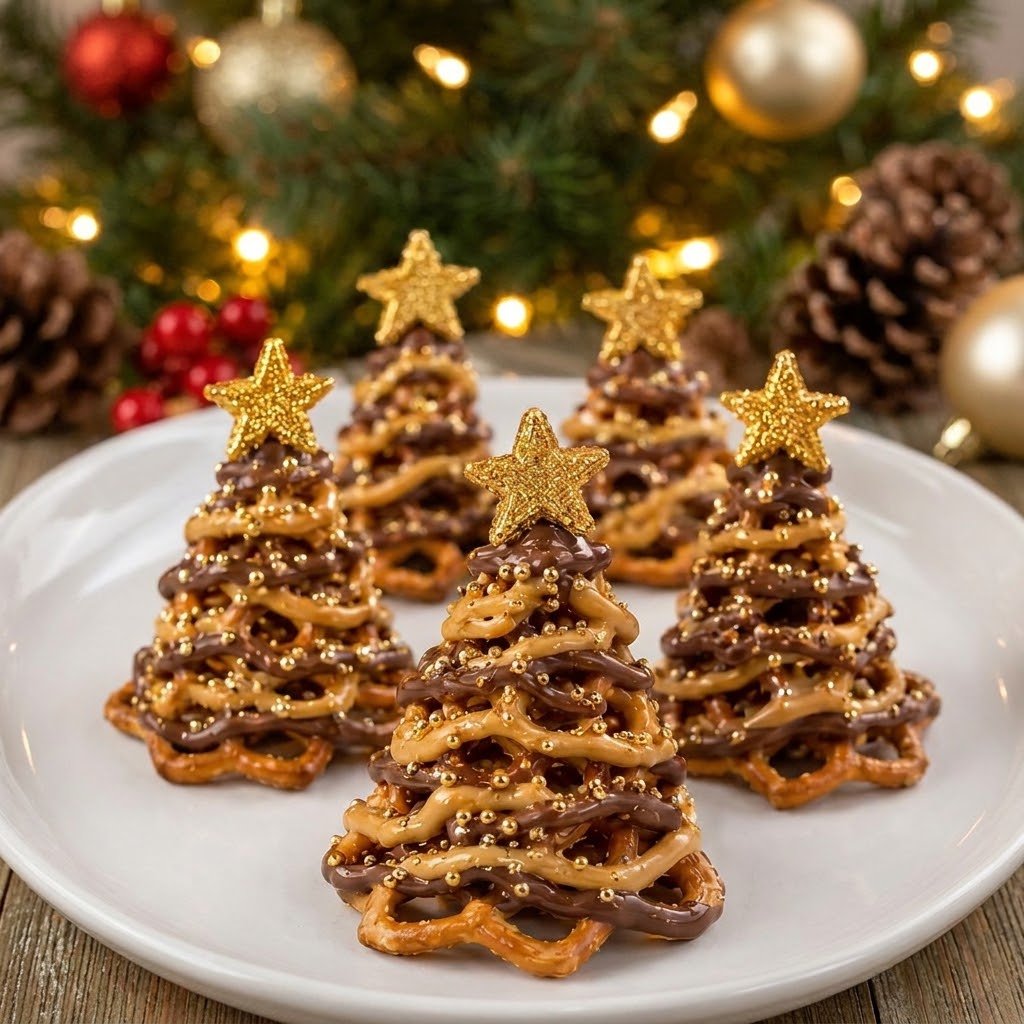
Introduction to Peanut Butter Pretzel Christmas Trees
When the holiday season rolls around, I find myself searching for that perfect blend of fun and flavor. That’s where these delightful Peanut Butter Pretzel Christmas Trees come into play! They’re not only easy to whip up but also a festive treat that brings joy to both kids and adults alike. Picture a busy day, with little time to spare, yet wanting to create something wonderful for your loved ones. These trees are a charming solution that stands out on any holiday table and are sure to spark smiles around every corner!
Why You’ll Love This Peanut Butter Pretzel Christmas Trees
If you’re like me, you cherish recipes that save time without skimping on taste. These Peanut Butter Pretzel Christmas Trees are refreshingly simple, made in just 35 minutes! The salty-sweet combination brings an explosion of flavor that dances on your taste buds. Plus, they make a delightful project for little hands or a festive treat at any gathering. Just imagine the smiles when you present these colorful trees; they’ll surely light up the season!
Ingredients for Peanut Butter Pretzel Christmas Trees
Gathering the right ingredients is half the fun of making these festive Peanut Butter Pretzel Christmas Trees! Here’s what you’ll need:
- Mini pretzel twists: These crunchy little bites form the base of your trees. Look for fresh and crisp ones for the best crunch!
- Milk chocolate melting wafers: The star of the show! These make the chocolatey coating that binds the pretzels together and adds sweetness.
- Creamy peanut butter: This delicious ingredient gives your trees a smooth, nutty flavor that complements the chocolate perfectly. Make sure it’s creamy for easy drizzling!
- Peanut butter baking chips: These melt beautifully and add a richer peanut flavor. They work wonders when combined with creamy peanut butter.
- Coconut oil (optional): A little bit of this can help thin out the peanut butter drizzle, making it smoother and easier to work with.
- Edible gold sugar pearls: These sprinkles add a touch of holiday glamour to your trees. Feel free to use other festive colors if you’re in the mood!
- Edible gold star decorations: The cherry on top! These cute stars complete your trees and make them look extra special.
For exact measurements and to make shopping easier, don’t forget to check the list at the bottom of the article, where you’ll find everything available for printing!
How to Make Peanut Butter Pretzel Christmas Trees
Prepare the Pretzels
First things first, grab a baking sheet and line it with parchment paper. This is where the magic begins! Arrange the mini pretzels into twelve Christmas tree shapes. Start with wider rows at the bottom and narrow them as you go higher, just like a real tree. It’s like playing with your food, and trust me, the kids will love getting involved in this creative step!
Melt the Chocolate
Next, let’s get that chocolate melting! Place your milk chocolate melting wafers in a microwave-safe bowl. Heat them in the microwave for 20 seconds at a time. After each burst, stir until smooth. This method ensures we avoid burnt chocolate. Keep an eye on it, as we want that perfect silky texture for coating our delightful Peanut Butter Pretzel Christmas Trees!
Assemble the Trees
Now, it’s time for the fun part: assembling the trees! Carefully dip the overlapping sections of the pretzels into the melted chocolate. Then, layer them together to form your Christmas tree shape. Don’t be shy with extra chocolate; drizzle it between the pretzels to keep them secure. Each tree will be unique in design, and this is where creativity truly shines!
Make the Peanut Butter Drizzle
For that rich peanut butter drizzle, melt the peanut butter baking chips in short microwave intervals. Stir frequently to get a smooth consistency. Mix in the creamy peanut butter until it’s beautifully smooth. If you find the mixture a bit thick, add a touch of coconut oil to thin it out. This step adds a delightful creaminess that complements our trees perfectly!
Decorate the Trees
Let’s make these trees sparkle! Drizzle the melted chocolate over the assembled trees in playful zigzag patterns, followed by the peanut butter drizzle. Be generous! The more drizzle, the more festive these trees will look. This is also a chance to let your artistic side flourish as you create swirls of sweet goodness; no two trees need to look alike.
Add Festive Decorations
While the drizzles are still soft, it’s time to add the finishing touches. Sprinkle those edible gold sugar pearls over the trees, making them shine like the stars! As a final touch, attach an edible gold star at the top of each tree with a small dab of melted chocolate. This is the grand reveal, and trust me, it’s totally worth the effort!
Chill and Serve
Almost there! Place the baking sheet in the fridge for about 20 minutes, allowing the chocolate to set properly. Once firm, carefully lift each tree off the parchment paper and present them on a festive platter. These Peanut Butter Pretzel Christmas Trees are ready to spread holiday cheer. Just look at those beauties; they’ll steal the spotlight on any dessert table!
Tips for Success
- Make sure your pretzels are fresh for that perfect crunch.
- Use a microwave-safe bowl for melting chocolate to prevent messes.
- When drizzling, let your artistic side shine; there’s no wrong way to do it!
- Chilling the trees sets the chocolate and makes them easier to handle.
- If the peanut butter drizzle is too thick, add a bit more coconut oil.
Equipment Needed
- Baking sheet: A standard size works great, but you can use any flat surface to catch drips.
- Parchment paper: This prevents sticking; wax paper can be an alternative.
- Microwave-safe bowl: Any heatproof container will do.
- Spatula or spoon: Useful for drizzling and stirring your chocolate.
- Measuring cups: Handy for portioning the ingredients precisely!
Variations
- Nut-Free Option: Swap peanut butter and baking chips with sun butter or almond butter for a nut-free alternative.
- Dark Chocolate Lovers: Use dark chocolate melting wafers instead of milk chocolate for a richer flavor.
- Add Flavor: Experiment by adding a touch of peppermint extract to the chocolate for a festive twist!
- Colorful Trees: Substitute edible gold sugar pearls with red and green sprinkles for a vibrant look.
- Gluten-Free Treat: Use gluten-free pretzels to make these trees suitable for gluten-sensitive folks.
Serving Suggestions
- Pair these Peanut Butter Pretzel Christmas Trees with a warm cocoa or spiced cider for a cozy treat.
- Serve with a festive fruit platter for a refreshing side that balances out the sweetness.
- Display the trees on a decorative holiday platter for an eye-catching presentation.
FAQs about Peanut Butter Pretzel Christmas Trees
Can I make these Peanut Butter Pretzel Christmas Trees in advance? Absolutely! These trees can be made ahead and stored in an airtight container in the fridge for up to a week. Just let them come to room temperature before serving for the best taste.
What can I use instead of chocolate melting wafers? If you don’t have melting wafers, you can use chocolate chips, although they may not melt as smoothly.
Are these trees suitable for kids? Yes! This no-bake recipe is perfect for kids to help with, making it a fun family activity.
How do I store leftovers? Keep any leftovers in an airtight container in the fridge to maintain their crispiness and freshness.
Preparation Cues and Common Mistakes
To ensure your Peanut Butter Pretzel Christmas Trees turn out perfectly, it’s helpful to be aware of some key preparation cues and common pitfalls. These tips will guide you through the process and enhance your festive creation.
Tempering Chocolate: When melting the chocolate, make sure to temper it properly. Remove it from the microwave after each heating interval to prevent overheating. Stirring between intervals helps distribute the heat evenly and keeps your chocolate smooth.
Correct Spacing: When arranging the pretzels into tree shapes, leave enough space between them on the baking sheet to allow for easy assembly. This also makes it simpler to add chocolate and decorations without spilling over onto the parchment.
Cooling Time: Be patient and ensure the trees chill adequately in the refrigerator. Rushing this step can result in melty, misshapen trees. A solid 20 minutes usually ensures the chocolate sets properly.
- Watch for Drips: While decorating, check for any excess drizzle that might drip off the sides. This can create a mess and make the trees less stable. A light hand with the drizzle can help control this.
- Use Fresh Ingredients: Ensure all your ingredients, especially the pretzels and chocolate, are fresh for optimal flavor and texture. Staleness can affect both the taste and crunch of the final product.
- Don’t Overload the Decorations: It can be tempting to pile on decorations, but too many may make the trees top-heavy and unstable. Stick to a tasteful amount for visual appeal and balance.
By keeping these cues and common mistakes in mind, you’ll improve your chances of creating stunning and delicious Peanut Butter Pretzel Christmas Trees that are sure to impress.
Final Thoughts
Creating these Peanut Butter Pretzel Christmas Trees has been a delightful adventure! Each bite is a celebration of crunchy, sweet, and salty flavors that perfectly capture the essence of the holiday season. Whether you’re making them with loved ones or impressing unexpected guests, these trees bring joy and warmth to any gathering. Plus, the easy steps and flexibility in decorating makes it a wonderfully stress-free holiday treat. So, gather your ingredients and spread the cheer; with these festive trees, you’re bound to create memories that will last a lifetime!
Print
Peanut Butter Pretzel Christmas Trees
- Total Time: 35 minutes
- Yield: 12 Christmas trees 1x
- Diet: Vegetarian
Description
Delicious and festive Peanut Butter Pretzel Christmas Trees that are perfect for the holiday season.
Ingredients
- 3 cups mini pretzel twists
- 10 oz (280 g) milk chocolate melting wafers
- ½ cup creamy peanut butter
- 6 oz (170 g) peanut butter baking chips
- 1 teaspoon coconut oil (optional)
- ¼ cup edible gold sugar pearls
- 12 edible gold star decorations
Instructions
- Prepare the Pretzels: Line a baking sheet with parchment paper. Arrange the mini pretzels into 12 Christmas tree shapes, creating wider rows at the bottom and smaller rows toward the top.
- Melt the Chocolate: Place milk chocolate melting wafers in a microwave-safe bowl. Microwave in 20-second intervals, stirring until completely smooth.
- Assemble the Trees: Dip the overlapping pretzel sections into melted chocolate and arrange them into layered Christmas tree shapes. Drizzle additional chocolate between the pretzels to hold them together.
- Make the Peanut Butter Drizzle: Melt the peanut butter baking chips in short microwave intervals, stirring frequently. Mix in the creamy peanut butter until smooth. Add a little coconut oil if needed for a thinner consistency.
- Decorate the Trees: Drizzle the melted milk chocolate and peanut butter mixture over each pretzel tree in alternating zigzag patterns.
- Add Festive Decorations: While the coating is still soft, sprinkle edible gold sugar pearls over the trees. Attach one edible gold star to the top of each tree using a small dab of melted chocolate.
- Chill and Serve: Refrigerate for 20 minutes or until the chocolate is completely set. Carefully lift the trees from the parchment paper and arrange them on a festive serving platter.
Notes
- Ensure pretzels are fresh and crisp for better texture.
- You can use other color sugar pearls for a different festive look.
- Store any leftovers in an airtight container in the fridge.
- Prep Time: 30 minutes
- Cook Time: 5 minutes
- Category: Dessert
- Method: No-bake
- Cuisine: American
Nutrition
- Serving Size: 1 tree
- Calories: 150
- Sugar: 8g
- Sodium: 150mg
- Fat: 8g
- Saturated Fat: 3g
- Unsaturated Fat: 5g
- Trans Fat: 0g
- Carbohydrates: 15g
- Fiber: 1g
- Protein: 3g
- Cholesterol: 0mg