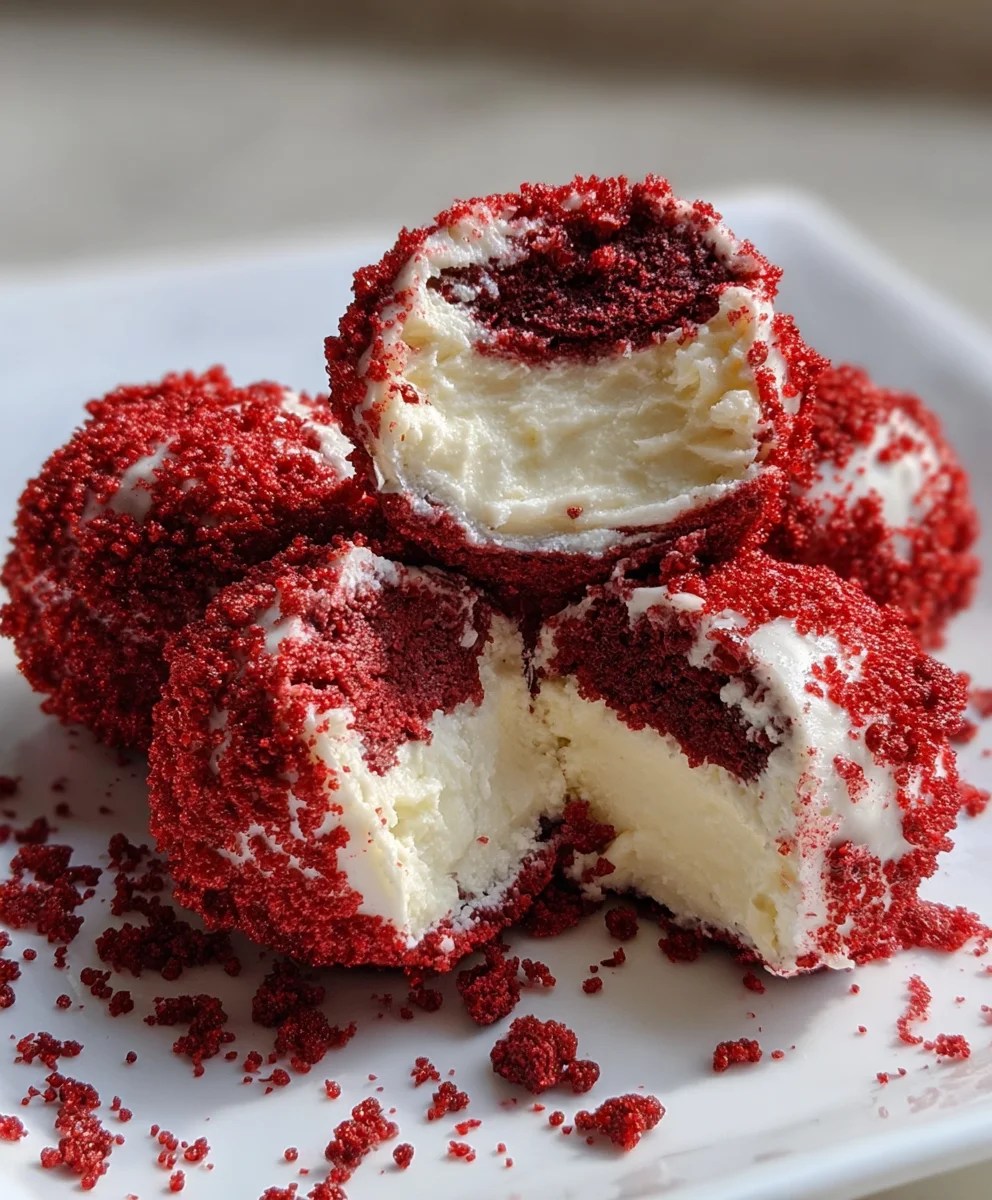
Introduction to Red Velvet Cheesecake Truffle Bombs
Are you in search of a sweet treat that’s not just delicious but also easy to whip up? Look no further than my Red Velvet Cheesecake Truffle Bombs! These little bites of heaven combine the rich, indulgent flavors of red velvet cake and creamy cheesecake in one delightful package. As a busy mom, I know how precious time is, and this quick no-bake dessert is perfect for impressing your loved ones or simply enjoying a moment of sweet indulgence. Trust me, these truffles will bring joy to any occasion, whether it’s a family gathering or a cozy night in.
Why You’ll Love This Red Velvet Cheesecake Truffle Bombs
Let’s be honest: who doesn’t adore a dessert that’s both easy to prepare and utterly delicious? These Red Velvet Cheesecake Truffle Bombs are a dream come true for busy lives. They require minimal effort yet deliver maximum flavor. Plus, these no-bake treats are versatile enough for any occasion—whether you’re celebrating a special milestone or just treating yourself. Each bite feels like a little hug for your taste buds!
Ingredients for Red Velvet Cheesecake Truffle Bombs
Gathering the right ingredients is the first step in creating these delightful Red Velvet Cheesecake Truffle Bombs. Each component plays a vital role in achieving that decadent taste. Here’s what you’ll need:
- Cream cheese: This is the star of the filling, adding richness and a creamy texture. Make sure it’s softened for easy mixing.
- Powdered sugar: This adds just the right amount of sweetness to your cheesecake centers. It blends smoothly, avoiding any grainy texture.
- Vanilla extract: A dash of vanilla brings warmth and enhances all the flavors. It’s an essential ingredient that you’ll find in many desserts.
- Red velvet cake crumbs: You can use store-bought to save time or make your own. They’re not just a beautiful color; their soft texture is perfect for wrapping around the cheesecake.
- Red candy melts or white chocolate: This is key for the outer coating. Choose red candy melts for that vibrant finish or white chocolate for a classic touch.
- Heavy cream (optional): Adding a bit of this creates a smoother, more luxurious chocolate coating. Use only if the mixture seems a bit too dry.
- Crushed red velvet cookie crumbs: Sprinkle these over the truffles for an added crunch and a beautiful finishing touch. You can also use fine cake crumbs if you prefer.
- Red sanding sugar (optional): It adds an extra sparkle and crunch for those special occasions. It’s like fairy dust for your truffles!
If you’re curious about the exact measurements, they’re listed at the bottom of the article for easy printing. Happy baking!
How to Make Red Velvet Cheesecake Truffle Bombs
Ready to dive into the world of divine dessert-making? Let’s get those hands busy as we create these delicious Red Velvet Cheesecake Truffle Bombs. I promise each step will guide you closer to a treat that’ll have everyone asking for seconds!
Step 1: Prepare the Cheesecake Centers
First things first: let’s tackle the cheesecake centers. Start by placing your softened cream cheese in a mixing bowl. Use a hand mixer or a spatula to beat in the powdered sugar and vanilla extract.
Mix until everything is smooth and creamy, like a cloud. It should be free of lumps to ensure that fudgy texture we crave!
Step 2: Roll the Cheesecake into Balls
Now that your cheesecake mixture is ready, it’s time to scoop it. I love using a mini cookie scoop for this! Take about 1 teaspoon of that creamy goodness and roll it gently in your palms. You’re aiming for small balls—just the right size for a delightful bite.
Once rolled, place each ball on a lined baking sheet and pop them in the freezer for about 20 to 25 minutes. This step is crucial for keeping them firm during assembly!
Step 3: Make the Red Velvet Mixture
While the cheesecake centers chill, let’s move to the red velvet mixture. Crush your red velvet cake into fine crumbs. If you’re using leftover cake, this is the perfect way to avoid waste!
Combine these crumbs in a large bowl with melted candy melts or white chocolate. Mix until it resembles soft cookie dough. If your mixture seems too dry, drizzle in a tablespoon of heavy cream. It should feel moldable but tender!
Step 4: Assemble the Truffles
Time to wrap those cheesecake balls! Take about 1.5 tablespoons of your red velvet mixture and flatten it in your palm. Place one of the chilled cheesecake balls in the center.
Now, wrap the red velvet mixture around the cheesecake ball, sealing it completely. Roll it gently into a smooth sphere. Repeat this step until you’ve covered all your cheesecake centers. It’s like giving them a cozy little red velvet blanket!
Step 5: Coat the Truffles
Once your truffles are all rolled, it’s coating time! Lay out some crushed red velvet cookie crumbs on a clean plate. Gently roll each truffle in these crumbs until they’re well coated. If you like a bit of sparkle, sprinkle some red sanding sugar over them for that extra crunch!
Step 6: Chill Before Serving
Now for the final stretch! Place your beautifully coated truffles back onto the baking sheet and chill them in the refrigerator for at least 1 hour. This makes them firm and easier to eat.
Fancy a garnish? Add a swirl of whipped cream or a sprinkle of extra cookie crumbs before serving. These little bites of joy are ready to impress!
Tips for Success
- Ensure your cream cheese is at room temperature for easy mixing.
- Use a cookie scoop for even-sized truffle balls—no one likes an uneven dessert!
- Don’t skip the chilling step; it helps maintain the truffles’ shape.
- Feel free to experiment with different coatings, like sprinkles or nuts.
- Store any leftovers in an airtight container to keep them fresh.
Equipment Needed
- Mixing bowls: Use any size, but a medium bowl works best for mixing.
- Hand mixer or spatula: A hand mixer speeds up the process, but a spatula will work just fine.
- Cookie scoop: This ensures uniform truffle sizes—if you don’t have one, use a tablespoon!
- Baking sheet: Line it with parchment paper for easy cleanup during the freezing process.
- Refrigerator: Essential for chilling your truffles to perfection before serving!
Variations
- Gluten-free option: Use gluten-free red velvet cake crumbs for a delightful treat that everyone can enjoy.
- Dairy-free twist: Substitute cream cheese with a plant-based cream cheese alternative and use dairy-free chocolate melts.
- Chocolate lovers delight: Blend cocoa powder into the red velvet mixture for a double chocolate version that’s sure to satisfy.
- Nutty goodness: Add finely chopped nuts, like walnuts or pecans, into the red velvet mixture for a crunchy texture.
- Seasonal flavors: Incorporate festive spices like cinnamon or nutmeg into the red velvet mixture during the holidays.
Serving Suggestions
- Pair your Red Velvet Cheesecake Truffle Bombs with a cup of rich coffee or hot chocolate for a cozy treat.
- Serve them on a beautiful platter, garnished with mint leaves for a pop of color.
- For a fun twist, slice them and serve with a drizzle of chocolate sauce.
- Consider serving with fresh berries to balance the sweetness.
FAQs about Red Velvet Cheesecake Truffle Bombs
Let’s tackle some common questions about these decadent Red Velvet Cheesecake Truffle Bombs. I want to ensure you have all the information for a successful baking adventure!
Can I make these truffles ahead of time?
Absolutely! These truffles are perfect for making ahead. They can be stored in the refrigerator for up to a week, making them a great choice for pre-party prep.
What if I can’t find red candy melts?
No worries! You can use white chocolate or even milk chocolate melts as a substitute. It’ll create a delightful twist on the classic truffle.
How should I store leftover truffles?
Store any leftover Red Velvet Cheesecake Truffle Bombs in an airtight container in the fridge. This will keep them fresh and delicious for several days.
Can I freeze these truffles?
Yes! You can freeze them for up to three months. Just make sure to place them in a single layer on a baking sheet to freeze, then transfer them to an airtight container.
What can I substitute for cream cheese?
If you’re looking for a dairy-free option, try using a plant-based cream cheese. It will still provide that rich flavor you love in the truffles!
Final Thoughts
Indulging in these Red Velvet Cheesecake Truffle Bombs is truly a celebration of flavors and memories. They’re not just a dessert; they’re a ticket to nostalgia, sweet family gatherings, and the simple joy of sharing. I hope you’ll find delight in their creamy centers and the charming crunch of red velvet crumbs. Remember, creating these little gems doesn’t just satisfy your sweet tooth; it offers a moment of happiness in our hectic lives. So, grab your loved ones, make these truffles, and relish every bite together. You deserve a little bliss in your kitchen!
Print
Red Velvet Cheesecake Truffle Bombs
- Total Time: 1 hour 30 minutes
- Yield: Approximately 24 truffles 1x
- Diet: Vegetarian
Description
Red Velvet Cheesecake Truffle Bombs are delectable treats combining the rich flavors of red velvet cake and creamy cheesecake, perfect for any indulgent occasion.
Ingredients
- 8 oz (225 g) cream cheese, softened
- ¼ cup (60 g) powdered sugar
- ½ tsp vanilla extract
- 2 cups (about 10 oz) red velvet cake crumbs
- ½ cup (120 ml) red candy melts or white chocolate, melted
- 2 tbsp heavy cream (optional, for smooth coating)
- 1½ cups crushed red velvet cookie crumbs or fine cake crumbs
- ½ cup red sanding sugar (optional, for extra crunch and sparkle)
Instructions
- In a small bowl, beat together cream cheese, powdered sugar, and vanilla until smooth and creamy.
- Scoop 1 tsp portions and roll into small balls.
- Freeze for 20–25 minutes until firm.
- Crumble the red velvet cake into a large bowl.
- Add melted candy melts or white chocolate and mix until the texture is soft but moldable (like cookie dough).
- If too dry, add 1–2 tablespoons of heavy cream.
- Flatten about 1½ tbsp of the red velvet mixture in your palm.
- Place one cheesecake ball in the center and wrap the red velvet around it, sealing completely.
- Roll between your palms to form a smooth sphere.
- Repeat with all cheesecake centers.
- Roll each truffle in crushed red velvet crumbs (or a mix of crumbs + red sugar) to coat evenly.
- Chill for at least 1 hour before serving to firm up.
- Plate the truffles and top with whipped cream or frosting swirl.
- Sprinkle extra red velvet crumbs for decoration.
Notes
- These truffles can be made ahead of time and stored in the refrigerator.
- For a richer flavor, use cream cheese at room temperature.
- Feel free to customize the coating with different types of sprinkles or toppings.
- Prep Time: 30 minutes
- Cook Time: 0 minutes
- Category: Dessert
- Method: No-bake
- Cuisine: American
Nutrition
- Serving Size: 1 truffle
- Calories: 150
- Sugar: 10 g
- Sodium: 90 mg
- Fat: 9 g
- Saturated Fat: 5 g
- Unsaturated Fat: 3 g
- Trans Fat: 0 g
- Carbohydrates: 15 g
- Fiber: 1 g
- Protein: 2 g
- Cholesterol: 30 mg