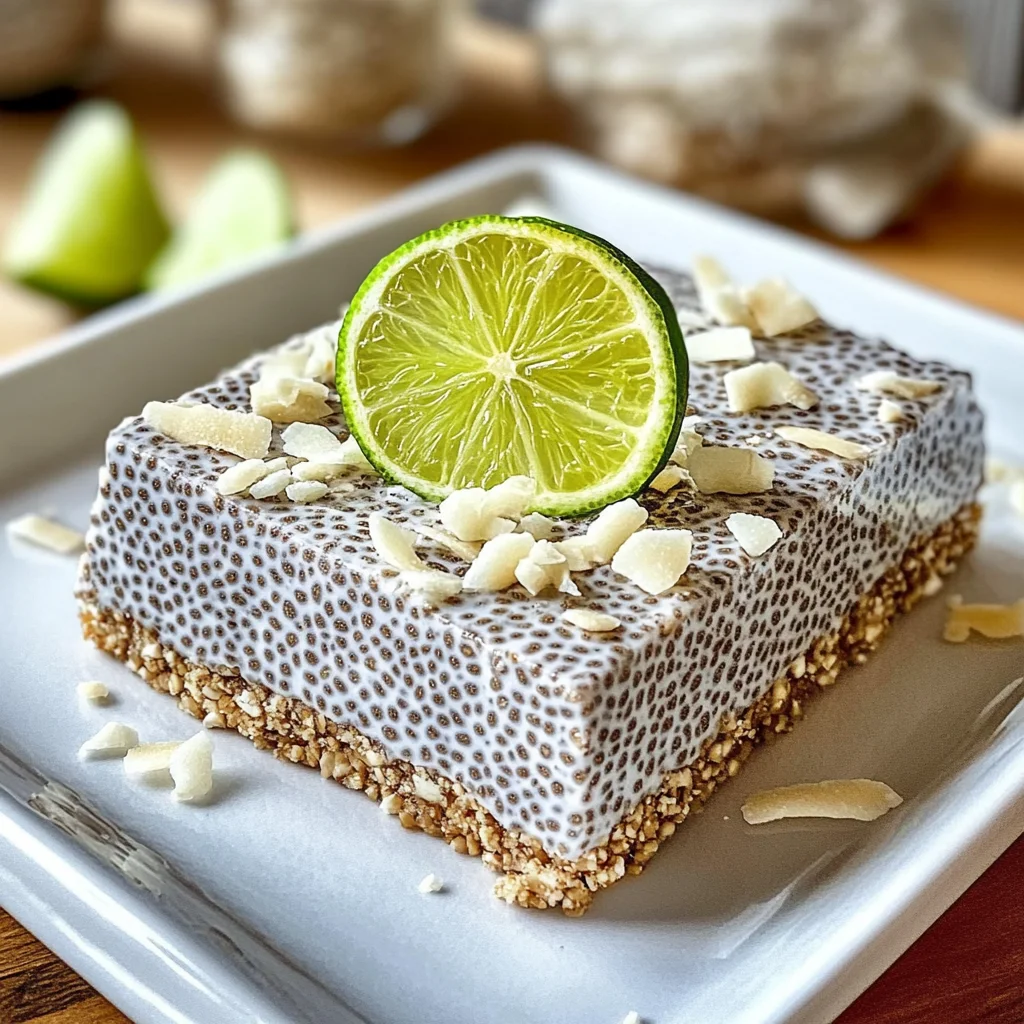
Introduction to Refreshing No-Bake Chia Pudding Bars with Zesty Coconut Lime Flavor
As a busy mom, I often find myself searching for quick, healthy snacks that my family will love. That’s when I discovered the Refreshing No-Bake Chia Pudding Bars with Zesty Coconut Lime Flavor. These delightful bars are not just easy to whip up but also bursting with flavor that tickles your taste buds. They’re perfect for an afternoon snack or a sweet treat after dinner!
With minimal prep time and ingredients, you’ll feel like a kitchen wizard. Plus, they’re a hit with both kids and adults alike. Let’s dive in and make some magic happen!
Why You’ll Love This Refreshing No-Bake Chia Pudding Bars with Zesty Coconut Lime Flavor
You’ll adore these Refreshing No-Bake Chia Pudding Bars with Zesty Coconut Lime Flavor for their effortless charm! They come together in just a few simple steps, making them perfect for hectic days.
Plus, the vibrant coconut and lime flavors sing out, leaving you feeling invigorated. And let’s not forget: they’re a wholesome, guilt-free snack your family can enjoy without hesitation, so say goodbye to those pesky cravings!
Ingredients for Refreshing No-Bake Chia Pudding Bars with Zesty Coconut Lime Flavor
Gathering the right ingredients for your Refreshing No-Bake Chia Pudding Bars with Zesty Coconut Lime Flavor is half the fun! Here’s what you’ll need to create these delightful treats:
- Coconut milk: This creamy base gives the bars their luscious texture and rich flavor. Make sure to use full-fat for maximum creaminess.
- Chia seeds: Tiny but mighty, chia seeds provide the pudding’s body and a healthy dose of omega-3 fatty acids. They’re the superhero ingredient here!
- Maple syrup or agave nectar: Sweetness is essential! Both options offer a natural sweetness that enhances the overall flavor. Adjust to your liking!
- Lime zest: The zest takes your bars to a whole new level. It adds a fresh, zesty kick that perfectly complements the coconut.
- Lime juice: Adding lime juice really amplifies that tangy flavor, making each bite a refreshing experience.
- Vanilla extract: A splash of vanilla rounds up the flavors beautifully, giving a hint of warmth to your bars.
- Salt: Just a pinch enhances all the flavors without being overpowering. It’s the little things!
- Nuts (optional): Almonds or cashews can be blended to create a delightful crust. If you’re nut-free, sunflower seeds are an excellent alternative!
- Shredded coconut (optional): Adds texture and a lovely coconut flavor to the crust. Use unsweetened for a healthier option!
- Medjool dates (optional): These sticky gems naturally sweeten the crust and bind everything together.
- Melted coconut oil (optional): Just a tablespoon helps the crust hold together nicely and adds a subtle coconut flavor.
- Toasted coconut flakes and extra lime zest (for topping): These lovely finishing touches elevate the presentation and add a delightful crunch.
You can find the exact quantities for each ingredient at the bottom of the article for your convenience. Now, let’s set the stage for the joy of creating these delicious bars!
How to Make Refreshing No-Bake Chia Pudding Bars with Zesty Coconut Lime Flavor
Prepare the Optional Crust
If you’re looking to add a delightful crunch, making the optional crust is the way to go!
Start by tossing your almonds or cashews, unsweetened shredded coconut, and Medjool dates into a food processor. Pulse them until they clump together—like a sandy beach waiting for foot traffic!
Once it’s all mixed, press this mixture evenly into the bottom of an 8×8 inch pan lined with parchment paper. This is where the magic begins as it sets up in the fridge, creating a lovely base for your chia pudding.
The crust not only adds a layer of taste but also gives your pudding bars a wonderful texture. Pop it in the fridge while you make that creamy filling—we’re almost there!
Prepare the Chia Pudding Filling
With your crust chilling, let’s whip up that zesty chia pudding filling.
In a medium bowl, combine the full-fat coconut milk, chia seeds, maple syrup or agave, lime zest, lime juice, vanilla extract, and a pinch of salt. Now, it’s a party! Whisk vigorously to avoid clumps and ensure everything melds magically together.
Keep whisking until it’s smooth—this part is a workout for your whisking arm! Remember, the more you whisk, the better your texture will be. When that creamy filling is ready, it’s time to let it rest. Just a few more steps to go!
Let the Mixture Rest
This step is crucial for achieving the perfect consistency in your chia pudding.
Allow your mixture to sit for about 5-10 minutes after whisking. The magic happens here as the chia seeds expand and soak up the coconut milk, creating that pudding-like texture.
After the resting period, give it another vigorous whisk to break up any clumps that may have formed. This ensures an even distribution of the chia seeds throughout the mixture. The goal is a smooth, creamy blend that will transform into delightful bars once set!
Combine and Refrigerate
Now we’re ready to combine the two delicious components into one sweet creation!
Pour the luscious chia pudding over your prepared crust, if you’re using one. If you opted to go crustless, directly pour it into the parchment-lined pan. Use a spatula to spread it out evenly.
Cover the pan with plastic wrap or a lid and pop it into the refrigerator for at least 4 hours—or better yet, overnight. This chilling time allows the chia pudding to set completely. When it’s ready, you’ll be greeted by a firm, cuttable slab of creamy goodness, ready for enjoyment!
Add Finishing Touches
Finally, it’s time for the grand finale!
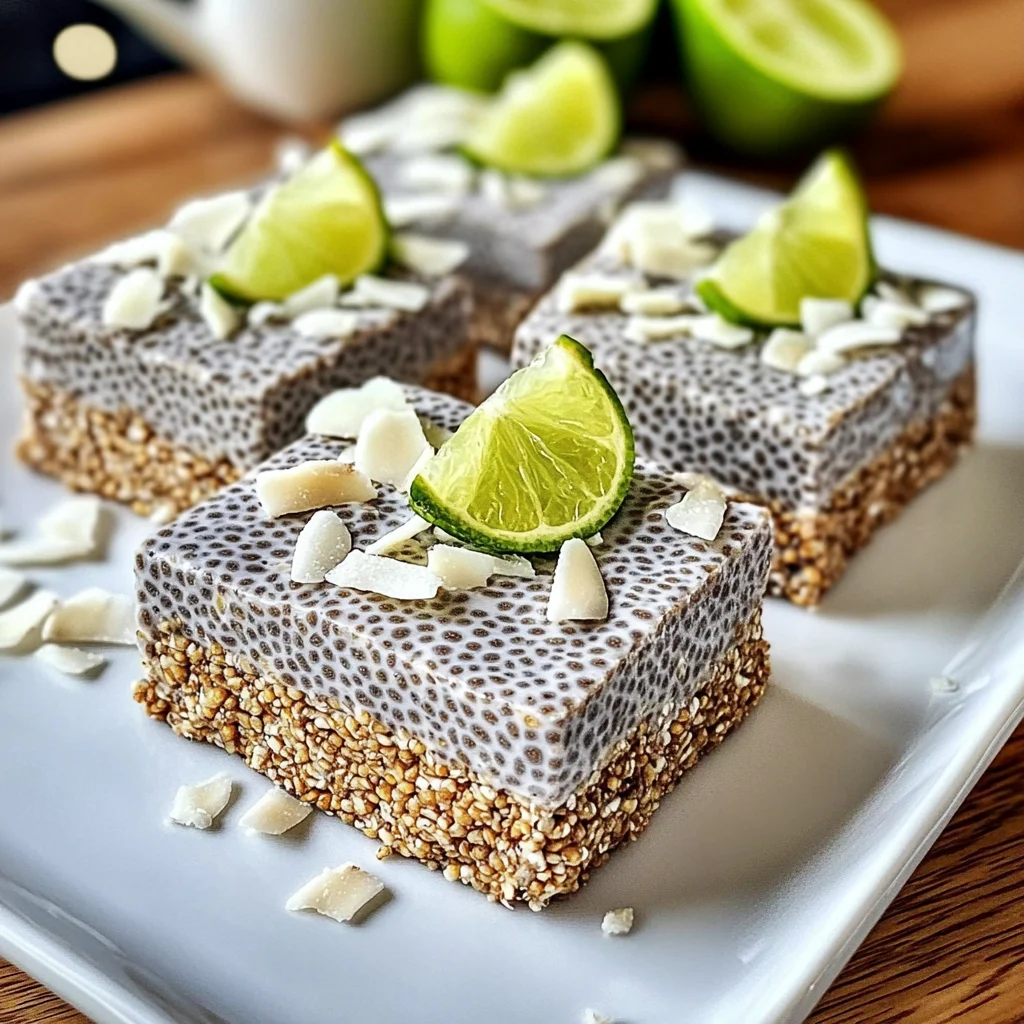
Once your bars have set, lift them out of the pan using the parchment paper overhang. Sprinkle toasted coconut flakes lightly over the top, followed by a generous dusting of extra lime zest. These finishing touches will make your bars look irresistible!
Cut them into squares or bars, and you’ve got a stunning, healthy snack that will impress your family and friends alike. Now, let’s dig in!
Tips for Success
- Always whisk your chia mixture thoroughly to avoid clumps; it makes a world of difference!
- For a firmer texture, let your chia pudding set overnight. Patience is key!
- Feel free to adjust the sweetness. Taste as you go!
- When cutting the bars, use a sharp knife for clean edges.
- Store leftovers in an airtight container in the fridge for freshness.
Equipment Needed
- Food processor: Essential for making the optional crust. A blender can work in a pinch.
- Mixing bowl: Needed for whisking the chia pudding filling. Any large bowl will do!
- Whisk: For combining ingredients smoothly. A fork can substitute in a hurry.
- 8×8 inch pan: Perfect for setting your bars. Use any similar-sized dish you have!
- Parchment paper: Helps with easy removal. If you’re out, use a light coating of oil.
Variations
- Chocolate Lovers: Add unsweetened cocoa powder to the chia pudding filling for a chocolate twist. It’s a delightful combo with coconut and lime!
- Fruit Infusion: Mix in fresh berries or mango pieces before pouring the filling into the pan. This adds a juicy burst of flavor!
- Nut-Free Version: Substitute nuts in the crust with sunflower seeds or pumpkin seeds for a crunchy texture without allergens.
- Protein Boost: Stir in your favorite protein powder into the chia pudding filling for an extra health kick. Perfect for post-workout snacks!
- Herbal Touch: Try adding a bit of fresh mint or basil to the pudding for an herbaceous note that pairs beautifully with lime.
Serving Suggestions
- Pair your bars with a chilled glass of coconut water for a refreshing drink.
- Top them with fresh berries like raspberries or strawberries for an extra burst of flavor.
- Serve alongside a dollop of dairy-free yogurt for a creamy contrast.
- Garnish with a sprig of mint to elevate the presentation.
- Enjoy these bars as a midday snack or a sweet treat for the kids’ lunchboxes!
FAQs about Refreshing No-Bake Chia Pudding Bars with Zesty Coconut Lime Flavor
Can I make the Refreshing No-Bake Chia Pudding Bars with Zesty Coconut Lime Flavor without a crust?
Absolutely! If you prefer a simple option, feel free to skip the crust and pour the chia pudding directly into the pan. It will still be delicious!
How long do these bars last in the fridge?
Your Refreshing No-Bake Chia Pudding Bars with Zesty Coconut Lime Flavor can be stored in the refrigerator for about 4-5 days. Just keep them covered to maintain freshness.
Can I freeze these bars for later?
Yes! These bars freeze wonderfully. Just wrap them tightly and pop them in the freezer. Thaw them in the fridge before serving for the best texture.
What can I substitute if I’m allergic to coconut?
If coconut isn’t your thing, consider swapping full-fat coconut milk with almond milk or another plant-based milk. This will change the flavor profile slightly, but it will still be a tasty treat!
Can I use different flavors instead of lime?
Certainly! You can experiment with different citrus fruits like lemon or orange. Just be sure to adjust the zest and juice according to your preference for a zesty twist!
Final Thoughts
Creating the Refreshing No-Bake Chia Pudding Bars with Zesty Coconut Lime Flavor has been a delightful journey! Each bite is a celebration of vibrant flavors that dance on your palate. Not only are these bars a healthy treat, but they also inspire a sense of joy and accomplishment in the kitchen. I love how they embody the bright, sunny essence of summer, even if it’s just a midday snack. Whether you share them or keep them all to yourself, these bars are sure to bring smiles and satisfaction to your family. Get ready to savor every moment!
Print
Refreshing No-Bake Chia Pudding Bars with Zesty Coconut Lime Flavor
- Total Time: 4 hours 15 minutes (or overnight)
- Yield: 16 bars 1x
- Diet: Vegan
Description
Refreshing No-Bake Chia Pudding Bars with Zesty Coconut Lime Flavor that are easy to prepare and perfect for a healthy snack.
Ingredients
- 1 can (13.5 oz / 400ml) full-fat coconut milk
- 1/2 cup / 80g chia seeds
- 1/4 cup / 60ml maple syrup or agave nectar
- Zest of 1 large lime
- Juice of 1/2 large lime (about 2 tbsp / 30ml)
- 1 teaspoon / 5ml vanilla extract
- Pinch of salt
- 1 cup / 140g almonds or cashews (optional crust)
- 1/2 cup / 45g shredded unsweetened coconut (optional crust)
- 1/4 cup / 45g Medjool dates, pitted (optional crust)
- 1 tablespoon / 15ml melted coconut oil (optional crust)
- Pinch of salt (optional crust)
- Toasted coconut flakes (topping)
- Extra lime zest (topping)
Instructions
- Prepare the optional crust: Add almonds/cashews, shredded coconut, pitted dates, melted coconut oil, and salt to a food processor. Process until the mixture clumps together and sticks when pressed. Press this mixture firmly into the bottom of an 8×8 inch (20×20 cm) pan lined with parchment paper. Chill while preparing the filling.
- Prepare the chia pudding filling: In a medium bowl, whisk together the full-fat coconut milk, chia seeds, maple syrup/agave, lime zest, lime juice, vanilla extract, and salt. Whisk well to prevent clumps.
- Let the mixture sit for 5-10 minutes, then whisk again thoroughly to break up any clumps and ensure seeds are evenly distributed.
- Pour the chia pudding mixture over the prepared crust (if using) or directly into the parchment-lined pan if making crustless bars. Spread evenly.
- Cover the pan and refrigerate for at least 4 hours, or preferably overnight, until the chia pudding is very firm and set.
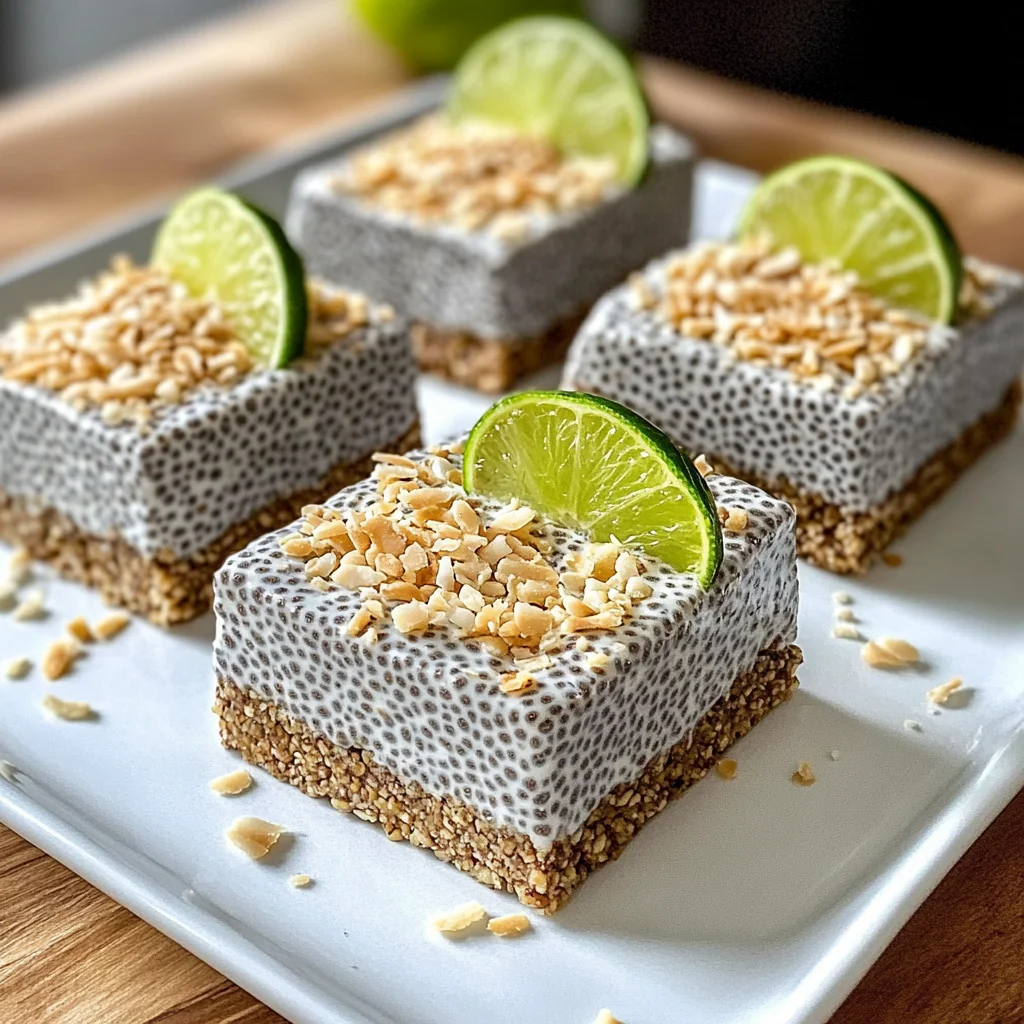
- Once firm, lift the slab out using the parchment paper overhang. Sprinkle generously with toasted coconut flakes and extra lime zest.
- Cut into squares or bars using a sharp knife.
- Store leftovers covered in the refrigerator for up to 4-5 days.
Notes
- For a nut-free version, use sunflower seeds instead of almonds or cashews.
- Adjust sweetness by adding more or less maple syrup/agave to taste.
- These bars can be frozen for longer storage; just thaw before serving.
- Prep Time: 15 minutes
- Cook Time: 0 minutes
- Category: Dessert
- Method: No-Bake
- Cuisine: Healthy
Nutrition
- Serving Size: 1 bar
- Calories: 200
- Sugar: 10g
- Sodium: 50mg
- Fat: 12g
- Saturated Fat: 10g
- Unsaturated Fat: 2g
- Trans Fat: 0g
- Carbohydrates: 22g
- Fiber: 5g
- Protein: 4g
- Cholesterol: 0mg