
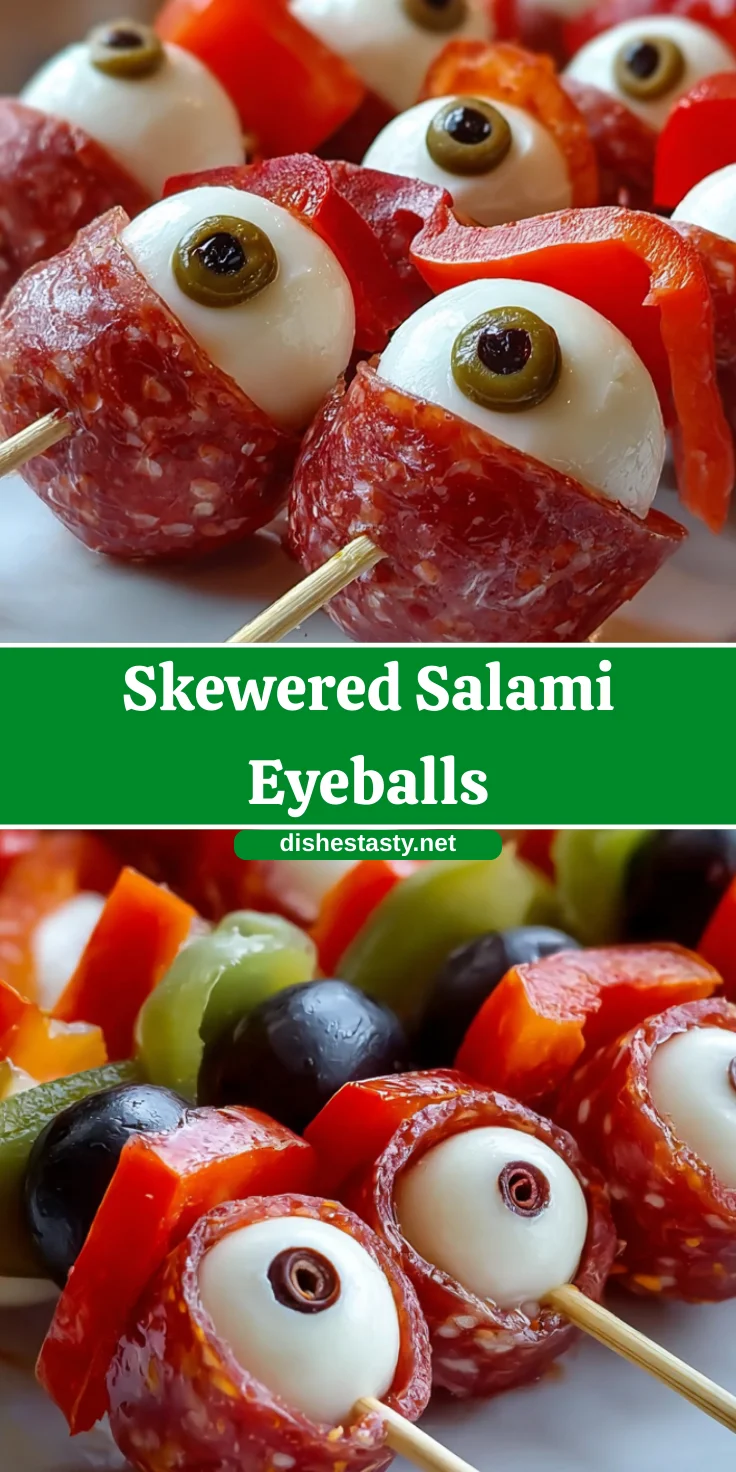
Introduction to Skewered Salami Eyeballs
Hey there, fellow food lovers! If you’re like me, you know how hectic life can be, especially when juggling work and family. That’s why I’m excited to share my go-to recipe for Skewered Salami Eyeballs! It’s a fun and tasty treat that’s perfect for parties or even game day snacking. Imagine delightful little eyeballs on a skewer, combining creamy mozzarella, zesty olives, and savory salami. This dish not only impresses your loved ones but also brings a sprinkle of joy to your busy day. Trust me; your family will be talking about this one for ages!
Why You’ll Love This Skewered Salami Eyeballs
These Skewered Salami Eyeballs are the epitome of ease and fun. You can whip them up in just 15 minutes, making them perfect for those busy afternoons. They’re not just visually appealing; the combination of flavors is irresistible! Plus, they’re gluten-free, so everyone can enjoy them. Whether it’s a casual gathering or a festive celebration, these skewers are destined to be a hit. You’ll be the star of any party!
Ingredients for Skewered Salami Eyeballs
Let’s gather the essential ingredients for these delightful Skewered Salami Eyeballs. Each element plays a critical role in creating a delicious and visually captivating dish.
- Mozzarella Balls: These cute little bites serve as the base of your eyeballs. Go for fresh mozzarella for the best flavor and creaminess.
- Kalamata Olives: Finely chopped, these olives add an eye-catching contrast and provide a briny punch that balances the rich mozzarella.
- Red Bell Pepper: Sliced into wedges, the sweet crunch of bell pepper is essential for adding vibrant color and texture to each skewer.
- Pepperoni Stick: Sliced into chunks and thin slices, this adds a savory element that’s simply irresistible. If you’re feeling adventurous, try different types of cured meats!
- Skewers: Opt for wooden or metal skewers to hold all your ingredients together. If using wooden skewers, soak them in water beforehand to prevent burning.
All ingredients specified with exact quantities can be found at the bottom of this article for easy printing. Happy skewer-building!
How to Make Skewered Salami Eyeballs
Step 1: Prepare the Mozzarella Balls
To start, grab your fresh mozzarella balls. Using a small knife, make little indents on one side of each ball. This is where the magic begins! Those little divots will hold the kalamata olives perfectly, giving life to your skewered salami eyeballs. You want just enough space, so they fit snugly, but not too deep that it compromises the cheese’s structure. Trust me, this part is crucial for that eyeball effect!
Step 2: Add the Olive Eyes
Now, take those finely chopped kalamata olives and carefully fill the indents in your mozzarella balls. This simple addition transforms each ball into an adorable “eye.” The contrast of the dark olives with the creamy mozzarella is just delightful. Plus, every bite will have that briny goodness coming through! Take your time with this step; it’s where the character comes alive!
Step 3: Prepare the Pepperoni
Next up, it’s time to get cozy with the pepperoni. Slice the stick into chunks roughly 3/4 inch thick for the base of each skewer. Then, cut some very thin slices for decorative flair. Trust me on this step; those paper-thin slices will add elegance. If you’re feeling adventurous, try using different varieties of pepperoni for a fun twist!
Step 4: Slice the Red Bell Pepper
It’s time to add some color! Using a cutting board, slice the red bell pepper into small wedges. You’re looking for bite-sized pieces that are easy to skewer. The sweetness of bell peppers balances all those savory components beautifully. Plus, their vibrant red hue is a feast for the eyes!
Step 5: Assemble the Skewers
Now, let’s bring it all together! Take a skewer and start with a slice of red bell pepper at the bottom. Add a chunk of pepperoni next; it’s the base layer! Then, gently slide on a mozzarella ball that now has its olive eye. Don’t forget to finish with those thin pepperoni slices on top. Keep a steady hand as you assemble; this isn’t just food; it’s an edible work of art!
Step 6: Chill and Serve
Finally, it’s time for a chill session. Place your assembled skewers in the fridge for at least 30 minutes before serving. This helps the flavors meld beautifully together. Plus, it keeps the skewers fresh and firm! When the time is up, present them proudly, and watch your friends and family light up with excitement!
Tips for Success
- Always use fresh ingredients for the best taste and presentation.
- Prepare the skewers in advance, but assemble them no more than six hours before serving.
- Substitute ingredients like cherry tomatoes for extra flair or jalapeños for added heat.
- Use a variety of olives to enhance flavors and visual appeal.
- Ensure the skewers are chilled for at least 30 minutes to let the flavors mingle.

Equipment Needed
- Skewers: Wooden or metal; if you use wooden skewers, soak them in water first.
- Cutting Board: Essential for safe chopping of your ingredients.
- Knife: A sharp knife will help you slice through the cheese and peppers effortlessly.
- Mixing Bowl: Use this to combine ingredients and keep your workspace tidy.
Variations
- Spicy Kick: Swap out the red bell pepper for jalapeño slices for a fiery twist!
- Veggie Delight: Add cherry tomatoes or cucumber slices for extra fresh flavors and crunch.
- Cheese Lovers: Use different types of cheese, like cheddar or pepper jack, to change up the flavor profile.
- Herbed Olives: Opt for herbed or stuffed olives to infuse more character into the eyeballs.
- Plant-Based Option: Substitute mozzarella with vegan cheese and replace pepperoni with plant-based deli slices.
Serving Suggestions
- Pair with Dips: Serve your skewers alongside tangy ranch or zesty marinara sauce for extra flavor.
- Accompany with Drinks: These skewers pair perfectly with sparkling water or a crisp white wine.
- Presentation Matters: Arrange on a colorful platter with some fresh herbs for an eye-catching display.
- Garnish: Sprinkle some crushed red pepper flakes on top for an added splash of color and taste!
FAQs about Skewered Salami Eyeballs
Can I make Skewered Salami Eyeballs ahead of time?
Absolutely! You can assemble them up to six hours in advance. Just remember to refrigerate them for at least 30 minutes before serving. This way, the flavors meld nicely while keeping everything fresh!
What if I can’t find mozzarella balls?
No problem at all! You can cut a larger piece of mozzarella cheese into cubes or even use cheese slices rolled up for a fun twist. The goal is to keep that creamy texture intact!
Can I use other meats instead of pepperoni?
Definitely! Feel free to explore other meats like salami, prosciutto, or even turkey pepperoni for a leaner option. Each will add a unique flavor to your Skewered Salami Eyeballs.
Are Skewered Salami Eyeballs suitable for kids?
Yes! These skewers are colorful and fun, making them perfect for kids. They’re great for parties, and their bite-sized nature makes them easy for little hands to enjoy.
How do I store leftover skewers?
If you happen to have leftovers, store them in an airtight container in the fridge. They’ll stay fresh for a day, but remember, they’re best enjoyed the day they’re made!
Final Thoughts
Creating Skewered Salami Eyeballs is a joyful experience that brings out the inner chef in all of us. The delight on your loved ones’ faces as they enjoy these whimsical bites is simply priceless. Each skewer is a burst of flavor and creativity, reminding us that cooking doesn’t have to be complicated to be enjoyable. Whether you’re hosting a party or just looking to brighten up a regular day, these fun treats make any occasion special. So, gather your ingredients, invite your family to help, and let the laughter and deliciousness unfold in your kitchen!
Print
Skewered Salami Eyeballs: A Fun, Tasty Treat!
- Total Time: 45 minutes
- Yield: 4 servings 1x
- Diet: Gluten Free
Description
Skewered Salami Eyeballs are a fun and tasty treat perfect for parties and gatherings, combining mozzarella, olives, and pepperoni for a delightful presentation.
Ingredients
- 1 cup Mozzarella Balls
- 1/2 cup Kalamata Olives, finely chopped
- 1 medium Red Bell Pepper, sliced into wedges
- 1 stick Pepperoni Stick, sliced into chunks and thin slices
- Skewers (Wooden or Metal)
Instructions
- Prepare the mozzarella balls by making small indents on one side of each ball.
- Add the olive eyes by loading the chopped kalamata olives into the indents in the mozzarella balls.
- Prepare the pepperoni by slicing it into chunks about 3/4 inch thick and thin slices for decoration.
- Slice the red bell pepper into small wedges.
- Assemble the skewers starting with a red bell pepper wedge, followed by pepperoni, a mozzarella ball with olives, and finish with thin slices of pepperoni.
- Chill and serve by refrigerating the skewers for at least 30 minutes before serving.
Notes
- For best results, use fresh ingredients and serve immediately after assembly for optimal flavor and presentation.
- To prevent sogginess, assemble no more than 6 hours before serving.
- Refrigerate assembled skewers for at least 30 minutes before serving to enhance flavor melding.
- Consider adding other vegetables like cherry tomatoes for extra flair.
- Swap red bell pepper for jalapeño for a spicy kick.
- Prep Time: 15 minutes
- Cook Time: 0 minutes
- Category: Appetizer
- Method: No-cook
- Cuisine: American
Nutrition
- Serving Size: 4 skewers
- Calories: 200
- Sugar: 1g
- Sodium: 600mg
- Fat: 15g
- Saturated Fat: 5g
- Unsaturated Fat: 8g
- Trans Fat: 0g
- Carbohydrates: 4g
- Fiber: 1g
- Protein: 10g
- Cholesterol: 25mg