
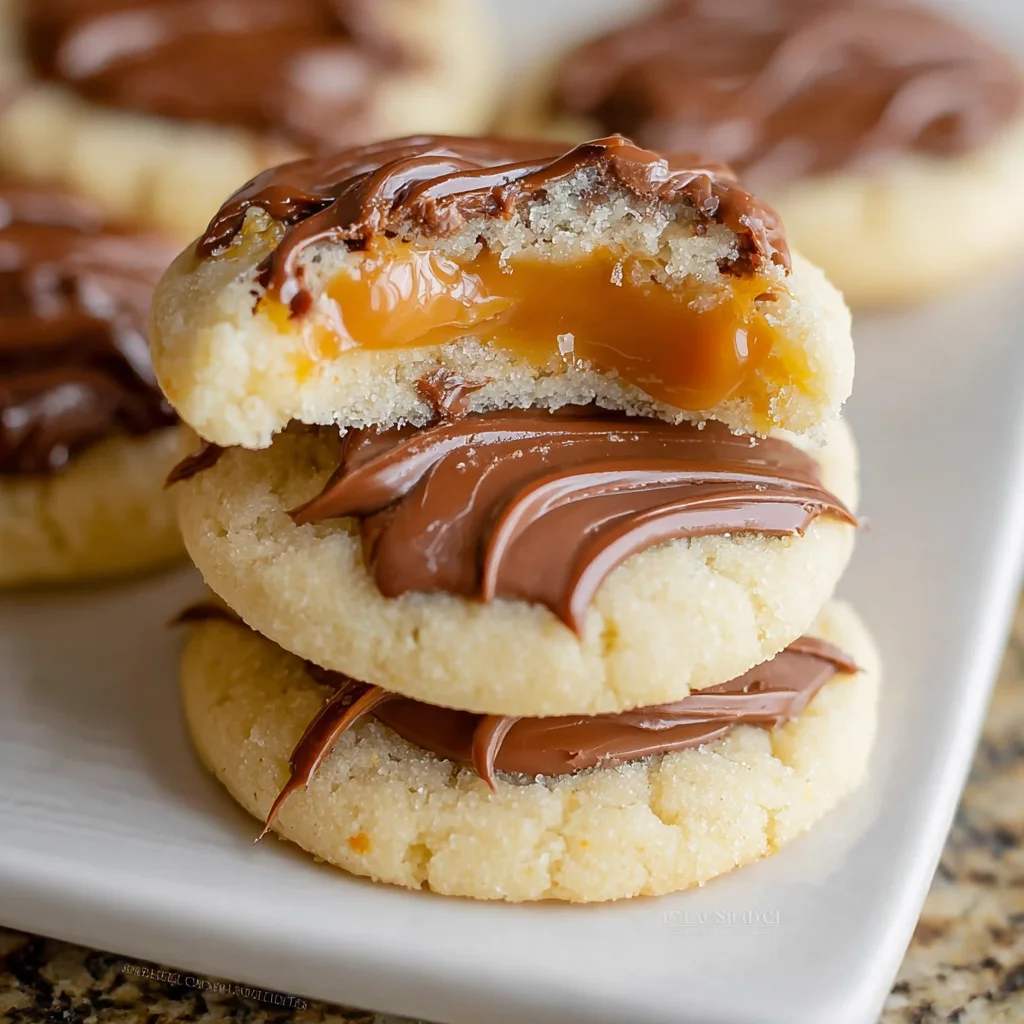
Introduction to Twix Cookies
There’s something magical about cookies fresh from the oven, isn’t there? Twix Cookies offer that delightful magic with each chewy bite, marrying buttery goodness with luscious caramel and chocolate. As a busy mom, I understand how essential it is to whip up quick yet scrumptious treats that bring joy and smiles to my family. These Twix Cookies don’t just satisfy sweet cravings; they add a dash of indulgence to regular days. Trust me, they are worth every moment spent in the kitchen, transforming simple ingredients into an extraordinary experience!
Why You’ll Love This Twix Cookies
These Twix Cookies are a busy mom’s best friend. They come together in just 25 minutes, making them perfect for those hectic days. The warm, chewy texture is simply irresistible, combining sweet and salty flavors that dance on your taste buds. Plus, the kids will adore them! They’re unique enough to impress guests, yet simple enough for a cozy family treat. Who wouldn’t love that?
Ingredients for Twix Cookies
Gathering the right ingredients is the first step toward your delicious Twix Cookies. Here’s what you need:
- Salted Butter: It gives your cookies a rich, buttery flavor. I always use salted for that extra savory touch.
- Granulated Sugar: This sweetener brings balance and a tender texture to your cookies, making them perfectly chewy.
- Vanilla Extract: A splash of this adds depth and warmth, enhancing all the flavors in your dough.
- Egg White: Using just the egg white makes your cookies soft and chewy while keeping them lightweight.
- All-Purpose Flour: The backbone of the cookie, it provides structure and absorbs moisture for that perfect chewy texture.
- Baking Powder: This leavening agent helps the cookies rise beautifully, creating that lovely puffed shape.
- Caramels: Unwrapped and ready for melting, these sweet squares provide the delightful gooey topping we all crave!
- Milk: Adding a tablespoon helps to smooth the caramel, making it luscious and easy to spread.
- Milk Chocolate Chips: These are the crowning glory of your cookies, providing rich chocolate flavor that beautifully complements the caramel.
Be sure to check the bottom of the article for exact measurements. All ingredient quantities are available for printing, making your baking experience seamless.
How to Make Twix Cookies
Now, let’s dive into the exciting part—making these delightful Twix Cookies! Follow these simple steps, and you’ll have a chewy treat that will impress anyone.
Step 1: Preheat Oven
Begin by preheating your oven to 350°F. This ensures even baking for your Twix Cookies, creating that perfect chewy texture.
Step 2: Cream Butter and Sugar
Cream together the softened salted butter and granulated sugar until light and fluffy. This creates a smooth base for your cookies, adding that rich, buttery goodness.
Step 3: Add Egg and Vanilla
Now, incorporate the egg white and vanilla extract into the mixture. Mix until fully combined to add an extra depth of flavor that enhances your cookie dough.
Step 4: Mix in Dry Ingredients
Gradually add all-purpose flour and baking powder to your mixture. Stir until a dough forms, bringing all those heavenly ingredients together!
Step 5: Roll and Cut Dough
Roll the dough out to 1/4 to 1/2 inches thick. Use a round cookie cutter to cut out circles. Place them on an ungreased baking sheet, ensuring some space between each cookie.
Step 6: Bake the Cookies
Bake them at 350°F for 6-8 minutes. Keep an eye out for a puffed texture and a glossy finish that disappears, signaling they’re ready to come out!
Step 7: Cool Cookies
Carefully transfer the baked cookies to a wire rack, allowing them to cool completely. This step is crucial before adding any toppings; patience is key!
Step 8: Prepare Caramel Topping
While the cookies are cooling, microwave the unwrapped caramels with a tablespoon of milk. Stir until smooth for that luscious topping we’ve all been dreaming about.
Step 9: Add Caramel to Cookies
Spoon the melted caramel onto each cookie, spreading it just to the edges. This creates a delightful layer of flavor that elevates the whole cookie experience.
Step 10: Chill Cookies
Place the caramel-topped cookies in the fridge for 10-15 minutes. This helps the caramel firm up nicely, giving you that perfect bite.
Step 11: Melt Chocolate Chips
Now, melt the milk chocolate chips in the microwave, stirring at intervals until it’s completely smooth. This luxurious chocolate layer will be the icing on the cake—well, cookie!
Step 12: Finish with Chocolate
Spread the melted chocolate over the cooled caramel layer. Let it set before indulging in your cookie creations. The moment of joy is just around the corner!
Tips for Success
- Always preheat your oven. It guarantees even baking, making your Twix Cookies perfect every time.
- Don’t skip cooling the cookies! It prevents the caramel from sliding off and keeps everything in place.
- Use high-quality chocolate chips for a richer flavor.
- For easier caramel spreading, let it cool slightly before adding it to the cookies.
- Store cookies in an airtight container to maintain their chewy texture.
Equipment Needed
- Baking sheet: A standard cookie sheet works perfectly, but a glass baking dish can also be used.
- Mixing bowl: Any medium to large bowl will do; consider a stand mixer for ease.
- Cookie cutter: A round cutter is ideal, but a glass or jar’s rim can work too.
- Wire rack: Use one for cooling; if unavailable, any sturdy plate will suffice.
Variations on Twix Cookies
- Nutty Twist: Add chopped nuts like pecans or almonds into the dough for added crunch and flavor.
- Gluten-Free Option: Substitute all-purpose flour with a gluten-free flour blend to make these cookies suitable for gluten-sensitive friends.
- Dark Chocolate Delight: Swap milk chocolate chips for dark chocolate chips for a richer, more decadent flavor.
- Caramel Swirl: Instead of topping cookies with melted caramel, swirl in chopped Twix bars into the dough before baking for an extra treat.
- Minty Fresh: Add a few drops of peppermint extract to your chocolate for a refreshing mint twist on each cookie.
Serving Suggestions for Twix Cookies
- Pair your Twix Cookies with a tall glass of cold milk for the ultimate treat experience.
- Serve with a scoop of vanilla ice cream on the side for a delectable dessert combo.
- Arrange cookies on a decorative platter, dusting with a sprinkle of sea salt for an elegant touch.
- Include fresh fruit like strawberries or raspberries for a refreshing contrast to the sweet cookies.
- Consider a hot cup of coffee or tea, balancing the sweetness beautifully.
FAQs about Twix Cookies
As a passionate home cook, I often get questions about these Twix Cookies. Here are some common inquiries that might help you bake with confidence!
Can I make these Twix Cookies ahead of time?
Absolutely! You can prepare the dough in advance and refrigerate it. Just make sure to roll and cut the cookies when you’re ready to bake. This way, you can have fresh cookies even on the busiest days!
What can I use instead of salted butter?
If you don’t have salted butter, unsalted will work just fine. Just add a pinch of salt to balance the flavors. Your Twix Cookies will still be delicious!
How should I store leftover cookies?
Store your Twix Cookies in an airtight container at room temperature. They’ll stay fresh and chewy for about a week, but I doubt they’ll last that long!
Can I freeze Twix Cookies?
Yes! You can freeze these cookies for up to three months. Wrap them tightly in plastic wrap or place them in a freezer bag. Just thaw them at room temperature when you’re ready to enjoy!
Are there any nut-free options for this recipe?
Yes, this recipe is naturally nut-free unless you decide to add nuts in the variations. Always check labels on your ingredient packaging to ensure they are made in nut-free facilities if allergies are a concern.
Final Thoughts
Baking these Twix Cookies isn’t just about satisfying a sweet craving; it’s about creating precious memories in the kitchen with your loved ones. The process is simple, yet the result is nothing short of delightful—a perfect blend of chewy, buttery, and sweet flavors that uplift even the busiest days. Each bite brings a smile and a little sense of indulgence. So go ahead, embrace your inner baker! Let these cookies transform your home into a haven of warmth and happiness, filling it with the delicious aroma of love and joy—aren’t those the sweetest ingredients of all?
Print
Twix Cookies: Indulge in a Perfectly Chewy Delight!
- Total Time: 25 minutes
- Yield: 24 cookies 1x
- Diet: Vegetarian
Description
Twix Cookies: A deliciously chewy cookie that combines the flavors of buttery and sweet ingredients with a decadent caramel and chocolate topping.
Ingredients
- 1/2 cup (111g) salted butter
- 1/2 cup (115g) granulated sugar
- 1 tsp vanilla extract
- 1 egg white
- 1 1/2 cups (228g) all-purpose flour
- 1 tsp baking powder
- 20 caramels unwrapped
- 1 tbsp milk
- 2 cups (400g) milk chocolate chips
Instructions
- Preheat oven to 350°.
- Cream together the butter and sugar.
- Add in the egg and vanilla. Mix until well combined.
- Add the flour and baking powder. Mix thoroughly.
- Roll the dough out until 1/4 to 1/2 inch thick. Use a round cookie cutter to cut out circles. Transfer to an ungreased pan.
- Bake at 350° for 6-8 minutes. Pull out of the oven when the cookies are puffy and no longer glossy.
- Transfer to a wire rack and allow to cool completely.
- While the cookies are cooling, microwave the caramels and milk for 1 minute. Stir at the 30 second mark. Stir until smooth and creamy.
- Carefully spoon a few teaspoons of caramel onto each cookie, spreading until it almost covers the cookie.
- Place the cookies and caramel into the fridge for 10-15 minutes or until completely cold.
- Melt the chocolate chips for 30 second intervals until completely melted and incorporated.
- Spread a small amount of chocolate onto each cookie. Let the chocolate layer cool and set up before serving.
Notes
- Ensure the cookies are completely cooled before adding the caramel and chocolate.
- Store cookies in an airtight container to keep them fresh.
- For extra chocolate flavor, drizzle more melted chocolate on top of the set chocolate layer.
- Prep Time: 15 minutes
- Cook Time: 8 minutes
- Category: Dessert
- Method: Baking
- Cuisine: American
Nutrition
- Serving Size: 1 cookie
- Calories: 150
- Sugar: 10g
- Sodium: 120mg
- Fat: 7g
- Saturated Fat: 4g
- Unsaturated Fat: 2g
- Trans Fat: 0g
- Carbohydrates: 20g
- Fiber: 1g
- Protein: 2g
- Cholesterol: 15mg